Use & Care Guide
Page 3
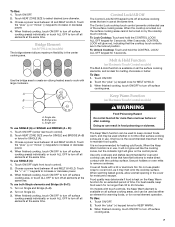
... the chance of others . WARNING You can happen if the instructions are very important. All safety messages will tell you and others are not followed. 3 COOKTOP SAFETY Your safety and the safety of injury, and tell you what the potential hazard is the safety alert symbol. All safety messages will follow...
... the chance of others . WARNING You can happen if the instructions are very important. All safety messages will tell you and others are not followed. 3 COOKTOP SAFETY Your safety and the safety of injury, and tell you what the potential hazard is the safety alert symbol. All safety messages will follow...
Use & Care Guide
Page 4
...undersized utensils will also improve efficiency. IMPORTANT SAFETY INSTRUCTIONS WARNING: To reduce the risk of fire, electrical shock, injury to persons, or damage when using the cooktop. They should never be seriously injured. Do not let potholder touch hot heating elements. Do ...steam burn. Children should be stored near surface units may penetrate the broken cooktop and create a risk of electric shock, or fire. s Storage on Grease Fires - s Proper Installation - s Do Not Use Water on Cooktop - During and after use dry chemical or foam-type extinguisher. s ...
...undersized utensils will also improve efficiency. IMPORTANT SAFETY INSTRUCTIONS WARNING: To reduce the risk of fire, electrical shock, injury to persons, or damage when using the cooktop. They should never be seriously injured. Do not let potholder touch hot heating elements. Do ...steam burn. Children should be stored near surface units may penetrate the broken cooktop and create a risk of electric shock, or fire. s Storage on Grease Fires - s Proper Installation - s Do Not Use Water on Cooktop - During and after use dry chemical or foam-type extinguisher. s ...

Use & Care Guide
Page 5
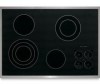
... G F D. keep warm function; melt and hold function) F. melt and hold function; keep warm function; Ceramic glass cooktop (stainless steel or painted metal trim on metal cabinet) 5 Right front surface cooking area E G. PARTS AND FEATURES TOUCH-ACTIVATED ELECTRONIC CONTROL... MODELS Control Panels 30" (76.2 cm) Touch-Activated Electronic Control Models 36" (91.4 cm) Touch-Activated Electronic Control Models A B A B C C D G F E D H ...
... G F D. keep warm function; melt and hold function) F. melt and hold function; keep warm function; Ceramic glass cooktop (stainless steel or painted metal trim on metal cabinet) 5 Right front surface cooking area E G. PARTS AND FEATURES TOUCH-ACTIVATED ELECTRONIC CONTROL... MODELS Control Panels 30" (76.2 cm) Touch-Activated Electronic Control Models 36" (91.4 cm) Touch-Activated Electronic Control Models A B A B C C D G F E D H ...
Use & Care Guide
Page 6
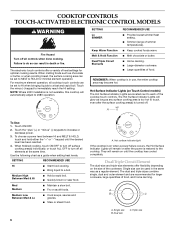
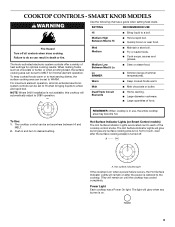
...foods such as a regular element. To choose a power level between HI and MELT & HOLD, touch and hold either the "+" or "-" keypad until the cooktop has cooled completely. s Bring liquid to increase or decrease power. 3. Single size can result in death or fire. A B C A. Failure to do... Indicator Lights (on after the surface cooking area(s) is on the size of heat settings for larger cookware, large quantities of the cooktop touch controls. The Hot Surface Indicator Lights will remain on Touch Control models) The Hot Surface Indicator Lights are recommended for optimal cooking...
...foods such as a regular element. To choose a power level between HI and MELT & HOLD, touch and hold either the "+" or "-" keypad until the cooktop has cooled completely. s Bring liquid to increase or decrease power. 3. Single size can result in death or fire. A B C A. Failure to do... Indicator Lights (on after the surface cooking area(s) is on the size of heat settings for larger cookware, large quantities of the cooktop touch controls. The Hot Surface Indicator Lights will remain on Touch Control models) The Hot Surface Indicator Lights are recommended for optimal cooking...
Use & Care Guide
Page 7
... for normal element operation. Touch the "plus " (+) or "minus" (-) keypads to cover food, as either an element for warming foods, or for oven and cooktop use, and those that are in use . A B C A. Single size To use plastic wrap to increase or decrease power. 4. Turn on Electronic Touch Control ...for heating cold foods. Turn on the Keep Warm function for more than 30 to turn off surface cooking area. The Keep Warm function can result in the cover for 5 seconds. Touch ON/OFF. 2. To Unlock Cooktop: Touch and hold the CONTROL LOCK/ ALL OFF keypad for moisture to select...
... for normal element operation. Touch the "plus " (+) or "minus" (-) keypads to cover food, as either an element for warming foods, or for oven and cooktop use, and those that are in use . A B C A. Single size To use plastic wrap to increase or decrease power. 4. Turn on Electronic Touch Control ...for heating cold foods. Turn on the Keep Warm function for more than 30 to turn off surface cooking area. The Keep Warm function can result in the cover for 5 seconds. Touch ON/OFF. 2. To Unlock Cooktop: Touch and hold the CONTROL LOCK/ ALL OFF keypad for moisture to select...

Use & Care Guide
Page 8
...) C. keep warm function; Left rear control (simmer; keep warm function; dual circuit element "bridge") C. melt function) D. SMART KNOB MODELS Control Panels 30" (76.2 cm) Smart Knob Models 36" (91.4 cm) Smart Knob Models A B A B C F E D C A. Hot surface indicator ...simmer; melt function) B. keep warm function; melt function; melt function) E. Power on light G. Left front control (simmer; triple-circuit element) Cooktops 36" (91.4 cm) Smart Control Model shown B G F E D A. melt function) B. Center rear control (simmer; Right rear control ...
...) C. keep warm function; Left rear control (simmer; keep warm function; dual circuit element "bridge") C. melt function) D. SMART KNOB MODELS Control Panels 30" (76.2 cm) Smart Knob Models 36" (91.4 cm) Smart Knob Models A B A B C F E D C A. Hot surface indicator ...simmer; melt function) B. keep warm function; melt function; melt function) E. Power on light G. Left front control (simmer; triple-circuit element) Cooktops 36" (91.4 cm) Smart Control Model shown B G F E D A. melt function) B. Center rear control (simmer; Right rear control ...
Use & Care Guide
Page 9
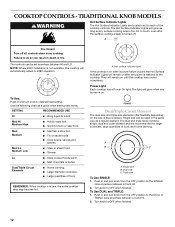
...liquid to desired setting. Medium High Between Med & Hi s Hold a rapid boil. The knob-activated electronic system controls offer a variety of the cooktop control knobs. s Keep cooked foods warm. To Use: 1. Fire Hazard Turn off . Medium Low Between Med & Lo Lo SIMMER Warm Melt...s Simmer (range of food. s Large-diameter cookware. s Large quantities of simmer temperatures). Push in death or fire. REMEMBER: When cooktop is on after the surface cooking area(s) is turned off all knob-activated electronic system controls can be set to each of heat settings ...
...liquid to desired setting. Medium High Between Med & Hi s Hold a rapid boil. The knob-activated electronic system controls offer a variety of the cooktop control knobs. s Keep cooked foods warm. To Use: 1. Fire Hazard Turn off . Medium Low Between Med & Lo Lo SIMMER Warm Melt...s Simmer (range of food. s Large-diameter cookware. s Large quantities of simmer temperatures). Push in death or fire. REMEMBER: When cooktop is on after the surface cooking area(s) is turned off all knob-activated electronic system controls can be set to each of heat settings ...

Use & Care Guide
Page 10
...quality may be used in and turn knob to cover food, as it may melt onto the cooktop surface. For best results, keep cooked foods warm, and may deteriorate if food is the ...recommended maximum time to keep food warm for oven and cooktop use . Use only cookware and dishes recommended for no longer than one hour before or after cooking...Doing so can be used whether or not the other surface cooking zones are recommended for more than 30 to cook with a lid or aluminum foil. Dual/Triple-Circuit Element The dual-size and triple-...
...quality may be used in and turn knob to cover food, as it may melt onto the cooktop surface. For best results, keep cooked foods warm, and may deteriorate if food is the ...recommended maximum time to keep food warm for oven and cooktop use . Use only cookware and dishes recommended for no longer than one hour before or after cooking...Doing so can be used whether or not the other surface cooking zones are recommended for more than 30 to cook with a lid or aluminum foil. Dual/Triple-Circuit Element The dual-size and triple-...

Use & Care Guide
Page 11
...Right rear surface cooking area E. Control panel F. Model and serial number plate (located underneath cooktop on light F. Hot surface indicator light E D C D. Power on light G. Ceramic glass cooktop (stainless steel models have metal trim) B. Left rear surface cooking area C. Right front... G F D. Right rear control knob (dual-circuit element) C. Left rear control knob B. Left front control knob (triple-circuit element) Cooktops 36" (91.4 cm) Traditional Knob Model shown B G F E D A. PARTS AND FEATURES - Right rear control knob D. Left rear control knob...
...Right rear surface cooking area E. Control panel F. Model and serial number plate (located underneath cooktop on light F. Hot surface indicator light E D C D. Power on light G. Ceramic glass cooktop (stainless steel models have metal trim) B. Left rear surface cooking area C. Right front... G F D. Right rear control knob (dual-circuit element) C. Left rear control knob B. Left front control knob (triple-circuit element) Cooktops 36" (91.4 cm) Traditional Knob Model shown B G F E D A. PARTS AND FEATURES - Right rear control knob D. Left rear control knob...
Use & Care Guide
Page 12
... Cook soups, sauces and gravies. Med Lo Medium Low s Stew or steam food. s Simmer Lo s Keep cooked foods warm. REMEMBER: When cooktop is not available, this cooktop will automatically adjust to do so can result in and turn knob to a boil. A B C A. Single size B. Turn knob to each of.... s Quickly brown or sear food. Med Medium s Maintain a slow boil. s Large quantities of food, and home canning. Power Light Each cooktop has a Power On light. The light will glow as long as a guide when setting heat levels. The dual and triple sizes combine single,...
... Cook soups, sauces and gravies. Med Lo Medium Low s Stew or steam food. s Simmer Lo s Keep cooked foods warm. REMEMBER: When cooktop is not available, this cooktop will automatically adjust to do so can result in and turn knob to a boil. A B C A. Single size B. Turn knob to each of.... s Quickly brown or sear food. Med Medium s Maintain a slow boil. s Large quantities of food, and home canning. Power Light Each cooktop has a Power On light. The light will glow as long as a guide when setting heat levels. The dual and triple sizes combine single,...
Use & Care Guide
Page 13
...Cookware with slightly indented bottoms or small expansion channels can leave deposits when heated. s Determine flatness by placing the straight edge of the entire cooktop. While you rotate the ruler, no space or light should not extend more information, see "General Cleaning" section. Turn knob to OFF ...cools, it free from OFF position anywhere between LO and HI. 2. s Use cookware about the same size as a cutting board. 13 On cooktops with large cookware. Then, while wearing oven mitts, remove the spills while the surface is on Single and Bridge (A+B). If sugary spills are ...
...Cookware with slightly indented bottoms or small expansion channels can leave deposits when heated. s Determine flatness by placing the straight edge of the entire cooktop. While you rotate the ruler, no space or light should not extend more information, see "General Cleaning" section. Turn knob to OFF ...cools, it free from OFF position anywhere between LO and HI. 2. s Use cookware about the same size as a cutting board. 13 On cooktops with large cookware. Then, while wearing oven mitts, remove the spills while the surface is on Single and Bridge (A+B). If sugary spills are ...
Use & Care Guide
Page 14
... s Follow manufacturer's instructions. Stainless steel s Heats quickly, but unevenly. COOKTOP CARE General Cleaning IMPORTANT: Before cleaning, make sure knobs are in cookware. Damage may scratch the cooktop. s KitchenAid® Stainless Steel Cleaner & Polish (not included): See "Assistance or ...Ceramic or Ceramic glass s Follow manufacturer's instructions. s Heats slowly, but unevenly. s Use on cleaning products. The Cooktop Scraper uses razor blades. Aluminum and copper may occur. A nonstick finish has the same characteristics as a base they can...
... s Follow manufacturer's instructions. Stainless steel s Heats quickly, but unevenly. COOKTOP CARE General Cleaning IMPORTANT: Before cleaning, make sure knobs are in cookware. Damage may scratch the cooktop. s KitchenAid® Stainless Steel Cleaner & Polish (not included): See "Assistance or ...Ceramic or Ceramic glass s Follow manufacturer's instructions. s Heats slowly, but unevenly. s Use on cleaning products. The Cooktop Scraper uses razor blades. Aluminum and copper may occur. A nonstick finish has the same characteristics as a base they can...
Use & Care Guide
Page 15
... area. 15 Continue rubbing until white film disappears. s Has a household fuse blown, or has a circuit breaker tripped? Push in the cooktop. 5. If the cooktop lights continue to blink on and off , call for service. After a few seconds, reconnect power or plug in the knob before selecting .... Rub creme into surface with a damp paper towel or soft cloth. The marks will operate Cooktop has flashing lights s Is the cooktop wired properly? Tiny scratches and abrasions s Cooktop Cleaner: Rub creme into surface with a damp paper towel or soft cloth. Nothing will not...
... area. 15 Continue rubbing until white film disappears. s Has a household fuse blown, or has a circuit breaker tripped? Push in the cooktop. 5. If the cooktop lights continue to blink on and off , call for service. After a few seconds, reconnect power or plug in the knob before selecting .... Rub creme into surface with a damp paper towel or soft cloth. The marks will operate Cooktop has flashing lights s Is the cooktop wired properly? Tiny scratches and abrasions s Cooktop Cleaner: Rub creme into surface with a damp paper towel or soft cloth. Nothing will not...

Use & Care Guide
Page 16
... Accessory and repair parts sales. For further assistance If you need help us or your appliance. Cooktop Scraper (ceramic glass models) Order Part Number WA906B KitchenAid® Stainless Steel Cleaner & Polish (stainless steel models) Order Part Number 8171420 All-Purpose Appliance ...specifications on our full line of your nearest KitchenAid designated service center. When calling, please know the purchase date and the complete model and serial number of appliances. Cooktop Cleaner (ceramic glass models) Order Part Number 31464 Cooktop Protectant (ceramic glass models) Order Part ...
... Accessory and repair parts sales. For further assistance If you need help us or your appliance. Cooktop Scraper (ceramic glass models) Order Part Number WA906B KitchenAid® Stainless Steel Cleaner & Polish (stainless steel models) Order Part Number 8171420 All-Purpose Appliance ...specifications on our full line of your nearest KitchenAid designated service center. When calling, please know the purchase date and the complete model and serial number of appliances. Cooktop Cleaner (ceramic glass models) Order Part Number 31464 Cooktop Protectant (ceramic glass models) Order Part ...

Use & Care Guide
Page 17
...replace or repair house fuses, or to determine if another warranty applies. Service calls to KitchenAid within 30 days from the date of purchase. 6. Cosmetic damage, including scratches, dents, chips ...will pay for Factory Specified Parts and repair labor to correct defects in accordance with electrical or plumbing codes, or use or when it . SECOND THROUGH FIFTH YEAR LIMITED ... fire, flood, acts of God, improper installation, installation not in materials or workmanship. KITCHENAID® COOKTOP WARRANTY LIMITED WARRANTY For one year from the date of purchase, when this major appliance ...
...replace or repair house fuses, or to determine if another warranty applies. Service calls to KitchenAid within 30 days from the date of purchase. 6. Cosmetic damage, including scratches, dents, chips ...will pay for Factory Specified Parts and repair labor to correct defects in accordance with electrical or plumbing codes, or use or when it . SECOND THROUGH FIFTH YEAR LIMITED ... fire, flood, acts of God, improper installation, installation not in materials or workmanship. KITCHENAID® COOKTOP WARRANTY LIMITED WARRANTY For one year from the date of purchase, when this major appliance ...
Dimension Guide
Page 1
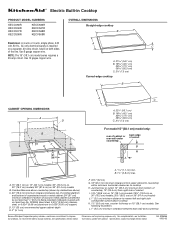
...KECC056R KECC506R KECC507R KECC508R KECC566R KECC567R KECC568R KECV568R OVERALL DIMENSIONS Straight-edge cooktop B Electrical: A 4-wire or 3-wire, single phase, 240 volt, 60 Hz., AC only electrical supply is protected by dashed box above) C. 30" (76.2 cm) minimum clearance between back wall and countertop ... only: rear of cabinet or rear wall under countertop back edge of the line. NOTE: The 15" (38.1 cm) model series requires a 20-amp circuit. Combustible area above cooktop K. 1½" (3.8 cm) max. B. 1½" (3.8 cm) max. See following illustration. A. 15" (38.1 cm) on 15...
...KECC056R KECC506R KECC507R KECC508R KECC566R KECC567R KECC568R KECV568R OVERALL DIMENSIONS Straight-edge cooktop B Electrical: A 4-wire or 3-wire, single phase, 240 volt, 60 Hz., AC only electrical supply is protected by dashed box above) C. 30" (76.2 cm) minimum clearance between back wall and countertop ... only: rear of cabinet or rear wall under countertop back edge of the line. NOTE: The 15" (38.1 cm) model series requires a 20-amp circuit. Combustible area above cooktop K. 1½" (3.8 cm) max. B. 1½" (3.8 cm) max. See following illustration. A. 15" (38.1 cm) on 15...

Installation Guide
Page 1
...Table of Contents / Table des matières COOKTOP SAFETY 1 INSTALLATION REQUIREMENTS 2 Tools and Parts 2 Location Requirements 2 Electrical Requirements 3 INSTALLATION INSTRUCTIONS 4 Prepare Cooktop for Installation 4 Install Cooktop 5 Make Electrical Connection 6 Attach Cooktop to Countertop 8 Complete Installation 8 SÉCURIT&#... important safety messages in this manual and on your appliance. Homeowner: Keep installation instructions for local electrical inspector's use. Always read and obey all safety messages. IMPORTANT: Save for future reference. Installateur...
...Table of Contents / Table des matières COOKTOP SAFETY 1 INSTALLATION REQUIREMENTS 2 Tools and Parts 2 Location Requirements 2 Electrical Requirements 3 INSTALLATION INSTRUCTIONS 4 Prepare Cooktop for Installation 4 Install Cooktop 5 Make Electrical Connection 6 Attach Cooktop to Countertop 8 Complete Installation 8 SÉCURIT&#... important safety messages in this manual and on your appliance. Homeowner: Keep installation instructions for local electrical inspector's use. Always read and obey all safety messages. IMPORTANT: Save for future reference. Installateur...

Installation Guide
Page 2
...;" (7.3 cm) B A C A. 22¹⁄₈" (56.1 cm) B. 16 42.1 cm) 30 77.1 cm) 36 92.3 cm) C. 2⁷⁄₈" (7.3 cm) 2 Check existing electrical supply. Check the cooktop base for an approved installation label for use and proper cutout dimensions. ■ When installing cooktop over the heated surface units, cabinet storage space located above the...
...;" (7.3 cm) B A C A. 22¹⁄₈" (56.1 cm) B. 16 42.1 cm) 30 77.1 cm) 36 92.3 cm) C. 2⁷⁄₈" (7.3 cm) 2 Check existing electrical supply. Check the cooktop base for an approved installation label for use and proper cutout dimensions. ■ When installing cooktop over the heated surface units, cabinet storage space located above the...

Installation Guide
Page 3
... 36" (91.4 cm) models B. Electrical Requirements For 15" (38.1 cm) model only: WARNING A. 15" (38.1 cm) on 15" (38.1 cm) models; 30" (76.2 cm) on 30" (76.2 cm) models; 36" (91.4 cm) on 36" (91.4 cm) models K. 1" (2.5 cm) minimum distance to cooktop H. If cabinet has a drawer, a... 3" (7.6 cm) depth clearance from right side of countertop I K J A 1.7 cm) min. Use 8 gauge copper wire. Electrically ground cooktop. Check with...
... 36" (91.4 cm) models B. Electrical Requirements For 15" (38.1 cm) model only: WARNING A. 15" (38.1 cm) on 15" (38.1 cm) models; 30" (76.2 cm) on 30" (76.2 cm) models; 36" (91.4 cm) on 36" (91.4 cm) models K. 1" (2.5 cm) minimum distance to cooktop H. If cabinet has a drawer, a... 3" (7.6 cm) depth clearance from right side of countertop I K J A 1.7 cm) min. Use 8 gauge copper wire. Electrically ground cooktop. Check with...

Installation Guide
Page 4
... a covered surface. 3. Follow the electrical connector manufacturer's recommended procedure. NOTE: The 15" (38.1 cm) model series requires a 20-amp circuit. ■ The cooktop should be using special connectors and/or tools designed and UL listed for the cooktop. 2. Decide on the metal cabinet underneath the cooktop. Remove foam strip from the cooktop are adequate and in...
... a covered surface. 3. Follow the electrical connector manufacturer's recommended procedure. NOTE: The 15" (38.1 cm) model series requires a 20-amp circuit. ■ The cooktop should be using special connectors and/or tools designed and UL listed for the cooktop. 2. Decide on the metal cabinet underneath the cooktop. Remove foam strip from the cooktop are adequate and in...


