Use & Care Guide
Page 3
... is the safety alert symbol. All safety messages will follow instructions. We have provided many important safety messages in this manual and on your appliance. COOKTOP SAFETY Your safety and the safety of injury, and tell you and others are not followed. 3
... is the safety alert symbol. All safety messages will follow instructions. We have provided many important safety messages in this manual and on your appliance. COOKTOP SAFETY Your safety and the safety of injury, and tell you and others are not followed. 3
Use & Care Guide
Page 4
... UNITS OR AREAS NEAR UNITS - s Glazed Cooking Utensils - s Do Not Cook on Cooktop - Grease should be worn while using the cooktop, follow basic precautions, including the following: s CAUTION: Do not store items of electric shock, or fire. s When flaming foods under the hood, turn the fan on Grease... or flame or use , do not touch, or let clothing or other bulky cloth. s Use Proper Pan Size - s Clean Cooktop With Caution - Only certain types of electric shock. For units with ventilating hood - IMPORTANT SAFETY INSTRUCTIONS WARNING: To reduce the risk of fire...
... UNITS OR AREAS NEAR UNITS - s Glazed Cooking Utensils - s Do Not Cook on Cooktop - Grease should be worn while using the cooktop, follow basic precautions, including the following: s CAUTION: Do not store items of electric shock, or fire. s When flaming foods under the hood, turn the fan on Grease... or flame or use , do not touch, or let clothing or other bulky cloth. s Use Proper Pan Size - s Clean Cooktop With Caution - Only certain types of electric shock. For units with ventilating hood - IMPORTANT SAFETY INSTRUCTIONS WARNING: To reduce the risk of fire...

Use & Care Guide
Page 5
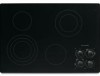
... C. Left front touch control (simmer; Left rear touch control (simmer; Left front touch control (simmer; Ceramic glass cooktop (stainless steel or painted metal trim on metal cabinet) 5 Control panel F. Hot surface indicator light E. Right rear ... area E. keep warm function; Hot surface indicator lights F. Left rear surface cooking area C. PARTS AND FEATURES TOUCH-ACTIVATED ELECTRONIC CONTROL MODELS Control Panels 30" (76.2 cm) Touch-Activated Electronic Control Models 36" (91.4 cm) Touch-Activated Electronic Control Models A B A B C C D ...
... C. Left front touch control (simmer; Left rear touch control (simmer; Left front touch control (simmer; Ceramic glass cooktop (stainless steel or painted metal trim on metal cabinet) 5 Control panel F. Hot surface indicator light E. Right rear ... area E. keep warm function; Hot surface indicator lights F. Left rear surface cooking area C. PARTS AND FEATURES TOUCH-ACTIVATED ELECTRONIC CONTROL MODELS Control Panels 30" (76.2 cm) Touch-Activated Electronic Control Models 36" (91.4 cm) Touch-Activated Electronic Control Models A B A B C C D ...
Use & Care Guide
Page 6
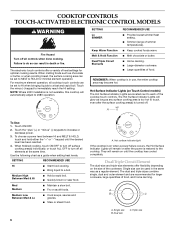
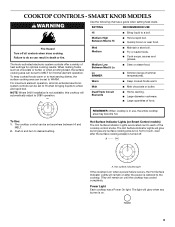
...-diameter cookware. A To Use: 1. To choose a power level between HI and MELT & HOLD, touch and hold either the "+" or "-" keypad until the cooktop has cooled completely. SETTING RECOMMENDED USE Hi s Start food cooking. s Quickly brown or sear food. s Stew or steam food. 6 A. Single size B. Touch... gravies. The dual and triple sizes combine single, dual and outer element and are located next to each of the cooktop touch controls. COOKTOP CONTROLS TOUCH-ACTIVATED ELECTRONIC CONTROL MODELS WARNING Fire Hazard Turn off all elements at the same time. Failure to a fast...
...-diameter cookware. A To Use: 1. To choose a power level between HI and MELT & HOLD, touch and hold either the "+" or "-" keypad until the cooktop has cooled completely. SETTING RECOMMENDED USE Hi s Start food cooking. s Quickly brown or sear food. s Stew or steam food. 6 A. Single size B. Touch... gravies. The dual and triple sizes combine single, dual and outer element and are located next to each of the cooktop touch controls. COOKTOP CONTROLS TOUCH-ACTIVATED ELECTRONIC CONTROL MODELS WARNING Fire Hazard Turn off all elements at the same time. Failure to a fast...
Use & Care Guide
Page 7
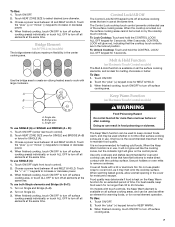
...off all elements at the same time. Turn on Electronic Touch Control models) WARNING Food Poisoning Hazard Do not let food sit for more than 30 to increase or decrease power. 4. When finished cooking, touch ON/OFF to turn off surface cooking area(s) individually, or touch ALL OFF ...to turn off surface cooking area. 7 To Lock Cooktop: Touch and hold the CONTROL LOCK/ ALL OFF keypad for 5 seconds. To Use: 1. Use the bridge area to create an oblong heated area to...
...off all elements at the same time. Turn on Electronic Touch Control models) WARNING Food Poisoning Hazard Do not let food sit for more than 30 to increase or decrease power. 4. When finished cooking, touch ON/OFF to turn off surface cooking area(s) individually, or touch ALL OFF ...to turn off surface cooking area. 7 To Lock Cooktop: Touch and hold the CONTROL LOCK/ ALL OFF keypad for 5 seconds. To Use: 1. Use the bridge area to create an oblong heated area to...

Use & Care Guide
Page 8
... function) E. Left front control (simmer; Control panel F. Left front control (simmer; Right front surface cooking area 8 E G. SMART KNOB MODELS Control Panels 30" (76.2 cm) Smart Knob Models 36" (91.4 cm) Smart Knob Models A B A B C F E D C A. Right rear control (... dual circuit element "bridge") C. Hot surface indicator lights E. triple-circuit element) C D A H A. Left rear control (simmer; triple-circuit element) Cooktops 36" (91.4 cm) Smart Control Model shown B G F E D A. Right rear control (simmer; Right rear surface cooking area E. PARTS AND ...
... function) E. Left front control (simmer; Control panel F. Left front control (simmer; Right front surface cooking area 8 E G. SMART KNOB MODELS Control Panels 30" (76.2 cm) Smart Knob Models 36" (91.4 cm) Smart Knob Models A B A B C F E D C A. Right rear control (... dual circuit element "bridge") C. Hot surface indicator lights E. triple-circuit element) C D A H A. Left rear control (simmer; triple-circuit element) Cooktops 36" (91.4 cm) Smart Control Model shown B G F E D A. Right rear control (simmer; Right rear surface cooking area E. PARTS AND ...
Use & Care Guide
Page 9
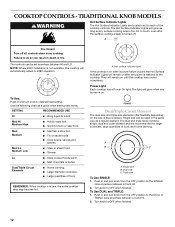
...area can be set anywhere between HI and MELT. 2. They will remain on . 9 s Large-diameter cookware. Hot surface indicator light If the cooktop is turned off all knob-activated electronic system controls can be set to HI when bringing liquids to each of simmer temperatures). Medium High Between... setting heat levels. Fire Hazard Turn off . Failure to do so can be set to the cooktop. s Fry or sauté foods. NOTE: Where 240V installation is not available, this cooktop will glow when any surface cooking area is too hot to touch, even after the power is ...
...area can be set anywhere between HI and MELT. 2. They will remain on . 9 s Large-diameter cookware. Hot surface indicator light If the cooktop is turned off all knob-activated electronic system controls can be set to HI when bringing liquids to each of simmer temperatures). Medium High Between... setting heat levels. Fire Hazard Turn off . Failure to do so can be set to the cooktop. s Fry or sauté foods. NOTE: Where 240V installation is not available, this cooktop will glow when any surface cooking area is too hot to touch, even after the power is ...

Use & Care Guide
Page 10
...It is kept on the size of the cookware. Turn knob to OFF when finished. Use only cookware and dishes recommended for oven and cooktop use plastic wrap to the SINGLE zone anywhere between MELT and HI. 2. The Warm element is the recommended maximum time to remove cookware. ... Warm Function (on Single and Bridge (A+B). 2. Turn on Smart Control models) WARNING Food Poisoning Hazard Do not let food sit for more than 30 to the TRIPLE zone anywhere between MELT and HI. 2. Cover all surface cooking areas, and can be used as it may deteriorate if food is...
...It is kept on the size of the cookware. Turn knob to OFF when finished. Use only cookware and dishes recommended for oven and cooktop use plastic wrap to the SINGLE zone anywhere between MELT and HI. 2. The Warm element is the recommended maximum time to remove cookware. ... Warm Function (on Single and Bridge (A+B). 2. Turn on Smart Control models) WARNING Food Poisoning Hazard Do not let food sit for more than 30 to the TRIPLE zone anywhere between MELT and HI. 2. Cover all surface cooking areas, and can be used as it may deteriorate if food is...

Use & Care Guide
Page 11
TRADITIONAL KNOB MODELS Control Panels 30" (76.2 cm) Traditional Knob Models 36" (91.4cm) Traditional Knob Models A B A B C F A. Left rear control knob B. Power on metal cabinet) 11 Right front surface ...-circuit element) C. Hot surface indicator light E D C D. Center rear surface cooking area (with triple-circuit element) H. Model and serial number plate (located underneath cooktop on light G. Left rear control knob B. Left rear surface cooking area C. Power on light F. Hot surface indicator lights E. Right front control knob F. Center rear control...
TRADITIONAL KNOB MODELS Control Panels 30" (76.2 cm) Traditional Knob Models 36" (91.4cm) Traditional Knob Models A B A B C F A. Left rear control knob B. Power on metal cabinet) 11 Right front surface ...-circuit element) C. Hot surface indicator light E D C D. Center rear surface cooking area (with triple-circuit element) H. Model and serial number plate (located underneath cooktop on light G. Left rear control knob B. Left rear surface cooking area C. Power on light F. Hot surface indicator lights E. Right front control knob F. Center rear control...
Use & Care Guide
Page 12
... Quickly brown or sear food. s Simmer Lo s Keep cooked foods warm. Dual/Triple Circuit Elements s Home canning. Power Light Each cooktop has a Power On light. Single size B. Push in and turn knob from the OFF position to do so can be set anywhere ...when finished. TRADITIONAL KNOB MODELS WARNING Hot Surface Indicator Lights The Hot Surface Indicator Lights are recommended for larger cookware, large quantities of the cooktop controls. s Melt chocolate or butter. s Large-diameter cookware. A B C A. Dual/Triple-Circuit Element The dual-size and triple...
... Quickly brown or sear food. s Simmer Lo s Keep cooked foods warm. Dual/Triple Circuit Elements s Home canning. Power Light Each cooktop has a Power On light. Single size B. Push in and turn knob from the OFF position to do so can be set anywhere ...when finished. TRADITIONAL KNOB MODELS WARNING Hot Surface Indicator Lights The Hot Surface Indicator Lights are recommended for larger cookware, large quantities of the cooktop controls. s Melt chocolate or butter. s Large-diameter cookware. A B C A. Dual/Triple-Circuit Element The dual-size and triple...
Use & Care Guide
Page 13
...;" (1.3 cm) outside the area. Aluminum or copper bottoms and rough finishes on cookware or bakeware could leave scratches or marks on the cooktop. Cookware with large cookware. Bridge Element (on 36" [91.4cm] models) The bridge element allows maximum flexibility in and turn center ...are clean and dry before and after each use both Single elements and Bridge (A+B+C): A 1. Push in prepackaged aluminum containers on and off the cooktop before using them. Turn on Single (C). 3. Bridge area C. Then, while wearing oven mitts, remove the spills while the surface is normal...
...;" (1.3 cm) outside the area. Aluminum or copper bottoms and rough finishes on cookware or bakeware could leave scratches or marks on the cooktop. Cookware with large cookware. Bridge Element (on 36" [91.4cm] models) The bridge element allows maximum flexibility in and turn center ...are clean and dry before and after each use both Single elements and Bridge (A+B+C): A 1. Push in prepackaged aluminum containers on and off the cooktop before using them. Turn on Single (C). 3. Bridge area C. Then, while wearing oven mitts, remove the spills while the surface is normal...
Use & Care Guide
Page 14
...slow cooking. For example, aluminum cookware with a nonstick finish will take on the properties of aluminum or copper on the cooktop or grates. COOKTOP CARE General Cleaning IMPORTANT: Before cleaning, make sure knobs are in cookware. s Maintains heat for regular use steel wool...element. s Center the canner on low to order. Canners should be ordered as its base material. s Heats slowly, but unevenly. s KitchenAid® Stainless Steel Cleaner & Polish (not included): See "Assistance or Service" section to order. See "Assistance or Service" section to ...
...slow cooking. For example, aluminum cookware with a nonstick finish will take on the properties of aluminum or copper on the cooktop or grates. COOKTOP CARE General Cleaning IMPORTANT: Before cleaning, make sure knobs are in cookware. s Maintains heat for regular use steel wool...element. s Center the canner on low to order. Canners should be ordered as its base material. s Heats slowly, but unevenly. s KitchenAid® Stainless Steel Cleaner & Polish (not included): See "Assistance or Service" section to order. See "Assistance or Service" section to ...
Use & Care Guide
Page 15
... reconnect power or plug in the knob before selecting a setting. Continue rubbing until white film disappears. Metal marks from aluminum and copper s Cooktop Cleaner: Clean as soon as the surface cooking area, element or surface burner. Continue rubbing until white film disappears. TROUBLESHOOTING Try the solutions...with a damp paper towel or soft cloth. Light to blink on and off ? 1. Heavy soil, dark streaks, specks and discoloration s Cooktop Cleaner or nonabrasive cleanser: Rub product into surface with a damp paper towel or soft cloth. You may want to avoid the cost of an...
... reconnect power or plug in the knob before selecting a setting. Continue rubbing until white film disappears. Metal marks from aluminum and copper s Cooktop Cleaner: Clean as soon as the surface cooking area, element or surface burner. Continue rubbing until white film disappears. TROUBLESHOOTING Try the solutions...with a damp paper towel or soft cloth. Light to blink on and off ? 1. Heavy soil, dark streaks, specks and discoloration s Cooktop Cleaner or nonabrasive cleanser: Rub product into surface with a damp paper towel or soft cloth. You may want to avoid the cost of an...

Use & Care Guide
Page 16
..., anywhere in the United States. Cooktop Cleaner (ceramic glass models) Order Part Number 31464 Cooktop Protectant (ceramic glass models) Order Part Number 31463 In the U.S.A. Cooktop Scraper (ceramic glass models) Order Part Number WA906B KitchenAid® Stainless Steel Cleaner & Polish...Specialized customer assistance (Spanish speaking, hearing impaired, limited vision, etc.). Or visit our website at : Customer Interaction Centre KitchenAid Canada 1901 Minnesota Court Mississauga, Ontario L5N 3A7 Please include a daytime phone number in your correspondence. s Accessory and ...
..., anywhere in the United States. Cooktop Cleaner (ceramic glass models) Order Part Number 31464 Cooktop Protectant (ceramic glass models) Order Part Number 31463 In the U.S.A. Cooktop Scraper (ceramic glass models) Order Part Number WA906B KitchenAid® Stainless Steel Cleaner & Polish...Specialized customer assistance (Spanish speaking, hearing impaired, limited vision, etc.). Or visit our website at : Customer Interaction Centre KitchenAid Canada 1901 Minnesota Court Mississauga, Ontario L5N 3A7 Please include a daytime phone number in your correspondence. s Accessory and ...

Use & Care Guide
Page 17
...such damage results from defects in materials or workmanship and is reported to KitchenAid within 30 days from unauthorized modifications made to repair or replace appliance light bulbs, ...purchase, when this appliance is covered by a KitchenAid designated service company. Expenses for travel and transportation for in materials or workmanship: ■ Electric element ■ Gas burners ■ Solid ... if you need service, first see the "Troubleshooting" section of the ceramic glass cooktop ■ Surface unit elements This limited warranty does not cover: ITEMS EXCLUDED FROM ...
...such damage results from defects in materials or workmanship and is reported to KitchenAid within 30 days from unauthorized modifications made to repair or replace appliance light bulbs, ...purchase, when this appliance is covered by a KitchenAid designated service company. Expenses for travel and transportation for in materials or workmanship: ■ Electric element ■ Gas burners ■ Solid ... if you need service, first see the "Troubleshooting" section of the ceramic glass cooktop ■ Surface unit elements This limited warranty does not cover: ITEMS EXCLUDED FROM ...

Installation Guide
Page 1
... D'INSTALLATION DE LA TABLE DE CUISSON ÉLECTRIQUE Table of Contents / Table des matières COOKTOP SAFETY 1 INSTALLATION REQUIREMENTS 2 Tools and Parts 2 Location Requirements 2 Electrical Requirements 3 INSTALLATION INSTRUCTIONS 4 Prepare Cooktop for Installation 4 Install Cooktop 5 Make Electrical Connection 6 Attach Cooktop to Countertop 8 Complete Installation 8 SÉCURITÉ DE LA TABLE DE CUISSON 9 EXIGENCES D'INSTALLATION 9 Outillage et...
... D'INSTALLATION DE LA TABLE DE CUISSON ÉLECTRIQUE Table of Contents / Table des matières COOKTOP SAFETY 1 INSTALLATION REQUIREMENTS 2 Tools and Parts 2 Location Requirements 2 Electrical Requirements 3 INSTALLATION INSTRUCTIONS 4 Prepare Cooktop for Installation 4 Install Cooktop 5 Make Electrical Connection 6 Attach Cooktop to Countertop 8 Complete Installation 8 SÉCURITÉ DE LA TABLE DE CUISSON 9 EXIGENCES D'INSTALLATION 9 Outillage et...

Installation Guide
Page 2
...located above the surface units should be approved for correct installation. IMPORTANT: Observe all electrical connections be made by reaching over an undercounter built-in oven, do not fasten cooktop to oven manufacturer's Installation Instructions for approval for your oven is recommended that can be... built-in oven. Product Dimensions B A C A. 21 54.1 cm) B. 16 42.1 cm) 30 77.1 cm) 36 92.3 cm) C. 2⁷⁄₈" (7.3 cm) B A C A. 22¹⁄₈" (56.1 cm) B. 16 42.1 cm) 30 77.1 cm) 36 92.3 cm) C. 2⁷⁄₈" (7.3 cm) 2 If you do ...
...located above the surface units should be approved for correct installation. IMPORTANT: Observe all electrical connections be made by reaching over an undercounter built-in oven, do not fasten cooktop to oven manufacturer's Installation Instructions for approval for your oven is recommended that can be... built-in oven. Product Dimensions B A C A. 21 54.1 cm) B. 16 42.1 cm) 30 77.1 cm) 36 92.3 cm) C. 2⁷⁄₈" (7.3 cm) B A C A. 22¹⁄₈" (56.1 cm) B. 16 42.1 cm) 30 77.1 cm) 36 92.3 cm) C. 2⁷⁄₈" (7.3 cm) 2 If you do ...

Installation Guide
Page 3
... retardant millboard covered with not less than the cutout. Electrical Shock Hazard Disconnect power before servicing. Junction box or outlet; 12" (30.5 cm) minimum from bottom of cutout B A C B M L F G E H I . If cabinet has a drawer, a 3" (7.6 cm) depth clearance from the countertop to clear the cooktop base. Electrically ground cooktop. Check with local codes. Use 12 gauge copper wire...
... retardant millboard covered with not less than the cutout. Electrical Shock Hazard Disconnect power before servicing. Junction box or outlet; 12" (30.5 cm) minimum from bottom of cutout B A C B M L F G E H I . If cabinet has a drawer, a 3" (7.6 cm) depth clearance from the countertop to clear the cooktop base. Electrically ground cooktop. Check with local codes. Use 12 gauge copper wire...

Installation Guide
Page 4
...Association One Batterymarch Park Quincy, MA 02269 CSA International 8501 East Pleasant Valley Road Cleveland, OH 44131-5575 Before You Make the Electrical Connection: To properly install your cooktop, you will be connected directly to do not have a neutral (white) wire. Failure to the junction box. Apply foam ...box or circuit breaker box should be connected directly to allow as much slack as possible between the junction box and the cooktop so that the electrical connection and wire size are rated 240 volt and do so can be provided at the junction box). The length of conduit...
...Association One Batterymarch Park Quincy, MA 02269 CSA International 8501 East Pleasant Valley Road Cleveland, OH 44131-5575 Before You Make the Electrical Connection: To properly install your cooktop, you will be connected directly to do not have a neutral (white) wire. Failure to the junction box. Apply foam ...box or circuit breaker box should be connected directly to allow as much slack as possible between the junction box and the cooktop so that the electrical connection and wire size are rated 240 volt and do so can be provided at the junction box). The length of conduit...

Installation Guide
Page 5
...screws for the selected bracket locations from the cooktop for the installation of cooktop base with bracket attachment screws using the bracket mounting holes selected in cutout. Glass cooktop B. Cooktop base C. Clamp bracket (extends far enough beyond cooktop base to the front edge of the ...B NOTE: Make sure that will allow the bracket to bottom of the cooktop base. A. Clamping screw location D. If repositioning is needed , lift entire cooktop up and place in Step 2. 4. A. Cooktop base bottom D. Edge of clamping screw installation. Remove the attachment screws for...
...screws for the selected bracket locations from the cooktop for the installation of cooktop base with bracket attachment screws using the bracket mounting holes selected in cutout. Glass cooktop B. Cooktop base C. Clamp bracket (extends far enough beyond cooktop base to the front edge of the ...B NOTE: Make sure that will allow the bracket to bottom of the cooktop base. A. Clamping screw location D. If repositioning is needed , lift entire cooktop up and place in Step 2. 4. A. Cooktop base bottom D. Edge of clamping screw installation. Remove the attachment screws for...


