
Use & Care Guide
Page 2
...Convection Broil 18 EasyConvect™ Conversion 19 Proofing Bread 19 STEAM-ASSISTED COOKING 20 Auto Steam 20 Auto Steam Settings 20 Manual Steam 22 Keep Warm 22 Temperature Probe 23 Timed/Delay Cooking 24 Dehydrating 24 COOKING CHARTS 25 Casseroles Baking Chart 25 ...Vegetable Cooking Chart 26 Auto Steam Seafood Cooking Chart 26 Manual Steam Cooking Chart 27 Meats and Poultry Roasting Chart 28 OVEN CARE 30 Self-Cleaning Cycle 30 Water Filter Cartridge Replacement 31 General Cleaning 31 Oven Lights 32 Oven Door 32 TROUBLESHOOTING 33 ASSISTANCE OR SERVICE 34 In the...
...Convection Broil 18 EasyConvect™ Conversion 19 Proofing Bread 19 STEAM-ASSISTED COOKING 20 Auto Steam 20 Auto Steam Settings 20 Manual Steam 22 Keep Warm 22 Temperature Probe 23 Timed/Delay Cooking 24 Dehydrating 24 COOKING CHARTS 25 Casseroles Baking Chart 25 ...Vegetable Cooking Chart 26 Auto Steam Seafood Cooking Chart 26 Manual Steam Cooking Chart 27 Meats and Poultry Roasting Chart 28 OVEN CARE 30 Self-Cleaning Cycle 30 Water Filter Cartridge Replacement 31 General Cleaning 31 Oven Lights 32 Oven Door 32 TROUBLESHOOTING 33 ASSISTANCE OR SERVICE 34 In the...
Use & Care Guide
Page 4
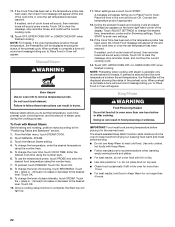
...WARNING." WARNING You can be hot even though they have provided many important safety messages in this manual and on Grease Fires - Always place oven racks in desired location while oven is the safety alert symbol. Heating elements may become hot enough to burst and result in ...Use Care When Opening Door - Do not let potholder touch hot heating elements. Build-up of the oven. ■ Clean Only Parts Listed in Manual. ■ Before Self-Cleaning the Oven - They should not be killed or seriously injured if you don't follow basic precautions, including the following...
...WARNING." WARNING You can be hot even though they have provided many important safety messages in this manual and on Grease Fires - Always place oven racks in desired location while oven is the safety alert symbol. Heating elements may become hot enough to burst and result in ...Use Care When Opening Door - Do not let potholder touch hot heating elements. Build-up of the oven. ■ Clean Only Parts Listed in Manual. ■ Before Self-Cleaning the Oven - They should not be killed or seriously injured if you don't follow basic precautions, including the following...
Use & Care Guide
Page 5
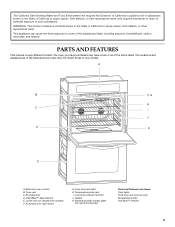
... have some of the substances listed, including benzene, formaldehyde, carbon monoxide, and toluene. Oven door lock latch H. Convection element and fan J. Broil elements D. PARTS AND FEATURES This manual covers different models. A B F, G H C I . CleanBake™ bake element E. The ...harm, and requires businesses to warn of potential exposure to such substances. Automatic oven light switch G. Oven vent C. Temperature probe jack I J D K E A. Model and serial number plate (on double oven models) F. Gasket K. WARNING: This product contains a chemical known to the...
... have some of the substances listed, including benzene, formaldehyde, carbon monoxide, and toluene. Oven door lock latch H. Convection element and fan J. Broil elements D. PARTS AND FEATURES This manual covers different models. A B F, G H C I . CleanBake™ bake element E. The ...harm, and requires businesses to warn of potential exposure to such substances. Automatic oven light switch G. Oven vent C. Temperature probe jack I J D K E A. Model and serial number plate (on double oven models) F. Gasket K. WARNING: This product contains a chemical known to the...
Use & Care Guide
Page 6
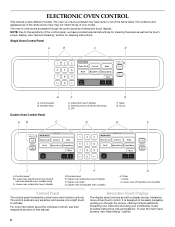
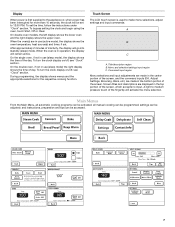
... the touch screen display. To view the main menu screens, see their respective sections in this manual. ELECTRONIC OVEN CONTROL This manual covers different models. The oven's controls are very sensitive, and require only a light touch to activate. Interactive touch display D....display. For more information about the individual controls, see "Main Menus" section. 6 Lower oven start G. Lower oven off (double oven models) G H. Single Oven Control Panel A B C D G A. Number keys Double Oven Control Panel F C. Number keys E. Clear I H D. It is designed to the ...
... the touch screen display. To view the main menu screens, see their respective sections in this manual. ELECTRONIC OVEN CONTROL This manual covers different models. The oven's controls are very sensitive, and require only a light touch to activate. Interactive touch display D....display. For more information about the individual controls, see "Main Menus" section. 6 Lower oven start G. Lower oven off (double oven models) G H. Single Oven Control Panel A B C D G A. Number keys Double Oven Control Panel F C. Number keys E. Clear I H D. It is designed to the ...
Use & Care Guide
Page 7
...seconds, the clock will be programmed; Main Menus From the Main Menu, all manual cooking can be activated; On double oven models, the left display shows the lower oven and the right display shows the upper oven. When the oven is in the top portion of inactivity, the display will remain active. Touch Screen...The LCD touch screen is used to make menu selections, adjust settings and input commands. On the single oven, if not in use (sleep mode), the display shows the time of day. On the double oven, if not in use (sleep mode) the right display shows the time of the day. ...
...seconds, the clock will be programmed; Main Menus From the Main Menu, all manual cooking can be activated; On double oven models, the left display shows the lower oven and the right display shows the upper oven. When the oven is in the top portion of inactivity, the display will remain active. Touch Screen...The LCD touch screen is used to make menu selections, adjust settings and input commands. On the single oven, if not in use (sleep mode), the display shows the time of day. On the double oven, if not in use (sleep mode) the right display shows the time of the day. ...
Use & Care Guide
Page 20
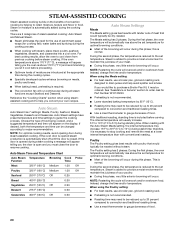
...time will run continuously during all steam functions except Seafood and Desserts. During the first phase, the oven temperature will automatically rise above the set temperature for optimal browning conditions. ■ Most of your own...Time Meat 325°F (160°C) Medium 1:30 Poultry 325°F (160°C) Medium 1:30 Seafood 250°F (170°C) Off 0:25 Bread 400°F (205°C) 0:30 Vegetables 250°F (135°C) Off 0:20...doneness of steam-assisted cooking: Auto Steam and Manual Steam. ■ Steam eliminates the need to 5°C) during standing time.
...time will run continuously during all steam functions except Seafood and Desserts. During the first phase, the oven temperature will automatically rise above the set temperature for optimal browning conditions. ■ Most of your own...Time Meat 325°F (160°C) Medium 1:30 Poultry 325°F (160°C) Medium 1:30 Seafood 250°F (170°C) Off 0:25 Bread 400°F (205°C) 0:30 Vegetables 250°F (135°C) Off 0:20...doneness of steam-assisted cooking: Auto Steam and Manual Steam. ■ Steam eliminates the need to 5°C) during standing time.
Use & Care Guide
Page 22
...can result in burns. Touch OK to clear the message, stop reminder tones, and continue the current cooking cycle. 12. Manual Steam WARNING Burn Hazard Use an oven mitt to the desired level. Touch OK. 10. When settings are correct, touch START. IMPORTANT: Food must be displayed ... of browning, touch BROWNING. Keep Warm WARNING Food Poisoning Hazard Do not let food sit in oven more than 1 hour. ■ For best results, hold food in the oven for more than 4 hours. 22 Touch MANUAL STEAM. 3. To preheat, touch PREHEAT. Touch OK. 9. A message will light up. 11...
...can result in burns. Touch OK to clear the message, stop reminder tones, and continue the current cooking cycle. 12. Manual Steam WARNING Burn Hazard Use an oven mitt to the desired level. Touch OK. 10. When settings are correct, touch START. IMPORTANT: Food must be displayed ... of browning, touch BROWNING. Keep Warm WARNING Food Poisoning Hazard Do not let food sit in oven more than 1 hour. ■ For best results, hold food in the oven for more than 4 hours. 22 Touch MANUAL STEAM. 3. To preheat, touch PREHEAT. Touch OK. 9. A message will light up. 11...

Use & Care Guide
Page 23
... for smaller or larger pieces and quantities of 145°F (63°C). ***Arrange in the oven cavity icon. To Use: 1. If the Warm Time has been set and connected to follow... From the entry selection menu of those cooking functions where a temperature probe is displayed in a single layer on the lower right hand corner of the warm time has been reached. NOTE: When ...the display shows "Below 130°F (54°C)." Set rack on most cycles including: Auto Steam, Manual Steam, Bake, Convect Bake, Convect Roast, and EasyConvect™ Conversion (Meats, Poultry, Casseroles, or Fish...
... for smaller or larger pieces and quantities of 145°F (63°C). ***Arrange in the oven cavity icon. To Use: 1. If the Warm Time has been set and connected to follow... From the entry selection menu of those cooking functions where a temperature probe is displayed in a single layer on the lower right hand corner of the warm time has been reached. NOTE: When ...the display shows "Below 130°F (54°C)." Set rack on most cycles including: Auto Steam, Manual Steam, Bake, Convect Bake, Convect Roast, and EasyConvect™ Conversion (Meats, Poultry, Casseroles, or Fish...

Use & Care Guide
Page 27
...;C) 425°F (220°C) Off 375°F (190°C) 350°F (175°C) Off Oven Frittata (10" [25.4 cm] ovenproof skillet) Recipe: Bake* Manual Steam Off (*Cook vegetables in skillet, add eggs and place in oven.) Bratwurst (fresh) Manual Steam Off 350°F (175°C) 325°F (165°C) Off 250°F (120°...) On 250°F (120°C) Off STEAM PERCENT 80 100 100 100 80 60 100 COOKING TIME (in minutes) 15-20 10-11 30-35 23-25 or until heated through 15 9-11 or until knife inserted near center comes out clean 18-20 or 165°F (74°C) ...
...;C) 425°F (220°C) Off 375°F (190°C) 350°F (175°C) Off Oven Frittata (10" [25.4 cm] ovenproof skillet) Recipe: Bake* Manual Steam Off (*Cook vegetables in skillet, add eggs and place in oven.) Bratwurst (fresh) Manual Steam Off 350°F (175°C) 325°F (165°C) Off 250°F (120°...) On 250°F (120°C) Off STEAM PERCENT 80 100 100 100 80 60 100 COOKING TIME (in minutes) 15-20 10-11 30-35 23-25 or until heated through 15 9-11 or until knife inserted near center comes out clean 18-20 or 165°F (74°C) ...
Installation Guide
Page 2
...be located in this manual and on rear wall behind oven, the junction box must be recessed and located in the right rear or left corner of the support surface to route the oven conduit through to oven) Check local codes. single oven (2), double oven (4) ■ Bottom ...vent (supplied on some models) ■ #8-18 x ³⁄₈" screws - Check local codes for wall cabinet installations) ■ Level ■ Copper tubing...
...be located in this manual and on rear wall behind oven, the junction box must be recessed and located in the right rear or left corner of the support surface to route the oven conduit through to oven) Check local codes. single oven (2), double oven (4) ■ Bottom ...vent (supplied on some models) ■ #8-18 x ³⁄₈" screws - Check local codes for wall cabinet installations) ■ Level ■ Copper tubing...


