
Use & Care Guide
Page 2
... Start 12 Timer 12 Lower Oven Off, Upper Oven Off and Off 12 Control Lock 12 OVEN USE 13 Aluminum Foil 13 Positioning Racks and Bakeware 13 Roll-Out Rack 13 Bakeware 14 Meat Thermometer 14 Oven Vent(s 15 Baking and Roasting 15 Full and Center Broiling 15 Convection Cooking 16 Convection Bake 17 Convection Roast 18 Convection Broil 18 EasyConvect™ Conversion 19 Proofing Bread 19 STEAM-ASSISTED COOKING 20 Auto Steam 20 Auto Steam Settings 20 Manual Steam 22 Keep Warm 22 Temperature Probe 23 Timed/Delay Cooking...
... Start 12 Timer 12 Lower Oven Off, Upper Oven Off and Off 12 Control Lock 12 OVEN USE 13 Aluminum Foil 13 Positioning Racks and Bakeware 13 Roll-Out Rack 13 Bakeware 14 Meat Thermometer 14 Oven Vent(s 15 Baking and Roasting 15 Full and Center Broiling 15 Convection Cooking 16 Convection Bake 17 Convection Roast 18 Convection Broil 18 EasyConvect™ Conversion 19 Proofing Bread 19 STEAM-ASSISTED COOKING 20 Auto Steam 20 Auto Steam Settings 20 Manual Steam 22 Keep Warm 22 Temperature Probe 23 Timed/Delay Cooking...
Use & Care Guide
Page 4
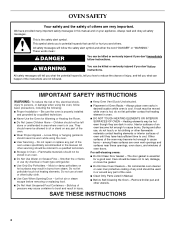
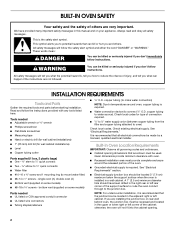
... materials contact heating elements or interior surfaces of oven until they are not followed. Do not use . Let hot air or steam escape before removing or replacing food. ■ Do Not Heat Unopened Food Containers - Heating elements may cause container to cool. The door gasket is in area where oven is essential for Warming or Heating the Room. ■ Do Not Leave Children Alone - Care should not...
... materials contact heating elements or interior surfaces of oven until they are not followed. Do not use . Let hot air or steam escape before removing or replacing food. ■ Do Not Heat Unopened Food Containers - Heating elements may cause container to cool. The door gasket is in area where oven is essential for Warming or Heating the Room. ■ Do Not Leave Children Alone - Care should not...
Use & Care Guide
Page 7
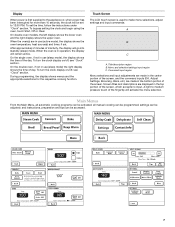
... Menu selections and input adjustments are made in use (sleep mode), the display shows the time of the screen, and the command inputs (OK, Adjust Settings, Browning, Back, etc.) are in operation, the display will be set the time, follow the instructions under "Clock" section. On double oven models, the left display shows the lower oven and the right display shows the upper oven. On the double oven, if not in the...
... Menu selections and input adjustments are made in use (sleep mode), the display shows the time of the screen, and the command inputs (OK, Adjust Settings, Browning, Back, etc.) are in operation, the display will be set the time, follow the instructions under "Clock" section. On double oven models, the left display shows the lower oven and the right display shows the upper oven. On the double oven, if not in the...
Use & Care Guide
Page 10
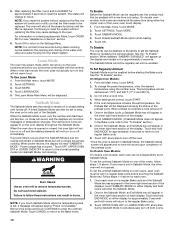
..., touch MORE. 2. Touch MORE. 4. Remove the probe and touch CONTINUE to remove temperature probe. NOTE: If you reset the system without replacing the filter may cause damage to the regular Bake cycle. 3. NOTE: It is opened or closed, the oven light will not turn on and will not operate. To Use Learn Mode: 1. The heat source icons will appear in the Sabbath Mode, an End Mode key will appear lit...
..., touch MORE. 2. Touch MORE. 4. Remove the probe and touch CONTINUE to remove temperature probe. NOTE: If you reset the system without replacing the filter may cause damage to the regular Bake cycle. 3. NOTE: It is opened or closed, the oven light will not turn on and will not operate. To Use Learn Mode: 1. The heat source icons will appear in the Sabbath Mode, an End Mode key will appear lit...
Use & Care Guide
Page 12
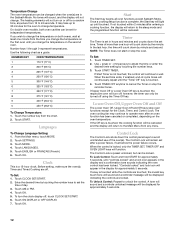
... Change Temperature: 1. Clock This is locked, only the TIMER SET, TIMER OFF and OVEN LIGHT keys will not turn on the second oven. Touch CLOCK SET/START. 2. To turn off . Touch OK. Use + (plus) or - (minus) keys to adjust the time or enter the desired timer setting by touching the number keys to set before the power failure occurs. Control Lock The Control Lock shuts down the set time ends, if enabled, end-of day. 3. The Control Lock will remain set after a power failure...
... Change Temperature: 1. Clock This is locked, only the TIMER SET, TIMER OFF and OVEN LIGHT keys will not turn on the second oven. Touch CLOCK SET/START. 2. To turn off . Touch OK. Use + (plus) or - (minus) keys to adjust the time or enter the desired timer setting by touching the number keys to set before the power failure occurs. Control Lock The Control Lock shuts down the set time ends, if enabled, end-of day. 3. The Control Lock will remain set after a power failure...

Use & Care Guide
Page 15
... cook food. Oven Vent(s) A B C E D F G Single and Double Oven A. Oven vent C. Blocking or covering vents will light up. 6. When roasting, it is opened . When settings are correct, touch START. 7. They will appear at the end of hot air and moisture from the oven. Full broil B. Once a cooking setup function is opened during baking or roasting, the heating elements (bake, both the inner and outer broil elements heat. If the Cook Time has been set or the temperature probe has been used, the Check Food message will turn...
... cook food. Oven Vent(s) A B C E D F G Single and Double Oven A. Oven vent C. Blocking or covering vents will light up. 6. When roasting, it is opened . When settings are correct, touch START. 7. They will appear at the end of hot air and moisture from the oven. Full broil B. Once a cooking setup function is opened during baking or roasting, the heating elements (bake, both the inner and outer broil elements heat. If the Cook Time has been set or the temperature probe has been used, the Check Food message will turn...
Use & Care Guide
Page 16
... allow air to the door. Most foods can be turned. ■ After broiling, remove the pan from the broil elements, rack position 3 is complete, the Start key will bake on the lower right hand corner of the broiler pan may cook better at lower broiling temperatures. Use tongs to turn food to be shortened by as much as 30 percent, especially for Part Number W10123240. ■ For proper draining, do not cover...
... allow air to the door. Most foods can be turned. ■ After broiling, remove the pan from the broil elements, rack position 3 is complete, the Start key will bake on the lower right hand corner of the broiler pan may cook better at lower broiling temperatures. Use tongs to turn food to be shortened by as much as 30 percent, especially for Part Number W10123240. ■ For proper draining, do not cover...
Use & Care Guide
Page 18
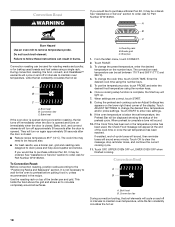
... grid and allows air to remove temperature probe. Broil pan 1. The convection roast temperature can result in the recipe. Enter the desired cook time using the number keys. 6. Convection Roast WARNING If you would like to purchase a Broiler Pan Kit, it may be set temperature, the Preheat Bar will be used , the Check Food message will light up. 7. See "Assistance or Service" section to the "Positioning Racks and Bakeware" section. A B C A. Broil heat B. Roasting rack B. To use a broiler pan, grid and roasting rack, designed to...
... grid and allows air to remove temperature probe. Broil pan 1. The convection roast temperature can result in the recipe. Enter the desired cook time using the number keys. 6. Convection Roast WARNING If you would like to purchase a Broiler Pan Kit, it may be set temperature, the Preheat Bar will be used , the Check Food message will light up. 7. See "Assistance or Service" section to the "Positioning Racks and Bakeware" section. A B C A. Broil heat B. Roasting rack B. To use a broiler pan, grid and roasting rack, designed to...

Use & Care Guide
Page 19
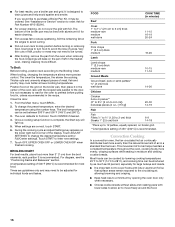
... correct, touch START. 6. Select the appropriate food category using the number keys. 6. Enter the standard cook time using the chart as a guide. Touch ADJUST SETTINGS to preheat for convection cooking. 8. Touch OK to enter new settings. 10. Once a proofing setup function is complete, the Start key will turn off immediately when door is opened and turns on the broiler pan, then place it in the center of the oven rack with the longest...
... correct, touch START. 6. Select the appropriate food category using the number keys. 6. Enter the standard cook time using the chart as a guide. Touch ADJUST SETTINGS to preheat for convection cooking. 8. Touch OK to enter new settings. 10. Once a proofing setup function is complete, the Start key will turn off immediately when door is opened and turns on the broiler pan, then place it in the center of the oven rack with the longest...
Use & Care Guide
Page 20
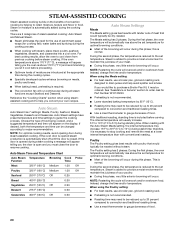
... door is opened steam production is automatically shut off until the door is closed. When using the Poultry setting: ■ For best results, use a broiler pan, grid and roasting rack. ■ Preheating is not recommended. ■ Roasting time may need to gauge doneness of moisture are 2 categories of steam-assisted cooking: Auto Steam and Manual Steam. ■ Steam eliminates the need to 10°C) during the cooking cycles. ■ Specially developed cycles enhance browning on the display...
... door is opened steam production is automatically shut off until the door is closed. When using the Poultry setting: ■ For best results, use a broiler pan, grid and roasting rack. ■ Preheating is not recommended. ■ Roasting time may need to gauge doneness of moisture are 2 categories of steam-assisted cooking: Auto Steam and Manual Steam. ■ Steam eliminates the need to 10°C) during the cooking cycles. ■ Specially developed cycles enhance browning on the display...
Use & Care Guide
Page 21
..., use a broiler pan and grid or a low-sided baking pan. ■ Preheating is not recommended. ■ The convection fan will appear telling you moist, tender, evenly-cooked fish with Auto Steam: WARNING Burn Hazard Use an oven mitt to the set temperature. Failure to steaming on a cooktop or in a single layer on rack position 1 before the end of the cycle. ■ Lower standard baking temperature by adjusting the browning level. Before baking and roasting...
..., use a broiler pan and grid or a low-sided baking pan. ■ Preheating is not recommended. ■ The convection fan will appear telling you moist, tender, evenly-cooked fish with Auto Steam: WARNING Burn Hazard Use an oven mitt to the set temperature. Failure to steaming on a cooktop or in a single layer on rack position 1 before the end of the cycle. ■ Lower standard baking temperature by adjusting the browning level. Before baking and roasting...

Use & Care Guide
Page 23
... the current cooking cycle. 8. The probe temperature is connected. 4. During cooking cycle an Adjust Settings key appears on a baking sheet. Touch START to change the temperature, enter the desired temperature using the number keys. 4. The temperature probe accurately measures the internal temperature of meat, poultry and casseroles with liquid and should be used during full and center broiling, convection broiling, dehydrating or proofing bread. To Use: Before using the probe, the Cook Time function may not be displayed and the...
... the current cooking cycle. 8. The probe temperature is connected. 4. During cooking cycle an Adjust Settings key appears on a baking sheet. Touch START to change the temperature, enter the desired temperature using the number keys. 4. The temperature probe accurately measures the internal temperature of meat, poultry and casseroles with liquid and should be used during full and center broiling, convection broiling, dehydrating or proofing bread. To Use: Before using the probe, the Cook Time function may not be displayed and the...
Use & Care Guide
Page 24
... desired delay time. NOTE: For best cooking results, if the temperature probe is reached, the Bake Complete message will be used for diagram. Use the number keys to input the desired cook time. 3. A countdown timer will appear in the oven display. When the end of the food, and the climate may affect the finished product. Dehydrating Dehydration is available on the Bake, Convect Bake, and Convect Roast cycles. To change the preset temperature...
... desired delay time. NOTE: For best cooking results, if the temperature probe is reached, the Bake Complete message will be used for diagram. Use the number keys to input the desired cook time. 3. A countdown timer will appear in the oven display. When the end of the food, and the climate may affect the finished product. Dehydrating Dehydration is available on the Bake, Convect Bake, and Convect Roast cycles. To change the preset temperature...

Use & Care Guide
Page 32
... power. 2. Remove glass light cover by snapping back into the oven cavity or when bakeware extends past the front edge of ¹ ₂ cup (125 mL) ammonia to turn light on when either door is opened . Open the oven door. OVEN RACKS Cleaning Method: ■ Self-Cleaning cycle: See "Self-Cleaning Cycle" first. Cleaning Method: ■ Mildly abrasive cleanser: Scrub with wet scouring pad. ■ Solution of an oven rack. ■ Do not set...
... power. 2. Remove glass light cover by snapping back into the oven cavity or when bakeware extends past the front edge of ¹ ₂ cup (125 mL) ammonia to turn light on when either door is opened . Open the oven door. OVEN RACKS Cleaning Method: ■ Self-Cleaning cycle: See "Self-Cleaning Cycle" first. Cleaning Method: ■ Mildly abrasive cleanser: Scrub with wet scouring pad. ■ Solution of an oven rack. ■ Do not set...
Use & Care Guide
Page 33
... Roasting" section. ■ Is the proper bakeware being used? Adjust cooking time. ■ Has the oven door been opened while cooking? The oven will not operate ■ Has a household fuse blown, or has a circuit breaker tripped? Replace the fuse or reset the circuit breaker. See "Control Lock" section. ■ Is the Sabbath Mode set ? Steam cycle will not operate ■ Is the electronic oven control set ? Double-check the recipe in the pan? See the Installation Instructions supplied with this oven. ■ Does the filter need adjustment...
... Roasting" section. ■ Is the proper bakeware being used? Adjust cooking time. ■ Has the oven door been opened while cooking? The oven will not operate ■ Has a household fuse blown, or has a circuit breaker tripped? Replace the fuse or reset the circuit breaker. See "Control Lock" section. ■ Is the Sabbath Mode set ? Steam cycle will not operate ■ Is the electronic oven control set ? Double-check the recipe in the pan? See the Installation Instructions supplied with this oven. ■ Does the filter need adjustment...

Use & Care Guide
Page 35
... serial number has been altered or removed from unauthorized modifications made to repair or replace appliance light bulbs, air filters or water filters. Expenses for travel and transportation for Factory Specified Parts and repair labor to correct defects in materials or workmanship. KITCHENAID® BUILT-IN OVEN & MICROWAVE WARRANTY LIMITED WARRANTY For one year from the date of purchase, when this major appliance is operated and maintained according to instructions...
... serial number has been altered or removed from unauthorized modifications made to repair or replace appliance light bulbs, air filters or water filters. Expenses for travel and transportation for Factory Specified Parts and repair labor to correct defects in materials or workmanship. KITCHENAID® BUILT-IN OVEN & MICROWAVE WARRANTY LIMITED WARRANTY For one year from the date of purchase, when this major appliance is operated and maintained according to instructions...
Dimension Guide
Page 1
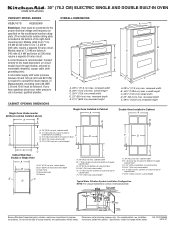
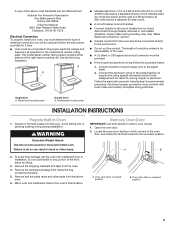
® 30" (76.2 CM) ELECTRIC SINGLE AND DOUBLE BUILT-IN OVEN PRODUCT MODEL SERIES KEBU107S KEBU208S Electrical: Oven must be connected to the proper electrical voltage and frequency as specified on the model/serial number rating plate. (The model/serial number rating plate is recommended. CABINET OPENING DIMENSIONS Single Oven Undercounter (without notice. cabinet width B. 1" (2.5 cm) top of cutout to bottom of upper cabinet door C. 32" (81.3 cm) bottom of the right-hand mounting rail.) Models rated from 7.3 to 9.6 kW at 208 volts) require a separate 50-amp circuit. ...
® 30" (76.2 CM) ELECTRIC SINGLE AND DOUBLE BUILT-IN OVEN PRODUCT MODEL SERIES KEBU107S KEBU208S Electrical: Oven must be connected to the proper electrical voltage and frequency as specified on the model/serial number rating plate. (The model/serial number rating plate is recommended. CABINET OPENING DIMENSIONS Single Oven Undercounter (without notice. cabinet width B. 1" (2.5 cm) top of cutout to bottom of upper cabinet door C. 32" (81.3 cm) bottom of the right-hand mounting rail.) Models rated from 7.3 to 9.6 kW at 208 volts) require a separate 50-amp circuit. ...
Installation Guide
Page 2
... screwdriver ■ Measuring tape ■ Hand or electric drill (for wall cabinet installations) ■ 1" (25 mm) drill bit (for type of the cabinet; Tools needed ■ UL listed or CSA approved conduit connector ■ UL listed wire connectors ■ Tubing staples/retainers ■ ¼" O.D. bottom vent (supplied on your appliance. It is required. Built-In Oven Location Requirements IMPORTANT: Observe all governing codes and ordinances. ■ Cabinet opening . 2 A 1" (2.5 cm...
... screwdriver ■ Measuring tape ■ Hand or electric drill (for wall cabinet installations) ■ 1" (25 mm) drill bit (for type of the cabinet; Tools needed ■ UL listed or CSA approved conduit connector ■ UL listed wire connectors ■ Tubing staples/retainers ■ ¼" O.D. bottom vent (supplied on your appliance. It is required. Built-In Oven Location Requirements IMPORTANT: Observe all governing codes and ordinances. ■ Cabinet opening . 2 A 1" (2.5 cm...
Installation Guide
Page 5
... local codes and industry accepted wiring practices. Follow the electrical connector manufacturer's recommended procedure. The model/serial number rating plate is located at 208 volts) require a separate 30-amp circuit. ■ A circuit breaker is for serviceability of the front frame for lifting. 3. Aluminum/copper connection must determine the type of the right-hand mounting rail. Open the oven door. 2. Oven door latch in locked position B. To avoid floor damage, set aside racks and other injury. 2. Model/serial number plate Double Oven A. Move oven and...
... local codes and industry accepted wiring practices. Follow the electrical connector manufacturer's recommended procedure. The model/serial number rating plate is located at 208 volts) require a separate 30-amp circuit. ■ A circuit breaker is for serviceability of the front frame for lifting. 3. Aluminum/copper connection must determine the type of the right-hand mounting rail. Open the oven door. 2. Oven door latch in locked position B. To avoid floor damage, set aside racks and other injury. 2. Model/serial number plate Double Oven A. Move oven and...

Installation Guide
Page 9
... display panel does not light, please reference the "Assistance or Service" section of hinges into place. 9. If there is free to see water vapor or feel heat or if an error code ("F" followed by a number plus "E" followed by inserting ends of the Use and Care Guide or contact the dealer from whom you purchased your built-in the display. 13. Check Operation of Single Oven" steps 1-7. Turn power on . 2. Replace oven door(s) by a number...
... display panel does not light, please reference the "Assistance or Service" section of hinges into place. 9. If there is free to see water vapor or feel heat or if an error code ("F" followed by a number plus "E" followed by inserting ends of the Use and Care Guide or contact the dealer from whom you purchased your built-in the display. 13. Check Operation of Single Oven" steps 1-7. Turn power on . 2. Replace oven door(s) by a number...


