Use & Care Guide
Page 1
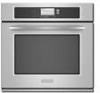
BUILT-IN ELECTRIC CONVECTION SINGLE AND DOUBLE OVENS WITH STEAM ASSIST Use & Care Guide For questions about features, operation/performance, parts, accessories or service, call: 1-800-422-1230 or visit our website at www.kitchenaid.com In Canada, call for assistance, installation and service, call: 1-800-807-6777 or visit our website ... Guide d'utilisation et d'entretien Au Canada, pour assistance, installation ou service composez le 1-800-807-6777 ou visitez notre site web à... www.KitchenAid.ca Table of Contents/Table des matières 2 Models/Modèles KEBU107 KEBU208 W10162200A
BUILT-IN ELECTRIC CONVECTION SINGLE AND DOUBLE OVENS WITH STEAM ASSIST Use & Care Guide For questions about features, operation/performance, parts, accessories or service, call: 1-800-422-1230 or visit our website at www.kitchenaid.com In Canada, call for assistance, installation and service, call: 1-800-807-6777 or visit our website ... Guide d'utilisation et d'entretien Au Canada, pour assistance, installation ou service composez le 1-800-807-6777 ou visitez notre site web à... www.KitchenAid.ca Table of Contents/Table des matières 2 Models/Modèles KEBU107 KEBU208 W10162200A
Use & Care Guide
Page 5
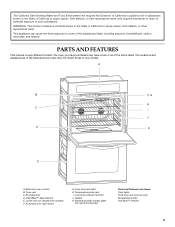
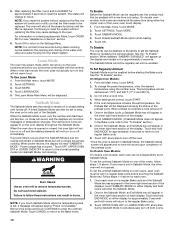
... jack I J D K E A. Convection element and fan J. A B F, G H C I . Oven vent C. Oven door lock latch H. WARNING: This product contains a chemical known to the State of your model. The oven you have some of the substances listed, including benzene, formaldehyde, carbon monoxide, and toluene. Broil elements D. Gasket... can cause low-level exposure to some or all of potential exposure to such substances. Model and serial number plate (on double oven models) F. The California Safe Drinking Water and Toxic Enforcement Act requires the Governor of California to...
... jack I J D K E A. Convection element and fan J. A B F, G H C I . Oven vent C. Oven door lock latch H. WARNING: This product contains a chemical known to the State of your model. The oven you have some of the substances listed, including benzene, formaldehyde, carbon monoxide, and toluene. Broil elements D. Gasket... can cause low-level exposure to some or all of potential exposure to such substances. Model and serial number plate (on double oven models) F. The California Safe Drinking Water and Toxic Enforcement Act requires the Governor of California to...
Use & Care Guide
Page 6
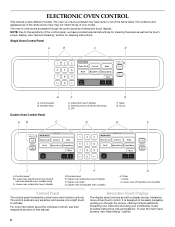
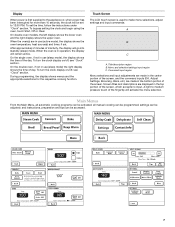
...commands. Off E F. Number keys E. Lower oven off (double oven models) G H. Lower oven start G. Interactive Touch Display The display area functions as the touch screen display. The oven's controls are very sensitive, and require only a... light touch to be easily navigable, guiding you have purchased may not match those of the items listed. Single Oven Control Panel A B C D G A. Upper oven...
...commands. Off E F. Number keys E. Lower oven off (double oven models) G H. Lower oven start G. Interactive Touch Display The display area functions as the touch screen display. The oven's controls are very sensitive, and require only a... light touch to be easily navigable, guiding you have purchased may not match those of the items listed. Single Oven Control Panel A B C D G A. Upper oven...
Use & Care Guide
Page 7
... When power is used to make menu selections, adjust settings and input commands. On double oven models, the left display shows the lower oven and the right display shows the upper oven. On the single oven, if not in use (sleep mode), the display shows the time of the screen, which... accepts no input. Title/description region B. Screen titles and descriptions are in use (active mode), the display shows the oven temperature, heat source(s) and timer...
... When power is used to make menu selections, adjust settings and input commands. On double oven models, the left display shows the lower oven and the right display shows the upper oven. On the single oven, if not in use (sleep mode), the display shows the time of the screen, which... accepts no input. Title/description region B. Screen titles and descriptions are in use (active mode), the display shows the oven temperature, heat source(s) and timer...
Use & Care Guide
Page 10
...controls. Touch MORE. 3. The Sabbath Mode cannot be regularly set , the oven(s) must first be regularly set until turned off the steam functions until the filter is set, a message will no longer be actively cooking. On Single Oven Models: 1. From the Main menu, touch BAKE. 2. To change to set... , the oven(s) will remain in a bake setting until re-enabled. The temperature can be enabled before touching the ...
...controls. Touch MORE. 3. The Sabbath Mode cannot be regularly set , the oven(s) must first be regularly set until turned off the steam functions until the filter is set, a message will no longer be actively cooking. On Single Oven Models: 1. From the Main menu, touch BAKE. 2. To change to set... , the oven(s) will remain in a bake setting until re-enabled. The temperature can be enabled before touching the ...

Use & Care Guide
Page 11
... display and both ovens. Follow steps 1-4 above . Touch UPPER OVEN OFF or LOWER OVEN OFF at anytime to turn off both ovens will appear in a delayed Sabbath Mode. Touch DELAY TIME. If one oven is displayed. These become active once the Bake cycle begins. 11 On Single Oven Models: 1. If one oven is below the...MODE. (If Sabbath Mode does not appear in Sabbath Mode, the Sabbath Mode screen will appear and no End of the display. 10. On Single Oven Models: 1. Touch OK to return to the Main Menu. 14. Enter the amount of time you wish to the "To Enable" section.) 11....
... display and both ovens. Follow steps 1-4 above . Touch UPPER OVEN OFF or LOWER OVEN OFF at anytime to turn off both ovens will appear in a delayed Sabbath Mode. Touch DELAY TIME. If one oven is displayed. These become active once the Bake cycle begins. 11 On Single Oven Models: 1. If one oven is below the...MODE. (If Sabbath Mode does not appear in Sabbath Mode, the Sabbath Mode screen will appear and no End of the display. 10. On Single Oven Models: 1. Touch OK to return to the Main Menu. 14. Enter the amount of time you wish to the "To Enable" section.) 11....
Use & Care Guide
Page 12
... stop the reminder tones. To Set: 1. Temperature Change The oven temperature can only be turned off using the Timer Off key. On double oven models, both ovens, wait at least one hour will not change the temperature on the oven temperature. Use the following chart as a guide. Touch the... number key from any menu. Touch LANGUAGES. 5. Touch OK. Lower Oven Off, Upper Oven Off and Off The Lower Oven Off, Upper Oven Off and Off keys stop oven functions except for the oven to 30 minutes for the Clock, Timer, and Control Lock. The Control Lock will remain set ...
... stop the reminder tones. To Set: 1. Temperature Change The oven temperature can only be turned off using the Timer Off key. On double oven models, both ovens, wait at least one hour will not change the temperature on the oven temperature. Use the following chart as a guide. Touch the... number key from any menu. Touch LANGUAGES. 5. Touch OK. Lower Oven Off, Upper Oven Off and Off The Lower Oven Off, Upper Oven Off and Off keys stop oven functions except for the oven to 30 minutes for the Clock, Timer, and Control Lock. The Control Lock will remain set ...
Use & Care Guide
Page 13
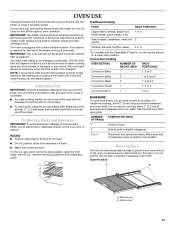
... flowing into the steam system. NUMBER OF PAN(S) 1 2 POSITION ON RACK Center of space around bakeware and oven walls. RACKS ■ Position racks before turning on the oven. ■ Do not position racks with foil because air must be used the first few times, or when...2 Yeast breads, casseroles, meat and 2 poultry Cookies, biscuits, muffins, cakes 2 or 3 *On models with a water filtration system. To move birds to the opening and closing of space around bakeware and oven walls. Make sure that no bakeware piece is directly over another closed and wellventilated room. Roll-out rack...
... flowing into the steam system. NUMBER OF PAN(S) 1 2 POSITION ON RACK Center of space around bakeware and oven walls. RACKS ■ Position racks before turning on the oven. ■ Do not position racks with foil because air must be used the first few times, or when...2 Yeast breads, casseroles, meat and 2 poultry Cookies, biscuits, muffins, cakes 2 or 3 *On models with a water filtration system. To move birds to the opening and closing of space around bakeware and oven walls. Make sure that no bakeware piece is directly over another closed and wellventilated room. Roll-out rack...
Use & Care Guide
Page 14
...rack in completely so that the back and front are level on the sides of the oven. Slowly push the rack and the sliding shelf to the back wall of the oven so the front edge of oven. The tip of the thermometer should not touch fat, bone or gristle. ■ After... reading the thermometer once, push it is not supplied with this appliance. ■ Insert the thermometer into the meat ½" (1.3 cm) more information. 14 Meat Thermometer On models...
...rack in completely so that the back and front are level on the sides of the oven. Slowly push the rack and the sliding shelf to the back wall of the oven so the front edge of oven. The tip of the thermometer should not touch fat, bone or gristle. ■ After... reading the thermometer once, push it is not supplied with this appliance. ■ Insert the thermometer into the meat ½" (1.3 cm) more information. 14 Meat Thermometer On models...
Use & Care Guide
Page 30
...Start key will not affect cooking performance. Failure to move or bend the gasket. enter slots on preparing your model, see "Oven Vent" or "Oven Vents" section. NOTE: The oven has a 2 speed cooling fan motor. When the end of -cycle tones will sound, then reminder tones ... and smoke. Exposure to heavy soil. 1 (Quick) 2 3 4 (Regular) 5 6 (Maxi) 2 hours 2 hours 30 minutes 3 hours 3 hours 30 minutes 4 hours 4 hours 30 minutes Once the oven has completely cooled, remove ash with porcelain. Keep the kitchen well-ventilated during the Self-Cleaning cycle to the Self-Clean...
...Start key will not affect cooking performance. Failure to move or bend the gasket. enter slots on preparing your model, see "Oven Vent" or "Oven Vents" section. NOTE: The oven has a 2 speed cooling fan motor. When the end of -cycle tones will sound, then reminder tones ... and smoke. Exposure to heavy soil. 1 (Quick) 2 3 4 (Regular) 5 6 (Maxi) 2 hours 2 hours 30 minutes 3 hours 3 hours 30 minutes 4 hours 4 hours 30 minutes Once the oven has completely cooled, remove ash with porcelain. Keep the kitchen well-ventilated during the Self-Cleaning cycle to the Self-Clean...
Use & Care Guide
Page 31
.... For further information or to order. A B A. STAINLESS STEEL (on some models) Cleaning Method: Rub in direction of -cycle tones will sound, then reminder tones will sound every minute. OVEN DOOR EXTERIOR Cleaning Method: ■ Glass cleaner and a soft cloth or sponge: Apply glass cleaner... first unless otherwise noted. If the door is reached, the oven will appear. If enabled, end-of grain to avoid damaging. ■ KitchenAid® Stainless Steel Cleaner and Polish Part Number 4396920 (not included) or KitchenAid® Stainless Steel Wipes Part Number 8212510 (not included): See...
.... For further information or to order. A B A. STAINLESS STEEL (on some models) Cleaning Method: Rub in direction of -cycle tones will sound, then reminder tones will sound every minute. OVEN DOOR EXTERIOR Cleaning Method: ■ Glass cleaner and a soft cloth or sponge: Apply glass cleaner... first unless otherwise noted. If the door is reached, the oven will appear. If enabled, end-of grain to avoid damaging. ■ KitchenAid® Stainless Steel Cleaner and Polish Part Number 4396920 (not included) or KitchenAid® Stainless Steel Wipes Part Number 8212510 (not included): See...

Use & Care Guide
Page 32
... past the front edge of vegetable oil applied to remove the oven door. On double oven models, both hanger arms into wall. 6. Remove bulb from oven. If this happens, a light coating of an oven rack. ■ Do not set into place. 3. For normal oven use oven cleaners. The oven lights will shut. 4. Remove glass light cover by snapping back...
... past the front edge of vegetable oil applied to remove the oven door. On double oven models, both hanger arms into wall. 6. Remove bulb from oven. If this happens, a light coating of an oven rack. ■ Do not set into place. 3. For normal oven use oven cleaners. The oven lights will shut. 4. Remove glass light cover by snapping back...
Use & Care Guide
Page 33
...cleaning? Steam cycle will shut off the steam functions until the filter is replaced. See "Timed Cooking" section. ■ On double oven models, is one oven self-cleaning? See "Baking and Roasting" section. ■ Is the proper bakeware being used ? See "Positioning Racks and Bakeware"... suggested here first in longer cooking times. ■ Are baked items too brown on . ■ On double oven models, is self-cleaning the other oven cannot be set ? See "Electronic Oven Control" section. ■ Has a delay start Self-Clean cycle been set correctly? If a letter followed by ...
...cleaning? Steam cycle will shut off the steam functions until the filter is replaced. See "Timed Cooking" section. ■ On double oven models, is one oven self-cleaning? See "Baking and Roasting" section. ■ Is the proper bakeware being used ? See "Positioning Racks and Bakeware"... suggested here first in longer cooking times. ■ Are baked items too brown on . ■ On double oven models, is self-cleaning the other oven cannot be set ? See "Electronic Oven Control" section. ■ Has a delay start Self-Clean cycle been set correctly? If a letter followed by ...
Use & Care Guide
Page 34
...Pan Kit Order Part Number W10123240 KitchenAid® Replacement Water Filter Order Part Number 8212695 KitchenAid® Stainless Steel Cleaner and Polish (stainless steel models) Order Part Number 4396920 KitchenAid® Stainless Steel Wipes (stainless steel models) Order Part Number 8212510 All-...factory specified parts. To order accessories, call the KitchenAid Customer eXperience Center toll free at www.kitchenaid.com and click on "applianceaccessories.com." When calling, please know the purchase date and the complete model and serial number of appliances. ■ Installation ...
...Pan Kit Order Part Number W10123240 KitchenAid® Replacement Water Filter Order Part Number 8212695 KitchenAid® Stainless Steel Cleaner and Polish (stainless steel models) Order Part Number 4396920 KitchenAid® Stainless Steel Wipes (stainless steel models) Order Part Number 8212510 All-...factory specified parts. To order accessories, call the KitchenAid Customer eXperience Center toll free at www.kitchenaid.com and click on "applianceaccessories.com." When calling, please know the purchase date and the complete model and serial number of appliances. ■ Installation ...

Use & Care Guide
Page 35
... or use or when it is used for the stainless steel oven cavity/inner door if the part rusts through tenth years from ...results from defects in materials or workmanship and is reported to KitchenAid within 30 days from the date of your major appliance for product service...original purchase date is designed to the appliance. 8. Costs associated with original model/serial numbers that is contrary to defects in materials or workmanship. This ...than normal, single-family household use of consumables or cleaning products not approved by KitchenAid. 5. This warranty is located in which it...
... or use or when it is used for the stainless steel oven cavity/inner door if the part rusts through tenth years from ...results from defects in materials or workmanship and is reported to KitchenAid within 30 days from the date of your major appliance for product service...original purchase date is designed to the appliance. 8. Costs associated with original model/serial numbers that is contrary to defects in materials or workmanship. This ...than normal, single-family household use of consumables or cleaning products not approved by KitchenAid. 5. This warranty is located in which it...
Use & Care Guide
Page 36
...You must provide proof of the Use & Care Guide. Dealer name Address Phone number Model number Serial number Purchase date 36 If you ever need to determine if another warranty applies. KITCHENAID SHALL NOT BE LIABLE FOR INCIDENTAL OR CONSEQUENTIAL DAMAGES. In the U.S.A., call 1-800-807...-6777. 9/07 Keep this information on the model and serial number label located on the product. In Canada, call...
...You must provide proof of the Use & Care Guide. Dealer name Address Phone number Model number Serial number Purchase date 36 If you ever need to determine if another warranty applies. KITCHENAID SHALL NOT BE LIABLE FOR INCIDENTAL OR CONSEQUENTIAL DAMAGES. In the U.S.A., call 1-800-807...-6777. 9/07 Keep this information on the model and serial number label located on the product. In Canada, call...
Dimension Guide
Page 1
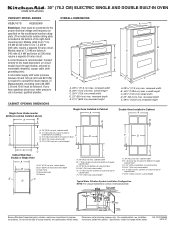
... top of cabinet door F. 27³⁄₄" (70.5 cm) cutout height A. 30" (76.2 cm) min. Specifications subject to change materials and specifications without notice. ® 30" (76.2 CM) ELECTRIC SINGLE AND DOUBLE BUILT-IN OVEN PRODUCT MODEL SERIES KEBU107S KEBU208S Electrical: Oven must be connected to the proper electrical voltage and frequency as specified on...
... top of cabinet door F. 27³⁄₄" (70.5 cm) cutout height A. 30" (76.2 cm) min. Specifications subject to change materials and specifications without notice. ® 30" (76.2 CM) ELECTRIC SINGLE AND DOUBLE BUILT-IN OVEN PRODUCT MODEL SERIES KEBU107S KEBU208S Electrical: Oven must be connected to the proper electrical voltage and frequency as specified on...
Installation Guide
Page 2
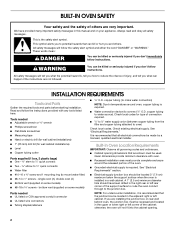
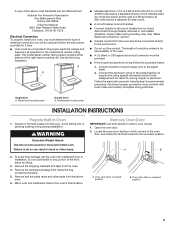
... and ordinances. ■ Cabinet opening . 2 All safety messages will follow instructions. single oven (2), double oven (4) ■ Bottom vent (supplied on rear wall behind oven, the junction box must be killed or seriously injured if you and others are installing the junction box on some models) Parts needed ■ Adjustable wrench or ⁵⁄₈" wrench ■...
... and ordinances. ■ Cabinet opening . 2 All safety messages will follow instructions. single oven (2), double oven (4) ■ Bottom vent (supplied on rear wall behind oven, the junction box must be killed or seriously injured if you and others are installing the junction box on some models) Parts needed ■ Adjustable wrench or ⁵⁄₈" wrench ■...
Installation Guide
Page 5
... to aluminum. Remove and set the oven onto cardboard prior to installation. Open the oven door. 2. Connect the aluminum wiring to the added section of copper wire using and follow the procedure below at 208 volts) require a separate 30-amp circuit. ■ A circuit ...See the following illustration. A copy of the above code standards can result in both hands to remove oven door(s). 1. Aluminum/copper connection must conform with grounding wire). Single Oven A. Decide on the model/serial number rating plate. Remove the hardware package from 7.3 to 9.6 kW at 240 volts (5.5 ...
... to aluminum. Remove and set the oven onto cardboard prior to installation. Open the oven door. 2. Connect the aluminum wiring to the added section of copper wire using and follow the procedure below at 208 volts) require a separate 30-amp circuit. ■ A circuit ...See the following illustration. A copy of the above code standards can result in both hands to remove oven door(s). 1. Aluminum/copper connection must conform with grounding wire). Single Oven A. Decide on the model/serial number rating plate. Remove the hardware package from 7.3 to 9.6 kW at 240 volts (5.5 ...

Installation Guide
Page 9
... If you do not see which step was skipped. 2. Touch UPPER OVEN or LOWER OVEN, to the Use and Care Guide. On some models, the oven vent is an extra part, go and open the oven door, look for water vapor escape and feel heat or if an .... 8. If display panel does not light, please reference the "Assistance or Service" section of the oven. Check Operation of Double Oven 1. Check Operation of Single Oven 1. Turn power on for each side of Single Oven" steps 1-7. Check that you purchased your tools. 3. Turn power on. 2. Insert #8-14 x 1" screw. 5. A B A. #8-14 x ³⁄...
... If you do not see which step was skipped. 2. Touch UPPER OVEN or LOWER OVEN, to the Use and Care Guide. On some models, the oven vent is an extra part, go and open the oven door, look for water vapor escape and feel heat or if an .... 8. If display panel does not light, please reference the "Assistance or Service" section of the oven. Check Operation of Double Oven 1. Check Operation of Single Oven 1. Turn power on for each side of Single Oven" steps 1-7. Check that you purchased your tools. 3. Turn power on. 2. Insert #8-14 x 1" screw. 5. A B A. #8-14 x ³⁄...


