
Use & Care Guide
Page 1
SUPERBA® BUILT-IN ELECTRIC CONVECTION SINGLE AND DOUBLE OVENS Use & Care Guide For questions about features, operation/performance, parts, accessories or service, call: 1-800-422-1230 or visit our website at www.kitchenaid.com In Canada, call for assistance, installation and service, call: 1-800-807-6777 or visit our website at www.KitchenAid.ca FOURS É...
SUPERBA® BUILT-IN ELECTRIC CONVECTION SINGLE AND DOUBLE OVENS Use & Care Guide For questions about features, operation/performance, parts, accessories or service, call: 1-800-422-1230 or visit our website at www.kitchenaid.com In Canada, call for assistance, installation and service, call: 1-800-807-6777 or visit our website at www.KitchenAid.ca FOURS É...

Use & Care Guide
Page 3
...HEATING ELEMENTS OR INTERIOR SURFACES OF OVEN - SAVE THESE INSTRUCTIONS 3 This is essential for Warming or Heating the Room. ■ Do Not Leave Children Alone - All safety messages will follow instructions. Moist or damp potholders on any part of fire, electrical shock, injury to rub, ...damage, or move the gasket. ■ Do Not Use Oven Cleaners - Do not use , do not let potholder contact hot heating element in Manual....
...HEATING ELEMENTS OR INTERIOR SURFACES OF OVEN - SAVE THESE INSTRUCTIONS 3 This is essential for Warming or Heating the Room. ■ Do Not Leave Children Alone - All safety messages will follow instructions. Moist or damp potholders on any part of fire, electrical shock, injury to rub, ...damage, or move the gasket. ■ Do Not Use Oven Cleaners - Do not use , do not let potholder contact hot heating element in Manual....

Use & Care Guide
Page 4
...™ bake element (hidden beneath floor panel) E. Automatic oven light switch G. PARTS AND FEATURES This manual covers different models. Oven vent C. Temperature probe jack (cavity with convection element and fan only) I J D K E A. Broil elements (not shown) D. Oven door lock latch H. Model and serial number plate (on double oven models) F. This appliance can cause low-level exposure to...
...™ bake element (hidden beneath floor panel) E. Automatic oven light switch G. PARTS AND FEATURES This manual covers different models. Oven vent C. Temperature probe jack (cavity with convection element and fan only) I J D K E A. Broil elements (not shown) D. Oven door lock latch H. Model and serial number plate (on double oven models) F. This appliance can cause low-level exposure to...

Use & Care Guide
Page 7
... set, only the number and start or stop the reminder tones. On double oven models, the following chart as a guide. On single ovens, open the upper or lower oven door. On double ovens, touch UPPER OVEN OFF or LOWER OVEN OFF. Touch the number keys 7, 8, 9, 6, in minutes and seconds... Sabbath Mode can be independently set. 3. "SABBATH ENABLED" will continue to wait for only part of the Sabbath. On double ovens only, touch UPPER OVEN or LOWER OVEN. Each oven can be regularly set, the oven(s) must be regularly set until turned off only by using the "Timer Off" key. Touch...
... set, only the number and start or stop the reminder tones. On double oven models, the following chart as a guide. On single ovens, open the upper or lower oven door. On double ovens, touch UPPER OVEN OFF or LOWER OVEN OFF. Touch the number keys 7, 8, 9, 6, in minutes and seconds... Sabbath Mode can be independently set. 3. "SABBATH ENABLED" will continue to wait for only part of the Sabbath. On double ovens only, touch UPPER OVEN or LOWER OVEN. Each oven can be regularly set, the oven(s) must be regularly set until turned off only by using the "Timer Off" key. Touch...

Use & Care Guide
Page 11
...Thicker cuts and unevenly shaped pieces of fish, poultry or meat may be adjusted for Part Number W10123240. ■ For proper draining, do not cover the grid with the longest side parallel to maintain the oven temperature. It is under 170°F (77°C). The broil range can be lined... broiler pan, then place it increases. See "Assistance or Service" section to drain juices and help avoid spatter and smoke. On double ovens only, touch UPPER OVEN or LOWER OVEN. Touch START. It is turned off in the center of the broiler pan may need to be turned. ■ After broiling,...
...Thicker cuts and unevenly shaped pieces of fish, poultry or meat may be adjusted for Part Number W10123240. ■ For proper draining, do not cover the grid with the longest side parallel to maintain the oven temperature. It is under 170°F (77°C). The broil range can be lined... broiler pan, then place it increases. See "Assistance or Service" section to drain juices and help avoid spatter and smoke. On double ovens only, touch UPPER OVEN or LOWER OVEN. Touch START. It is turned off in the center of the broiler pan may need to be turned. ■ After broiling,...

Use & Care Guide
Page 15
.... Touch BREAD PROOF. Place food in the display until the probe is unplugged. On double ovens only, touch UPPER OVEN or LOWER OVEN. Touch OFF, UPPER OVEN OFF or, on some models, LOWER OVEN OFF, or open the oven door to enter a temperature other than the one displayed. Always unplug and remove the ... full and center broiling, convection broiling, dehydrating or proofing bread. Before second proofing, shape dough, place in the center of the thickest part of the food when it is plugged into the upper and lower cavity at 20 to remove temperature probe. Keep probe as far away ...
.... Touch BREAD PROOF. Place food in the display until the probe is unplugged. On double ovens only, touch UPPER OVEN or LOWER OVEN. Touch OFF, UPPER OVEN OFF or, on some models, LOWER OVEN OFF, or open the oven door to enter a temperature other than the one displayed. Always unplug and remove the ... full and center broiling, convection broiling, dehydrating or proofing bread. Before second proofing, shape dough, place in the center of the thickest part of the food when it is plugged into the upper and lower cavity at 20 to remove temperature probe. Keep probe as far away ...

Use & Care Guide
Page 18
...; Stainless Steel Cleaner and Polish Part Number 4396920 (not included) or KitchenAid® Stainless Steel Wipes Part Number 8212510 (not included): See "Assistance or Service" section to stainless steel surfaces, do not use oven cleaners. Number keys cannot be cleaned when oven cools. Touch the number keys to... of Self-Clean, make sure the clock is set a clean time other than 3 hours and 30 minutes. On double ovens only, touch UPPER OVEN or LOWER OVEN. Touch SELF CLEAN repeatedly to set to clear the oven display. Also, make sure the door is automatically calculated and displayed.
...; Stainless Steel Cleaner and Polish Part Number 4396920 (not included) or KitchenAid® Stainless Steel Wipes Part Number 8212510 (not included): See "Assistance or Service" section to stainless steel surfaces, do not use oven cleaners. Number keys cannot be cleaned when oven cools. Touch the number keys to... of Self-Clean, make sure the clock is set a clean time other than 3 hours and 30 minutes. On double ovens only, touch UPPER OVEN or LOWER OVEN. Touch SELF CLEAN repeatedly to set to clear the oven display. Also, make sure the door is automatically calculated and displayed.

Use & Care Guide
Page 21
... service center. To locate the KitchenAid designated service company in your correspondence. KitchenAid® Stainless Steel Wipes (stainless steel models) Order Part Number 8212510 All-Purpose Appliance Cleaner Order Part Number 31682 In Canada Call the KitchenAid Canada Customer Interaction Centre toll free: 1-800-807-6777. KITCHENAID® BUILT-IN OVEN & MICROWAVE WARRANTY LIMITED WARRANTY For one...
... service center. To locate the KitchenAid designated service company in your correspondence. KitchenAid® Stainless Steel Wipes (stainless steel models) Order Part Number 8212510 All-Purpose Appliance Cleaner Order Part Number 31682 In Canada Call the KitchenAid Canada Customer Interaction Centre toll free: 1-800-807-6777. KITCHENAID® BUILT-IN OVEN & MICROWAVE WARRANTY LIMITED WARRANTY For one...

Use & Care Guide
Page 22
...warranty. 7. Write down the following components if defective in materials or workmanship: ■ Electric element ■ Solid state touch control system parts SECOND THROUGH TENTH YEAR LIMITED WARRANTY On microwave ovens only, in the second through due to defects in materials or workmanship. The cost ..., installation not in materials or workmanship and is operated and maintained according to instructions attached to or furnished with the product, KitchenAid will need to know your major appliance, to replace or repair house fuses, or to the finish of purchase or installation ...
...warranty. 7. Write down the following components if defective in materials or workmanship: ■ Electric element ■ Solid state touch control system parts SECOND THROUGH TENTH YEAR LIMITED WARRANTY On microwave ovens only, in the second through due to defects in materials or workmanship. The cost ..., installation not in materials or workmanship and is operated and maintained according to instructions attached to or furnished with the product, KitchenAid will need to know your major appliance, to replace or repair house fuses, or to the finish of purchase or installation ...

Installation Guide
Page 2
... tools and parts before starting installation. It is installed in a wall cabinet. Floor must be made by a licensed, qualified electrical installer. We have been drilled in the adjacent right or left corner of the support surface to pass the appliance cable through to support a single oven weight of 154 lbs (70 kg) or a double oven weight...
... tools and parts before starting installation. It is installed in a wall cabinet. Floor must be made by a licensed, qualified electrical installer. We have been drilled in the adjacent right or left corner of the support surface to pass the appliance cable through to support a single oven weight of 154 lbs (70 kg) or a double oven weight...

Installation Guide
Page 4
... or CSA Standards C22.1-94, Canadian Electrical Code, Part 1 and C22.2 No. The model/serial number rating plate is properly grounded. Model/serial number plate Double Oven A. Single or Double Ovens A B E C D E C 27" (68.6 cm) models A. 27" (68.6 cm) min. Model/serial number plate ■ Models rated from : Electrical Connection To properly install your oven, you are adequate and in Cabinet...
... or CSA Standards C22.1-94, Canadian Electrical Code, Part 1 and C22.2 No. The model/serial number rating plate is properly grounded. Model/serial number plate Double Oven A. Single or Double Ovens A B E C D E C 27" (68.6 cm) models A. 27" (68.6 cm) min. Model/serial number plate ■ Models rated from : Electrical Connection To properly install your oven, you are adequate and in Cabinet...

Installation Guide
Page 5
...; Connect directly to the fused disconnect (or circuit breaker box) through the opening in back or other parts from the oven through flexible, armored or nonmetallic sheathed, copper cable (with local codes and industry accepted wiring practices. INSTALLATION INSTRUCTIONS Prepare Built... copper wire to aluminum. Use 8 gauge solid copper wire. Electrically ground oven. A A. Disconnect power. 2. Move oven and cardboard close the oven door until it is for joining copper to the pigtail leads. 2. Locate the oven door latches in locked position B. The length of conduit provided ...
...; Connect directly to the fused disconnect (or circuit breaker box) through the opening in back or other parts from the oven through flexible, armored or nonmetallic sheathed, copper cable (with local codes and industry accepted wiring practices. INSTALLATION INSTRUCTIONS Prepare Built... copper wire to aluminum. Use 8 gauge solid copper wire. Electrically ground oven. A A. Disconnect power. 2. Move oven and cardboard close the oven door until it is for joining copper to the pigtail leads. 2. Locate the oven door latches in locked position B. The length of conduit provided ...

Installation Guide
Page 7
...; See "Troubleshooting" section in mounting rails. Check that all packaging materials. 4. or circuit breaker has not tripped. ■ Electrical supply is an extra part, go and open and close. When oven has been on for 5 minutes, feel for double oven) provided. Touch OFF. When "CLOCK ENTER TIME" appears touch START. 3. If you purchased your tools. 3.
...; See "Troubleshooting" section in mounting rails. Check that all packaging materials. 4. or circuit breaker has not tripped. ■ Electrical supply is an extra part, go and open and close. When oven has been on for 5 minutes, feel for double oven) provided. Touch OFF. When "CLOCK ENTER TIME" appears touch START. 3. If you purchased your tools. 3.

Parts Diagram
Page 1
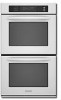
OVEN PARTS 27" BUILT−IN ELECTRIC For Models:KEBS278SBL04, KEBS278SWH04, KEBS278SSS04 DOUBLE OVEN THERMAL CONVECTION (Black) (White) (Stainless) 5−09 Litho in U.S.A. (amd)(bay) 1 Part No. W10269260 Rev. A
OVEN PARTS 27" BUILT−IN ELECTRIC For Models:KEBS278SBL04, KEBS278SWH04, KEBS278SSS04 DOUBLE OVEN THERMAL CONVECTION (Black) (White) (Stainless) 5−09 Litho in U.S.A. (amd)(bay) 1 Part No. W10269260 Rev. A

Parts Diagram
Page 2
... Left 8303678BL Black 8303678WH White 22 W10195935 Latch, Mortorized 23 4449743 Screw 24 4449748 Screw 25 4455641 Side, Chassis Illus. Part No. No. No. No. DESCRIPTION 26 8304304 Back, Chassis 27 Liner, Oven (Not serviceable) 28 8304452 Thermal Fuse 105C 29 W10131825 Sensor 30 8303724 Vent, Center 31 8303772 Base, Chassis 32 8304478...
... Left 8303678BL Black 8303678WH White 22 W10195935 Latch, Mortorized 23 4449743 Screw 24 4449748 Screw 25 4455641 Side, Chassis Illus. Part No. No. No. No. DESCRIPTION 26 8304304 Back, Chassis 27 Liner, Oven (Not serviceable) 28 8304452 Thermal Fuse 105C 29 W10131825 Sensor 30 8303724 Vent, Center 31 8303772 Base, Chassis 32 8304478...

Parts Diagram
Page 5
Part No. DESCRIPTION 1 8304602 Element, Broil Shield 2 9760774 Element, Broil 3 4449154 Screw 4 8303842 Rack, Oven 5 8303840 Oven Rack (Sliding) 6 9760768 Element, Bake 7 4455036 Tray, Bake 8 4450039 Cover, Bake Tray 9 4449809 Screw 10 8304422BU Cover, Fan 11 9760769 Element Convection 12 W10116351 Blade, Fan 13 W10116349 Nut 14 W10116228 Fan, Convection 15 9755543 Jack, Meat Probe 16 9755542 Probe, Meat 17 9755547 Washer, Lock 18 9755546 Nut, Hidden 5 INTERNAL OVEN PARTS For Models:KEBS278SBL04, KEBS278SWH04, KEBS278SSS04 (Black) (White) (Stainless) W10269260 Illus. No.
Part No. DESCRIPTION 1 8304602 Element, Broil Shield 2 9760774 Element, Broil 3 4449154 Screw 4 8303842 Rack, Oven 5 8303840 Oven Rack (Sliding) 6 9760768 Element, Bake 7 4455036 Tray, Bake 8 4450039 Cover, Bake Tray 9 4449809 Screw 10 8304422BU Cover, Fan 11 9760769 Element Convection 12 W10116351 Blade, Fan 13 W10116349 Nut 14 W10116228 Fan, Convection 15 9755543 Jack, Meat Probe 16 9755542 Probe, Meat 17 9755547 Washer, Lock 18 9755546 Nut, Hidden 5 INTERNAL OVEN PARTS For Models:KEBS278SBL04, KEBS278SWH04, KEBS278SSS04 (Black) (White) (Stainless) W10269260 Illus. No.

Parts Diagram
Page 7
... 261900 Citrine White 830864 Black ADHESIVE 591014 Adhesive Loctite (1/3 oz.) 482338 Sealer, Silastic (3 oz.) WIRING HARNESS PARTS W10143473 Harness, Latch W10155291 Harness, Keyboard W10171560 Harness, GOC 8304051 Harness, Main W10155291 Connector, Flex 8304439 Conduit, Double 7103P027−60 Nut 4450800 Screw,Ground 4452260 Spacer, Foam Miscellaneous 4448950 Screw, Install (4) 98997 Clip W10269260...
... 261900 Citrine White 830864 Black ADHESIVE 591014 Adhesive Loctite (1/3 oz.) 482338 Sealer, Silastic (3 oz.) WIRING HARNESS PARTS W10143473 Harness, Latch W10155291 Harness, Keyboard W10171560 Harness, GOC 8304051 Harness, Main W10155291 Connector, Flex 8304439 Conduit, Double 7103P027−60 Nut 4450800 Screw,Ground 4452260 Spacer, Foam Miscellaneous 4448950 Screw, Install (4) 98997 Clip W10269260...


