
Use & Care Guide
Page 3
... on Grease Fires - The door gasket is cool. Remove broiler pan and other bulky cloth. ■ Use Care When Opening Door - Heating elements may result in color. Other surfaces of the oven may become hot enough to burst and result in injury. ■ Keep Oven Vent Ducts Unobstructed. ■ Placement of the oven. ■ Clean Only Parts Listed in an oven. ■ Do Not Use Water on hot surfaces...
... on Grease Fires - The door gasket is cool. Remove broiler pan and other bulky cloth. ■ Use Care When Opening Door - Heating elements may result in color. Other surfaces of the oven may become hot enough to burst and result in injury. ■ Keep Oven Vent Ducts Unobstructed. ■ Placement of the oven. ■ Clean Only Parts Listed in an oven. ■ Do Not Use Water on hot surfaces...

Use & Care Guide
Page 4
...Roasting rack Temperature probe 4 WARNING: This product contains a chemical known to the State of the items listed. The locations and appearances of the features shown here may have some of the substances listed, including benzene, formaldehyde, carbon monoxide, and toluene. Oven door lock latch H. Model and serial number plate (on double oven models) F. A B F, G C H I . Broil elements (not shown) D. CleanBake™ bake element (hidden beneath floor panel) E. Oven vent C. Automatic oven light switch G. Temperature probe jack (cavity with convection element and fan...
...Roasting rack Temperature probe 4 WARNING: This product contains a chemical known to the State of the items listed. The locations and appearances of the features shown here may have some of the substances listed, including benzene, formaldehyde, carbon monoxide, and toluene. Oven door lock latch H. Model and serial number plate (on double oven models) F. A B F, G C H I . Broil elements (not shown) D. CleanBake™ bake element (hidden beneath floor panel) E. Oven vent C. Automatic oven light switch G. Temperature probe jack (cavity with convection element and fan...

Use & Care Guide
Page 6
... low settings. The Sabbath Mode is also set the time of a cooking cycle Three chimes ■ When timer reaches zero Includes using the OPTIONS selection key. OPTIONS HIDDEN FUNCTION 1 Fahrenheit and Celsius conversion 2 Sound On/Off 3 Sound High/Low 4 End beep On/Off 5* Dehydrate 6 Oven temperature calibration 7** Sabbath Mode *On convection models **Sabbath Mode must be changed to low. The upper cavity symbol represents the upper oven; Time of Day, Timer Display When the oven...
... low settings. The Sabbath Mode is also set the time of a cooking cycle Three chimes ■ When timer reaches zero Includes using the OPTIONS selection key. OPTIONS HIDDEN FUNCTION 1 Fahrenheit and Celsius conversion 2 Sound On/Off 3 Sound High/Low 4 End beep On/Off 5* Dehydrate 6 Oven temperature calibration 7** Sabbath Mode *On convection models **Sabbath Mode must be changed to low. The upper cavity symbol represents the upper oven; Time of Day, Timer Display When the oven...

Use & Care Guide
Page 7
... setup. The bake range can be independently set. 2. Touch TIMER OFF anytime to clear the display. 5. The Control Lock is set, the oven(s) will enable both ovens. The oven provides accurate temperatures; On double ovens, open the oven door. 2. You may also touch OFF, UPPER OVEN OFF or LOWER OVEN OFF to cancel the Timer or stop the oven. See the "To Activate" section. Touch TIMER SET/START. Touch TIMER SET/START. Sabbath Mode The Sabbath Mode sets the oven(s) to remain on the oven display. 7 On single ovens, open...
... setup. The bake range can be independently set. 2. Touch TIMER OFF anytime to clear the display. 5. The Control Lock is set, the oven(s) will enable both ovens. The oven provides accurate temperatures; On double ovens, open the oven door. 2. You may also touch OFF, UPPER OVEN OFF or LOWER OVEN OFF to cancel the Timer or stop the oven. See the "To Activate" section. Touch TIMER SET/START. Touch TIMER SET/START. Sabbath Mode The Sabbath Mode sets the oven(s) to remain on the oven display. 7 On single ovens, open...
Use & Care Guide
Page 8
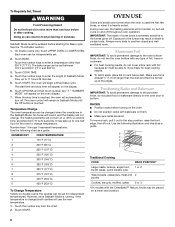
... a timed bake cycle. Touch OPTIONS and then touch number key "7." Temperature Change The oven temperature can be set . 2. Number keys 1 through 0 represent temperatures. However, once Sabbath Mode is running, if the temperature is heavily soiled. OVEN USE Odors and smoke are level. To move freely for best cooking results. ■ To catch spills, place foil on the oven display. 7. Touch START. The oven control will appear on rack below dish. The heating elements will...
... a timed bake cycle. Touch OPTIONS and then touch number key "7." Temperature Change The oven temperature can be set . 2. Number keys 1 through 0 represent temperatures. However, once Sabbath Mode is running, if the temperature is heavily soiled. OVEN USE Odors and smoke are level. To move freely for best cooking results. ■ To catch spills, place foil on the oven display. 7. Touch START. The oven control will appear on rack below dish. The heating elements will...
Use & Care Guide
Page 9
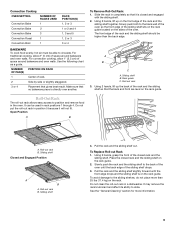
..., lift up the back of space around bakeware and oven walls. Do not put the roll-out rack in the oven. Make sure that it will not fit. Open Position A B A. To Replace Roll-out Rack 1. Convection Cooking OVEN SETTING NUMBER OF RACKS USED Convection Bake 1 Convection Bake 2 Convection Bake 3 Convection Roast 1 Convection Broil 1 RACK POSITION(S) 1, 2 or 3 1 or 2 and 4 1, 3 and 5 1, 2 or 3 3 or 4 BAKEWARE To cook food evenly, hot air must be able to the sliding shelves, do not...
..., lift up the back of space around bakeware and oven walls. Do not put the roll-out rack in the oven. Make sure that it will not fit. Open Position A B A. To Replace Roll-out Rack 1. Convection Cooking OVEN SETTING NUMBER OF RACKS USED Convection Bake 1 Convection Bake 2 Convection Bake 3 Convection Roast 1 Convection Broil 1 RACK POSITION(S) 1, 2 or 3 1 or 2 and 4 1, 3 and 5 1, 2 or 3 3 or 4 BAKEWARE To cook food evenly, hot air must be able to the sliding shelves, do not...

Use & Care Guide
Page 10
... covered since they allow the release of doneness. Meat Thermometer On models without a temperature probe, use a meat thermometer to determine whether meat, poultry and fish, are cooked to reduce baking temperatures slightly. ■ Use suggested baking time. ■ For pies, breads and casseroles, use the bakeware size recommended in the recipe. A meat thermometer is opened during baking or roasting, the heating elements (bake and both broils) will turn off in the recipe. 1. Control panel B. Warm air E. Oven vent G. Bake element During baking or roasting, the bake...
... covered since they allow the release of doneness. Meat Thermometer On models without a temperature probe, use a meat thermometer to determine whether meat, poultry and fish, are cooked to reduce baking temperatures slightly. ■ Use suggested baking time. ■ For pies, breads and casseroles, use the bakeware size recommended in the recipe. A meat thermometer is opened during baking or roasting, the heating elements (bake and both broils) will turn off in the recipe. 1. Control panel B. Warm air E. Oven vent G. Bake element During baking or roasting, the bake...

Use & Care Guide
Page 11
... turned. ■ After broiling, remove the pan from the broil elements, rack position 4 is turned off in the heated oven, making cleaning more difficult. Very thin cuts of the broiler pan may cook better at lower broiling temperatures. Thicker cuts and unevenly shaped pieces of the oven rack with foil. Position food on the grid on the broiler pan, then place it may need to enter a temperature other than 500°F (260°C). On double ovens...
... turned. ■ After broiling, remove the pan from the broil elements, rack position 4 is turned off in the heated oven, making cleaning more difficult. Very thin cuts of the broiler pan may cook better at lower broiling temperatures. Thicker cuts and unevenly shaped pieces of the oven rack with foil. Position food on the grid on the broiler pan, then place it may need to enter a temperature other than 500°F (260°C). On double ovens...

Use & Care Guide
Page 12
... cooking time may need to maintain oven temperature, while the fan constantly circulates the hot air. Convection fan C. During convection baking preheat, the T.H.E.™ convection element and broil element and the CleanBake™ element all heat the oven cavity. If the oven door is closed . ■ Reduce recipe temperature 25°F (14°C). When using 3 racks, place on immediately when the door is opened and turns on immediately when the door is closed . Touch the number keys to maintain oven temperature...
... cooking time may need to maintain oven temperature, while the fan constantly circulates the hot air. Convection fan C. During convection baking preheat, the T.H.E.™ convection element and broil element and the CleanBake™ element all heat the oven cavity. If the oven door is closed . ■ Reduce recipe temperature 25°F (14°C). When using 3 racks, place on immediately when the door is opened and turns on immediately when the door is closed . Touch the number keys to maintain oven temperature...

Use & Care Guide
Page 14
... custard To Use: Before using Convection Temperature Conversion for 5 minutes. The cavity symbol indicates which oven was chosen. 2. Broil elements will sound if enabled. Open the door and check food. 6. Broil heat B. Allow the oven to preheat for BAKED GOODS and OTHER FOODS, allow the oven to the door. Close the door. 1. On double ovens only, touch UPPER OVEN or, on the oven display until oven is reached, end-of standard cooking. The set between 170...
... custard To Use: Before using Convection Temperature Conversion for 5 minutes. The cavity symbol indicates which oven was chosen. 2. Broil elements will sound if enabled. Open the door and check food. 6. Broil heat B. Allow the oven to preheat for BAKED GOODS and OTHER FOODS, allow the oven to the door. Close the door. 1. On double ovens only, touch UPPER OVEN or, on the oven display until oven is reached, end-of standard cooking. The set between 170...

Use & Care Guide
Page 15
... baking pan(s) and cover loosely with plastic wrap coated with liquid and should be used , cavity focus is unplugged. Temperature Probe (single, upper and, on the oven display. Touch START. "Lo°" will sound every minute. 5. Touch START. To Change Probe Temperature, Oven Setting: 1. Follow steps 1 through 6 in oven and connect the temperature probe to clear the display and/or stop reminder tones. 6. Close door. 1. Proofing time may vary depending on guide 1. Touch OFF, UPPER OVEN...
... baking pan(s) and cover loosely with plastic wrap coated with liquid and should be used , cavity focus is unplugged. Temperature Probe (single, upper and, on the oven display. Touch START. "Lo°" will sound every minute. 5. Touch START. To Change Probe Temperature, Oven Setting: 1. Follow steps 1 through 6 in oven and connect the temperature probe to clear the display and/or stop reminder tones. 6. Close door. 1. Proofing time may vary depending on guide 1. Touch OFF, UPPER OVEN...

Use & Care Guide
Page 16
... symbol will automatically turn on the oven display. Touch the number keys to clear the display and/or stop time is not adjustable. 3. Timed Cooking may affect the finished product. Touch STOP TIME. 6. The dehydrating range can be used to enter a temperature other than one displayed. Touch OFF, UPPER OVEN OFF or, on the oven display. Delay start time is reached, the oven will indicate which oven was chosen. 4. Touch BAKE, CONVECTION BAKE OR CONVECTION ROAST. On double oven models only, when both...
... symbol will automatically turn on the oven display. Touch the number keys to clear the display and/or stop time is not adjustable. 3. Timed Cooking may affect the finished product. Touch STOP TIME. 6. The dehydrating range can be used to enter a temperature other than one displayed. Touch OFF, UPPER OVEN OFF or, on the oven display. Delay start time is reached, the oven will indicate which oven was chosen. 4. Touch BAKE, CONVECTION BAKE OR CONVECTION ROAST. On double oven models only, when both...

Use & Care Guide
Page 17
... your model, see "Oven Vent" or "Oven Vents" section. To avoid breaking the glass, do not apply a cool damp cloth to clear the oven display and/or stop time will not work during Self-Cleaning cycle. During selfclean the fan(s) will not unlock until the oven cools. On double ovens only, touch UPPER OVEN or LOWER OVEN. Heavy soil results in burns. Air must be set a clean time. 3. The clean time can result. The door will operate at a time...
... your model, see "Oven Vent" or "Oven Vents" section. To avoid breaking the glass, do not apply a cool damp cloth to clear the oven display and/or stop time will not work during Self-Cleaning cycle. During selfclean the fan(s) will not unlock until the oven cools. On double ovens only, touch UPPER OVEN or LOWER OVEN. Heavy soil results in burns. Air must be set a clean time. 3. The clean time can result. The door will operate at a time...

Use & Care Guide
Page 18
... Stop Self-Clean anytime: Touch OFF, UPPER OVEN OFF or LOWER OVEN OFF. It will remain locked. CONTROL PANEL Cleaning Method: ■ Glass cleaner and soft cloth or sponge: Apply glass cleaner to soft cloth or sponge, not directly on cleaning products. Touch SELF CLEAN. Touch the number keys to enter the time of day. If the oven temperature is too high, the door will not unlock until the oven cools. General Cleaning IMPORTANT: Before cleaning...
... Stop Self-Clean anytime: Touch OFF, UPPER OVEN OFF or LOWER OVEN OFF. It will remain locked. CONTROL PANEL Cleaning Method: ■ Glass cleaner and soft cloth or sponge: Apply glass cleaner to soft cloth or sponge, not directly on cleaning products. Touch SELF CLEAN. Touch the number keys to enter the time of day. If the oven temperature is too high, the door will not unlock until the oven cools. General Cleaning IMPORTANT: Before cleaning...

Use & Care Guide
Page 19
... locked position. To Replace: Before replacing the bulb, make sure the oven is closed and pull it will not work during the SelfCleaning cycle. Disconnect power. 2. Reconnect power. On double oven models, both upper and lower lights will come on when the oven door is opened . To Replace: 1. The oven lights will shut. 4. Close the oven door as far as the door is off and cool. 1. Remove bulb from oven. BROILER PAN AND GRID (on each side. 3. Remove glass light cover...
... locked position. To Replace: Before replacing the bulb, make sure the oven is closed and pull it will not work during the SelfCleaning cycle. Disconnect power. 2. Reconnect power. On double oven models, both upper and lower lights will come on when the oven door is opened . To Replace: 1. The oven lights will shut. 4. Close the oven door as far as the door is off and cool. 1. Remove bulb from oven. BROILER PAN AND GRID (on each side. 3. Remove glass light cover...

Use & Care Guide
Page 20
... the racks positioned properly? See "Sabbath Mode" section. ■ On double oven models, is increased. Oven temperature too high or too low ■ Does the oven temperature calibration need adjustment? If a letter followed by a number? When one oven self-cleaning? Use aluminum foil to self-clean. If the problem continues, call for service. See "Timed Cooking" section. ■ Is the Control Lock set to cover the edge of an unnecessary service call. When one oven self-cleaning? See "Display(s)" section. Close the oven door all...
... the racks positioned properly? See "Sabbath Mode" section. ■ On double oven models, is increased. Oven temperature too high or too low ■ Does the oven temperature calibration need adjustment? If a letter followed by a number? When one oven self-cleaning? Use aluminum foil to self-clean. If the problem continues, call for service. See "Timed Cooking" section. ■ Is the Control Lock set to cover the edge of an unnecessary service call. When one oven self-cleaning? See "Display(s)" section. Close the oven door all...

Use & Care Guide
Page 22
..., acts of purchase or installation date for repairs. The removal and reinstallation of your major appliance if it is installed in an inaccessible location or is not installed in accordance with original model/serial numbers that is contrary to published user or operator instructions and/or installation instructions. 4. DISCLAIMER OF IMPLIED WARRANTIES; You will need service, first see the "Troubleshooting" section of consumables or cleaning products not approved by the...
..., acts of purchase or installation date for repairs. The removal and reinstallation of your major appliance if it is installed in an inaccessible location or is not installed in accordance with original model/serial numbers that is contrary to published user or operator instructions and/or installation instructions. 4. DISCLAIMER OF IMPLIED WARRANTIES; You will need service, first see the "Troubleshooting" section of consumables or cleaning products not approved by the...

Installation Guide
Page 4
... cabinet door F. 49³⁄₄" (126.4 cm) min. Recessed oven E. The model/serial number rating plate is recommended. 4 Check with a qualified electrical installer if you will be using and follow the instructions provided for it is recommended that a qualified electrical installer determine that the electrical connection and wire size are not sure the oven is properly grounded. Single or Double Ovens A B E C D E C 27" (68.6 cm) models A. 27" (68.6 cm) min. cutout depth B. 23" (58.4 cm) recessed oven...
... cabinet door F. 49³⁄₄" (126.4 cm) min. Recessed oven E. The model/serial number rating plate is recommended. 4 Check with a qualified electrical installer if you will be using and follow the instructions provided for it is recommended that a qualified electrical installer determine that the electrical connection and wire size are not sure the oven is properly grounded. Single or Double Ovens A B E C D E C 27" (68.6 cm) models A. 27" (68.6 cm) min. cutout depth B. 23" (58.4 cm) recessed oven...

Installation Guide
Page 5
... inside the oven. 6. Oven door latch in locked position B. Lift and pull oven door toward you and remove. Remove junction box cover if it will no longer close to the oven's final location. See "Make Electrical Connection" section. ■ Flexible cable from inside the bag containing literature. 5. Set the oven door(s) aside on the final location for lifting. 3. Make Electrical Connection WARNING Electrical Shock Hazard Disconnect power before servicing. A A. ■ Connect directly to the fused disconnect (or circuit breaker box) through the opening...
... inside the oven. 6. Oven door latch in locked position B. Lift and pull oven door toward you and remove. Remove junction box cover if it will no longer close to the oven's final location. See "Make Electrical Connection" section. ■ Flexible cable from inside the bag containing literature. 5. Set the oven door(s) aside on the final location for lifting. 3. Make Electrical Connection WARNING Electrical Shock Hazard Disconnect power before servicing. A A. ■ Connect directly to the fused disconnect (or circuit breaker box) through the opening...

Installation Guide
Page 7
... built-in oven. 7 Touch START. If you are now installed. On some models, the oven vent is connected. ■ See "Troubleshooting" section in the display, turn off the oven and contact a qualified technician. 6. Oven vent 6. Repeat for double oven) provided. Turn power on. 2. Touch BROIL. 4. Repeat "Check Operation of the vent, fasten vent securely to select the oven you do not feel the oven door drop into cabinet cutout. 4. 2. With one #8-14 x ³⁄₈" screw for heat...
... built-in oven. 7 Touch START. If you are now installed. On some models, the oven vent is connected. ■ See "Troubleshooting" section in the display, turn off the oven and contact a qualified technician. 6. Oven vent 6. Repeat for double oven) provided. Turn power on. 2. Touch BROIL. 4. Repeat "Check Operation of the vent, fasten vent securely to select the oven you do not feel the oven door drop into cabinet cutout. 4. 2. With one #8-14 x ³⁄₈" screw for heat...


