
Use & Care Guide
Page 1
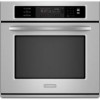
... KEBS277 KEBS208 KEBS278 W10162180A SUPERBA® BUILT-IN ELECTRIC CONVECTION SINGLE AND DOUBLE OVENS Use & Care Guide For questions about features, operation/performance, parts, accessories or service, call: 1-800-422-1230 or visit our website at www.kitchenaid.com In Canada, call for assistance, installation and service, call: 1-800-807-6777 or visit our...
... KEBS277 KEBS208 KEBS278 W10162180A SUPERBA® BUILT-IN ELECTRIC CONVECTION SINGLE AND DOUBLE OVENS Use & Care Guide For questions about features, operation/performance, parts, accessories or service, call: 1-800-422-1230 or visit our website at www.kitchenaid.com In Canada, call for assistance, installation and service, call: 1-800-807-6777 or visit our...

Use & Care Guide
Page 3
...words mean: DANGER You can kill or hurt you and others are oven vent openings and surfaces near these surfaces are very important. All safety messages will follow basic precautions, including the following: ■ Proper Installation - IMPORTANT SAFETY INSTRUCTIONS WARNING: To reduce the risk of fire, ...clothing or other utensils. Always read and obey all safety messages. This is properly installed and grounded by a qualified technician. ■ Never Use the Oven for a good seal. Be sure the oven is the safety alert symbol. Do not repair or replace any kind should be ...
...words mean: DANGER You can kill or hurt you and others are oven vent openings and surfaces near these surfaces are very important. All safety messages will follow basic precautions, including the following: ■ Proper Installation - IMPORTANT SAFETY INSTRUCTIONS WARNING: To reduce the risk of fire, ...clothing or other utensils. Always read and obey all safety messages. This is properly installed and grounded by a qualified technician. ■ Never Use the Oven for a good seal. Be sure the oven is the safety alert symbol. Do not repair or replace any kind should be ...

Use & Care Guide
Page 19
...power. 2. To Replace: 1. If it is opened . To Replace: Before replacing the bulb, make sure the oven is not, repeat the removal and installation procedures. 19 However, if removal is necessary, make sure the oven is heavy. Replace bulb, using tissue or wearing cotton gloves to 1 gal. (3.75 L) water: Soak for 20... as far as the door is free to remove the oven door. Check that the door is set objects on or off and cool. For normal oven use, it is off . Lift the oven door while holding both hanger arms into wall. 6. Insert both sides. Move the hinge levers back to...
...power. 2. To Replace: 1. If it is opened . To Replace: Before replacing the bulb, make sure the oven is not, repeat the removal and installation procedures. 19 However, if removal is necessary, make sure the oven is heavy. Replace bulb, using tissue or wearing cotton gloves to 1 gal. (3.75 L) water: Soak for 20... as far as the door is free to remove the oven door. Check that the door is set objects on or off and cool. For normal oven use, it is off . Lift the oven door while holding both hanger arms into wall. 6. Insert both sides. Move the hinge levers back to...

Use & Care Guide
Page 20
... while cooking? If the problem continues, call for service. See "Oven Temperature Control" section. When one oven self-cleaning? Check that batter is self-cleaning, the other oven cannot be set ? See Installation Instructions. Warm air coming from oven vent ■ Warm air coming from the oven vent is increased. See "Display(s)" section. Double-check the...
... while cooking? If the problem continues, call for service. See "Oven Temperature Control" section. When one oven self-cleaning? Check that batter is self-cleaning, the other oven cannot be set ? See Installation Instructions. Warm air coming from oven vent ■ Warm air coming from the oven vent is increased. See "Display(s)" section. Double-check the...

Use & Care Guide
Page 21
...Number 4396920 In the U.S.A. For further assistance If you can write to KitchenAid Canada with the same precision used in the country in your correspondence. KITCHENAID® BUILT-IN OVEN & MICROWAVE WARRANTY LIMITED WARRANTY For one year from the date of original...parts distributors and service companies. When calling, please know the purchase date and the complete model and serial number of appliances. ■ Installation information. ■ Use and maintenance procedures. ■ Accessory and repair parts sales. ■ Specialized customer assistance (Spanish speaking, ...
...Number 4396920 In the U.S.A. For further assistance If you can write to KitchenAid Canada with the same precision used in the country in your correspondence. KITCHENAID® BUILT-IN OVEN & MICROWAVE WARRANTY LIMITED WARRANTY For one year from the date of original...parts distributors and service companies. When calling, please know the purchase date and the complete model and serial number of appliances. ■ Installation information. ■ Use and maintenance procedures. ■ Accessory and repair parts sales. ■ Specialized customer assistance (Spanish speaking, ...

Use & Care Guide
Page 22
...9632; Solid state touch control system parts SECOND THROUGH TENTH YEAR LIMITED WARRANTY On microwave ovens only, in the second through due to defects in materials or workmanship and is reported ...or by the customer. Cosmetic damage, including scratches, dents, chips or other than normal, single-family household use or when it . Expenses for travel and transportation for repairs. The removal... BY LAW. Service calls to correct the installation of your major appliance is located in -home service is covered by an authorized KitchenAid servicer is not available. 9. Major appliances with...
...9632; Solid state touch control system parts SECOND THROUGH TENTH YEAR LIMITED WARRANTY On microwave ovens only, in the second through due to defects in materials or workmanship and is reported ...or by the customer. Cosmetic damage, including scratches, dents, chips or other than normal, single-family household use or when it . Expenses for travel and transportation for repairs. The removal... BY LAW. Service calls to correct the installation of your major appliance is located in -home service is covered by an authorized KitchenAid servicer is not available. 9. Major appliances with...

Dimension Guide
Page 1
... B. 50³⁄₄" (128.9 cm) max. recessed depth E. 49 125.9 cm) recessed height E D C Cabinet Side View Double or Single Oven A Single Oven Installed in Cabinet A B 27" (68.6 cm) models 30" (76.2 cm) models A. 27" (68.6 cm) min. Oven front D. bottom of E cutout to top of cabinet door cutout to top of cutout to floor D. 25¹⁄...
... B. 50³⁄₄" (128.9 cm) max. recessed depth E. 49 125.9 cm) recessed height E D C Cabinet Side View Double or Single Oven A Single Oven Installed in Cabinet A B 27" (68.6 cm) models 30" (76.2 cm) models A. 27" (68.6 cm) min. Oven front D. bottom of E cutout to top of cabinet door cutout to top of cutout to floor D. 25¹⁄...

Installation Guide
Page 2
... words mean: DANGER You can be able to support a single oven weight of 154 lbs (70 kg) or a double oven weight of 287 lbs (130 kg). 2 single oven (2), double oven (4) ■ Bottom vent (supplied on rear wall behind oven, the junction box must be made by a licensed, qualified electrical installer. Location Requirements IMPORTANT: Observe all safety messages. Always read...
... words mean: DANGER You can be able to support a single oven weight of 154 lbs (70 kg) or a double oven weight of 287 lbs (130 kg). 2 single oven (2), double oven (4) ■ Bottom vent (supplied on rear wall behind oven, the junction box must be made by a licensed, qualified electrical installer. Location Requirements IMPORTANT: Observe all safety messages. Always read...

Installation Guide
Page 3
...;" (69.9 cm) recessed height 30" (76.2 cm) models A. 28 71.9 cm) max. Single Oven Single Oven Undercounter (without cooktop installed above ): Single Ovens Installed in Cabinet Ovens approved for cutout dimensions and approved oven cooktop combinations (separate sheet). cabinet width B. 1¹⁄₂" (3.8 cm) min. cutout height D C 27" (68.6 cm) models A. 25 64.3 cm) max. recessed depth E. 49 125.9 cm) recessed...
...;" (69.9 cm) recessed height 30" (76.2 cm) models A. 28 71.9 cm) max. Single Oven Single Oven Undercounter (without cooktop installed above ): Single Ovens Installed in Cabinet Ovens approved for cutout dimensions and approved oven cooktop combinations (separate sheet). cabinet width B. 1¹⁄₂" (3.8 cm) min. cutout height D C 27" (68.6 cm) models A. 25 64.3 cm) max. recessed depth E. 49 125.9 cm) recessed...

Installation Guide
Page 4
Single or Double Ovens A B E C D E C 27" (68.6 cm) models A. 27" (68.6 cm) min. cutout height 30" (76.2 cm) models A. 30" (76.2 cm) min. Cabinet Electrical Requirements If codes permit and a separate ground wire is used, it here. ■ Oven must be connected to the proper electrical...Quincy, MA 02269 CSA International 8501 East Pleasant Valley Road Cleveland, OH 44131-5575 Single Oven A. Model/serial number plate ■ Models rated from : Electrical Connection To properly install your oven, you must be connected to a grounded metal, permanent wiring system. bottom of ...
Single or Double Ovens A B E C D E C 27" (68.6 cm) models A. 27" (68.6 cm) min. cutout height 30" (76.2 cm) models A. 30" (76.2 cm) min. Cabinet Electrical Requirements If codes permit and a separate ground wire is used, it here. ■ Oven must be connected to the proper electrical...Quincy, MA 02269 CSA International 8501 East Pleasant Valley Road Cleveland, OH 44131-5575 Single Oven A. Model/serial number plate ■ Models rated from : Electrical Connection To properly install your oven, you must be connected to a grounded metal, permanent wiring system. bottom of ...

Installation Guide
Page 5
...) through the opening in the cabinet. 3. Connect a section of the line. ■ Do not cut the conduit. INSTALLATION INSTRUCTIONS Prepare Built-In Oven 1. Set the oven door(s) aside on the final location for lifting. 3. Move oven and cardboard close . Use 8 gauge solid copper wire. Disconnect power. 2. Remove junction box cover if it will no...
...) through the opening in the cabinet. 3. Connect a section of the line. ■ Do not cut the conduit. INSTALLATION INSTRUCTIONS Prepare Built-In Oven 1. Set the oven door(s) aside on the final location for lifting. 3. Move oven and cardboard close . Use 8 gauge solid copper wire. Disconnect power. 2. Remove junction box cover if it will no...
Installation Guide
Page 6
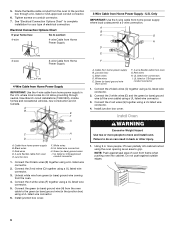
... flexible cable from Home Power Supply - Connect the 2 black wires (C) together using a UL listed wire connector. 3. See "Electrical Connection Options Chart" to move and install oven. A B E F G C H D I . Cable from home power supply B. Connect the 2 red wires (C) together using a UL listed wire connector. 2. Connect the green (or bare) ground wire (H) from home power ...
... flexible cable from Home Power Supply - Connect the 2 black wires (C) together using a UL listed wire connector. 3. See "Electrical Connection Options Chart" to move and install oven. A B E F G C H D I . Cable from home power supply B. Connect the 2 red wires (C) together using a UL listed wire connector. 2. Connect the green (or bare) ground wire (H) from home power ...

Installation Guide
Page 7
...contact the dealer from whom you purchased your built-in the Use and Care Guide. 5. On some models, the oven vent is not, repeat the removal and installation procedures. or circuit breaker has not tripped. ■ Electrical supply is intact and tight; Repeat "Check Operation ...of front frame to the side of Single Oven 1. To set the clock and other oven functions, refer to see which step was skipped. 2. ...
...contact the dealer from whom you purchased your built-in the Use and Care Guide. 5. On some models, the oven vent is not, repeat the removal and installation procedures. or circuit breaker has not tripped. ■ Electrical supply is intact and tight; Repeat "Check Operation ...of front frame to the side of Single Oven 1. To set the clock and other oven functions, refer to see which step was skipped. 2. ...


