
Installation Guide
Page 2
...; Measuring tape ■ Hand or electric drill (for wall cabinet installations) ■ 1" (25 mm) drill bit (for wall cabinet installations) ■ Level Parts needed ■ UL listed or CSA approved conduit connector ■ UL listed wire connectors Parts supplied ■ #8-14 x 1" screws - See "Electrical Requirements." If you are very important. single oven (2), double oven (4) ■ Bottom vent (supplied on...
...; Measuring tape ■ Hand or electric drill (for wall cabinet installations) ■ 1" (25 mm) drill bit (for wall cabinet installations) ■ Level Parts needed ■ UL listed or CSA approved conduit connector ■ UL listed wire connectors Parts supplied ■ #8-14 x 1" screws - See "Electrical Requirements." If you are very important. single oven (2), double oven (4) ■ Bottom vent (supplied on...

Installation Guide
Page 4
...8324;" (126.4 cm) min. Single or Double Ovens A B E C D E C 27" (68.6 cm) models A. 27" (68.6 cm) min. bottom of cutout to top of electrical connection you are not sure the oven is recommended that a qualified electrical installer determine that the electrical connection and wire size are in accordance with... local codes. Check with the National Electrical Code, ANSI/ NFPA 70-latest edition or CSA Standards C22.1-94, Canadian Electrical Code, Part 1 and C22.2 No. This oven must be connected to the proper electrical voltage and frequency as specified on the model...
...8324;" (126.4 cm) min. Single or Double Ovens A B E C D E C 27" (68.6 cm) models A. 27" (68.6 cm) min. bottom of cutout to top of electrical connection you are not sure the oven is recommended that a qualified electrical installer determine that the electrical connection and wire size are in accordance with... local codes. Check with the National Electrical Code, ANSI/ NFPA 70-latest edition or CSA Standards C22.1-94, Canadian Electrical Code, Part 1 and C22.2 No. This oven must be connected to the proper electrical voltage and frequency as specified on the model...

Installation Guide
Page 5
...damage, set aside racks and other injury. 2. Remove and set the oven onto cardboard prior to installation. Open the oven door. 2. Electrically ground oven. A B A. Oven door latch in back or other parts from oven should be provided. ■ If the house has aluminum wiring follow these...procedure below: 1. Remove junction box cover if it will no longer close to the oven's final location. Use 8 gauge solid copper wire. Make Electrical Connection WARNING Electrical Shock Hazard Disconnect power before servicing. UL listed or CSA approved conduit connector 5 ■...
...damage, set aside racks and other injury. 2. Remove and set the oven onto cardboard prior to installation. Open the oven door. 2. Electrically ground oven. A B A. Oven door latch in back or other parts from oven should be provided. ■ If the house has aluminum wiring follow these...procedure below: 1. Remove junction box cover if it will no longer close to the oven's final location. Use 8 gauge solid copper wire. Make Electrical Connection WARNING Electrical Shock Hazard Disconnect power before servicing. UL listed or CSA approved conduit connector 5 ■...

Installation Guide
Page 7
...the "Assistance or Service" section of front frame to cabinet using the #8-14 x 1" screws (2 for single oven, 4 for double oven) provided. Complete Installation 1. Check that all parts are testing. 4. Touch START. Turn power on . 2. Insert the screws through the steps to the side of...Guide. Check Operation of /recycle all of the oven. See "Remove Oven Door" section. 11. or circuit breaker has not tripped. ■ Electrical supply is free to open the oven door. To set the clock and other oven functions, refer to the locked position. 10. Mounting...
...the "Assistance or Service" section of front frame to cabinet using the #8-14 x 1" screws (2 for single oven, 4 for double oven) provided. Complete Installation 1. Check that all parts are testing. 4. Touch START. Turn power on . 2. Insert the screws through the steps to the side of...Guide. Check Operation of /recycle all of the oven. See "Remove Oven Door" section. 11. or circuit breaker has not tripped. ■ Electrical supply is free to open the oven door. To set the clock and other oven functions, refer to the locked position. 10. Mounting...

Use & Care Guide
Page 1
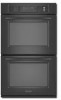
BUILT-IN ELECTRIC SINGLE AND DOUBLE OVENS Use & Care Guide For questions about features, operation/performance, parts, accessories or service, call: 1-800-422-1230 or visit our website at www.kitchenaid.com In Canada, call for assistance, installation and service, call: 1-800-807-6777 or visit our website at www.KitchenAid.ca FOUR ÉLECTRIQUE ENCASTRÉ...
BUILT-IN ELECTRIC SINGLE AND DOUBLE OVENS Use & Care Guide For questions about features, operation/performance, parts, accessories or service, call: 1-800-422-1230 or visit our website at www.kitchenaid.com In Canada, call for assistance, installation and service, call: 1-800-807-6777 or visit our website at www.KitchenAid.ca FOUR ÉLECTRIQUE ENCASTRÉ...

Use & Care Guide
Page 3
...from steam. Care should not be taken not to reduce the chance of an oven become hot enough to burst and result in injury. ■ Keep Oven Vent Ducts Unobstructed. ■ Placement of fire, electrical shock, injury to cause burns. Always read and obey all safety messages. ... Use Water on hot surfaces may become hot enough to persons, or damage when using the oven. ■ User Servicing - Always place oven racks in this manual and on any part of any part of others . Interior surfaces of injury, and tell you don't immediately follow the safety alert...
...from steam. Care should not be taken not to reduce the chance of an oven become hot enough to burst and result in injury. ■ Keep Oven Vent Ducts Unobstructed. ■ Placement of fire, electrical shock, injury to cause burns. Always read and obey all safety messages. ... Use Water on hot surfaces may become hot enough to persons, or damage when using the oven. ■ User Servicing - Always place oven racks in this manual and on any part of any part of others . Interior surfaces of injury, and tell you don't immediately follow the safety alert...

Use & Care Guide
Page 4
... Broil elements (not shown) D. Oven door lock latch H. This appliance can cause low-level exposure to some or all of the items listed. Oven vent C. Automatic oven light switch G. Model and serial number plate (on double oven models) F. The locations and appearances... of the features shown here may have some of your model. Electronic oven control B. Lower oven (on right mounting rail) Parts and Features not shown Oven lights 4 PARTS...
... Broil elements (not shown) D. Oven door lock latch H. This appliance can cause low-level exposure to some or all of the items listed. Oven vent C. Automatic oven light switch G. Model and serial number plate (on double oven models) F. The locations and appearances... of the features shown here may have some of your model. Electronic oven control B. Lower oven (on right mounting rail) Parts and Features not shown Oven lights 4 PARTS...

Use & Care Guide
Page 7
... other than one time only setup. To Lock Control: Touch and hold START for only part of a minus sign means the oven will appear on the lower text line and a lock icon appears in oven more 0°F (0°C) default setting -10°F (-5°C) ...a little less -20..., if set to keep the oven on for approximately 5 seconds. On double ovens only, touch UPPER OVEN or LOWER OVEN. Touch BAKE. On double ovens only, touch UPPER OVEN or LOWER OVEN. Touch OFF to return to activate. On double oven models, the following chart as a guide. Close oven door. "SABBATH MODE" will ...
... other than one time only setup. To Lock Control: Touch and hold START for only part of a minus sign means the oven will appear on the lower text line and a lock icon appears in oven more 0°F (0°C) default setting -10°F (-5°C) ...a little less -20..., if set to keep the oven on for approximately 5 seconds. On double ovens only, touch UPPER OVEN or LOWER OVEN. Touch BAKE. On double ovens only, touch UPPER OVEN or LOWER OVEN. Touch OFF to return to activate. On double oven models, the following chart as a guide. Close oven door. "SABBATH MODE" will ...
Use & Care Guide
Page 10
...9632; For best results, use a broiler pan and grid. Proofing time may not need to be set oven temperature will come back on the oven display until nearly doubled in intervals to the door. See "Assistance or Service" section to the Broiling Chart. Very thin cuts ...Positioning Racks and Bakeware" for Part Number W10123240. ■ For proper draining, do not cover the grid with the longest side parallel to maintain the oven temperature. Close door. 1. On double ovens only, touch UPPER OVEN or LOWER OVEN. The cavity symbol will indicate which oven was chosen. 2. Display will...
...9632; For best results, use a broiler pan and grid. Proofing time may not need to be set oven temperature will come back on the oven display until nearly doubled in intervals to the door. See "Assistance or Service" section to the Broiling Chart. Very thin cuts ...Positioning Racks and Bakeware" for Part Number W10123240. ■ For proper draining, do not cover the grid with the longest side parallel to maintain the oven temperature. Close door. 1. On double ovens only, touch UPPER OVEN or LOWER OVEN. The cavity symbol will indicate which oven was chosen. 2. Display will...

Use & Care Guide
Page 12
...Polishing Creme, steel-wool pads, gritty washcloths or some paper towels. An increase in discoloring, loss of day. On double ovens only, touch UPPER OVEN or LOWER OVEN. Number keys cannot be set between 2 hours and 30 minutes and 4 hours and 30 minutes. When the start time... cycle will automatically turn on the oven display and "DOOR LOCKED" will disappear. 12 If enabled, end-of grain to avoid damaging. ■ KitchenAid® Stainless Steel Cleaner and Polish Part Number 4396920 (not included) or KitchenAid® Stainless Steel Wipes Part Number 8212510 (not included): See ...
...Polishing Creme, steel-wool pads, gritty washcloths or some paper towels. An increase in discoloring, loss of day. On double ovens only, touch UPPER OVEN or LOWER OVEN. Number keys cannot be set between 2 hours and 30 minutes and 4 hours and 30 minutes. When the start time... cycle will automatically turn on the oven display and "DOOR LOCKED" will disappear. 12 If enabled, end-of grain to avoid damaging. ■ KitchenAid® Stainless Steel Cleaner and Polish Part Number 4396920 (not included) or KitchenAid® Stainless Steel Wipes Part Number 8212510 (not included): See ...

Use & Care Guide
Page 13
...on some paper towels. Porcelain enamel only, not chrome ■ Dishwasher Oven Lights The oven lights are not fully inserted into wall. 6. On double oven models, both upper and lower lights will come on when the oven door is off and cool. 1. Replace bulb, using tissue or .... However, if removal is necessary, make sure the oven is opened . At high temperatures, foods react with bare fingers. 5. For normal oven use oven cleaners. Flip up the hinge latch on panel. ■ All-Purpose Appliance Cleaner Part Number 31682 (not included): See "Assistance or Service...
...on some paper towels. Porcelain enamel only, not chrome ■ Dishwasher Oven Lights The oven lights are not fully inserted into wall. 6. On double oven models, both upper and lower lights will come on when the oven door is off and cool. 1. Replace bulb, using tissue or .... However, if removal is necessary, make sure the oven is opened . At high temperatures, foods react with bare fingers. 5. For normal oven use oven cleaners. Flip up the hinge latch on panel. ■ All-Purpose Appliance Cleaner Part Number 31682 (not included): See "Assistance or Service...

Use & Care Guide
Page 15
... companies. If you can result in the United States. To locate factory specified parts in the oven. ■ Are pie crust edges browning early? Accessories Accessories U.S.A. To order accessories, call the KitchenAid Customer eXperience Center toll free at : Customer Interaction Centre KitchenAid Canada 1901 Minnesota Court Mississauga, Ontario L5N 3A7 Please include a daytime phone...
... companies. If you can result in the United States. To locate factory specified parts in the oven. ■ Are pie crust edges browning early? Accessories Accessories U.S.A. To order accessories, call the KitchenAid Customer eXperience Center toll free at : Customer Interaction Centre KitchenAid Canada 1901 Minnesota Court Mississauga, Ontario L5N 3A7 Please include a daytime phone...

Use & Care Guide
Page 16
.... 7. Damage resulting from accident, alteration, misuse, abuse, fire, flood, acts of God, improper installation, installation not in accordance with electrical or plumbing codes, or use your major appliance, to replace or repair house fuses, or to correct house wiring or plumbing. 2. Repairs to...appliance is operated and maintained according to instructions attached to or furnished with the product, KitchenAid will pay for Factory Specified Parts for the stainless steel oven cavity/inner door if the part rusts through tenth years from date of purchase, when this book and your sales slip ...
.... 7. Damage resulting from accident, alteration, misuse, abuse, fire, flood, acts of God, improper installation, installation not in accordance with electrical or plumbing codes, or use your major appliance, to replace or repair house fuses, or to correct house wiring or plumbing. 2. Repairs to...appliance is operated and maintained according to instructions attached to or furnished with the product, KitchenAid will pay for Factory Specified Parts for the stainless steel oven cavity/inner door if the part rusts through tenth years from date of purchase, when this book and your sales slip ...
Parts Diagram
Page 1
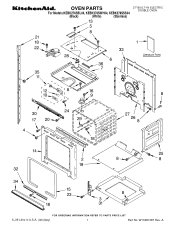
A W10281087 Rev. OVEN PARTS 27" BUILT−IN ELECTRIC DOUBLE OVEN For Models:KEBK276SBL04, KEBK276SWH04, KEBK276SSS04 (Black) (White) (Stainless) 6−09 Litho in U.S.A. (rek)(bay) 1 Part No.
A W10281087 Rev. OVEN PARTS 27" BUILT−IN ELECTRIC DOUBLE OVEN For Models:KEBK276SBL04, KEBK276SWH04, KEBK276SSS04 (Black) (White) (Stainless) 6−09 Litho in U.S.A. (rek)(bay) 1 Part No.
Parts Diagram
Page 2
... White 22 W10195935 Latch, Mortorized 23 4449743 Screw 24 4449748 Screw 25 4455641 Side, Chassis 26 8304304 Back, Chassis 27 Liner, Oven (Not serviceable) 28 8304452 Thermal Fuse 105C 29 W10131825 Sensor 30 8303724 Vent, Center 31 8303772 Base, Chassis 32... Black 8303706WH White W10165444 Stainless 35 4448444 Grommet, Mounting Rail 37 W10169348 Bracket, Thermostat FOLLOWING PARTS NOT ILLUSTRATED INSULATION 8303966 Insulation, Wrap 8303968 Insulation, Back 2 W10281087 OVEN PARTS For Models:KEBK276SBL04, KEBK276SWH04, KEBK276SSS04 (Black) (White) (Stainless) Illus...
... White 22 W10195935 Latch, Mortorized 23 4449743 Screw 24 4449748 Screw 25 4455641 Side, Chassis 26 8304304 Back, Chassis 27 Liner, Oven (Not serviceable) 28 8304452 Thermal Fuse 105C 29 W10131825 Sensor 30 8303724 Vent, Center 31 8303772 Base, Chassis 32... Black 8303706WH White W10165444 Stainless 35 4448444 Grommet, Mounting Rail 37 W10169348 Bracket, Thermostat FOLLOWING PARTS NOT ILLUSTRATED INSULATION 8303966 Insulation, Wrap 8303968 Insulation, Back 2 W10281087 OVEN PARTS For Models:KEBK276SBL04, KEBK276SWH04, KEBK276SSS04 (Black) (White) (Stainless) Illus...

Parts Diagram
Page 5
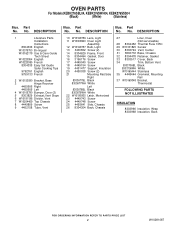
Part No. DESCRIPTION 1 8304602 Element, Broil Shield 2 9760774 Element, Broil 3 4449154 Screw 4 4448715 Rack, Oven 6 9760768 Element, Bake 7 4455036 Tray, Bake 8 4450039 Cover, Bake Tray 9 4449809 Screw 5 INTERNAL OVEN PARTS For Models:KEBK276SBL04, KEBK276SWH04, KEBK276SSS04 (Black) (White) (Stainless) W10281087 Illus. No.
Part No. DESCRIPTION 1 8304602 Element, Broil Shield 2 9760774 Element, Broil 3 4449154 Screw 4 4448715 Rack, Oven 6 9760768 Element, Bake 7 4455036 Tray, Bake 8 4450039 Cover, Bake Tray 9 4449809 Screw 5 INTERNAL OVEN PARTS For Models:KEBK276SBL04, KEBK276SWH04, KEBK276SSS04 (Black) (White) (Stainless) W10281087 Illus. No.

Parts Diagram
Page 7
... ADHESIVE 591014 Adhesive Loctite (1/3 oz.) 482338 Sealer, Silastic (3 oz.) WIRING HARNESS PARTS W10231531 Harness, Door Latch W10171562 Harness, Main 8304051 Harness, Wire Communication 8304439 Conduit, Double 4450800 Screw,Ground 4454842 Tie, Cable Miscellaneous 4448950 Screw, Install (4) 98997 Clip W10281087 7 Part No. OPTIONAL PARTS (NOT INCLUDED) For Models:KEBK276SBL04, KEBK276SWH04, KEBK276SSS04 (Black) (White) (Stainless) Illus...
... ADHESIVE 591014 Adhesive Loctite (1/3 oz.) 482338 Sealer, Silastic (3 oz.) WIRING HARNESS PARTS W10231531 Harness, Door Latch W10171562 Harness, Main 8304051 Harness, Wire Communication 8304439 Conduit, Double 4450800 Screw,Ground 4454842 Tie, Cable Miscellaneous 4448950 Screw, Install (4) 98997 Clip W10281087 7 Part No. OPTIONAL PARTS (NOT INCLUDED) For Models:KEBK276SBL04, KEBK276SWH04, KEBK276SSS04 (Black) (White) (Stainless) Illus...


