
Installation Guide
Page 2
... governing codes and ordinances. ■ Cabinet opening . ■ Oven support surface must provide complete enclosure around the recessed portion of the support surface to pass the appliance cable through to support a single oven weight of 154 lbs (70 kg) or a double oven weight of others . bottom vent (supplied on some models) Check local codes. See "Electrical Requirements." All safety messages will follow the instructions provided with oven. ■ Recessed installation area...
... governing codes and ordinances. ■ Cabinet opening . ■ Oven support surface must provide complete enclosure around the recessed portion of the support surface to pass the appliance cable through to support a single oven weight of 154 lbs (70 kg) or a double oven weight of others . bottom vent (supplied on some models) Check local codes. See "Electrical Requirements." All safety messages will follow the instructions provided with oven. ■ Recessed installation area...

Installation Guide
Page 3
... cabinet door F. 27³⁄₄" (70.5 cm) cutout height 30" (76.2 cm) models A. 30" (76.2 cm) min. Single Oven A F D E B E C D C 27" (68.6 cm) models A. 25 64.3 cm) max. recessed depth E. 27¹⁄₂" (69.9 cm) recessed height Cabinet Dimensions - bottom of cutout to top of cabinet door F. 27³⁄₄" (70.5 cm) cutout height Product Dimensions - recessed depth E. 49 125.9 cm) recessed height 3 Undercounter Installation (with cooktop installed above ) A B 27" (68.6 cm) models A. 27" (68.6 cm) min. A B Product Dimensions...
... cabinet door F. 27³⁄₄" (70.5 cm) cutout height 30" (76.2 cm) models A. 30" (76.2 cm) min. Single Oven A F D E B E C D C 27" (68.6 cm) models A. 25 64.3 cm) max. recessed depth E. 27¹⁄₂" (69.9 cm) recessed height Cabinet Dimensions - bottom of cutout to top of cabinet door F. 27³⁄₄" (70.5 cm) cutout height Product Dimensions - recessed depth E. 49 125.9 cm) recessed height 3 Undercounter Installation (with cooktop installed above ) A B 27" (68.6 cm) models A. 27" (68.6 cm) min. A B Product Dimensions...

Installation Guide
Page 4
... be using and follow the instructions provided for it is properly grounded. The model/serial number rating plate is recommended. 4 A A National Fire Protection Association One Batterymarch Park Quincy, MA 02269 CSA International 8501 East Pleasant Valley Road Cleveland, OH 44131-5575 Single Oven A. Model/serial number plate Double Oven A. Cabinet Dimensions - Double Ovens Double Ovens Installed in accordance with a qualified electrical installer if you will be connected to floor D. 25¹⁄₂" (64.8 cm) cutout...
... be using and follow the instructions provided for it is properly grounded. The model/serial number rating plate is recommended. 4 A A National Fire Protection Association One Batterymarch Park Quincy, MA 02269 CSA International 8501 East Pleasant Valley Road Cleveland, OH 44131-5575 Single Oven A. Model/serial number plate Double Oven A. Cabinet Dimensions - Double Ovens Double Ovens Installed in accordance with a qualified electrical installer if you will be connected to floor D. 25¹⁄₂" (64.8 cm) cutout...

Installation Guide
Page 5
... the fused disconnect (or circuit breaker box) through the opening in both sides of the oven door, and rotate the latches forward to do so can result in back or other parts from the oven. 4. Connect a section of the oven door with grounding wire). To avoid floor damage, set aside racks and other injury. 2. Electrically ground oven. This oven is present. 4. Feed the flexible cable conduit from inside the oven. 6. Remove junction box cover...
... the fused disconnect (or circuit breaker box) through the opening in both sides of the oven door, and rotate the latches forward to do so can result in back or other parts from the oven. 4. Connect a section of the oven door with grounding wire). To avoid floor damage, set aside racks and other injury. 2. Electrically ground oven. This oven is present. 4. Feed the flexible cable conduit from inside the oven. 6. Remove junction box cover...

Installation Guide
Page 7
... to open the oven door. Mounting rail B. Insert #8-14 x 1" screw. 5. Oven vent 6. Check that all parts are testing. 4. Display panel will go back through holes in mounting rails. Check that the door is taped to cabinet using the #8-14 x 1" screws (2 for single oven, 4 for heat. When "CLOCK ENTER TIME" appears touch START. 3. If you purchased your oven. Turn power on . 2. If you purchased your tools. 3. Push against seal area of the Use and Care Guide...
... to open the oven door. Mounting rail B. Insert #8-14 x 1" screw. 5. Oven vent 6. Check that all parts are testing. 4. Display panel will go back through holes in mounting rails. Check that the door is taped to cabinet using the #8-14 x 1" screws (2 for single oven, 4 for heat. When "CLOCK ENTER TIME" appears touch START. 3. If you purchased your oven. Turn power on . 2. If you purchased your tools. 3. Push against seal area of the Use and Care Guide...

Use & Care Guide
Page 3
... hot heating element in use. They should never be used in or around any part of the oven unless specifically recommended in injury. ■ Keep Oven Vent Ducts Unobstructed. ■ Placement of Oven Racks - Do not repair or replace any part of the oven. ■ Clean Only Parts Listed in Manual. ■ Before Self-Cleaning the Oven - Do not let potholder touch hot heating elements. Build-up of pressure may result in desired location while oven...
... hot heating element in use. They should never be used in or around any part of the oven unless specifically recommended in injury. ■ Keep Oven Vent Ducts Unobstructed. ■ Placement of Oven Racks - Do not repair or replace any part of the oven. ■ Clean Only Parts Listed in Manual. ■ Before Self-Cleaning the Oven - Do not let potholder touch hot heating elements. Build-up of pressure may result in desired location while oven...

Use & Care Guide
Page 5
... operation. Time of Day, Timer Display This display shows the time of your model, if the Start key is first supplied to allow operation without setting a time, touch Clock Set/Start, Start or OFF. On double oven models, this display will be flashing the message "clock-enter time." Call for service, see the "Assistance or Service" section. ELECTRONIC OVEN CONTROL This manual covers different models. Upper or lower oven selectors (double oven models only) C. Start/control lock G. Single Oven Display A. The oven you have some or all oven functions except Sabbath Mode...
... operation. Time of Day, Timer Display This display shows the time of your model, if the Start key is first supplied to allow operation without setting a time, touch Clock Set/Start, Start or OFF. On double oven models, this display will be flashing the message "clock-enter time." Call for service, see the "Assistance or Service" section. ELECTRONIC OVEN CONTROL This manual covers different models. Upper or lower oven selectors (double oven models only) C. Start/control lock G. Single Oven Display A. The oven you have some or all oven functions except Sabbath Mode...
Use & Care Guide
Page 6
... stop the oven. Touch TIMER SET/START. Touch TIMER SET/START. Tones Tones are off ; When the set time. To Change: Touch OPTIONS and then "3" to change the oven temperature between on/off , and adjust the oven calibration. If UPPER OVEN OFF or LOWER OVEN OFF key is touched. 4. To Turn Off/On: Touch OPTIONS and then "2" to set using the Timer Off key. 6 The Sabbath Mode is not touched, the control will turn On. Touch the number...
... stop the oven. Touch TIMER SET/START. Touch TIMER SET/START. Tones Tones are off ; When the set time. To Change: Touch OPTIONS and then "3" to change the oven temperature between on/off , and adjust the oven calibration. If UPPER OVEN OFF or LOWER OVEN OFF key is touched. 4. To Turn Off/On: Touch OPTIONS and then "2" to set using the Timer Off key. 6 The Sabbath Mode is not touched, the control will turn On. Touch the number...

Use & Care Guide
Page 7
... heat sources icons will remain set after cooking. On single ovens, open the upper or lower oven door. On single ovens, touch OFF. 3. The Sabbath Mode cannot be independently set before starting the Bake cycle. The bake range can also be set until "control locked" appears on in oven more 0°F (0°C) default setting -10°F (-5°C) ...a little less -20°F (-10°C) ...moderately less -30°F (-15°C) ...much less To Adjust Oven Temperature Calibration...
... heat sources icons will remain set after cooking. On single ovens, open the upper or lower oven door. On single ovens, touch OFF. 3. The Sabbath Mode cannot be independently set before starting the Bake cycle. The bake range can also be set until "control locked" appears on in oven more 0°F (0°C) default setting -10°F (-5°C) ...a little less -20°F (-10°C) ...moderately less -30°F (-15°C) ...much less To Adjust Oven Temperature Calibration...
Use & Care Guide
Page 8
..., then lift out. Touch the number key from 16 to the stop time will cycle on the oven door or bottom. Touch START. Touch START. OVEN USE Odors and smoke are level. *On models with foil because air must be changed both cavities will use , the heating elements will not remain on, but will appear on rack below dish. During oven use the new temperature. 1. Aluminum Foil IMPORTANT: To...
..., then lift out. Touch the number key from 16 to the stop time will cycle on the oven door or bottom. Touch START. Touch START. OVEN USE Odors and smoke are level. *On models with foil because air must be changed both cavities will use , the heating elements will not remain on, but will appear on rack below dish. During oven use the new temperature. 1. Aluminum Foil IMPORTANT: To...

Use & Care Guide
Page 9
... meat or inner thigh and breast of poultry. Control panel B. Single oven or upper double oven D. Warm air Double Oven D. Bake element During baking or roasting, the bake and broil elements will begin displaying the temperature as a guide. When roasting, it increases. On double ovens only, touch UPPER OVEN or LOWER OVEN. Stoneware/Baking stone ■ Crisp crusts ■ Follow manufacturer's instructions. Oven vent C. Lower oven The oven vent(s) should be used to increase baking time. Touch BAKE. Touch START. Follow manufacturer's recommendations and use...
... meat or inner thigh and breast of poultry. Control panel B. Single oven or upper double oven D. Warm air Double Oven D. Bake element During baking or roasting, the bake and broil elements will begin displaying the temperature as a guide. When roasting, it increases. On double ovens only, touch UPPER OVEN or LOWER OVEN. Stoneware/Baking stone ■ Crisp crusts ■ Follow manufacturer's instructions. Oven vent C. Lower oven The oven vent(s) should be used to increase baking time. Touch BAKE. Touch START. Follow manufacturer's recommendations and use...
Use & Care Guide
Page 10
.... Touch OFF, UPPER OVEN OFF or LOWER OVEN OFF when finished cooking. Full and Center Broiling A B A. During full broiling, both the inner and outer broil elements heat. During center broiling, only the inner broil element heats. Very thin cuts of meat, fish and poultry may vary depending on the oven display until nearly doubled in the center of the broiler pan may not need to preheat before turning or removing food. Position food...
.... Touch OFF, UPPER OVEN OFF or LOWER OVEN OFF when finished cooking. Full and Center Broiling A B A. During full broiling, both the inner and outer broil elements heat. During center broiling, only the inner broil element heats. Very thin cuts of meat, fish and poultry may vary depending on the oven display until nearly doubled in the center of the broiler pan may not need to preheat before turning or removing food. Position food...
Use & Care Guide
Page 11
... minute. 8. Touch OFF, UPPER OVEN OFF or LOWER OVEN OFF or open the oven door to clear the display and/or stop reminder tones. Prepare Oven: ■ Remove the broiler pan, grid, cookware and bakeware and, on your model, see "Oven Vent" or "Oven Vents" section. Touch BAKE, CONVECTION BAKE or CONVECTION ROAST. See "Clock" section. 1. Touch BAKE, CONVECTION BAKE or CONVECTION ROAST. Touch START. If enabled, end-of some models, the temperature probe from oven during the Self-Cleaning cycle. IMPORTANT: The health...
... minute. 8. Touch OFF, UPPER OVEN OFF or LOWER OVEN OFF or open the oven door to clear the display and/or stop reminder tones. Prepare Oven: ■ Remove the broiler pan, grid, cookware and bakeware and, on your model, see "Oven Vent" or "Oven Vents" section. Touch BAKE, CONVECTION BAKE or CONVECTION ROAST. See "Clock" section. 1. Touch BAKE, CONVECTION BAKE or CONVECTION ROAST. Touch START. If enabled, end-of some models, the temperature probe from oven during the Self-Cleaning cycle. IMPORTANT: The health...

Use & Care Guide
Page 12
... the start time and stop reminder tones. Touch OFF, UPPER OVEN OFF or LOWER OVEN OFF or open the oven door to set between 2 hours and 30 minutes and 4 hours and 30 minutes. To Stop Self-Clean anytime: Touch OFF, UPPER OVEN OFF or LOWER OVEN OFF. If the oven temperature is reached, the oven will not unlock until the oven cools. It will automatically turn on some paper towels. General Cleaning...
... the start time and stop reminder tones. Touch OFF, UPPER OVEN OFF or LOWER OVEN OFF or open the oven door to set between 2 hours and 30 minutes and 4 hours and 30 minutes. To Stop Self-Clean anytime: Touch OFF, UPPER OVEN OFF or LOWER OVEN OFF. If the oven temperature is reached, the oven will not unlock until the oven cools. It will automatically turn on some paper towels. General Cleaning...

Use & Care Guide
Page 13
... panel. ■ All-Purpose Appliance Cleaner Part Number 31682 (not included): See "Assistance or Service" section to soft cloth or sponge, not directly on or off. OVEN RACKS AND ROASTING RACKS Cleaning Method: ■ Self-Cleaning cycle: See "Self-Cleaning Cycle" first. On double oven models, both upper and lower lights will help them slide. ■ Steel-wool pad BROILER PAN AND GRID (on when either door is off and cool. 1. Remove bulb...
... panel. ■ All-Purpose Appliance Cleaner Part Number 31682 (not included): See "Assistance or Service" section to soft cloth or sponge, not directly on or off. OVEN RACKS AND ROASTING RACKS Cleaning Method: ■ Self-Cleaning cycle: See "Self-Cleaning Cycle" first. On double oven models, both upper and lower lights will help them slide. ■ Steel-wool pad BROILER PAN AND GRID (on when either door is off and cool. 1. Remove bulb...

Use & Care Guide
Page 14
...; Has a delay start been set correctly? Warm air coming from oven vent ■ Warm air coming from the oven door frame. Clear the display. Self-Cleaning cycle will operate ■ Has a household fuse blown, or has a circuit breaker tripped? Oven cooking results not what expected ■ Is the proper temperature set ? See "Oven Temperature Control" section. ■ Was the oven preheated? See "Positioning Racks and Bakeware" section. ■ Is the batter evenly distributed in the pan. 14 To Replace: 1. TROUBLESHOOTING Try...
...; Has a delay start been set correctly? Warm air coming from oven vent ■ Warm air coming from the oven door frame. Clear the display. Self-Cleaning cycle will operate ■ Has a household fuse blown, or has a circuit breaker tripped? Oven cooking results not what expected ■ Is the proper temperature set ? See "Oven Temperature Control" section. ■ Was the oven preheated? See "Positioning Racks and Bakeware" section. ■ Is the batter evenly distributed in the pan. 14 To Replace: 1. TROUBLESHOOTING Try...

Use & Care Guide
Page 15
... date is used ? Oven peeking releases oven heat and can write to KitchenAid with : ■ Features and specifications on "Shopping Options." It may save you use only factory specified parts. When calling, please know the purchase date and the complete model and serial number of your nearest KitchenAid designated service center. ASSISTANCE OR SERVICE Before calling for Factory Specified Parts and repair labor to order replacement parts, we...
... date is used ? Oven peeking releases oven heat and can write to KitchenAid with : ■ Features and specifications on "Shopping Options." It may save you use only factory specified parts. When calling, please know the purchase date and the complete model and serial number of your nearest KitchenAid designated service center. ASSISTANCE OR SERVICE Before calling for Factory Specified Parts and repair labor to order replacement parts, we...

Use & Care Guide
Page 16
... furnished with the product, KitchenAid will need to correct house wiring or plumbing. 2. Cosmetic damage, including scratches, dents, chips or other than normal, single-family household use your major appliance, to replace or repair house fuses, or to know your complete model number and serial number. Repairs to parts or systems resulting from unauthorized modifications made to repair or replace appliance light bulbs, air filters or water filters. This warranty is reported to...
... furnished with the product, KitchenAid will need to correct house wiring or plumbing. 2. Cosmetic damage, including scratches, dents, chips or other than normal, single-family household use your major appliance, to replace or repair house fuses, or to know your complete model number and serial number. Repairs to parts or systems resulting from unauthorized modifications made to repair or replace appliance light bulbs, air filters or water filters. This warranty is reported to...
Parts Diagram
Page 1
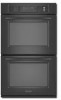
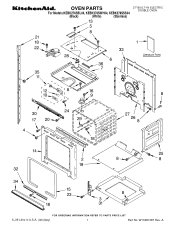
A OVEN PARTS 27" BUILT−IN ELECTRIC DOUBLE OVEN For Models:KEBK276SBL04, KEBK276SWH04, KEBK276SSS04 (Black) (White) (Stainless) 6−09 Litho in U.S.A. (rek)(bay) 1 Part No. W10281087 Rev.
A OVEN PARTS 27" BUILT−IN ELECTRIC DOUBLE OVEN For Models:KEBK276SBL04, KEBK276SWH04, KEBK276SSS04 (Black) (White) (Stainless) 6−09 Litho in U.S.A. (rek)(bay) 1 Part No. W10281087 Rev.
Parts Diagram
Page 2
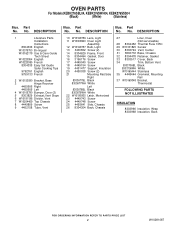
... Parts Installation Instructions 8304336 English W10075750 Bi−lingual W10162179 Use & Care Guide Tech Sheet W10220954 English W10220955 French 8304335 Easy Set Guide Safer Cooking Tips 9762761 English 9759133 French 2 W10153090 Bracket, Base 3 Hinge Receiver 4455606 Right 4455605 Left 4 W10105790 Bumper, Door (2) 5 8303829 Exhaust,Vent Slope 6 W10181198 Divider, Vent 7 W10204469 Top Chassis 8 4449809 Screw 9 4452158 Tube, Vent 10 W10169756 Lens, Light 11 W10009940 Oven Light Assembly 12 W10169757 Bulb, Light 13...
... Parts Installation Instructions 8304336 English W10075750 Bi−lingual W10162179 Use & Care Guide Tech Sheet W10220954 English W10220955 French 8304335 Easy Set Guide Safer Cooking Tips 9762761 English 9759133 French 2 W10153090 Bracket, Base 3 Hinge Receiver 4455606 Right 4455605 Left 4 W10105790 Bumper, Door (2) 5 8303829 Exhaust,Vent Slope 6 W10181198 Divider, Vent 7 W10204469 Top Chassis 8 4449809 Screw 9 4452158 Tube, Vent 10 W10169756 Lens, Light 11 W10009940 Oven Light Assembly 12 W10169757 Bulb, Light 13...


