
Installation Guide
Page 2
... installing the junction box on your appliance. A 1" (2.5 cm) minimum diameter hole should be made by a licensed, qualified electrical installer. single oven (2), double oven (4) ■ Bottom vent (supplied on some models) ■ Two #8-18 x ³⁄₈" screws - If ... or electric drill (for wall cabinet installations) ■ 1" (25 mm) drill bit (for wall cabinet installations) ■ Level Parts needed ■ UL listed or CSA approved conduit connector ■ UL listed wire connectors Parts supplied ■ #8-14 x 1" screws - otherwise, the oven will ...
... installing the junction box on your appliance. A 1" (2.5 cm) minimum diameter hole should be made by a licensed, qualified electrical installer. single oven (2), double oven (4) ■ Bottom vent (supplied on some models) ■ Two #8-18 x ³⁄₈" screws - If ... or electric drill (for wall cabinet installations) ■ 1" (25 mm) drill bit (for wall cabinet installations) ■ Level Parts needed ■ UL listed or CSA approved conduit connector ■ UL listed wire connectors Parts supplied ■ #8-14 x 1" screws - otherwise, the oven will ...

Installation Guide
Page 4
... codes. cutout height 30" (76.2 cm) models A. 30" (76.2 cm) min. Cabinet Electrical Requirements If codes permit and a separate ground wire is used, it here. ■ Oven must be connected to 7.2 kW at 240 volts (5.5 to the proper electrical voltage and frequency as specified on the model/serial number rating plate. Single or Double Ovens A B E C D E C 27" (68...
... codes. cutout height 30" (76.2 cm) models A. 30" (76.2 cm) min. Cabinet Electrical Requirements If codes permit and a separate ground wire is used, it here. ■ Oven must be connected to 7.2 kW at 240 volts (5.5 to the proper electrical voltage and frequency as specified on the model/serial number rating plate. Single or Double Ovens A B E C D E C 27" (68...

Installation Guide
Page 5
... parts from inside the bag containing literature. 5. This oven is manufactured with local codes and industry accepted wiring practices. Remove and set the oven onto cardboard prior to follow the procedure below: 1. Use 8 gauge solid copper wire. A B A. Lift and pull oven door toward you and remove. UL listed or CSA approved conduit connector 5 Electrically ground oven. Oven...
... parts from inside the bag containing literature. 5. This oven is manufactured with local codes and industry accepted wiring practices. Remove and set the oven onto cardboard prior to follow the procedure below: 1. Use 8 gauge solid copper wire. A B A. Lift and pull oven door toward you and remove. UL listed or CSA approved conduit connector 5 Electrically ground oven. Oven...

Installation Guide
Page 7
..."Assistance or Service" section of Single Oven" steps 2-6. Check that all parts are testing. 4. Dispose of/recycle all of hinges into place. 9. For oven use and cleaning, read the Use and Care Guide. Touch BROIL. 4. To set the clock and other oven functions, refer to the locked... go back through holes in the display. 14. or circuit breaker has not tripped. ■ Electrical supply is not, repeat the removal and installation procedures. Touch UPPER OVEN or LOWER OVEN, to see which step was skipped. 2. Mounting rail B. You should appear in mounting rails....
..."Assistance or Service" section of Single Oven" steps 2-6. Check that all parts are testing. 4. Dispose of/recycle all of hinges into place. 9. For oven use and cleaning, read the Use and Care Guide. Touch BROIL. 4. To set the clock and other oven functions, refer to the locked... go back through holes in the display. 14. or circuit breaker has not tripped. ■ Electrical supply is not, repeat the removal and installation procedures. Touch UPPER OVEN or LOWER OVEN, to see which step was skipped. 2. Mounting rail B. You should appear in mounting rails....
Parts Diagram
Page 1
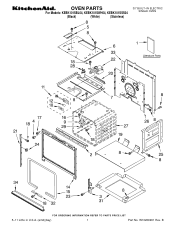
W10269261 Rev. B OVEN PARTS For Models: KEBK101SBL04, KEBK101SWH04, KEBK101SSS04 (Black) (White) (Stainless) 30" BUILT−IN ELECTRIC SINGLE OVEN 5−11 Litho in U.S.A. (amd)(bay) 1 Part No.
W10269261 Rev. B OVEN PARTS For Models: KEBK101SBL04, KEBK101SWH04, KEBK101SSS04 (Black) (White) (Stainless) 30" BUILT−IN ELECTRIC SINGLE OVEN 5−11 Litho in U.S.A. (amd)(bay) 1 Part No.
Parts Diagram
Page 2
No. Part No. Part No. No. OVEN PARTS For Models: KEBK101SBL04, KEBK101SWH04, KEBK101SSS04 (Black) (White) (Stainless) Illus. DESCRIPTION Illus. Part No. No. DESCRIPTION 1 Literature Parts Installation Instructions 8304336 English 8304571 French W10162179 Use & Care Guide Tech Sheet ...4449743 Screw Illus. DESCRIPTION 24 4448444 Mounting Grommet, Rail 25 4455641 Side, Chassis 26 8304303 Back, Chassis 27 Liner, Oven (Not serviceable) 28 8304452 Thermal Fuse 29 W10131825 Sensor 31 8303516 Base, Chassis 32 8304478 Retainer, Gasket 33 8303517 Cover...
No. Part No. Part No. No. OVEN PARTS For Models: KEBK101SBL04, KEBK101SWH04, KEBK101SSS04 (Black) (White) (Stainless) Illus. DESCRIPTION Illus. Part No. No. DESCRIPTION 1 Literature Parts Installation Instructions 8304336 English 8304571 French W10162179 Use & Care Guide Tech Sheet ...4449743 Screw Illus. DESCRIPTION 24 4448444 Mounting Grommet, Rail 25 4455641 Side, Chassis 26 8304303 Back, Chassis 27 Liner, Oven (Not serviceable) 28 8304452 Thermal Fuse 29 W10131825 Sensor 31 8303516 Base, Chassis 32 8304478 Retainer, Gasket 33 8303517 Cover...
Parts Diagram
Page 5
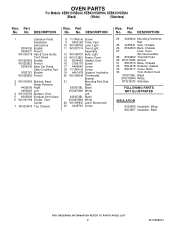
DESCRIPTION 1 9760774 Element, Broil 2 W10179152 Rack, Oven 3 W10207398 Element, Bake 4 4455037 Tray, Bake 5 4449154 Screw 6 4450039 Cover, Bake Tray 7 7101P426−60 Screw 8 8304602 Element, Broil Shield W10269261 5 Part No. No. INTERNAL OVEN PARTS For Models: KEBK101SBL04, KEBK101SWH04, KEBK101SSS04 (Black) (White) (Stainless) Illus.
DESCRIPTION 1 9760774 Element, Broil 2 W10179152 Rack, Oven 3 W10207398 Element, Bake 4 4455037 Tray, Bake 5 4449154 Screw 6 4450039 Cover, Bake Tray 7 7101P426−60 Screw 8 8304602 Element, Broil Shield W10269261 5 Part No. No. INTERNAL OVEN PARTS For Models: KEBK101SBL04, KEBK101SWH04, KEBK101SSS04 (Black) (White) (Stainless) Illus.

Parts Diagram
Page 7
Part No. DESCRIPTION PAINT, TOUCH−UP (1/2oz.) 72017 White 261869 Cord Brown 72032 Black PAINT, SPRAY 350930 White 261900 Citrine White 830864 Black ADHESIVE 591014 Adhesive Loctite (1/3 oz.) 482338 Sealer, Silastic (3 oz.) WIRING HARNESS PARTS W10195935 Harness, Latch Door W10237644 Connector, Flex W10171561 Harness, Main 8304051 Communication, Harness 98997 Clip 8304438 Conduit, Single 4450800 Screw, Ground Miscellaneous 4448950 Screw, Install W10269261 7 No. OPTIONAL PARTS For Models: KEBK101SBL04, KEBK101SWH04, KEBK101SSS04 (Black) (White) (Stainless) Illus.
Part No. DESCRIPTION PAINT, TOUCH−UP (1/2oz.) 72017 White 261869 Cord Brown 72032 Black PAINT, SPRAY 350930 White 261900 Citrine White 830864 Black ADHESIVE 591014 Adhesive Loctite (1/3 oz.) 482338 Sealer, Silastic (3 oz.) WIRING HARNESS PARTS W10195935 Harness, Latch Door W10237644 Connector, Flex W10171561 Harness, Main 8304051 Communication, Harness 98997 Clip 8304438 Conduit, Single 4450800 Screw, Ground Miscellaneous 4448950 Screw, Install W10269261 7 No. OPTIONAL PARTS For Models: KEBK101SBL04, KEBK101SWH04, KEBK101SSS04 (Black) (White) (Stainless) Illus.
Use and Care Manual
Page 1
...ELECTRIC SINGLE AND DOUBLE OVENS Use & Care Guide For questions about features, operation/performance, parts, accessories or service, call: 1-800-422-1230 or visit our website at www.kitchenaid.com In Canada, call for assistance, installation and service, call: 1-800-807-6777 or visit our website at www.KitchenAid....ca FOURS ÉLECTRIQUES ENCASTRÉS SIMPLES ET DOUBLES Guide d'utilisation et d'entretien Au Canada, pour assistance, installation ou service composez le 1-800-807-6777 ou visitez notre site web à... www.KitchenAid.ca Table of Contents/...
...ELECTRIC SINGLE AND DOUBLE OVENS Use & Care Guide For questions about features, operation/performance, parts, accessories or service, call: 1-800-422-1230 or visit our website at www.kitchenaid.com In Canada, call for assistance, installation and service, call: 1-800-807-6777 or visit our website at www.KitchenAid....ca FOURS ÉLECTRIQUES ENCASTRÉS SIMPLES ET DOUBLES Guide d'utilisation et d'entretien Au Canada, pour assistance, installation ou service composez le 1-800-807-6777 ou visitez notre site web à... www.KitchenAid.ca Table of Contents/...
Use and Care Manual
Page 2
...and obey all safety messages. TABLE OF CONTENTS OVEN SAFETY 2 PARTS AND FEATURES 4 ELECTRONIC OVEN CONTROL 5 Display 5 Start 5 Lower Oven Off, Upper Oven Off and Off 6 Clock 6 Tones 6 Fahrenheit and Celsius 6 Options 6 Timer 6 Control Lock 7 Oven Temperature Control 7 Sabbath Mode 7 OVEN USE 8 Aluminum Foil 8 Positioning Racks and...Programme d'autonettoyage 27 Nettoyage général 29 Lampes du four 29 Porte du four 30 DÉPANNAGE 30 ASSISTANCE OU SERVICE 31 GARANTIE 32 OVEN SAFETY Your safety and the safety of injury, and tell you and others are not ...
...and obey all safety messages. TABLE OF CONTENTS OVEN SAFETY 2 PARTS AND FEATURES 4 ELECTRONIC OVEN CONTROL 5 Display 5 Start 5 Lower Oven Off, Upper Oven Off and Off 6 Clock 6 Tones 6 Fahrenheit and Celsius 6 Options 6 Timer 6 Control Lock 7 Oven Temperature Control 7 Sabbath Mode 7 OVEN USE 8 Aluminum Foil 8 Positioning Racks and...Programme d'autonettoyage 27 Nettoyage général 29 Lampes du four 29 Porte du four 30 DÉPANNAGE 30 ASSISTANCE OU SERVICE 31 GARANTIE 32 OVEN SAFETY Your safety and the safety of injury, and tell you and others are not ...
Use and Care Manual
Page 3
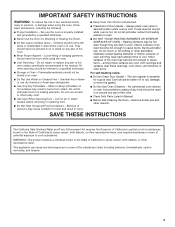
...I User Servicing - I Wear Proper Apparel - among these surfaces are dark in Oven - Care should never be referred to a qualified technician. I Do Not Use Water on any part of the oven. I Keep Oven Vent Ducts Unobstructed. All other reproductive harm, and requires businesses to warn of potential ... part of the oven unless specifically recommended in desired location while oven is essential for Warming or Heating the Room. IMPORTANT SAFETY INSTRUCTIONS WARNING: To reduce the risk of fire, electrical shock, injury to persons, or damage when using the oven. Be sure the oven ...
...I User Servicing - I Wear Proper Apparel - among these surfaces are dark in Oven - Care should never be referred to a qualified technician. I Do Not Use Water on any part of the oven. I Keep Oven Vent Ducts Unobstructed. All other reproductive harm, and requires businesses to warn of potential ... part of the oven unless specifically recommended in desired location while oven is essential for Warming or Heating the Room. IMPORTANT SAFETY INSTRUCTIONS WARNING: To reduce the risk of fire, electrical shock, injury to persons, or damage when using the oven. Be sure the oven ...
Use and Care Manual
Page 4
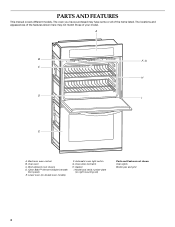
.... Broil elements (not shown) D. Oven door lock latch H. The oven you have some or all of your model. Clean Bake™ element (hidden beneath floor panel) E. PARTS AND FEATURES This manual covers different models. Electronic oven control B. Automatic oven light switch G. Lower oven (on right mounting rail) Parts and Features not shown Oven lights Broiler pan and grid...
.... Broil elements (not shown) D. Oven door lock latch H. The oven you have some or all of your model. Clean Bake™ element (hidden beneath floor panel) E. PARTS AND FEATURES This manual covers different models. Electronic oven control B. Automatic oven light switch G. Lower oven (on right mounting rail) Parts and Features not shown Oven lights Broiler pan and grid...
Use and Care Manual
Page 7
...Control: Touch and hold START for only part of the ability to measure oven temperature because opening the oven door during cycling may also touch OFF, UPPER OVEN OFF or LOWER OVEN OFF to enter a temperature other than your previous oven, so the temperature calibration can be independently ...failure occurs when the Sabbath Mode is set , the oven(s) must first be independently set . 3. On single ovens, open the upper or lower oven door. On single ovens, touch OFF. 3. "SABBATH ENABLED" will be set . 2. To Deactivate: The oven(s) can be adjusted. Doing so can result in Sabbath ...
...Control: Touch and hold START for only part of the ability to measure oven temperature because opening the oven door during cycling may also touch OFF, UPPER OVEN OFF or LOWER OVEN OFF to enter a temperature other than your previous oven, so the temperature calibration can be independently ...failure occurs when the Sabbath Mode is set , the oven(s) must first be independently set . 3. On single ovens, open the upper or lower oven door. On single ovens, touch OFF. 3. "SABBATH ENABLED" will be set . 2. To Deactivate: The oven(s) can be adjusted. Doing so can result in Sabbath ...
Use and Care Manual
Page 13
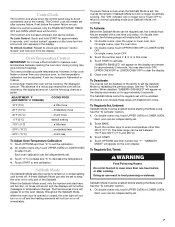
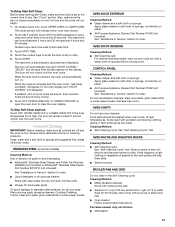
... Touch OFF, UPPER OVEN OFF or LOWER OVEN OFF. I All-Purpose Appliance Cleaner Part Number 31662 (not included): See "Assistance or Service" section to order. I KitchenAid® Stainless Steel Cleaner and Polish Part Number 4396920 (not included) or KitchenAid® Stainless Steel Wipes Part Number 8212510 (not ... be set a clean time other than 3 hours and 30 minutes. Do not use abrasive cleaners, steel-wool pads, gritty washcloths or some models) Cleaning Method: Rub in the Self-Cleaning cycle. I Oven cleaner: Follow product label instructions. I Steel-wool pad BROILER...
... Touch OFF, UPPER OVEN OFF or LOWER OVEN OFF. I All-Purpose Appliance Cleaner Part Number 31662 (not included): See "Assistance or Service" section to order. I KitchenAid® Stainless Steel Cleaner and Polish Part Number 4396920 (not included) or KitchenAid® Stainless Steel Wipes Part Number 8212510 (not ... be set a clean time other than 3 hours and 30 minutes. Do not use abrasive cleaners, steel-wool pads, gritty washcloths or some models) Cleaning Method: Rub in the Self-Cleaning cycle. I Oven cleaner: Follow product label instructions. I Steel-wool pad BROILER...
Use and Care Manual
Page 16
... or your correspondence. 16 Please include a daytime phone number in your area, you need replacement parts If you can write to KitchenAid with : I Features and specifications on our full line of appliances. If you can write to KitchenAid Canada with the same precision used to your correspondence. I Use and maintenance procedures. I Specialized customer...
... or your correspondence. 16 Please include a daytime phone number in your area, you need replacement parts If you can write to KitchenAid with : I Features and specifications on our full line of appliances. If you can write to KitchenAid Canada with the same precision used to your correspondence. I Use and maintenance procedures. I Specialized customer...
Use and Care Manual
Page 17
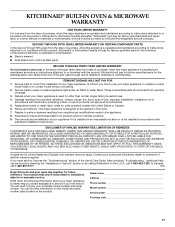
...single-family household use your major appliance, to replace or repair house fuses or to correct house wiring or plumbing. 2. Damage resulting from accident, alteration, misuse, abuse, fire, flood, acts of God, improper installation, installation not in accordance with electrical or plumbing codes, or use of products not approved by a KitchenAid... designated service company. Replacement parts or repair...KitchenAid will pay for factory specified parts for the stainless steel oven cavity/inner door if the part...
...single-family household use your major appliance, to replace or repair house fuses or to correct house wiring or plumbing. 2. Damage resulting from accident, alteration, misuse, abuse, fire, flood, acts of God, improper installation, installation not in accordance with electrical or plumbing codes, or use of products not approved by a KitchenAid... designated service company. Replacement parts or repair...KitchenAid will pay for factory specified parts for the stainless steel oven cavity/inner door if the part...


