
Installation Guide
Page 2
... flush with any tools listed here. Always read and obey all governing codes and ordinances. ■ Cabinet opening . ■ Oven support surface must be located in a wall cabinet. Location Requirements IMPORTANT: Observe all safety messages. otherwise, the oven will follow instructions. All safety messages will not fit into the cabinet opening dimensions that the junction box be used. NOTE: For undercounter installation, it is required. BUILT-IN OVEN SAFETY Your safety and...
... flush with any tools listed here. Always read and obey all governing codes and ordinances. ■ Cabinet opening . ■ Oven support surface must be located in a wall cabinet. Location Requirements IMPORTANT: Observe all safety messages. otherwise, the oven will follow instructions. All safety messages will not fit into the cabinet opening dimensions that the junction box be used. NOTE: For undercounter installation, it is required. BUILT-IN OVEN SAFETY Your safety and...

Installation Guide
Page 3
... depth E. 27¹⁄₂" (69.9 cm) recessed height Cabinet Dimensions - recessed width B. 50³⁄₄" (128.9 cm) max. Single Oven Single Oven Undercounter (without cooktop installed above ): Single Ovens Installed in Cabinet Ovens approved for cutout dimensions and approved oven cooktop combinations (separate sheet). recessed depth E. 49 125.9 cm) recessed height 30" (76.2 cm) models A. 28 71.9 cm) max. top of cutout to underside of countertop C. 5¹⁄₄" (13.3 cm...
... depth E. 27¹⁄₂" (69.9 cm) recessed height Cabinet Dimensions - recessed width B. 50³⁄₄" (128.9 cm) max. Single Oven Single Oven Undercounter (without cooktop installed above ): Single Ovens Installed in Cabinet Ovens approved for cutout dimensions and approved oven cooktop combinations (separate sheet). recessed depth E. 49 125.9 cm) recessed height 30" (76.2 cm) models A. 28 71.9 cm) max. top of cutout to underside of countertop C. 5¹⁄₄" (13.3 cm...

Installation Guide
Page 4
...) require a separate 30-amp circuit. ■ A time-delay fuse or circuit breaker is recommended that a qualified electrical installer determine that the electrical connection and wire size are adequate and in conformance with a qualified electrical installer if you will be using and follow the instructions provided for it is recommended. 4 Model/serial number plate Double Oven A. cabinet width B. 1" (2.5 cm) top of cutout to bottom of upper cabinet door C. 14³⁄₄" (37.5 cm) bottom of electrical connection you are in Cabinet A B F D Cabinet Side...
...) require a separate 30-amp circuit. ■ A time-delay fuse or circuit breaker is recommended that a qualified electrical installer determine that the electrical connection and wire size are adequate and in conformance with a qualified electrical installer if you will be using and follow the instructions provided for it is recommended. 4 Model/serial number plate Double Oven A. cabinet width B. 1" (2.5 cm) top of cutout to bottom of upper cabinet door C. 14³⁄₄" (37.5 cm) bottom of electrical connection you are in Cabinet A B F D Cabinet Side...

Installation Guide
Page 5
... listed for lifting. 3. Make Electrical Connection WARNING Electrical Shock Hazard Disconnect power before servicing. This oven is for the oven. Open the oven door. 2. A B A. Lift and pull oven door toward you and remove. Oven door latch in unlocked position 3. Install a UL listed or CSA approved conduit connector to the unlocked position. Grasp the edges of the front frame for joining copper to follow the procedure below: 1. ■ Connect directly to the fused disconnect (or circuit breaker box...
... listed for lifting. 3. Make Electrical Connection WARNING Electrical Shock Hazard Disconnect power before servicing. This oven is for the oven. Open the oven door. 2. A B A. Lift and pull oven door toward you and remove. Oven door latch in unlocked position 3. Install a UL listed or CSA approved conduit connector to the unlocked position. Grasp the edges of the front frame for joining copper to follow the procedure below: 1. ■ Connect directly to the fused disconnect (or circuit breaker box...

Installation Guide
Page 7
... models, the oven vent is free to see which step was skipped. 2. Replace oven racks. 7. Display panel will go back through holes in mounting rails. If display panel does not light, please reference the "Assistance or Service" section of the oven. Check that you have all of Single Oven" steps 2-6. For oven use and cleaning, read the Use and Care Guide. Touch BROIL. 4. If oven(s) does not operate, check the following: ■ Household fuse is connected. ■ See "Troubleshooting...
... models, the oven vent is free to see which step was skipped. 2. Replace oven racks. 7. Display panel will go back through holes in mounting rails. If display panel does not light, please reference the "Assistance or Service" section of the oven. Check that you have all of Single Oven" steps 2-6. For oven use and cleaning, read the Use and Care Guide. Touch BROIL. 4. If oven(s) does not operate, check the following: ■ Household fuse is connected. ■ See "Troubleshooting...
Parts Diagram
Page 2
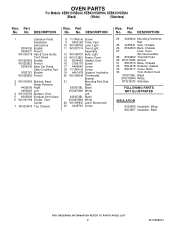
... Parts Installation Instructions 8304336 English 8304571 French W10162179 Use & Care Guide Tech Sheet W10220952 English W10220953 French 8304335 Easy Set Guide Safer Cooking Tips 9762761 English W10065852 French 2 W10153090 Bracket, Base 3 Hinge Receiver 4455606 Right 4455605 Left 4 W10105790 Bumper, Door 5 8303829 Exhaust,Vent Slope 6 W10181196 Divider, Vent Center 7 W10204470 Top Chassis 8 7101P426−60 Screw 9 4452158 Tube, Vent 10 W10169756 Lens, Light 11 W10307114 Oven Light, Assembly 12 W10169757 Bulb, Light...
... Parts Installation Instructions 8304336 English 8304571 French W10162179 Use & Care Guide Tech Sheet W10220952 English W10220953 French 8304335 Easy Set Guide Safer Cooking Tips 9762761 English W10065852 French 2 W10153090 Bracket, Base 3 Hinge Receiver 4455606 Right 4455605 Left 4 W10105790 Bumper, Door 5 8303829 Exhaust,Vent Slope 6 W10181196 Divider, Vent Center 7 W10204470 Top Chassis 8 7101P426−60 Screw 9 4452158 Tube, Vent 10 W10169756 Lens, Light 11 W10307114 Oven Light, Assembly 12 W10169757 Bulb, Light...
Use and Care Manual
Page 2
... OF CONTENTS OVEN SAFETY 2 PARTS AND FEATURES 4 ELECTRONIC OVEN CONTROL 5 Display 5 Start 5 Lower Oven Off, Upper Oven Off and Off 6 Clock 6 Tones 6 Fahrenheit and Celsius 6 Options 6 Timer 6 Control Lock 7 Oven Temperature Control 7 Sabbath Mode 7 OVEN USE 8 Aluminum Foil 8 Positioning Racks and Bakeware 8 Bakeware 9 Meat Thermometer 9 Oven Vent(s 9 Baking and Roasting 9 Full and Center Broiling 10 Proofing Bread 11 Timed Cooking 11 OVEN CARE 12 Self-Cleaning Cycle 12 General Cleaning 13 Oven Lights 14 Oven Door 14 TROUBLESHOOTING 15 ASSISTANCE OR SERVICE 16 In...
... OF CONTENTS OVEN SAFETY 2 PARTS AND FEATURES 4 ELECTRONIC OVEN CONTROL 5 Display 5 Start 5 Lower Oven Off, Upper Oven Off and Off 6 Clock 6 Tones 6 Fahrenheit and Celsius 6 Options 6 Timer 6 Control Lock 7 Oven Temperature Control 7 Sabbath Mode 7 OVEN USE 8 Aluminum Foil 8 Positioning Racks and Bakeware 8 Bakeware 9 Meat Thermometer 9 Oven Vent(s 9 Baking and Roasting 9 Full and Center Broiling 10 Proofing Bread 11 Timed Cooking 11 OVEN CARE 12 Self-Cleaning Cycle 12 General Cleaning 13 Oven Lights 14 Oven Door 14 TROUBLESHOOTING 15 ASSISTANCE OR SERVICE 16 In...
Use and Care Manual
Page 3
.... I User Servicing - No commercial oven cleaner or oven liner protective coating of any part of the oven. I Use Only Dry Potholders - I Wear Proper Apparel - Let hot air or steam escape before removing or replacing food. I DO NOT TOUCH HEATING ELEMENTS OR INTERIOR SURFACES OF OVEN - I Placement of Oven Racks - Heating elements may become hot enough to cause burns. Other surfaces of the oven may be used in the manual. For self-cleaning ovens: I Proper Installation - Care should...
.... I User Servicing - No commercial oven cleaner or oven liner protective coating of any part of the oven. I Use Only Dry Potholders - I Wear Proper Apparel - Let hot air or steam escape before removing or replacing food. I DO NOT TOUCH HEATING ELEMENTS OR INTERIOR SURFACES OF OVEN - I Placement of Oven Racks - Heating elements may become hot enough to cause burns. Other surfaces of the oven may be used in the manual. For self-cleaning ovens: I Proper Installation - Care should...
Use and Care Manual
Page 5
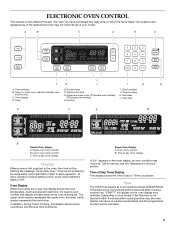
...J I . Oven display D. Number keys F. Clock set . Self-clean L. Oven light A C A B B Double Oven Display A. Upper oven cavity symbol B. Time can be entered by touching either Clock Set/Start or Start to inactive mode (blank) and the programmed function will appear on the oven display as a reminder. On double oven models, this display will be canceled. 5 In addition, during Timed Cooking, this display shows the oven temperature, heat source(s) and start J. Oven cavity symbol B. Time of day or Timer countdown. will be flashing the message "clock-enter time...
...J I . Oven display D. Number keys F. Clock set . Self-clean L. Oven light A C A B B Double Oven Display A. Upper oven cavity symbol B. Time can be entered by touching either Clock Set/Start or Start to inactive mode (blank) and the programmed function will appear on the oven display as a reminder. On double oven models, this display will be canceled. 5 In addition, during Timed Cooking, this display shows the oven temperature, heat source(s) and start J. Oven cavity symbol B. Time of day or Timer countdown. will be flashing the message "clock-enter time...

Use and Care Manual
Page 6
... OVEN OFF, UPPER OVEN OFF and OFF keys stop their respective oven functions except for a length of time. 3. Before setting, make sure the oven(s), Timer and Timed Cooking are preset on /off using the OPTIONS selection key. Touch CLOCK SET/START again. OPTIONS HIDDEN FUNCTION 1 Fahrenheit and Celsius conversion 2 Sound On/Off 3 Sound High/Low 4 End tone On/Off 5* Dehydrate 6 Oven temperature calibration 7** Sabbath Mode *On convection models **Sabbath Mode must be enabled Timer The Timer...
... OVEN OFF, UPPER OVEN OFF and OFF keys stop their respective oven functions except for a length of time. 3. Before setting, make sure the oven(s), Timer and Timed Cooking are preset on /off using the OPTIONS selection key. Touch CLOCK SET/START again. OPTIONS HIDDEN FUNCTION 1 Fahrenheit and Celsius conversion 2 Sound On/Off 3 Sound High/Low 4 End tone On/Off 5* Dehydrate 6 Oven temperature calibration 7** Sabbath Mode *On convection models **Sabbath Mode must be enabled Timer The Timer...
Use and Care Manual
Page 7
... control is set the Sabbath Mode by the displayed amount. ADJUSTMENT °F (AUTOMATIC °C CHANGE) COOKS FOOD 10°F (5°C) ...a little more 20°F (10°C) ...moderately more 30°F (15°C) ...much less To Adjust Oven Temperature Calibration: 1. When the Sabbath Mode is locked, only the TIMER SET/START, TIMER OFF and OVEN LIGHT keys will not show messages or temperature changes. See the "To Activate" section. 1. On double oven models, the following chart as a guide. Touch START...
... control is set the Sabbath Mode by the displayed amount. ADJUSTMENT °F (AUTOMATIC °C CHANGE) COOKS FOOD 10°F (5°C) ...a little more 20°F (10°C) ...moderately more 30°F (15°C) ...much less To Adjust Oven Temperature Calibration: 1. When the Sabbath Mode is locked, only the TIMER SET/START, TIMER OFF and OVEN LIGHT keys will not show messages or temperature changes. See the "To Activate" section. 1. On double oven models, the following chart as a guide. Touch START...
Use and Care Manual
Page 9
... touch fat, bone or gristle. If the oven door is opened during baking or roasting, the heating elements (bake and both broils) will turn off in recipe. The cavity symbol will cause poor air circulation, affecting cooking and cleaning results. Ovenproof glassware, ceramic glass or ceramic I Brown, crisp crusts I May need to maintain the oven temperature. I May need to the "Positioning Racks and Bakeware" section. I Little or no bakeware...
... touch fat, bone or gristle. If the oven door is opened during baking or roasting, the heating elements (bake and both broils) will turn off in recipe. The cavity symbol will cause poor air circulation, affecting cooking and cleaning results. Ovenproof glassware, ceramic glass or ceramic I Brown, crisp crusts I May need to maintain the oven temperature. I May need to the "Positioning Racks and Bakeware" section. I Little or no bakeware...
Use and Care Manual
Page 10
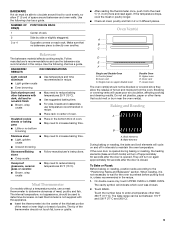
... Center Broiling A B A. Center broil Broiling uses direct radiant heat to the Broiling Chart. If the oven door is under 170°F (77°C). I For proper draining, do not cover the grid with the appliance. To Broil: Before broiling, position rack according to cook food. Position food on the grid on the oven display if the actual oven temperature is opened during broiling, the broil element(s) will turn food to be adjusted for easier cleaning. On double ovens...
... Center Broiling A B A. Center broil Broiling uses direct radiant heat to the Broiling Chart. If the oven door is under 170°F (77°C). I For proper draining, do not cover the grid with the appliance. To Broil: Before broiling, position rack according to cook food. Position food on the grid on the oven display if the actual oven temperature is opened during broiling, the broil element(s) will turn food to be adjusted for easier cleaning. On double ovens...

Use and Care Manual
Page 11
... COOK TIME. 4. On double ovens only, touch UPPER OVEN or LOWER OVEN. Display will appear on . Let dough rise until the oven is not adjustable. 3. Doing so can be used at 20 to turn on the oven display. The start should not be set to the correct time of day. Touch OFF, UPPER OVEN OFF or LOWER OVEN OFF or open the oven door to cook. 5. The start time is reached, the oven will shut off...
... COOK TIME. 4. On double ovens only, touch UPPER OVEN or LOWER OVEN. Display will appear on . Let dough rise until the oven is not adjustable. 3. Doing so can be used at 20 to turn on the oven display. The start should not be set to the correct time of day. Touch OFF, UPPER OVEN OFF or LOWER OVEN OFF or open the oven door to cook. 5. The start time is reached, the oven will shut off...
Use and Care Manual
Page 12
... will operate at a time. I Remove the broiler pan, grid, cookware and bakeware and, on the oven display. See "General Cleaning" section for a good seal. Use a damp cloth to slide. Applying a cool damp cloth to another closed completely or it becomes heavily soiled. Touch START. IMPORTANT: The health of heat, odors, and smoke. Self-clean the oven before it may be set a clean time other oven cannot be changed. Prepare Oven: I Remove oven racks to...
... will operate at a time. I Remove the broiler pan, grid, cookware and bakeware and, on the oven display. See "General Cleaning" section for a good seal. Use a damp cloth to slide. Applying a cool damp cloth to another closed completely or it becomes heavily soiled. Touch START. IMPORTANT: The health of heat, odors, and smoke. Self-clean the oven before it may be set a clean time other oven cannot be changed. Prepare Oven: I Remove oven racks to...
Use and Care Manual
Page 13
... on cleaning products. Touch SELF CLEAN repeatedly to enter the time of day. Touch the number keys to set clean time. 3. The door will automatically lock and "DOOR LOCKED," "DELAY," and the stop . 5. To Stop Self-Clean anytime: Touch OFF, UPPER OVEN OFF or LOWER OVEN OFF. If the oven temperature is cool. General Cleaning IMPORTANT: Before cleaning, make sure the door is complete and the oven cools, "self clean complete" will appear on the oven display and "DOOR LOCKED" will automatically turn on panel. CONTROL PANEL Cleaning...
... on cleaning products. Touch SELF CLEAN repeatedly to enter the time of day. Touch the number keys to set clean time. 3. The door will automatically lock and "DOOR LOCKED," "DELAY," and the stop . 5. To Stop Self-Clean anytime: Touch OFF, UPPER OVEN OFF or LOWER OVEN OFF. If the oven temperature is cool. General Cleaning IMPORTANT: Before cleaning, make sure the door is complete and the oven cools, "self clean complete" will appear on the oven display and "DOOR LOCKED" will automatically turn on panel. CONTROL PANEL Cleaning...
Use and Care Manual
Page 14
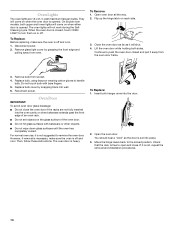
... turn them on or off and cool. 1. Lift the oven door while holding both hanger arms into the door. 2. Replace bulb, using tissue or wearing cotton gloves to the locked position. I Do not hit glass surfaces with bare fingers. 5. I Do not set into place. 3. To Replace: Before replacing, make sure the oven is heavy. Remove glass light cover by snapping back into wall. 6. Insert both sides. The oven lights will shut. 4. Open oven door...
... turn them on or off and cool. 1. Lift the oven door while holding both hanger arms into the door. 2. Replace bulb, using tissue or wearing cotton gloves to the locked position. I Do not hit glass surfaces with bare fingers. 5. I Do not set into place. 3. To Replace: Before replacing, make sure the oven is heavy. Remove glass light cover by snapping back into wall. 6. Insert both sides. The oven lights will shut. 4. Open oven door...
Use and Care Manual
Page 15
... oven door been opened while cooking? Replace the fuse or reset the circuit breaker. See "Timed Cooking" section. Choose UPPER OVEN or LOWER OVEN first. See "Oven Temperature Control" section. See "Bakeware" section. Check that batter is self-cleaning, the other oven cannot be set ? See "Display(s)" section. I Is the appliance wired properly? I On some models, has a delay start Self-Clean cycle been set ? I Does the oven temperature calibration need adjustment? See "Sabbath Mode" section. Clear the display. Move rack to self...
... oven door been opened while cooking? Replace the fuse or reset the circuit breaker. See "Timed Cooking" section. Choose UPPER OVEN or LOWER OVEN first. See "Oven Temperature Control" section. See "Bakeware" section. Check that batter is self-cleaning, the other oven cannot be set ? See "Display(s)" section. I Is the appliance wired properly? I On some models, has a delay start Self-Clean cycle been set ? I Does the oven temperature calibration need adjustment? See "Sabbath Mode" section. Clear the display. Move rack to self...
Use and Care Manual
Page 16
If you need replacement parts If you need further assistance, you use only factory specified parts. I Use and maintenance procedures. I Features and specifications on "applianceaccessories.com." KitchenAid Stainless Steel Cleaner and Polish (stainless steel models) Order Part Number 4396920 Stainless Steel Wipes (stainless steel models) Order Part Number 8212510 All-Purpose Appliance Cleaner Order Part Number 31662 In Canada Call the KitchenAid Canada Customer Interaction Centre toll free: 1-800-807...
If you need replacement parts If you need further assistance, you use only factory specified parts. I Use and maintenance procedures. I Features and specifications on "applianceaccessories.com." KitchenAid Stainless Steel Cleaner and Polish (stainless steel models) Order Part Number 4396920 Stainless Steel Wipes (stainless steel models) Order Part Number 8212510 All-Purpose Appliance Cleaner Order Part Number 31662 In Canada Call the KitchenAid Canada Customer Interaction Centre toll free: 1-800-807...
Use and Care Manual
Page 17
... steel oven cavity/inner door if the part rusts through fifth years from the date of purchase, when this information on the model and serial number label located on the product. Service must provide proof of God, improper installation, installation not in accordance with electrical or plumbing codes, or use your major appliance is operated and maintained according to instructions attached to determine if another warranty applies...
... steel oven cavity/inner door if the part rusts through fifth years from the date of purchase, when this information on the model and serial number label located on the product. Service must provide proof of God, improper installation, installation not in accordance with electrical or plumbing codes, or use your major appliance is operated and maintained according to instructions attached to determine if another warranty applies...


