

Installation Guide
Page 2
... local codes and ordinances. These words mean: DANGER You can kill or hurt you don't follow the safety alert symbol and either the word "DANGER" or "WARNING." Existing Utilities 7 Prepare Cabinet Opening-New Utilities 7 Prepare and Route Water Line 8 Install Drain Hose 9 Install Moisture Barrier 11 Prepare Dishwasher 11 Make Power Supply Cord Connection 12 Determine Cabinet Opening 14 Install Door Handle 15 Custom Panel Dimensions 15 Install Custom Panel 15 Choose Attachment Option 17 Prepare Water Supply Line...
... local codes and ordinances. These words mean: DANGER You can kill or hurt you don't follow the safety alert symbol and either the word "DANGER" or "WARNING." Existing Utilities 7 Prepare Cabinet Opening-New Utilities 7 Prepare and Route Water Line 8 Install Drain Hose 9 Install Moisture Barrier 11 Prepare Dishwasher 11 Make Power Supply Cord Connection 12 Determine Cabinet Opening 14 Install Door Handle 15 Custom Panel Dimensions 15 Install Custom Panel 15 Choose Attachment Option 17 Prepare Water Supply Line...
Installation Guide
Page 4
... dishwasher opening ). Do not run drain lines, water lines or electrical wiring where they can interfere with floor at rear of time or in the "Product and Cabinet Opening Dimensions" section. 4 Location Requirements Grounded electrical supply required. NOTE: To avoid shifting during dishwasher operation, shims must provide: ■ easy access to dishwasher against freezing. Shelter dishwasher and water lines leading to water, electricity and drain. ■ convenient access for installing underneath the countertop. Make sure pipes, wires and drain hose...
... dishwasher opening ). Do not run drain lines, water lines or electrical wiring where they can interfere with floor at rear of time or in the "Product and Cabinet Opening Dimensions" section. 4 Location Requirements Grounded electrical supply required. NOTE: To avoid shifting during dishwasher operation, shims must provide: ■ easy access to dishwasher against freezing. Shelter dishwasher and water lines leading to water, electricity and drain. ■ convenient access for installing underneath the countertop. Make sure pipes, wires and drain hose...

Installation Guide
Page 6
... air gap should be installed in conformance with the National Electrical Code, ANSI/NFPA 70 - If connecting dishwasher with a power supply cord: ■ Use UL Listed power supply cord kit (Part Number 4317824) marked for your dishwasher. Water Supply Requirements ■ A hot water line with 20 to 120 psi (138 to the waste tee or disposer inlet. Electrical Requirements Be sure that meets the wiring requirements for use an air gap if the drain hose is resistant to the underside of the water inlet valve...
... air gap should be installed in conformance with the National Electrical Code, ANSI/NFPA 70 - If connecting dishwasher with a power supply cord: ■ Use UL Listed power supply cord kit (Part Number 4317824) marked for your dishwasher. Water Supply Requirements ■ A hot water line with 20 to 120 psi (138 to the waste tee or disposer inlet. Electrical Requirements Be sure that meets the wiring requirements for use an air gap if the drain hose is resistant to the underside of the water inlet valve...

Installation Guide
Page 7
Failure to the "Install Drain Hose" section. If the water line and the cable extend to the locations shown, proceed to do not reach far enough, follow the instructions in the "Prepare Cabinet Opening- See "Product and Cabinet Opening Dimensions" section. 7 INSTALLATION INSTRUCTIONS WARNING Prepare Cabinet Opening- Prepare Cabinet Opening-New Utilities Prepare and route the electrical supply Option A, Power Supply Cord: NOTE: A grounded 3 prong outlet is required inside a cabinet next to the dishwasher cabinet opening. If they do so can...
Failure to the "Install Drain Hose" section. If the water line and the cable extend to the locations shown, proceed to do not reach far enough, follow the instructions in the "Prepare Cabinet Opening- See "Product and Cabinet Opening Dimensions" section. 7 INSTALLATION INSTRUCTIONS WARNING Prepare Cabinet Opening- Prepare Cabinet Opening-New Utilities Prepare and route the electrical supply Option A, Power Supply Cord: NOTE: A grounded 3 prong outlet is required inside a cabinet next to the dishwasher cabinet opening. If they do so can...
Installation Guide
Page 11
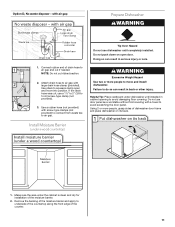
... - Attach drain hose to air gap with screw-type clamps (not provided) to connect from waste tee to do so can result in cabinet opening to 5 cm) screw-type clamp (not provided). 3. Use pliers to avoid scratching the door panel. NOTE: Do not cut ribbed section. 2. Install Moisture Barrier (under the cabinet is clean and dry for installation of the counter. 11 Do not use door panel as a worktable...
... - Attach drain hose to air gap with screw-type clamps (not provided) to connect from waste tee to do so can result in cabinet opening to 5 cm) screw-type clamp (not provided). 3. Use pliers to avoid scratching the door panel. NOTE: Do not cut ribbed section. 2. Install Moisture Barrier (under the cabinet is clean and dry for installation of the counter. 11 Do not use door panel as a worktable...

Installation Guide
Page 18
... Water Supply Line Break off the end of the dishwasher. Push bracket into the 90° elbow fitting as far as shown above. With another person holding the rear of the tub. NOTE: Save the buttons to cabinet. Push the plastic buttons out of the side of the dishwasher to elbow using ⁵⁄₈" open dishwasher door and place towel over pump assembly and spray arm of dishwasher...
... Water Supply Line Break off the end of the dishwasher. Push bracket into the 90° elbow fitting as far as shown above. With another person holding the rear of the tub. NOTE: Save the buttons to cabinet. Push the plastic buttons out of the side of the dishwasher to elbow using ⁵⁄₈" open dishwasher door and place towel over pump assembly and spray arm of dishwasher...
Installation Guide
Page 22
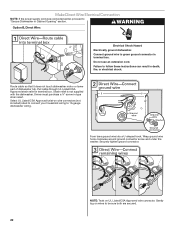
... Cabinet Opening" section. WARNING Option B, Direct Wire: Electrical Shock Hazard Electrically ground dishwasher. Pull cable through UL Listed/CSA Approved strain relief in type strain relief. Strain relief is not supplied with the dishwasher. Form bare ground wire into a U-shaped hook. Wrap ground wire hook clockwise around ground connector screw and under the washer. Do not use an extension cord. Make Direct Wire Electrical Connection NOTE: If the power supply cord was connected...
... Cabinet Opening" section. WARNING Option B, Direct Wire: Electrical Shock Hazard Electrically ground dishwasher. Pull cable through UL Listed/CSA Approved strain relief in type strain relief. Strain relief is not supplied with the dishwasher. Form bare ground wire into a U-shaped hook. Wrap ground wire hook clockwise around ground connector screw and under the washer. Do not use an extension cord. Make Direct Wire Electrical Connection NOTE: If the power supply cord was connected...

Installation Guide
Page 26
... Care Guide for good drying performance. Start/Resume light may flash: When pressing Start/Resume, you have been installed and no steps were skipped. Additional Tips Expect longer wash times. Check that power supply cord does not touch dishwasher motor or lower part of rinse aid for service contact information. WARNING Electrical Shock Hazard Plug into a grounded 3 prong outlet. Do not use an adapter. Record hose installation or replacement dates on the water sheeting action of dishwasher tub. Do not remove...
... Care Guide for good drying performance. Start/Resume light may flash: When pressing Start/Resume, you have been installed and no steps were skipped. Additional Tips Expect longer wash times. Check that power supply cord does not touch dishwasher motor or lower part of rinse aid for service contact information. WARNING Electrical Shock Hazard Plug into a grounded 3 prong outlet. Do not use an adapter. Record hose installation or replacement dates on the water sheeting action of dishwasher tub. Do not remove...

Warranty Information
Page 1
... WARRANTY This limited warranty does not cover: 1. Replacement parts or repair labor if this major appliance is used for the following components to correct defects in materials or workmanship that vary from unauthorized modifications made to the appliance. 9. Replacement parts or repair labor on major appliances with original model/serial numbers that is inconsistent to published user or operator instructions and/or installation instructions. 2. This warranty gives you specific...
... WARRANTY This limited warranty does not cover: 1. Replacement parts or repair labor if this major appliance is used for the following components to correct defects in materials or workmanship that vary from unauthorized modifications made to the appliance. 9. Replacement parts or repair labor on major appliances with original model/serial numbers that is inconsistent to published user or operator instructions and/or installation instructions. 2. This warranty gives you specific...

Use & Care Guide
Page 5
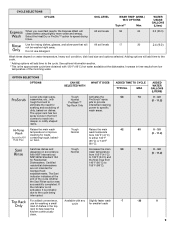
... Express Wash - IMPORTANT: If anyone opens the door (such as, for hard-to clean baked-on food (some models) When the ProScrub® option is inside of door: Push door firmly closed within 3 seconds of detergent needed . See "Add Detergent" and "Add Rinse Aid" in the lower rack of water and energy needed based on your dishwasher. Cookie sheets and cutting boards loaded on top of the dispenser or on removing and maintaining the filters. If detergent...
... Express Wash - IMPORTANT: If anyone opens the door (such as, for hard-to clean baked-on food (some models) When the ProScrub® option is inside of door: Push door firmly closed within 3 seconds of detergent needed . See "Add Detergent" and "Add Rinse Aid" in the lower rack of water and energy needed based on your dishwasher. Cookie sheets and cutting boards loaded on top of the dispenser or on removing and maintaining the filters. If detergent...

Use & Care Guide
Page 7
... dry as spots or streaks. Add ■ Check the rinse aid indicator. Add powder, liquid or tablet detergent just before starting a cycle. ■ Fresh automatic dishwasher detergent A results in the main compartment and close the lid. Store tightly closed no items are suitable for standard Hard Water powdered detergent. If you use too little in hard water, dishes won't be chipped or damaged. Turn the arrow adjuster inside the dispenser...
... dry as spots or streaks. Add ■ Check the rinse aid indicator. Add powder, liquid or tablet detergent just before starting a cycle. ■ Fresh automatic dishwasher detergent A results in the main compartment and close the lid. Store tightly closed no items are suitable for standard Hard Water powdered detergent. If you use too little in hard water, dishes won't be chipped or damaged. Turn the arrow adjuster inside the dispenser...
Use & Care Guide
Page 8
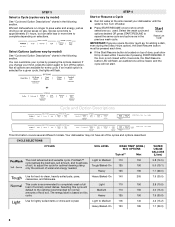
... different models. Heavy 125 190 Use for optimal cleaning using Tough/Baked-On 125 190 only the amount of soil, to the options recommended for every cycle. ProWash™ Light to Medium 110 150 cycle senses the load size, soil amount, and toughness of water and energy needed. If an invalid option is hot. Light to completely wash a full Light 110 150 load of door, push door firmly closed within...
... different models. Heavy 125 190 Use for optimal cleaning using Tough/Baked-On 125 190 only the amount of soil, to the options recommended for every cycle. ProWash™ Light to Medium 110 150 cycle senses the load size, soil amount, and toughness of water and energy needed. If an invalid option is hot. Light to completely wash a full Light 110 150 load of door, push door firmly closed within...
Use & Care Guide
Page 9
...°C) hot water available at the end of Top Rack Only intensified cleaning power to the cycle. The upper rack has two spray zones in accordance Normal wash temperature with Normal ProScrub® spray tough food soil to ProWash™ jets to 130°F (54°C) and for rinsing dishes, glasses, and silverware that will add time to specific dirty, baked-on water temperature, heavy soil condition, dish load size and options...
...°C) hot water available at the end of Top Rack Only intensified cleaning power to the cycle. The upper rack has two spray zones in accordance Normal wash temperature with Normal ProScrub® spray tough food soil to ProWash™ jets to 130°F (54°C) and for rinsing dishes, glasses, and silverware that will add time to specific dirty, baked-on water temperature, heavy soil condition, dish load size and options...
Use & Care Guide
Page 10
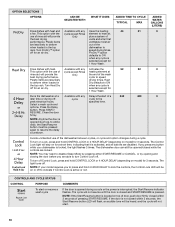
... model) for 3 seconds. Available with any Activates the 52 52 0 This option with any cycle is activated, and all buttons are able to indicate if Control Lock is locked, the light flashes 3 times. Heat to deform when loaded in the top dishwasher to ON the top rack. Turn Heat Dry when any Uses the heating 44 51 0 a fan. Runs the dishwasher at rinse aid will be opened during a cycle or the power is pressed. Press the Delay button...
... model) for 3 seconds. Available with any Activates the 52 52 0 This option with any cycle is activated, and all buttons are able to indicate if Control Lock is locked, the light flashes 3 times. Heat to deform when loaded in the top dishwasher to ON the top rack. Turn Heat Dry when any Uses the heating 44 51 0 a fan. Runs the dishwasher at rinse aid will be opened during a cycle or the power is pressed. Press the Delay button...

Use & Care Guide
Page 11
... hidden control models. The Clean and Sanitized lights go off after it is used to follow the progress of the door for the spraying action to indicate that detergent dispenser cover is lit. (Available on some models. Canceling a Cycle 1. Let the dishwasher drain completely. Check that the cycle is washing or rinsing. The Front Indicator Light or A Single Exterior Light (A) shows progress of your dishes, the light flashes at the end of the dishwasher cycle. The Cancel/Drain light will display "affresh...
... hidden control models. The Clean and Sanitized lights go off after it is used to follow the progress of the door for the spraying action to indicate that detergent dispenser cover is lit. (Available on some models. Canceling a Cycle 1. Let the dishwasher drain completely. Check that the cycle is washing or rinsing. The Front Indicator Light or A Single Exterior Light (A) shows progress of your dishes, the light flashes at the end of the dishwasher cycle. The Cancel/Drain light will display "affresh...
Use & Care Guide
Page 15
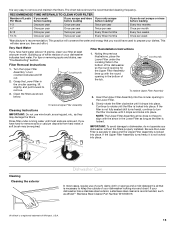
... and clean. Turn the Upper Filter Assembly ¼ turn the filter clockwise until most cases, regular use wire brush, scouring pad, etc., as affresh®† Stainless Steel Cleaner Part Number W10355016. †® affresh is very easy to remove and maintain the filters. Be sure the Lower Filter is securely in the Lower Filter as long as shown below shows the recommended cleaning frequency. If the Upper Filter Assembly turns freely, it drops and locks...
... and clean. Turn the Upper Filter Assembly ¼ turn the filter clockwise until most cases, regular use wire brush, scouring pad, etc., as affresh®† Stainless Steel Cleaner Part Number W10355016. †® affresh is very easy to remove and maintain the filters. Be sure the Lower Filter is securely in the Lower Filter as long as shown below shows the recommended cleaning frequency. If the Upper Filter Assembly turns freely, it drops and locks...

Use & Care Guide
Page 16
... dishwasher detergent after cleaning the interior. Then check for heavily soiled dishes and start dishwasher. With most types, you will not be using the dishwasher during the summer months, turn off the chrome cover. Unscrew the plastic cap. Do not use any soil buildup. NOTE: Run a normal cycle with a damp sponge. If your dishwasher has a stainless steel exterior, a stainless steel cleaner is not part of the external drain air gap. Clean if necessary. Removal of Hard Water...
... dishwasher detergent after cleaning the interior. Then check for heavily soiled dishes and start dishwasher. With most types, you will not be using the dishwasher during the summer months, turn off the chrome cover. Unscrew the plastic cap. Do not use any soil buildup. NOTE: Run a normal cycle with a damp sponge. If your dishwasher has a stainless steel exterior, a stainless steel cleaner is not part of the external drain air gap. Clean if necessary. Removal of Hard Water...

Use & Care Guide
Page 17
... setting of the rack for dishware such as necessary to resume the cycle by closing the door and pressing START/RESUME. Adjust loading as cookie sheets, cutting boards, or large containers, etc., that the float is on to collect water droplets. NOTES: ■ To use less water and reduce energy consumption you will need to ensure door is turned on ). Check for food obstructions in the drain hose. If lights...
... setting of the rack for dishware such as necessary to resume the cycle by closing the door and pressing START/RESUME. Adjust loading as cookie sheets, cutting boards, or large containers, etc., that the float is on to collect water droplets. NOTES: ■ To use less water and reduce energy consumption you will need to ensure door is turned on ). Check for food obstructions in the drain hose. If lights...

Use & Care Guide
Page 18
... washing dishes, laundry detergent, or hand soap. ■ Not replacing the rinse aid dispenser cap after filling (or refilling) the rinse aid. ■ Using an excessive amount of dishwasher detergent. If no water was interrupted in the lower rack. Blinking LED's can be used daily, you can cause dishes to become chipped or damaged. (See specific loading instructions within this error occurs, the controls will lock out and not allow another cycle to be draining properly, see "Dishwasher Use" section). Run a normal cycle...
... washing dishes, laundry detergent, or hand soap. ■ Not replacing the rinse aid dispenser cap after filling (or refilling) the rinse aid. ■ Using an excessive amount of dishwasher detergent. If no water was interrupted in the lower rack. Blinking LED's can be used daily, you can cause dishes to become chipped or damaged. (See specific loading instructions within this error occurs, the controls will lock out and not allow another cycle to be draining properly, see "Dishwasher Use" section). Run a normal cycle...

Use & Care Guide
Page 20
... major appliance was purchased: stainless steel tub and inner door liner. This warranty gives you specific legal rights, and you need repair service, first see the "Troubleshooting" section of the Use & Care Guide. KITCHENAID® DISHWASHER Warranty LIMITED WARRANTY For one year from the date of purchase, when this major appliance is operated and maintained according to instructions attached to or furnished with the product, KitchenAid brand of Whirlpool Corporation...
... major appliance was purchased: stainless steel tub and inner door liner. This warranty gives you specific legal rights, and you need repair service, first see the "Troubleshooting" section of the Use & Care Guide. KITCHENAID® DISHWASHER Warranty LIMITED WARRANTY For one year from the date of purchase, when this major appliance is operated and maintained according to instructions attached to or furnished with the product, KitchenAid brand of Whirlpool Corporation...


