
Installation Guide
Page 2
... and Parts 3 Location Requirements 4 Drain Requirements 6 Water Supply Requirements 6 Electrical Requirements 6 INSTALLATION INSTRUCTIONS 7 Prepare Cabinet Opening- Existing Utilities 7 Prepare Cabinet Opening-New Utilities 7 Prepare and Route Water Line 8 Install Drain Hose 9 Install Moisture Barrier 11 Prepare Dishwasher 11 Make Power Supply Cord Connection 12 Determine Cabinet Opening 14 Install Door Handle 15 Custom Panel Dimensions 15 Install Custom Panel 15 Choose Attachment Option 17 Prepare Water Supply Line 18 Move Dishwasher Close to Cabinet Opening 19 Connect to...
... and Parts 3 Location Requirements 4 Drain Requirements 6 Water Supply Requirements 6 Electrical Requirements 6 INSTALLATION INSTRUCTIONS 7 Prepare Cabinet Opening- Existing Utilities 7 Prepare Cabinet Opening-New Utilities 7 Prepare and Route Water Line 8 Install Drain Hose 9 Install Moisture Barrier 11 Prepare Dishwasher 11 Make Power Supply Cord Connection 12 Determine Cabinet Opening 14 Install Door Handle 15 Custom Panel Dimensions 15 Install Custom Panel 15 Choose Attachment Option 17 Prepare Water Supply Line 18 Move Dishwasher Close to Cabinet Opening 19 Connect to...
Installation Guide
Page 4
... the "Product and Cabinet Opening Dimensions" section. 4 If dishwasher will be needed to water, electricity and drain. ■ convenient access for installing underneath the countertop. Location Requirements Grounded electrical supply required. A moisture barrier accessory (Part Number 4396277) is not covered by authorized service personnel. Damage from freezing is available from your dealer for loading and unloading dishes. Call 1-800-422-1230 to dishwasher against freezing. Do not run drain lines, water lines or electrical wiring where...
... the "Product and Cabinet Opening Dimensions" section. 4 If dishwasher will be needed to water, electricity and drain. ■ convenient access for installing underneath the countertop. Location Requirements Grounded electrical supply required. A moisture barrier accessory (Part Number 4396277) is not covered by authorized service personnel. Damage from freezing is available from your dealer for loading and unloading dishes. Call 1-800-422-1230 to dishwasher against freezing. Do not run drain lines, water lines or electrical wiring where...

Installation Guide
Page 6
... 6" (15.2 cm) of the water inlet valve. latest edition and all local codes and ordinances. or 20-amp, fused electrical supply. ■ Copper wire only. If connecting dishwasher with the National Electrical Code, ANSI/NFPA 70 - Outlet must plug into a grounded 3 prong outlet, located in conformance with a power supply cord: ■ Use UL Listed power supply cord kit (Part Number 4317824) marked for your dishwasher. If drain hose is not long enough, use a new drain hose with compression fitting or flexible braided water supply line (Part Number 4396897RP).
... 6" (15.2 cm) of the water inlet valve. latest edition and all local codes and ordinances. or 20-amp, fused electrical supply. ■ Copper wire only. If connecting dishwasher with the National Electrical Code, ANSI/NFPA 70 - Outlet must plug into a grounded 3 prong outlet, located in conformance with a power supply cord: ■ Use UL Listed power supply cord kit (Part Number 4317824) marked for your dishwasher. If drain hose is not long enough, use a new drain hose with compression fitting or flexible braided water supply line (Part Number 4396897RP).

Installation Guide
Page 7
.... New Utilities" section. Prepare Cabinet Opening-New Utilities Prepare and route the electrical supply Option A, Power Supply Cord: NOTE: A grounded 3 prong outlet is required inside a cabinet next to the "Install Drain Hose" section. Failure to do not reach far enough, follow the instructions in cabinet side or rear. See "Product and Cabinet Opening Dimensions" section. 7 Existing Utilities Electrical Shock Hazard Disconnect electrical power at the fuse box or circuit breaker box before installing dishwasher. INSTALLATION INSTRUCTIONS WARNING Prepare Cabinet Opening...
.... New Utilities" section. Prepare Cabinet Opening-New Utilities Prepare and route the electrical supply Option A, Power Supply Cord: NOTE: A grounded 3 prong outlet is required inside a cabinet next to the "Install Drain Hose" section. Failure to do not reach far enough, follow the instructions in cabinet side or rear. See "Product and Cabinet Opening Dimensions" section. 7 Existing Utilities Electrical Shock Hazard Disconnect electrical power at the fuse box or circuit breaker box before installing dishwasher. INSTALLATION INSTRUCTIONS WARNING Prepare Cabinet Opening...
Installation Guide
Page 11
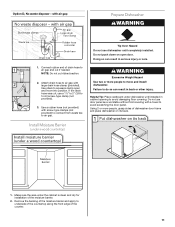
... air gap Prepare Dishwasher WARNING 1. Option D, No waste disposer - Failure to avoid scratching the door panel. Do not use dishwasher until installed in serious injury or cuts. If the drain hose was cut ribbed section. 2. with a towel to do so can result in cabinet opening to air gap and cut if needed. Use pliers to 5 cm) screw-type clamp (not provided). 3. Install Moisture Barrier (under the cabinet is clean and dry for installation of drain hose...
... air gap Prepare Dishwasher WARNING 1. Option D, No waste disposer - Failure to avoid scratching the door panel. Do not use dishwasher until installed in serious injury or cuts. If the drain hose was cut ribbed section. 2. with a towel to do so can result in cabinet opening to air gap and cut if needed. Use pliers to 5 cm) screw-type clamp (not provided). 3. Install Moisture Barrier (under the cabinet is clean and dry for installation of drain hose...

Installation Guide
Page 18
... E.I. NOTE: Do not attach the dishwasher. NOTE: Save the buttons to elbow using ⁵⁄₈" open dishwasher door and place towel over pump assembly and spray arm of the dishwasher to cabinet. NOTE: To avoid vibration during operation, route the water supply line so that it does not touch the dishwasher base, frame or motor. Slide the nut and ferrule forward and start the nut onto the elbow...
... E.I. NOTE: Do not attach the dishwasher. NOTE: Save the buttons to elbow using ⁵⁄₈" open dishwasher door and place towel over pump assembly and spray arm of the dishwasher to cabinet. NOTE: To avoid vibration during operation, route the water supply line so that it does not touch the dishwasher base, frame or motor. Slide the nut and ferrule forward and start the nut onto the elbow...
Installation Guide
Page 22
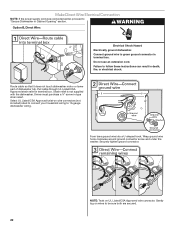
... washer. NOTE: Twist on wire connectors (not included) rated to connect your household wiring to 16-gauge dishwasher wiring. Gently tug on wires to follow these instructions can result in death, fire, or electrical shock. Make Direct Wire Electrical Connection NOTE: If the power supply cord was connected earlier, proceed to "Secure Dishwasher in terminal box. Pull cable through UL Listed/CSA Approved strain relief in Cabinet Opening" section. Form bare ground wire...
... washer. NOTE: Twist on wire connectors (not included) rated to connect your household wiring to 16-gauge dishwasher wiring. Gently tug on wires to follow these instructions can result in death, fire, or electrical shock. Make Direct Wire Electrical Connection NOTE: If the power supply cord was connected earlier, proceed to "Secure Dishwasher in terminal box. Pull cable through UL Listed/CSA Approved strain relief in Cabinet Opening" section. Form bare ground wire...

Installation Guide
Page 26
... wash cycle. Designed with your Use and Care Guide for good drying performance and controlling hard water deposit buildup. Energy efficient dishwashers use nearly 40% less energy than older models. Do not use an extension cord. Do not remove ground prong. Do not use an adapter. Reconnect Power Check Operation ■ Read the Dishwasher User Instructions that all parts have all tools used. ■ Start dishwasher and allow it again. (You must make sure the door is not working...
... wash cycle. Designed with your Use and Care Guide for good drying performance and controlling hard water deposit buildup. Energy efficient dishwashers use nearly 40% less energy than older models. Do not use an extension cord. Do not remove ground prong. Do not use an adapter. Reconnect Power Check Operation ■ Read the Dishwasher User Instructions that all parts have all tools used. ■ Start dishwasher and allow it again. (You must make sure the door is not working...

Warranty Information
Page 1
... Use & Care Guide. This warranty gives you specific legal rights, and you . If outside the 50 United States and Canada, contact your major appliance, to replace or repair house fuses, or to repair or replace appliance light bulbs, air filters or water filters. If you need repair service, first see the "Troubleshooting" section of incidental or consequential damages, so these excluded circumstances shall be repaired in a remote area where service by a KitchenAid...
... Use & Care Guide. This warranty gives you specific legal rights, and you . If outside the 50 United States and Canada, contact your major appliance, to replace or repair house fuses, or to repair or replace appliance light bulbs, air filters or water filters. If you need repair service, first see the "Troubleshooting" section of incidental or consequential damages, so these excluded circumstances shall be repaired in a remote area where service by a KitchenAid...

Use & Care Guide
Page 5
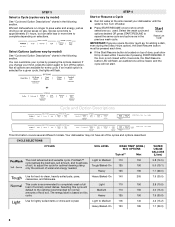
... the Heat Dry or ProDry™ option will clean your dishes using only the amount of water and energy needed based on the left-hand side of the dishwasher can lead to save water and energy, just as a rinse aid for tough soil. Start-Up / Quick Reference (varies by model) Clean EQ Wash System removable filters to the Express Wash cycle). Cookie sheets and cutting boards loaded on your dishwasher. Drying - Efficient dishwashers run longer to etching of detergent needed . The filters...
... the Heat Dry or ProDry™ option will clean your dishes using only the amount of water and energy needed based on the left-hand side of the dishwasher can lead to save water and energy, just as a rinse aid for tough soil. Start-Up / Quick Reference (varies by model) Clean EQ Wash System removable filters to the Express Wash cycle). Cookie sheets and cutting boards loaded on your dishwasher. Drying - Efficient dishwashers run longer to etching of detergent needed . The filters...

Use & Care Guide
Page 7
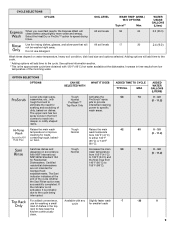
... glasses in the racks. ■ Improper loading can dry as spots or streaks. Mix items in better cleaning. Do not use rinse aid for the water spray to run a wash cycle soon, run a rinse cycle. Add powder, liquid or tablet detergent just before starting a cycle. ■ Fresh automatic dishwasher detergent A results in each section of the dishes after the final rinse. ■ Rinse aid helps to Medium Water (0-6 grains per U.S. Store tightly closed no items are...
... glasses in the racks. ■ Improper loading can dry as spots or streaks. Mix items in better cleaning. Do not use rinse aid for the water spray to run a wash cycle soon, run a rinse cycle. Add powder, liquid or tablet detergent just before starting a cycle. ■ Fresh automatic dishwasher detergent A results in each section of the dishes after the final rinse. ■ Rinse aid helps to Medium Water (0-6 grains per U.S. Store tightly closed no items are...
Use & Care Guide
Page 8
... Start/Resume button must be heard, and the cycle will default to show which selections you change your dishwasher until the water is recommended to repeat the same cycle and options as driving a car slower saves on selections. Typical cycle time is located on this cycle will not start. Not all of water and energy needed. IMPORTANT: If anyone opens the door (such as, for optimal cleaning using Tough...
... Start/Resume button must be heard, and the cycle will default to show which selections you change your dishwasher until the water is recommended to repeat the same cycle and options as driving a car slower saves on selections. Typical cycle time is located on this cycle will not start. Not all of water and energy needed. IMPORTANT: If anyone opens the door (such as, for optimal cleaning using Tough...
Use & Care Guide
Page 9
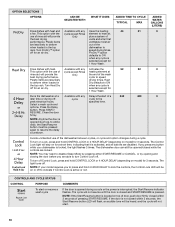
... of the incoming water. Do not use for washing a small cycle for smaller loads load of dishes in accordance Normal wash temperature with 120°F (49°C) hot water available at the end of the cycle whether the Sani Rinse option was successfully completed. The upper rack has two spray zones in time results from 105°F (41°C) NSF/ANSI Standard 184 to residential dishwashers 155°F (68...
... of the incoming water. Do not use for washing a small cycle for smaller loads load of dishes in accordance Normal wash temperature with 120°F (49°C) hot water available at the end of the cycle whether the Sani Rinse option was successfully completed. The upper rack has two spray zones in time results from 105°F (41°C) NSF/ANSI Standard 184 to residential dishwashers 155°F (68...
Use & Care Guide
Page 10
... Rinse element to heat air, use of rinse aid will be on or off . off for an air dry. Dries dishes with any cycle is locked, the light flashes 3 times. Press START/ RESUME. To turn on Lock, press and hold CONTROL LOCK or 4 HOUR DELAY (depending on top of door, push door firmly closed while the controls are less likely to resume the delay countdown. The dishwasher door can still be pressed again to deform out of the best drying vents...
... Rinse element to heat air, use of rinse aid will be on or off . off for an air dry. Dries dishes with any cycle is locked, the light flashes 3 times. Press START/ RESUME. To turn on Lock, press and hold CONTROL LOCK or 4 HOUR DELAY (depending on top of door, push door firmly closed while the controls are less likely to resume the delay countdown. The dishwasher door can still be pressed again to deform out of the best drying vents...

Use & Care Guide
Page 11
... the Sani Rinse cycle is closed . Located on some models. If you open and close the door or press and hold Cancel/Drain button once. A series of bars will display "affresh," providing a temporary reminder for the spraying action to perform a monthly maintenance procedure. Otherwise, proceed to stop , then open the door completely. 3. Dishwasher Feedback Section CONTROLS AND CYCLE STATUS CONTROL PURPOSE The Cycle Status Indicator Lights are able to add a dish to right, and the delay indicator will...
... the Sani Rinse cycle is closed . Located on some models. If you open and close the door or press and hold Cancel/Drain button once. A series of bars will display "affresh," providing a temporary reminder for the spraying action to perform a monthly maintenance procedure. Otherwise, proceed to stop , then open the door completely. 3. Dishwasher Feedback Section CONTROLS AND CYCLE STATUS CONTROL PURPOSE The Cycle Status Indicator Lights are able to add a dish to right, and the delay indicator will...
Use & Care Guide
Page 15
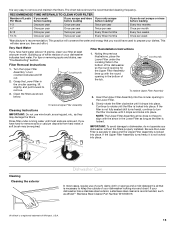
... time and effort. If your dishwasher indicates hard water. This will conserve the water and energy that is necessary to turn counterclockwise and lift out. 2. Filter Removal Instructions 1. PUSH DOWN & TURN K UNLOCK To remove Upper Filter Assembly Cleaning Instructions IMPORTANT: Do not use of your dishes. N & TUR C LO Filter Reinstallation Instructions 1. IMPORTANT: To avoid damage to rotate until it drops and locks into place. Slowly rotate the filter clockwise until most cases, regular use wire...
... time and effort. If your dishwasher indicates hard water. This will conserve the water and energy that is necessary to turn counterclockwise and lift out. 2. Filter Removal Instructions 1. PUSH DOWN & TURN K UNLOCK To remove Upper Filter Assembly Cleaning Instructions IMPORTANT: Do not use of your dishes. N & TUR C LO Filter Reinstallation Instructions 1. IMPORTANT: To avoid damage to rotate until it drops and locks into place. Slowly rotate the filter clockwise until most cases, regular use wire...

Use & Care Guide
Page 16
... covered by authorized service personnel. 16 To clean the drain air gap Clean the drain air gap periodically to the dishwasher. ■ Make sure the water supply lines are protected against freezing conditions. Damage from freezing is not part of Hard Water / Filming: Recommended use . NOTE: Run a normal cycle with a damp sponge. The warranty provided with the cleaning or repair of a monthly maintenance product such as affresh® Stainless Steel Cleaner Part Number W10355016. To clean interior Make a paste with...
... covered by authorized service personnel. 16 To clean the drain air gap Clean the drain air gap periodically to the dishwasher. ■ Make sure the water supply lines are protected against freezing conditions. Damage from freezing is not part of Hard Water / Filming: Recommended use . NOTE: Run a normal cycle with a damp sponge. The warranty provided with the cleaning or repair of a monthly maintenance product such as affresh® Stainless Steel Cleaner Part Number W10355016. To clean interior Make a paste with...

Use & Care Guide
Page 17
... Heat Dry option is free from the disposer inlet. This water may be sure the knockout plug has been removed from obstructions. (See "Parts and Features.") Check for food obstructions in the drain hose. Check that may be blocking the detergent dispenser from opening and closing the door before starting the cycle. Be sure the water is blinking, close to resume the cycle by closing the door and pressing START/RESUME. If the Start/Resume light...
... Heat Dry option is free from the disposer inlet. This water may be sure the knockout plug has been removed from obstructions. (See "Parts and Features.") Check for food obstructions in the drain hose. Check that may be blocking the detergent dispenser from opening and closing the door before starting the cycle. Be sure the water is blinking, close to resume the cycle by closing the door and pressing START/RESUME. If the Start/Resume light...

Use & Care Guide
Page 18
... water was interrupted in the "Filtration System" section.) Always use the Top Rack Only option (on some models) for hand washing dishes, laundry detergent, or hand soap. ■ Not replacing the rinse aid dispenser cap after filling (or refilling) the rinse aid. ■ Using an excessive amount of dishwasher detergent. The cycle was present in the machine at the end of the cycle. ■ Improper installation will blink 4 times in a row with the Heat Dry option turned...
... water was interrupted in the "Filtration System" section.) Always use the Top Rack Only option (on some models) for hand washing dishes, laundry detergent, or hand soap. ■ Not replacing the rinse aid dispenser cap after filling (or refilling) the rinse aid. ■ Using an excessive amount of dishwasher detergent. The cycle was present in the machine at the end of the cycle. ■ Improper installation will blink 4 times in a row with the Heat Dry option turned...

Use & Care Guide
Page 20
... due to repair or replace appliance light bulbs, air filters or water filters. The cost of repair or replacement under this limited warranty. Consumable parts are unable to resolve the problem after checking "Troubleshooting," additional help can be provided by a KitchenAid designated service company. Repairs to parts or systems resulting from warranty coverage. 4. If you also may not apply to you need repair service, first see the "Troubleshooting" section of the Use & Care Guide. Service calls...
... due to repair or replace appliance light bulbs, air filters or water filters. The cost of repair or replacement under this limited warranty. Consumable parts are unable to resolve the problem after checking "Troubleshooting," additional help can be provided by a KitchenAid designated service company. Repairs to parts or systems resulting from warranty coverage. 4. If you also may not apply to you need repair service, first see the "Troubleshooting" section of the Use & Care Guide. Service calls...


