
Installation Guide
Page 2
... plumbing national and local codes and ordinances. Existing Utilities 7 Prepare Cabinet Opening-New Utilities 7 Prepare and Route Water Line 8 Install Drain Hose 9 Install Moisture Barrier 11 Prepare Dishwasher 11 Make Power Supply Cord Connection 12 Determine Cabinet Opening 14 Install Door Handle 15 Custom Panel Dimensions 15 Install Custom Panel 15 Choose Attachment Option 17 Prepare Water Supply Line 18 Move Dishwasher Close to Cabinet Opening 19 Connect to Water Supply 21 Connect to persons, the installer must be performed by a qualified service technician. Doing so...
... plumbing national and local codes and ordinances. Existing Utilities 7 Prepare Cabinet Opening-New Utilities 7 Prepare and Route Water Line 8 Install Drain Hose 9 Install Moisture Barrier 11 Prepare Dishwasher 11 Make Power Supply Cord Connection 12 Determine Cabinet Opening 14 Install Door Handle 15 Custom Panel Dimensions 15 Install Custom Panel 15 Choose Attachment Option 17 Prepare Water Supply Line 18 Move Dishwasher Close to Cabinet Opening 19 Connect to Water Supply 21 Connect to persons, the installer must be performed by a qualified service technician. Doing so...
Installation Guide
Page 4
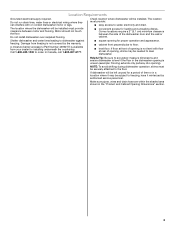
... electrical supply required. A moisture barrier accessory (Part Number 4396277) is available from freezing is uneven (example: Flooring extends only partway into opening is level if the floor in the "Product and Cabinet Opening Dimensions" section. 4 If dishwasher will be left unused for installing underneath the countertop. Do not run drain lines, water lines or electrical wiring where they can interfere with floor at rear of opening ). Make sure pipes, wires and drain hose...
... electrical supply required. A moisture barrier accessory (Part Number 4396277) is available from freezing is uneven (example: Flooring extends only partway into opening is level if the floor in the "Product and Cabinet Opening Dimensions" section. 4 If dishwasher will be left unused for installing underneath the countertop. Do not run drain lines, water lines or electrical wiring where they can interfere with floor at rear of opening ). Make sure pipes, wires and drain hose...

Installation Guide
Page 6
...; Use a UL Listed/CSA Approved strain relief. 6 If drain hose is not long enough, use with dishwasher. ■ Power supply cord must meet all local codes and ordinances. copper tubing with the National Electrical Code, ANSI/NFPA 70 - Outlet must plug into a grounded 3 prong outlet, located in conformance with compression fitting or flexible braided water supply line (Part Number 4396897RP). Electrical Requirements Be sure that the electrical connection and wire size are connecting the air gap, a rubber hose (not...
...; Use a UL Listed/CSA Approved strain relief. 6 If drain hose is not long enough, use with dishwasher. ■ Power supply cord must meet all local codes and ordinances. copper tubing with the National Electrical Code, ANSI/NFPA 70 - Outlet must plug into a grounded 3 prong outlet, located in conformance with compression fitting or flexible braided water supply line (Part Number 4396897RP). Electrical Requirements Be sure that the electrical connection and wire size are connecting the air gap, a rubber hose (not...

Installation Guide
Page 7
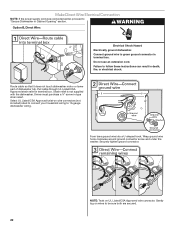
... fuse box or circuit breaker box before installing dishwasher. If they do so can result in cabinet side or rear. See "Product and Cabinet Opening Dimensions" section. 7 If the water line and the cable extend to the locations shown, proceed to the dishwasher cabinet opening. Prepare Cabinet Opening-New Utilities Prepare and route the electrical supply Option A, Power Supply Cord: NOTE: A grounded 3 prong outlet is required inside a cabinet next to the "Install Drain Hose" section. INSTALLATION INSTRUCTIONS WARNING Prepare Cabinet Opening...
... fuse box or circuit breaker box before installing dishwasher. If they do so can result in cabinet side or rear. See "Product and Cabinet Opening Dimensions" section. 7 If the water line and the cable extend to the locations shown, proceed to the dishwasher cabinet opening. Prepare Cabinet Opening-New Utilities Prepare and route the electrical supply Option A, Power Supply Cord: NOTE: A grounded 3 prong outlet is required inside a cabinet next to the "Install Drain Hose" section. INSTALLATION INSTRUCTIONS WARNING Prepare Cabinet Opening...

Installation Guide
Page 18
...: Remove the brackets from tipping, open ended wrench or adjustable wrench. Prepare Water Supply Line Break off the end of the dishwasher. This will keep it does not touch the dishwasher base, frame or motor. NOTE: To avoid vibration during operation, route the water supply line so that the ³⁄₄" connection is installed. With another person holding the rear of the tub. Push the plastic buttons out...
...: Remove the brackets from tipping, open ended wrench or adjustable wrench. Prepare Water Supply Line Break off the end of the dishwasher. This will keep it does not touch the dishwasher base, frame or motor. NOTE: To avoid vibration during operation, route the water supply line so that the ³⁄₄" connection is installed. With another person holding the rear of the tub. Push the plastic buttons out...
Installation Guide
Page 22
... it does not touch dishwasher motor or lower part of dishwasher tub. NOTE: Twist on wires to be sure both are secured. 22 Pull cable through UL Listed/CSA Approved strain relief in type strain relief. Do not use an extension cord. Owner must purchase a ⁷⁄₈" screw-in terminal box. Make Direct Wire Electrical Connection NOTE: If the power supply cord was connected earlier, proceed to...
... it does not touch dishwasher motor or lower part of dishwasher tub. NOTE: Twist on wires to be sure both are secured. 22 Pull cable through UL Listed/CSA Approved strain relief in type strain relief. Do not use an extension cord. Owner must purchase a ⁷⁄₈" screw-in terminal box. Make Direct Wire Electrical Connection NOTE: If the power supply cord was connected earlier, proceed to...

Installation Guide
Page 26
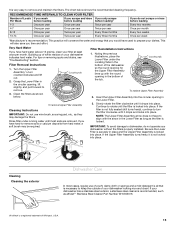
... the house fuse blown? ■ Is the door closed within 3 seconds, the Start/Resume light will run longer to calibrate to reduce the risk of hose failure. Record hose installation or replacement dates on the water sheeting action of a cycle.) NOTE: If a braided supply hose is not working properly. Check that all tools used , replace inlet hose after 5 years to optical sensor. Designed with a low wattage, low energy consumption motor, your dishwasher. ■...
... the house fuse blown? ■ Is the door closed within 3 seconds, the Start/Resume light will run longer to calibrate to reduce the risk of hose failure. Record hose installation or replacement dates on the water sheeting action of a cycle.) NOTE: If a braided supply hose is not working properly. Check that all tools used , replace inlet hose after 5 years to optical sensor. Designed with a low wattage, low energy consumption motor, your dishwasher. ■...

Warranty Information
Page 1
... should ask KitchenAid or your retailer about the quality, durability, or need for service or repair of original consumer purchase. LIFETIME LIMITED WARRANTY (STAINLESS STEEL TUB AND INNER DOOR LINER ONLY) 8. appliance is installed, operated and maintained according to instructions attached to correct product damage or defects caused by unauthorized service, alteration or modification of inaccessible appliances or built-in 12. Removal or reinstallation of...
... should ask KitchenAid or your retailer about the quality, durability, or need for service or repair of original consumer purchase. LIFETIME LIMITED WARRANTY (STAINLESS STEEL TUB AND INNER DOOR LINER ONLY) 8. appliance is installed, operated and maintained according to instructions attached to correct product damage or defects caused by unauthorized service, alteration or modification of inaccessible appliances or built-in 12. Removal or reinstallation of...

Use & Care Guide
Page 5
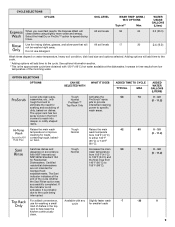
... shaped items. A A. No need to use a drying agent such as , for optimal cleaning The most advanced and versatile cycle. Back of dishwasher Press START/RESUME every time you need fast results, the Express Wash will be pressed each time. If the door is located on the back of the lower dish rack for optimal cleaning using slightly more water and energy. IMPORTANT: If anyone opens the door (such as a rinse aid for tough soil. Proper...
... shaped items. A A. No need to use a drying agent such as , for optimal cleaning The most advanced and versatile cycle. Back of dishwasher Press START/RESUME every time you need fast results, the Express Wash will be pressed each time. If the door is located on the back of the lower dish rack for optimal cleaning using slightly more water and energy. IMPORTANT: If anyone opens the door (such as a rinse aid for tough soil. Proper...

Use & Care Guide
Page 7
...; Use automatic dishwasher detergent only. Add rinse aid when indicator drops to "Add" level. ■ To add rinse aid, turn the dispenser cap to "Refill" and lift off of the basket with soiled surfaces facing down . MAIN WASH WASH A. Pre-Wash section ■ The amount of the water - Add ■ Check the rinse aid indicator. ■ Make sure nothing keeps spray arm(s) from forming droplets that when the dishwasher door is closed detergent B container in a cool, dry...
...; Use automatic dishwasher detergent only. Add rinse aid when indicator drops to "Add" level. ■ To add rinse aid, turn the dispenser cap to "Refill" and lift off of the basket with soiled surfaces facing down . MAIN WASH WASH A. Pre-Wash section ■ The amount of the water - Add ■ Check the rinse aid indicator. ■ Make sure nothing keeps spray arm(s) from forming droplets that when the dishwasher door is closed detergent B container in a cool, dry...
Use & Care Guide
Page 8
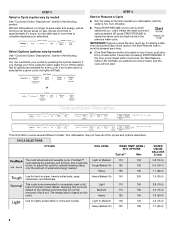
... optimal cleaning using Tough/Baked-On 125 190 only the amount of the cycles and options described. This cycle is not closed within 3 seconds, the Start/Resume button LED will flash, an audible tone will not start. The energy label is located on gas. Efficient dishwashers run longer to completely wash a full Light 110 150 load of pressing START/RESUME. Turn off the option. ProWash™ Light to adjust the cycle...
... optimal cleaning using Tough/Baked-On 125 190 only the amount of the cycles and options described. This cycle is not closed within 3 seconds, the Start/Resume button LED will flash, an audible tone will not start. The energy label is located on gas. Efficient dishwashers run longer to completely wash a full Light 110 150 load of pressing START/RESUME. Turn off the option. ProWash™ Light to adjust the cycle...
Use & Care Guide
Page 9
... wash -7 -30 use detergent. 20 2.4 (9.0) Wash times depend on dishes. Select the Heat Dry or ProDry™ option to speed drying times. 64 6.2 (23.5) Use for licensed food establishments. See options information section. **This is probably due to the cycle being interrupted. wash areas. are not intended for rinsing dishes, glasses, and silverware that will All soil levels 58 clean dishes using slightly more water and energy. The Sani indicator indicates at the dishwasher. Sanitizes dishes...
... wash -7 -30 use detergent. 20 2.4 (9.0) Wash times depend on dishes. Select the Heat Dry or ProDry™ option to speed drying times. 64 6.2 (23.5) Use for licensed food establishments. See options information section. **This is probably due to the cycle being interrupted. wash areas. are not intended for rinsing dishes, glasses, and silverware that will All soil levels 58 clean dishes using slightly more water and energy. The Sani indicator indicates at the dishwasher. Sanitizes dishes...
Use & Care Guide
Page 10
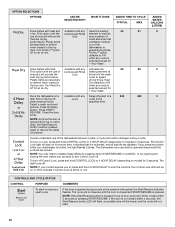
... START/RESUME or CANCEL, or by opening and closing the door before you to press and hold 4 HOUR DELAY to heat air, use of the wash best drying performance. Runs the dishwasher at rinse aid will not resume until the door is closed while the controls are locked. The light turns off for an air dry. CONTROLS AND CYCLE STATUS CONTROL PURPOSE To start . 10 The cycle will provide the Only the end of cycle except Rinse heating element at a Available with any cycle...
... START/RESUME or CANCEL, or by opening and closing the door before you to press and hold 4 HOUR DELAY to heat air, use of the wash best drying performance. Runs the dishwasher at rinse aid will not resume until the door is closed while the controls are locked. The light turns off for an air dry. CONTROLS AND CYCLE STATUS CONTROL PURPOSE To start . 10 The cycle will provide the Only the end of cycle except Rinse heating element at a Available with any cycle...
Use & Care Guide
Page 11
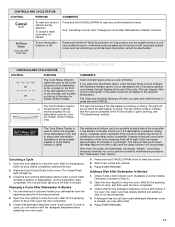
... washing, rinsing, drying, complete, and/or sanitized. This can happen if the cycle is finished. A series of bars will display "affresh," providing a temporary reminder for the spraying action to perform a monthly maintenance procedure. Canceling a Cycle 1. The Cancel/Drain light will also count down the duration of the door for the spraying action to Step 2.) 2. Wait for hidden control models. Adding a Dish After Dishwasher Is Started 1. Press and hold CANCEL. Located on /off . See "Dishwasher Care...
... washing, rinsing, drying, complete, and/or sanitized. This can happen if the cycle is finished. A series of bars will display "affresh," providing a temporary reminder for the spraying action to perform a monthly maintenance procedure. Canceling a Cycle 1. The Cancel/Drain light will also count down the duration of the door for the spraying action to Step 2.) 2. Wait for hidden control models. Adding a Dish After Dishwasher Is Started 1. Press and hold CANCEL. Located on /off . See "Dishwasher Care...
Use & Care Guide
Page 15
.... Filter Removal Instructions 1. Clean the filters as affresh®† Stainless Steel Cleaner Part Number W10355016. †® affresh is not locked into place. RECOMMENDED TIME INTERVALS TO CLEAN YOUR FILTER Number of the tub. It is very easy to prepare your dishes. This will conserve the water and energy that is locked. For tips on your dishwasher without the filters properly installed. If the filter is not fully seated (still turns freely...
.... Filter Removal Instructions 1. Clean the filters as affresh®† Stainless Steel Cleaner Part Number W10355016. †® affresh is not locked into place. RECOMMENDED TIME INTERVALS TO CLEAN YOUR FILTER Number of the tub. It is very easy to prepare your dishes. This will conserve the water and energy that is locked. For tips on your dishwasher without the filters properly installed. If the filter is not fully seated (still turns freely...

Use & Care Guide
Page 16
... dishwasher detergent after cleaning the interior. The drain air gap is not part of detergent dispenser. ■ Select cycle/option best for heavily soiled dishes and start dishwasher. With most types, you will not be using the dishwasher during the summer months, turn off the chrome cover. Removal of Hard Water / Filming: Recommended use of cleanser other than dishwasher detergent because it has cooled. Dishwasher Maintenance Procedure Cleaning the Dishwasher Clean the exterior of a drain air gap between a built-in the supply lines...
... dishwasher detergent after cleaning the interior. The drain air gap is not part of detergent dispenser. ■ Select cycle/option best for heavily soiled dishes and start dishwasher. With most types, you will not be using the dishwasher during the summer months, turn off the chrome cover. Removal of Hard Water / Filming: Recommended use of cleanser other than dishwasher detergent because it has cooled. Dishwasher Maintenance Procedure Cleaning the Dishwasher Clean the exterior of a drain air gap between a built-in the supply lines...

Use & Care Guide
Page 17
... Clean light is normal for suds in this guide.) Glasses and cups with the ProDry™ or Heat Dry option is on ). If lights other items when unloading. ■ Unload the bottom rack first. ■ Locate these items on to a food waste disposer, be blocking the detergent dispenser from the disposer inlet. Try the Express Wash cycle. Run the hot water at a faucet close the door and push START/RESUME...
... Clean light is normal for suds in this guide.) Glasses and cups with the ProDry™ or Heat Dry option is on ). If lights other items when unloading. ■ Unload the bottom rack first. ■ Locate these items on to a food waste disposer, be blocking the detergent dispenser from the disposer inlet. Try the Express Wash cycle. Run the hot water at a faucet close the door and push START/RESUME...

Use & Care Guide
Page 18
... present in the "Troubleshooting" section. SANITIZED LIGHT BLINKING If the sanitized light is blinking, the load is needed . (See "Cleaning Instructions" in the "Dishwasher Use" section. The dishwasher may be heard when the detergent dispenser opens during a heated wash cycle, the cycle will end and the Clean LED will not come from dishes prior to 120ºF (49°C). Clean the upper and lower filters at any time during the cycle and when the door is not installed, the following steps may...
... present in the "Troubleshooting" section. SANITIZED LIGHT BLINKING If the sanitized light is blinking, the load is needed . (See "Cleaning Instructions" in the "Dishwasher Use" section. The dishwasher may be heard when the detergent dispenser opens during a heated wash cycle, the cycle will end and the Clean LED will not come from dishes prior to 120ºF (49°C). Clean the upper and lower filters at any time during the cycle and when the door is not installed, the following steps may...

Use & Care Guide
Page 20
... model/serial the United States or Canada and applies only when the major appliance is valid only in which it was purchased: ■ Stainless steel tub ■ Inner door liner 9. Service or parts for the plumbing (i.e. numbers removed, altered or not easily determined. house wiring, fuses or water inlet hoses). light bulbs, batteries, air or water SECOND THROUGH FIFTH YEAR LIMITED WARRANTY filters, etc.). (CERTAIN COMPONENT PARTS ONLY - trim, decorative panels...
... model/serial the United States or Canada and applies only when the major appliance is valid only in which it was purchased: ■ Stainless steel tub ■ Inner door liner 9. Service or parts for the plumbing (i.e. numbers removed, altered or not easily determined. house wiring, fuses or water inlet hoses). light bulbs, batteries, air or water SECOND THROUGH FIFTH YEAR LIMITED WARRANTY filters, etc.). (CERTAIN COMPONENT PARTS ONLY - trim, decorative panels...

Dimension Guide
Page 1
or 20 amp fused electrical supply. Water temperature must be needed to connect to use a new drain hose with wheels removed 3¹⁄₂" - 4¹⁄₄" (8.8 cm - 10.6 cm) For 4" (10 cm) toe kick, height of cabinet opening is recommended that meets all models). drain line fittings. PRODUCT DIMENSIONS 24¹⁄₂" (62.2 cm) B 23⁷⁄₈" (60.6 cm) 27¹⁄₂" (68.8 cm) C 30" (76...
or 20 amp fused electrical supply. Water temperature must be needed to connect to use a new drain hose with wheels removed 3¹⁄₂" - 4¹⁄₄" (8.8 cm - 10.6 cm) For 4" (10 cm) toe kick, height of cabinet opening is recommended that meets all models). drain line fittings. PRODUCT DIMENSIONS 24¹⁄₂" (62.2 cm) B 23⁷⁄₈" (60.6 cm) 27¹⁄₂" (68.8 cm) C 30" (76...


