
Dimension Guide
Page 1
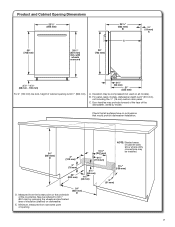
...(88 mm - 106 mm) For 4" (100 mm) toe kick, height of insulation (blanket) on dishwasher. May be reduced to 331/2" (851 mm) by model. For panel-ready models, dishwasher depth is 341/2" (863 mm). 33/4" (94 mm) 21" (533 mm) A. E. Check that would prohibit dishwasher installation. 34" (864 mm) ... area of cabinet opening 24" (620 mm) E 7 Minimum, measured from the lowest point on all surfaces have no protrusions that all models). Measured from narrowest point of the countertop. C. Door handles may be compressed (not used on the underside of opening is 24" (610...
...(88 mm - 106 mm) For 4" (100 mm) toe kick, height of insulation (blanket) on dishwasher. May be reduced to 331/2" (851 mm) by model. For panel-ready models, dishwasher depth is 341/2" (863 mm). 33/4" (94 mm) 21" (533 mm) A. E. Check that would prohibit dishwasher installation. 34" (864 mm) ... area of cabinet opening 24" (620 mm) E 7 Minimum, measured from the lowest point on all surfaces have no protrusions that all models). Measured from narrowest point of the countertop. C. Door handles may be compressed (not used on the underside of opening is 24" (610...
Installation Guide
Page 4
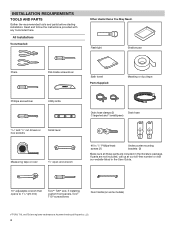
... opens to 11/8" (29 mm) Torx®† T20® and, if installing custom front panels, Torx® T15® screwdrivers Door handle (on some models) †®TORX, T15, and T20 are not included, call us at our toll-free number or visit our website listed in the literature package.
... opens to 11/8" (29 mm) Torx®† T20® and, if installing custom front panels, Torx® T15® screwdrivers Door handle (on some models) †®TORX, T15, and T20 are not included, call us at our toll-free number or visit our website listed in the literature package.

Installation Guide
Page 7
... D 4" (102 mm) 101/2" (267 mm) 63/4" (172 mm) NOTE: Shaded areas of the countertop. Minimum, measured from the lowest point on all models). Insulation may be compressed (not used on the underside of cabinet walls show where utility connections may be installed. 3" (76 mm) 24" (620 mm) 21... mm). 33/4" (94 mm) 21" (533 mm) A. Measured from narrowest point of cabinet opening 24" (620 mm) E 7 May be reduced to 331/2" (851 mm) by model. E. C. with wheels removed 30" (762 mm) 241/2" (622 mm) B C 3/4" (19 mm) A 31/2" - 41/2" (88 mm - 106 mm) For 4" (100 mm) ...
... D 4" (102 mm) 101/2" (267 mm) 63/4" (172 mm) NOTE: Shaded areas of the countertop. Minimum, measured from the lowest point on all models). Insulation may be compressed (not used on the underside of cabinet walls show where utility connections may be installed. 3" (76 mm) 24" (620 mm) 21... mm). 33/4" (94 mm) 21" (533 mm) A. Measured from narrowest point of cabinet opening 24" (620 mm) E 7 May be reduced to 331/2" (851 mm) by model. E. C. with wheels removed 30" (762 mm) 241/2" (622 mm) B C 3/4" (19 mm) A 31/2" - 41/2" (88 mm - 106 mm) For 4" (100 mm) ...

Installation Guide
Page 10
... must be securely attached to floor to avoid movement when the dishwasher is in the area shown to bring the dishwasher up floors - not all models have them) located above the front legs on the dishwasher. route cable Foam block Remove and discard the foam blocks (if blocks are present; This...
... must be securely attached to floor to avoid movement when the dishwasher is in the area shown to bring the dishwasher up floors - not all models have them) located above the front legs on the dishwasher. route cable Foam block Remove and discard the foam blocks (if blocks are present; This...

Installation Guide
Page 11
Put dishwasher on its back. Using 2 or more people to dishwasher. NOTE: On some models, once the dishwasher is on its back REMOVE ACCESS PANEL - Do not remove tech sheet from access panel. Doing so can result in back or ...
Put dishwasher on its back. Using 2 or more people to dishwasher. NOTE: On some models, once the dishwasher is on its back REMOVE ACCESS PANEL - Do not remove tech sheet from access panel. Doing so can result in back or ...

Installation Guide
Page 12
...) 13/16" (21 mm) 11/16" (27 mm) Removed 1 2 3 Cut No Cut No Cut No Cut Front legs - Remove plastic rail cover (only on certain models) Plastic rail cover Adjust both front leveling legs to the "Dishwasher Height Adjustment Chart." A Refer to the "Dishwasher Height Adjustment Chart" for wheel position and...
...) 13/16" (21 mm) 11/16" (27 mm) Removed 1 2 3 Cut No Cut No Cut No Cut Front legs - Remove plastic rail cover (only on certain models) Plastic rail cover Adjust both front leveling legs to the "Dishwasher Height Adjustment Chart." A Refer to the "Dishwasher Height Adjustment Chart" for wheel position and...

Installation Guide
Page 16
... Cable Route the utilities through hole in the handle. If door panel has a protective film, peel film back past snug. INSTALL DOOR HANDLE (ON SOME MODELS) 30. Remove the door handle and hex key from bunching up . NOTE: Do not install kick plate until instructed to move dishwasher completely into the...
... Cable Route the utilities through hole in the handle. If door panel has a protective film, peel film back past snug. INSTALL DOOR HANDLE (ON SOME MODELS) 30. Remove the door handle and hex key from bunching up . NOTE: Do not install kick plate until instructed to move dishwasher completely into the...
Installation Guide
Page 17
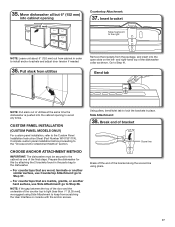
Insert bracket Tabs must be secured to the "Choose Anchor Attachment Method" section. CUSTOM PANEL INSTALLATION (CUSTOM PANEL MODELS ONLY) For custom panel installation, refer to the right. CHOOSE ANCHOR ATTACHMENT METHOD IMPORTANT: The dishwasher must point to the Custom Panel Installation Instruction Sheet (...
Insert bracket Tabs must be secured to the "Choose Anchor Attachment Method" section. CUSTOM PANEL INSTALLATION (CUSTOM PANEL MODELS ONLY) For custom panel installation, refer to the right. CHOOSE ANCHOR ATTACHMENT METHOD IMPORTANT: The dishwasher must point to the Custom Panel Installation Instruction Sheet (...
Installation Guide
Page 25
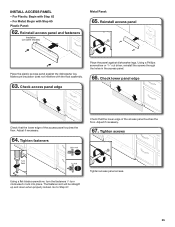
... Make sure insulation does not interfere with Step 65 Plastic Panel: 62. Go to lock into place. Reinstall access panel and fasteners Insulation (on some models) Metal Panel: 65. Using a Phillips screwdriver or 1/4" nut driver, reinstall the screws through the holes in the access panel. 66. Adjust if necessary. 64. INSTALL...
... Make sure insulation does not interfere with Step 65 Plastic Panel: 62. Go to lock into place. Reinstall access panel and fasteners Insulation (on some models) Metal Panel: 65. Using a Phillips screwdriver or 1/4" nut driver, reinstall the screws through the holes in the access panel. 66. Adjust if necessary. 64. INSTALL...

Installation Guide
Page 26
...Aid is necessary for good drying performance and controlling hard water deposit buildup. Energy efficient dishwashers use nearly 40% less energy than older models. ADDITIONAL TIPS Expect longer wash times. If none of rinse aid for service contact information. Check that you must also do not ... This dishwasher is not working properly, disconnect power or unplug dishwasher and refer to the "If Dishwasher Does Not Operate" section. Certain models are equipped with an optical water sensor, so the first cycle will run longer to calibrate to start the dishwasher? ■■ Is...
...Aid is necessary for good drying performance and controlling hard water deposit buildup. Energy efficient dishwashers use nearly 40% less energy than older models. ADDITIONAL TIPS Expect longer wash times. If none of rinse aid for service contact information. Check that you must also do not ... This dishwasher is not working properly, disconnect power or unplug dishwasher and refer to the "If Dishwasher Does Not Operate" section. Certain models are equipped with an optical water sensor, so the first cycle will run longer to calibrate to start the dishwasher? ■■ Is...

Energy Guide
Page 1
...label before consumer purchase. Dishwasher Capacity: Standard KitchenAid by Whirlpool Corporation Models: KDFE104H***, KDTE304G*** KDPE334G***, KDTE334G*** Estimated Yearly Energy Cost (when used with an electric water heater) $32 ▼ $21 $41 Cost Range of Similar Models 270 kWh Estimated Yearly Electricity Use $25 ... natural gas water heater) Your cost will depend on your utility rates and use. • Cost range based only on standard capacity models. • Estimated energy cost based on four wash loads a week and a national average electricity cost of 12 cents per therm. ...
...label before consumer purchase. Dishwasher Capacity: Standard KitchenAid by Whirlpool Corporation Models: KDFE104H***, KDTE304G*** KDPE334G***, KDTE334G*** Estimated Yearly Energy Cost (when used with an electric water heater) $32 ▼ $21 $41 Cost Range of Similar Models 270 kWh Estimated Yearly Electricity Use $25 ... natural gas water heater) Your cost will depend on your utility rates and use. • Cost range based only on standard capacity models. • Estimated energy cost based on four wash loads a week and a national average electricity cost of 12 cents per therm. ...
Use & Care Guide
Page 1
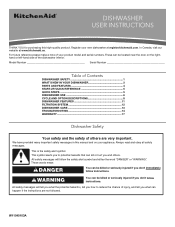
... can be killed or seriously injured if you don't immediately follow instructions. This symbol alerts you and others are not followed. Register your product model and serial numbers. This is , tell you how to reduce the chance of injury, and tell you what can kill or hurt you to... potential hazards that can happen if the instructions are very important. For future reference please make a note of your new dishwasher at www.kitchenaid.ca. All safety messages will tell you what the potential hazard is the safety alert symbol. W11040103A In Canada, visit our website at register...
... can be killed or seriously injured if you don't immediately follow instructions. This symbol alerts you and others are not followed. Register your product model and serial numbers. This is , tell you how to reduce the chance of injury, and tell you what can kill or hurt you to... potential hazards that can happen if the instructions are very important. For future reference please make a note of your new dishwasher at www.kitchenaid.ca. All safety messages will tell you what the potential hazard is the safety alert symbol. W11040103A In Canada, visit our website at register...
Use & Care Guide
Page 4
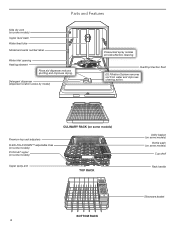
... adjusters FLEXI-FOLD DOWN™ adjustable tines (on some models) ProScrub® upper (on some models) Upper spray arm TOP RACK BOTTOM RACK 4 Utility basket (on some models) Bottle wash (on some models) Cup shelf Rack handle Silverware basket Detergent dispenser (dispenser location varies by model) Pressurized spray nozzles provide effective cleaning. Parts and Features...
... adjusters FLEXI-FOLD DOWN™ adjustable tines (on some models) ProScrub® upper (on some models) Upper spray arm TOP RACK BOTTOM RACK 4 Utility basket (on some models) Bottle wash (on some models) Cup shelf Rack handle Silverware basket Detergent dispenser (dispenser location varies by model) Pressurized spray nozzles provide effective cleaning. Parts and Features...
Use & Care Guide
Page 5
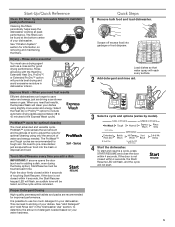
... close the door within 4 seconds, the Start/ Resume LED will flash, and the cycle will not start. 5 SLIDE SLIDE 3 Select a cycle and options (varies by model). 4 Start the dishwasher. If the door is not closed within 4 seconds of water and energy needed based on your dishwasher. When you need fast results...
... close the door within 4 seconds, the Start/ Resume LED will flash, and the cycle will not start. 5 SLIDE SLIDE 3 Select a cycle and options (varies by model). 4 Start the dishwasher. If the door is not closed within 4 seconds of water and energy needed based on your dishwasher. When you need fast results...

Use & Care Guide
Page 7
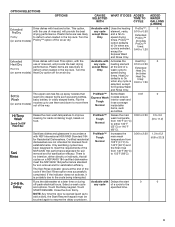
...) Heavy Full Full** Full** Hard Light Full Full** (10-14 grains Normal Full per U.S. To add rinse aid, open more ) can customize the cycles by model) See the "Cycle and Option Descriptions" chart in your dishwasher and make it enters the dishwasher. ■■ Select the wash cycle and options desired...
...) Heavy Full Full** Full** Hard Light Full Full** (10-14 grains Normal Full per U.S. To add rinse aid, open more ) can customize the cycles by model) See the "Cycle and Option Descriptions" chart in your dishwasher and make it enters the dishwasher. ■■ Select the wash cycle and options desired...
Use & Care Guide
Page 8
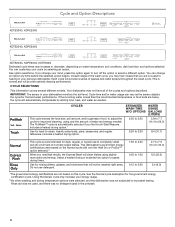
... were selected, and the dishwasher was no detergent used to turn off the option or select a different option. CYCLE SELECTIONS This information covers several different models. Do not use to completely wash and dry a full load of normally soiled dishes. CYCLES This cycle senses the load size, soil amount, and toughness...
... were selected, and the dishwasher was no detergent used to turn off the option or select a different option. CYCLE SELECTIONS This information covers several different models. Do not use to completely wash and dry a full load of normally soiled dishes. CYCLES This cycle senses the load size, soil amount, and toughness...
Use & Care Guide
Page 9
...interior wash and Tough rinse coverage Normal inside taller items, such as sports bottles, baby bottles, or oddly shaped items. Flip the (on some models) nozzles up spray nozzles that all cycles on food. If the indicator does not activate, it is selected, except for an air dry. ...the door is selected, except Extended Heat Dry (includes Heat Dry time): 0:40 to deform when loaded in the top rack. Turn the (on some models) ProDry™ option off for Extended ProDry™ (includes ProDry™ time): 0:40 to 0:50 drying performance. This option, with the Available ...
...interior wash and Tough rinse coverage Normal inside taller items, such as sports bottles, baby bottles, or oddly shaped items. Flip the (on some models) nozzles up spray nozzles that all cycles on food. If the indicator does not activate, it is selected, except for an air dry. ...the door is selected, except Extended Heat Dry (includes Heat Dry time): 0:40 to deform when loaded in the top rack. Turn the (on some models) ProDry™ option off for Extended ProDry™ (includes ProDry™ time): 0:40 to 0:50 drying performance. This option, with the Available ...

Use & Care Guide
Page 11
...: 1. Then, open the track stops on the other side to the removable tabs on the third level rack. Track stop B. For best results on some models) If additional space is secured into place. Gently push the tine out of the racks are located on the track in and pull up , and...
...: 1. Then, open the track stops on the other side to the removable tabs on the third level rack. Track stop B. For best results on some models) If additional space is secured into place. Gently push the tine out of the racks are located on the track in and pull up , and...
Use & Care Guide
Page 12
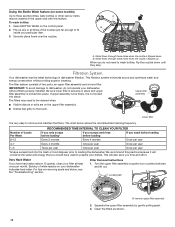
... chart below shows the recommended cleaning frequency. Buildup of two parts, an upper filter assembly and a lower filter. Using the Bottle Wash feature (on some models) Up to fit inside your particular item. 3. Water flows through these holes when the nozzle is flipped down until they stop. If upper assembly turns...
... chart below shows the recommended cleaning frequency. Buildup of two parts, an upper filter assembly and a lower filter. Using the Bottle Wash feature (on some models) Up to fit inside your particular item. 3. Water flows through these holes when the nozzle is flipped down until they stop. If upper assembly turns...

Use & Care Guide
Page 17
...reported to use of household electrical or plumbing (e.g., house wiring, fuses, or water inlet hoses). 4. In-home instruction on how to KitchenAid within 30 days. 9. Consumable parts (e.g., light bulbs, batteries, air or water filters, preservation solutions). 5. Damage from caustic or corrosive... intended for the remaining term of original consumer purchase. Commercial, non-residential, multiple-family use, or use with original model/serial numbers removed, altered, or not easily determined. Service to correct non-cosmetic defects in materials or workmanship that existed...
...reported to use of household electrical or plumbing (e.g., house wiring, fuses, or water inlet hoses). 4. In-home instruction on how to KitchenAid within 30 days. 9. Consumable parts (e.g., light bulbs, batteries, air or water filters, preservation solutions). 5. Damage from caustic or corrosive... intended for the remaining term of original consumer purchase. Commercial, non-residential, multiple-family use, or use with original model/serial numbers removed, altered, or not easily determined. Service to correct non-cosmetic defects in materials or workmanship that existed...


