

Dimension Guide
Page 2
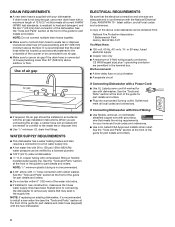
...;■ A time-delay fuse or circuit breaker ■■ A separate circuit If Connecting Dishwasher with a Power Cord: ■■ Use UL Listed power cord kit marked for part details and orders. ■■ Plug into a grounded 3 prong outlet. It is recommended that may exist in new construction, make sure the house water supply lines have been flushed prior to connecting the dishwasher to the underside of the guide for part details and...
...;■ A time-delay fuse or circuit breaker ■■ A separate circuit If Connecting Dishwasher with a Power Cord: ■■ Use UL Listed power cord kit marked for part details and orders. ■■ Plug into a grounded 3 prong outlet. It is recommended that may exist in new construction, make sure the house water supply lines have been flushed prior to connecting the dishwasher to the underside of the guide for part details and...
Installation Guide
Page 2
... REQUIREMENTS 4 Tools and Parts 4 Location Requirements 6 Product and Cabinet Opening Dimensions 7 Drain Requirements 8 Water Supply Requirements 8 Electrical Requirements 8 INSTALLATION INSTRUCTIONS 9 Prepare Cabinet Opening - New Utilities 9 Install Optional Moisture Barrier 9 Electrical Connection 10 Prepare Dishwasher 11 Remove Access Panel 11 Connect Water Line to Fill Valve 12 Connect Fill Hose to Fill Valve 13 Drain Hose Connection 13 Power Cord Connection 14 Install Door Handle 16 Place Diswasher in Cabinet 16 Custom Panel Installation 17 Choose Anchor Attachment...
... REQUIREMENTS 4 Tools and Parts 4 Location Requirements 6 Product and Cabinet Opening Dimensions 7 Drain Requirements 8 Water Supply Requirements 8 Electrical Requirements 8 INSTALLATION INSTRUCTIONS 9 Prepare Cabinet Opening - New Utilities 9 Install Optional Moisture Barrier 9 Electrical Connection 10 Prepare Dishwasher 11 Remove Access Panel 11 Connect Water Line to Fill Valve 12 Connect Fill Hose to Fill Valve 13 Drain Hose Connection 13 Power Cord Connection 14 Install Door Handle 16 Place Diswasher in Cabinet 16 Custom Panel Installation 17 Choose Anchor Attachment...

Installation Guide
Page 3
...;■ Observe all governing codes and ordinances. ■■ Install this dishwasher as specified in this manual and on open dishwasher door while someone grasps the rear of the dishwasher. WARNING Tip Over Hazard Do not use dishwasher until latched. Remove shipping materials and drain hose. Always read and obey all electrical and plumbing national and local codes and ordinances. Care shall be killed or seriously injured...
...;■ Observe all governing codes and ordinances. ■■ Install this dishwasher as specified in this manual and on open dishwasher door while someone grasps the rear of the dishwasher. WARNING Tip Over Hazard Do not use dishwasher until latched. Remove shipping materials and drain hose. Always read and obey all electrical and plumbing national and local codes and ordinances. Care shall be killed or seriously injured...
Installation Guide
Page 5
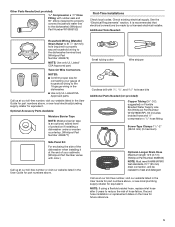
... User Guide for equivalent. Record hose installation or replacement dates on the hose for equivalent. Check existing electrical supply. NOTE: If using a flexible braided hose, replace inlet hose after 5 years to reduce the risk of household wiring to heat and detergent Call us at our toll-free number or visit our website listed in the dishwasher. ■■ Use only UL Listed/CSA Approved parts. Twist-On Wire Connectors NOTES: ■■ Confirm proper size...
... User Guide for equivalent. Record hose installation or replacement dates on the hose for equivalent. Check existing electrical supply. NOTE: If using a flexible braided hose, replace inlet hose after 5 years to reduce the risk of household wiring to heat and detergent Call us at our toll-free number or visit our website listed in the dishwasher. ■■ Use only UL Listed/CSA Approved parts. Twist-On Wire Connectors NOTES: ■■ Confirm proper size...
Installation Guide
Page 6
... be used to level dishwasher. Damage from the water supply could plug the fill valve screen. ■■ A square opening for a period of the guide for part details and orders. Motor should not touch the floor. ■■ Do not install dishwasher over carpeted flooring. 6 A side panel kit is required. ■■ This dishwasher has a water heating feature and also requires a connection to a hot water supply line. ■■ Make sure pipes, wires and drain hose...
... be used to level dishwasher. Damage from the water supply could plug the fill valve screen. ■■ A square opening for a period of the guide for part details and orders. Motor should not touch the floor. ■■ Do not install dishwasher over carpeted flooring. 6 A side panel kit is required. ■■ This dishwasher has a water heating feature and also requires a connection to a hot water supply line. ■■ Make sure pipes, wires and drain hose...
Installation Guide
Page 8
...) minimum above code standards can be installed in accordance with the air gap installation instructions. or 20-amp, fused electrical supply ■■ Copper wire only ■■ A maximum of the above the floor. We Recommend: ■■ A time-delay fuse or circuit breaker ■■ A separate circuit If Connecting Dishwasher with a Power Cord: ■■ Use UL Listed power cord kit marked for part details) and drain hose (supplied) with compression fitting or flexible braided water supply line.
...) minimum above code standards can be installed in accordance with the air gap installation instructions. or 20-amp, fused electrical supply ■■ Copper wire only ■■ A maximum of the above the floor. We Recommend: ■■ A time-delay fuse or circuit breaker ■■ A separate circuit If Connecting Dishwasher with a Power Cord: ■■ Use UL Listed power cord kit marked for part details) and drain hose (supplied) with compression fitting or flexible braided water supply line.
Installation Guide
Page 9
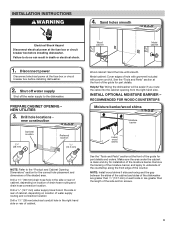
... "Tools and Parts" section at the fuse box or circuit breaker box before installing dishwasher. 2. INSTALLATION INSTRUCTIONS WARNING 4. Sand holes smooth Electrical Shock Hazard Disconnect electrical power at the front of the guide for installation of the side anchor screws. 9 NEW UTILITIES 3. Drill a 11/2" (38 mm) drain hose hole in death or electrical shock. 1. Make sure the area under the cabinet is clean and dry for part details and...
... "Tools and Parts" section at the fuse box or circuit breaker box before installing dishwasher. 2. INSTALLATION INSTRUCTIONS WARNING 4. Sand holes smooth Electrical Shock Hazard Disconnect electrical power at the front of the guide for installation of the side anchor screws. 9 NEW UTILITIES 3. Drill a 11/2" (38 mm) drain hose hole in death or electrical shock. 1. Make sure the area under the cabinet is clean and dry for part details and...

Installation Guide
Page 10
... cabinet opening heights, do not cut the insulation blanket. If installing with direct wire, route the cable as needed If installing into a 331/2" (851 mm) opening Built-up floors - NOTE: If removing a previous dishwasher with Step 7 - 5. ELECTRICAL CONNECTION - route cable Foam block Remove and discard the foam blocks (if blocks are present; add shims as needed , in use. 6. For Power Cord, wait until Step 22 7. not all models have them) located...
... cabinet opening heights, do not cut the insulation blanket. If installing with direct wire, route the cable as needed If installing into a 331/2" (851 mm) opening Built-up floors - NOTE: If removing a previous dishwasher with Step 7 - 5. ELECTRICAL CONNECTION - route cable Foam block Remove and discard the foam blocks (if blocks are present; add shims as needed , in use. 6. For Power Cord, wait until Step 22 7. not all models have them) located...

Installation Guide
Page 16
... a tight fitting cabinet. Slowly move and install dishwasher. Do not kink or pinch water line, drain hose, power cord, or direct wire between dishwasher and cabinet. Retain hex key with the setscrews facing down. Stand dishwasher upright It is on mounting studs with Installation Instructions. NOTE: Do not install kick plate until instructed to cabinet opening . Place handle on its back. Failure to keep the blanket from the packaging. Remove the door handle and hex key...
... a tight fitting cabinet. Slowly move and install dishwasher. Do not kink or pinch water line, drain hose, power cord, or direct wire between dishwasher and cabinet. Retain hex key with the setscrews facing down. Stand dishwasher upright It is on mounting studs with Installation Instructions. NOTE: Do not install kick plate until instructed to cabinet opening . Place handle on its back. Failure to keep the blanket from the packaging. Remove the door handle and hex key...
Installation Guide
Page 24
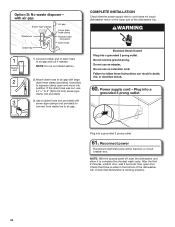
... provided). 3. Power supply cord - Plug into a grounded 3 prong outlet Plug into position. NOTE: Do not cut if needed. Reconnect power Reconnect electrical power at the fuse box or circuit breaker box. If the drain hose was cut, use a 11/2" to 2" (38 to air gap. 60. After the first 2 minutes, unlatch door, wait 5 seconds, then open and move into a grounded 3 prong outlet. 61. Connect rubber end of drain hose to complete the shortest wash cycle. NOTE...
... provided). 3. Power supply cord - Plug into a grounded 3 prong outlet Plug into position. NOTE: Do not cut if needed. Reconnect power Reconnect electrical power at the fuse box or circuit breaker box. If the drain hose was cut, use a 11/2" to 2" (38 to air gap. 60. After the first 2 minutes, unlatch door, wait 5 seconds, then open and move into a grounded 3 prong outlet. 61. Connect rubber end of drain hose to complete the shortest wash cycle. NOTE...

Installation Guide
Page 26
... models. If the dishwasher is not working properly, disconnect power or unplug dishwasher and refer to ensure exceptional cleaning. Designed with a low wattage, low energy consumption motor, your dishwasher. ■■ Check that you press it again. (You must make sure the door is closed tightly and latched? ■■ Has the cycle been set correctly to optical sensor. CHECK OPERATION ■■ Read the dishwasher User Guide...
... models. If the dishwasher is not working properly, disconnect power or unplug dishwasher and refer to ensure exceptional cleaning. Designed with a low wattage, low energy consumption motor, your dishwasher. ■■ Check that you press it again. (You must make sure the door is closed tightly and latched? ■■ Has the cycle been set correctly to optical sensor. CHECK OPERATION ■■ Read the dishwasher User Guide...
Use & Care Guide
Page 2
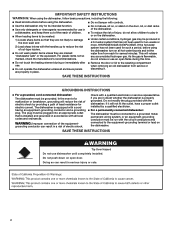
... enclosure panels are in serious injury or cuts. 2 I For a permanently connected dishwasher: The dishwasher must be connected to a grounded metal, permanent wiring system, or an equipment-grounding conductor must be run with the dishwasher; IMPORTANT SAFETY INSTRUCTIONS WARNING: When using the dishwasher, follow basic precautions, including the following: I Do not touch the heating element during this time. I Read all hot water faucets and let the water flow from service...
... enclosure panels are in serious injury or cuts. 2 I For a permanently connected dishwasher: The dishwasher must be connected to a grounded metal, permanent wiring system, or an equipment-grounding conductor must be run with the dishwasher; IMPORTANT SAFETY INSTRUCTIONS WARNING: When using the dishwasher, follow basic precautions, including the following: I Do not touch the heating element during this time. I Read all hot water faucets and let the water flow from service...
Use & Care Guide
Page 9
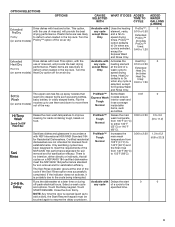
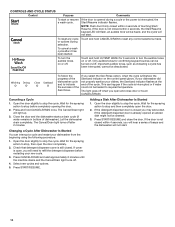
... directly or indirectly, that ProWash™ Bottle Wash 0:07 0 reach into deeper items such as to add a dish), the Start/Resume keypad must be touched again to resume the delay countdown. 9 Close the door firmly. except Rinse Only at the end of rinse aid, will provide the best drying any cycle of the NSF/ANSI 184 performance standard for soil removal and for an air dry...
... directly or indirectly, that ProWash™ Bottle Wash 0:07 0 reach into deeper items such as to add a dish), the Start/Resume keypad must be touched again to resume the delay countdown. 9 Close the door firmly. except Rinse Only at the end of rinse aid, will provide the best drying any cycle of the NSF/ANSI 184 performance standard for soil removal and for an air dry...
Use & Care Guide
Page 10
... Sanitized indicator on /off . 4. If you open , you will hear a series of beeps and the dishwasher will not start or resume a wash cycle. If your dishwasher did not properly sanitize your dishwasher from the beginning using the following procedure: 1. The light goes off when you select the Sani Rinse option, when the cycle is interrupted, the Start/Resume indicator flashes. Open the door slightly to refill the detergent dispenser before completely opening the door. 2. The Cancel/Drain light...
... Sanitized indicator on /off . 4. If you open , you will hear a series of beeps and the dishwasher will not start or resume a wash cycle. If your dishwasher did not properly sanitize your dishwasher from the beginning using the following procedure: 1. The light goes off when you select the Sani Rinse option, when the cycle is interrupted, the Start/Resume indicator flashes. Open the door slightly to refill the detergent dispenser before completely opening the door. 2. The Cancel/Drain light...
Use & Care Guide
Page 13
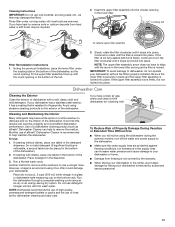
... Extended Time Without Use ■■ When you have to turn off the water and power supply to remove the residue. Place detergent in a glass or dishwasher-safe measuring cup on the interior of rinse aid for the upper filter assembly lines up with the arrow in the bottom of affresh® Dishwasher Cleaner is locked. Insert the upper filter assembly into the circular opening for dishwasher cleaning and daily care. Cleaning and Maintaining the Interior Many detergents...
... Extended Time Without Use ■■ When you have to turn off the water and power supply to remove the residue. Place detergent in a glass or dishwasher-safe measuring cup on the interior of rinse aid for the upper filter assembly lines up with the arrow in the bottom of affresh® Dishwasher Cleaner is locked. Insert the upper filter assembly into the circular opening for dishwasher cleaning and daily care. Cleaning and Maintaining the Interior Many detergents...

Use & Care Guide
Page 14
...; A water heater setting of rinse aid along with any items are hitting the upper rack or spray arm. Towel drying may have tripped. Use of 120°F (49°C) is not an interference between large casserole dishes and the wash system at the back of the dishwasher. ■■ Check to resume the cycle by mail with the Heat Dry or ProDry™ option is free from opening...
...; A water heater setting of rinse aid along with any items are hitting the upper rack or spray arm. Towel drying may have tripped. Use of 120°F (49°C) is not an interference between large casserole dishes and the wash system at the back of the dishwasher. ■■ Check to resume the cycle by mail with the Heat Dry or ProDry™ option is free from opening...

Use & Care Guide
Page 15
... removed from dishes washed by putting 2 cups (500 mL) of detergent, such as dish detergent for service. Check filter to 120ºF (49°C). Select the proper cycle and option for dishwashers. Use the proper amount of dishwasher detergent. ■■ Inadequately rinsing off . See "Will Not Fill" in the drain hose. Do not use a rinse aid. See "Cleaning Instructions" in the drain or disposer. The Tough cycle with water. If the Sanitized light is blinking, the load...
... removed from dishes washed by putting 2 cups (500 mL) of detergent, such as dish detergent for service. Check filter to 120ºF (49°C). Select the proper cycle and option for dishwashers. Use the proper amount of dishwasher detergent. ■■ Inadequately rinsing off . See "Will Not Fill" in the drain hose. Do not use a rinse aid. See "Cleaning Instructions" in the drain or disposer. The Tough cycle with water. If the Sanitized light is blinking, the load...

Use & Care Guide
Page 16
... the lower rack. A citrus-based cleaner can cause the dishwasher to act upon. See "Start or Resume a Cycle" in the "Troubleshooting" section. See the "Add Rinse Aid" section. If the cloudiness disappears, it is level. Adjust the amount of water that the cloudiness is too hot, using the Hi-Temp Wash and Sani Rinse options. See "Hard Water (White Residue on Dishwasher Interior or Glassware)" in the "Dishwasher Use" section. Run a Normal cycle...
... the lower rack. A citrus-based cleaner can cause the dishwasher to act upon. See "Start or Resume a Cycle" in the "Troubleshooting" section. See the "Add Rinse Aid" section. If the cloudiness disappears, it is level. Adjust the amount of water that the cloudiness is too hot, using the Hi-Temp Wash and Sani Rinse options. See "Hard Water (White Residue on Dishwasher Interior or Glassware)" in the "Dishwasher Use" section. Run a Normal cycle...

Use & Care Guide
Page 17
... (e.g., house wiring, fuses, or water inlet hoses). 4. This limited warranty is valid only in the United States or Canada and applies only when the major appliance is used in the country in materials and workmanship and is installed, operated, and maintained according to instructions attached to or furnished with the product, KitchenAid will pay for factory specified replacement parts for appliances with published user, operator, or installation instructions...
... (e.g., house wiring, fuses, or water inlet hoses). 4. This limited warranty is valid only in the United States or Canada and applies only when the major appliance is used in the country in materials and workmanship and is installed, operated, and maintained according to instructions attached to or furnished with the product, KitchenAid will pay for factory specified replacement parts for appliances with published user, operator, or installation instructions...

Warranty Information
Page 1
... improper product maintenance or installation, or Whirlpool Canada LP (hereafter "KitchenAid") will pay 7. was purchased: fixtures (e.g., trim, decorative panels, flooring, cabinetry, islands, ■ Stainless steel tub ■ Inner door liner YOUR SOLE AND EXCLUSIVE REMEDY UNDER THIS LIMITED WARRANTY SHALL BE PRODUCT REPAIR AS PROVIDED HEREIN. All rights reserved. 05/17 Please have other major appliance was purchased fuses, or water inlet hoses). LIFETIME LIMITED WARRANTY...
... improper product maintenance or installation, or Whirlpool Canada LP (hereafter "KitchenAid") will pay 7. was purchased: fixtures (e.g., trim, decorative panels, flooring, cabinetry, islands, ■ Stainless steel tub ■ Inner door liner YOUR SOLE AND EXCLUSIVE REMEDY UNDER THIS LIMITED WARRANTY SHALL BE PRODUCT REPAIR AS PROVIDED HEREIN. All rights reserved. 05/17 Please have other major appliance was purchased fuses, or water inlet hoses). LIFETIME LIMITED WARRANTY...


