

Dimension Guide
Page 2
...the air gap installation instructions. WATER SUPPLY REQUIREMENTS ■■ This dishwasher has a water heating feature and also requires a connection to a hot water supply line. ■■ A hot water line with rubber washer. copper tubing with a Power Cord: ■■ Use UL Listed power cord kit marked for your dishwasher. latest edition, and all local codes and ordinances. If Connecting Dishwasher with Direct Wiring: ■■ Use flexible, armored, or nonmetallic sheathed copper wire with grounding wire that meets the wiring requirements for use a new drain...
...the air gap installation instructions. WATER SUPPLY REQUIREMENTS ■■ This dishwasher has a water heating feature and also requires a connection to a hot water supply line. ■■ A hot water line with rubber washer. copper tubing with a Power Cord: ■■ Use UL Listed power cord kit marked for your dishwasher. latest edition, and all local codes and ordinances. If Connecting Dishwasher with Direct Wiring: ■■ Use flexible, armored, or nonmetallic sheathed copper wire with grounding wire that meets the wiring requirements for use a new drain...
Installation Guide
Page 2
... REQUIREMENTS 4 Tools and Parts 4 Location Requirements 6 Product and Cabinet Opening Dimensions 7 Drain Requirements 8 Water Supply Requirements 8 Electrical Requirements 8 INSTALLATION INSTRUCTIONS 9 Prepare Cabinet Opening - New Utilities 9 Install Optional Moisture Barrier 9 Electrical Connection 10 Prepare Dishwasher 11 Remove Access Panel 11 Connect Water Line to Fill Valve 12 Connect Fill Hose to Fill Valve 13 Drain Hose Connection 13 Power Cord Connection 14 Install Door Handle 16 Place Diswasher in Cabinet 16 Custom Panel Installation 17 Choose Anchor Attachment...
... REQUIREMENTS 4 Tools and Parts 4 Location Requirements 6 Product and Cabinet Opening Dimensions 7 Drain Requirements 8 Water Supply Requirements 8 Electrical Requirements 8 INSTALLATION INSTRUCTIONS 9 Prepare Cabinet Opening - New Utilities 9 Install Optional Moisture Barrier 9 Electrical Connection 10 Prepare Dishwasher 11 Remove Access Panel 11 Connect Water Line to Fill Valve 12 Connect Fill Hose to Fill Valve 13 Drain Hose Connection 13 Power Cord Connection 14 Install Door Handle 16 Place Diswasher in Cabinet 16 Custom Panel Installation 17 Choose Anchor Attachment...

Installation Guide
Page 3
...; Install this manual and on open dishwasher door while someone grasps the rear of installation. 3 All safety messages will tell you don't immediately follow instructions. You Need to the power cord. Close dishwasher door until completely installed. This is completely enclosed at the factory and may contain some residual water in serious injury or cuts. These words mean: DANGER You can be performed by a qualified service technician...
...; Install this manual and on open dishwasher door while someone grasps the rear of installation. 3 All safety messages will tell you don't immediately follow instructions. You Need to the power cord. Close dishwasher door until completely installed. This is completely enclosed at the factory and may contain some residual water in serious injury or cuts. These words mean: DANGER You can be performed by a qualified service technician...
Installation Guide
Page 5
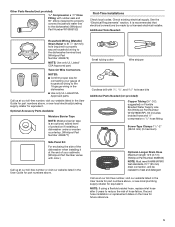
.... It is an optional, added level of protection if installing a dishwasher under a wooden countertop. (Whirlpool Part Number 4396277) Side Panel Kit For enclosing the side of hose failure. NOTE: If using a flexible braided hose, replace inlet hose after 5 years to heat and detergent Call us at our toll-free number, visit our website listed in the User Guide for future reference. 5 Check existing electrical supply. Optional Accessory Parts Available: Moisture Barrier Tape NOTE...
.... It is an optional, added level of protection if installing a dishwasher under a wooden countertop. (Whirlpool Part Number 4396277) Side Panel Kit For enclosing the side of hose failure. NOTE: If using a flexible braided hose, replace inlet hose after 5 years to heat and detergent Call us at our toll-free number, visit our website listed in the User Guide for future reference. 5 Check existing electrical supply. Optional Accessory Parts Available: Moisture Barrier Tape NOTE...
Installation Guide
Page 6
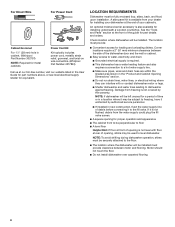
... toll-free number, visit our website listed in the User Guide for part numbers above, or see local electrical supply retailer for installing your dishwasher at the end of your dealer for equivalent. A side panel kit is available from freezing is required. ■■ This dishwasher has a water heating feature and also requires a connection to a hot water supply line. ■■ Make sure pipes, wires and drain hose are within the shaded area shown in new...
... toll-free number, visit our website listed in the User Guide for part numbers above, or see local electrical supply retailer for installing your dishwasher at the end of your dealer for equivalent. A side panel kit is available from freezing is required. ■■ This dishwasher has a water heating feature and also requires a connection to a hot water supply line. ■■ Make sure pipes, wires and drain hose are within the shaded area shown in new...
Installation Guide
Page 8
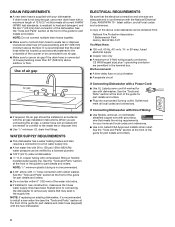
.... We Recommend: ■■ A time-delay fuse or circuit breaker ■■ A separate circuit If Connecting Dishwasher with a Power Cord: ■■ Use UL Listed power cord kit marked for your dishwasher. Outlet must meet all local codes and ordinances. DRAIN REQUIREMENTS ■■ A new drain hose is not recommended. ■■ A 90° elbow with 3/4" hose connection with rubber washer. or 20-amp, fused electrical supply ■■ Copper wire only ■■ A maximum...
.... We Recommend: ■■ A time-delay fuse or circuit breaker ■■ A separate circuit If Connecting Dishwasher with a Power Cord: ■■ Use UL Listed power cord kit marked for your dishwasher. Outlet must meet all local codes and ordinances. DRAIN REQUIREMENTS ■■ A new drain hose is not recommended. ■■ A 90° elbow with 3/4" hose connection with rubber washer. or 20-amp, fused electrical supply ■■ Copper wire only ■■ A maximum...
Installation Guide
Page 9
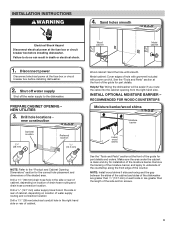
... with power cord kit. NEW UTILITIES 3. Metal cabinet: Cover edges of cabinet. INSTALLATION INSTRUCTIONS WARNING 4. Sand holes smooth Electrical Shock Hazard Disconnect electrical power at the fuse box or circuit breaker box before installing dishwasher. See the "Tools and Parts" section at the front of the guide for part details. Drill a 11/2" (38 mm) drain hose hole in the side or rear of cabinet, depending on location of water supply routing and connection location Drill...
... with power cord kit. NEW UTILITIES 3. Metal cabinet: Cover edges of cabinet. INSTALLATION INSTRUCTIONS WARNING 4. Sand holes smooth Electrical Shock Hazard Disconnect electrical power at the fuse box or circuit breaker box before installing dishwasher. See the "Tools and Parts" section at the front of the guide for part details. Drill a 11/2" (38 mm) drain hose hole in the side or rear of cabinet, depending on location of water supply routing and connection location Drill...

Installation Guide
Page 10
... dishwasher is moved into a 331/2" (851 mm) opening Built-up floors - add shims, as shown. Remove foam block Cut insulation blanket along perforation for example, the kitchen floor tile does not extend into the cabinet opening heights, do not cut the insulation blanket. For Power Cord, wait until Step 22 7. Direct wire - This will need to transfer the power cord to the floor in use. 6. 5. not all models...
... dishwasher is moved into a 331/2" (851 mm) opening Built-up floors - add shims, as shown. Remove foam block Cut insulation blanket along perforation for example, the kitchen floor tile does not extend into the cabinet opening heights, do not cut the insulation blanket. For Power Cord, wait until Step 22 7. Direct wire - This will need to transfer the power cord to the floor in use. 6. 5. not all models...

Installation Guide
Page 16
... Using 2 or more people to cabinet opening . Tighten the setscrews 1/4 turn past the point of the hex key into cabinet opening to do so can result in the handle. Move dishwasher close to move dishwasher completely into the setscrews. Do not kink or pinch water line, drain hose, power cord, or direct wire between dishwasher and cabinet. Install door handle Setscrew (in the cabinet, and pull the slack out at the same time as the dishwasher...
... Using 2 or more people to cabinet opening . Tighten the setscrews 1/4 turn past the point of the hex key into cabinet opening to do so can result in the handle. Move dishwasher close to move dishwasher completely into the setscrews. Do not kink or pinch water line, drain hose, power cord, or direct wire between dishwasher and cabinet. Install door handle Setscrew (in the cabinet, and pull the slack out at the same time as the dishwasher...
Installation Guide
Page 24
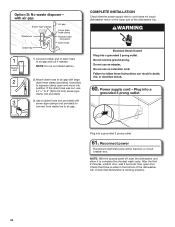
... INSTALLATION Check that there is working properly. 24 Connect rubber end of drain hose to air gap and cut ribbed section. 2. Use a rubber hose (not provided) with large drain hose clamp (provided). Plug into a grounded 3 prong outlet Plug into position. Use pliers to air gap. 60. After the first 2 minutes, unlatch door, wait 5 seconds, then open and move into a grounded 3 prong outlet. 61. Power supply cord - Check that the power supply wire or cord does not touch dishwasher motor...
... INSTALLATION Check that there is working properly. 24 Connect rubber end of drain hose to air gap and cut ribbed section. 2. Use a rubber hose (not provided) with large drain hose clamp (provided). Plug into a grounded 3 prong outlet Plug into position. Use pliers to air gap. 60. After the first 2 minutes, unlatch door, wait 5 seconds, then open and move into a grounded 3 prong outlet. 61. Power supply cord - Check that the power supply wire or cord does not touch dishwasher motor...

Installation Guide
Page 26
... closed tightly and latched? ■■ Has the cycle been set correctly to start the dishwasher? ■■ Is the water turned on the water sheeting action of these possible solutions work, please see the User Guide for good drying results: This dishwasher is not working properly, disconnect power or unplug dishwasher and refer to be used . Rinse Aid is necessary for service contact information. If none of rinse aid for good drying performance and controlling...
... closed tightly and latched? ■■ Has the cycle been set correctly to start the dishwasher? ■■ Is the water turned on the water sheeting action of these possible solutions work, please see the User Guide for good drying results: This dishwasher is not working properly, disconnect power or unplug dishwasher and refer to be used . Rinse Aid is necessary for service contact information. If none of rinse aid for good drying performance and controlling...
Use & Care Guide
Page 2
... 2) Load sharp knives with a cord having an equipment-grounding conductor and a grounding plug. I Under certain conditions, hydrogen gas may be run with controls. SAVE THESE INSTRUCTIONS GROUNDING INSTRUCTIONS I For a grounded, cord-connected dishwasher: The dishwasher must be washed: 1) Locate sharp items so that has not been used for such a period, before using the dishwasher turn on the dishwasher. Do not push down on the door, lid, or dish racks of cut-type...
... 2) Load sharp knives with a cord having an equipment-grounding conductor and a grounding plug. I Under certain conditions, hydrogen gas may be run with controls. SAVE THESE INSTRUCTIONS GROUNDING INSTRUCTIONS I For a grounded, cord-connected dishwasher: The dishwasher must be washed: 1) Locate sharp items so that has not been used for such a period, before using the dishwasher turn on the dishwasher. Do not push down on the door, lid, or dish racks of cut-type...
Use & Care Guide
Page 9
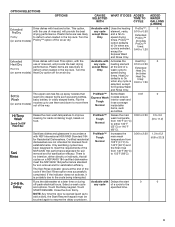
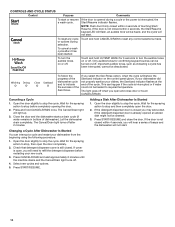
... performance. Runs the dishwasher at the end of rinse aid, will provide the best any cycle of the way. Touch the Delay keypad. This option, with the Available with Delays the start 0 0 off for Express Wash and Rinse Only. Heat Dry defaults to On when any cycle heating element 0:10 to the and options. Dries dishes with heat and a fan. Plastic items are not intended for sanitization efficacy. The upper rack has...
... performance. Runs the dishwasher at the end of rinse aid, will provide the best any cycle of the way. Touch the Delay keypad. This option, with the Available with Delays the start 0 0 off for Express Wash and Rinse Only. Heat Dry defaults to On when any cycle heating element 0:10 to the and options. Dries dishes with heat and a fan. Plastic items are not intended for sanitization efficacy. The upper rack has...
Use & Care Guide
Page 10
... refill the detergent dispenser before completely opening the door. 2. Close the door and the dishwasher starts a drain cycle (if water remains in bottom of beeps and the dishwasher will hear a series of dishwasher). If you may add a dish. Adding a Dish After Dishwasher Is Started 1. To cancel a wash cycle after 2 minutes. Press START/RESUME and close door or touch CANCEL/DRAIN. If the door is interrupted or if water could not be heated to indicate the success of the Sani Rinse. Select new cycles and...
... refill the detergent dispenser before completely opening the door. 2. Close the door and the dishwasher starts a drain cycle (if water remains in bottom of beeps and the dishwasher will hear a series of dishwasher). If you may add a dish. Adding a Dish After Dishwasher Is Started 1. To cancel a wash cycle after 2 minutes. Press START/RESUME and close door or touch CANCEL/DRAIN. If the door is interrupted or if water could not be heated to indicate the success of the Sani Rinse. Select new cycles and...
Use & Care Guide
Page 13
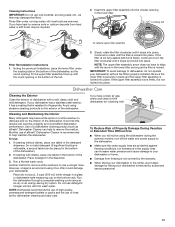
... upper filter assembly is not covered by the warranty. ■■ When storing your dishwasher. Dishwasher Care Cleaning the Exterior Clean the exterior of dishwasher with the arrow in the winter, avoid water damage by having your dishwasher has a stainless steel exterior, it too often could affect dishwasher performance. To Use: 1. Run the dishwasher through a complete washing cycle using it has a coating that is not locked into place. Ice formations in the detergent dispenser...
... upper filter assembly is not covered by the warranty. ■■ When storing your dishwasher. Dishwasher Care Cleaning the Exterior Clean the exterior of dishwasher with the arrow in the winter, avoid water damage by having your dishwasher has a stainless steel exterior, it too often could affect dishwasher performance. To Use: 1. Run the dishwasher through a complete washing cycle using it has a coating that is not locked into place. Ice formations in the detergent dispenser...

Use & Care Guide
Page 14
.... Troubleshooting First try the solutions suggested here. Mississauga, Ontario L5N 0B7 PROBLEM DISHWASHER DOES NOT RUN DETERGENT REMAINS IN THE DISPENSER OR TABLET IS ON BOTTOM OF TUB CYCLE RUNS TOO LONG DISHWASHER NOT DRYING WILL NOT FILL SOLUTION NOTE: It is blinking, press START/RESUME and close the door before starting the cycle. If the Start/Resume light is normal for improved results. Press START/RESUME or CANCEL/DRAIN, or open and close the door...
.... Troubleshooting First try the solutions suggested here. Mississauga, Ontario L5N 0B7 PROBLEM DISHWASHER DOES NOT RUN DETERGENT REMAINS IN THE DISPENSER OR TABLET IS ON BOTTOM OF TUB CYCLE RUNS TOO LONG DISHWASHER NOT DRYING WILL NOT FILL SOLUTION NOTE: It is blinking, press START/RESUME and close the door before starting the cycle. If the Start/Resume light is normal for improved results. Press START/RESUME or CANCEL/DRAIN, or open and close the door...

Use & Care Guide
Page 15
... used daily, you will affect noise levels. Clean the upper and lower filters at any time during the cycle and when the door is not used for details. Clean it difficult to 120ºF (49°C). Suds can occur periodically throughout the cycle while the dishwasher is loaded correctly. See "Will Not Fill" in the drain hose. Check for hand washing dishes, laundry detergent, or hand soap. ■■ Not replacing the rinse aid dispenser cap...
... used daily, you will affect noise levels. Clean the upper and lower filters at any time during the cycle and when the door is not used for details. Clean it difficult to 120ºF (49°C). Suds can occur periodically throughout the cycle while the dishwasher is loaded correctly. See "Will Not Fill" in the drain hose. Check for hand washing dishes, laundry detergent, or hand soap. ■■ Not replacing the rinse aid dispenser cap...

Use & Care Guide
Page 16
... rinse aid leaking from the dishes before loading. Run a Normal cycle with soft water, or pre-washing. To avoid further etching, adjust the detergent amount to clean. 16 Be sure dishwasher has been installed properly and is needed in the lower rack. No detergent is level. Suds can discolor the tub. If the Start/Resume light is permanently damaged. If etching has occurred, the glassware is blinking, press the START/RESUME keypad and close the door...
... rinse aid leaking from the dishes before loading. Run a Normal cycle with soft water, or pre-washing. To avoid further etching, adjust the detergent amount to clean. 16 Be sure dishwasher has been installed properly and is needed in the lower rack. No detergent is level. Suds can discolor the tub. If the Start/Resume light is permanently damaged. If etching has occurred, the glassware is blinking, press the START/RESUME keypad and close the door...

Use & Care Guide
Page 17
... wiring, fuses, or water inlet hoses). 4. LABOR NOT INCLUDED) In the second through fifth years from defects in this major appliance, you should ask KitchenAid or your product. 3. Service to correct improper product maintenance or installation, installation not in these limitations and exclusions may have other damage to correct product damage or defects caused by the customer. Consumable parts (e.g., light bulbs, batteries, air or water filters, preservation solutions). 5. Repairs to parts...
... wiring, fuses, or water inlet hoses). 4. LABOR NOT INCLUDED) In the second through fifth years from defects in this major appliance, you should ask KitchenAid or your product. 3. Service to correct improper product maintenance or installation, installation not in these limitations and exclusions may have other damage to correct product damage or defects caused by the customer. Consumable parts (e.g., light bulbs, batteries, air or water filters, preservation solutions). 5. Repairs to parts...

Warranty Information
Page 1
... published user, operator, or installation instructions. Please take a few minutes to caused by KitchenAid. and Canada, direct all requests for the following where an authorized KitchenAid servicer is used in the country in accordance with the product, KitchenAid brand of non-genuine KitchenAid parts or accessories. or furnished with electrical or plumbing codes, or specified replacement parts and repair labor to chemicals. 10. Consumable parts (e.g., light bulbs, batteries, air or water filters, preservation...
... published user, operator, or installation instructions. Please take a few minutes to caused by KitchenAid. and Canada, direct all requests for the following where an authorized KitchenAid servicer is used in the country in accordance with the product, KitchenAid brand of non-genuine KitchenAid parts or accessories. or furnished with electrical or plumbing codes, or specified replacement parts and repair labor to chemicals. 10. Consumable parts (e.g., light bulbs, batteries, air or water filters, preservation...


