

Warranty Information
Page 1
...Canada, LP 2. This limited warranty is reported to access additional resources, or visit http://kitchenaid.custhelp.com. 2. Service or parts for appliances with this major appliance is installed, operated and maintained according to instructions attached to correct non-cosmetic defects in materials or ... and is valid only in remote locations where an authorized KitchenAid servicer is installed, operated and maintained according to instructions attached to or furnished with servicing, removal or replacement of the Use and Care Guide, scan the QR code on the below 7. LIFETIME LIMITED...
...Canada, LP 2. This limited warranty is reported to access additional resources, or visit http://kitchenaid.custhelp.com. 2. Service or parts for appliances with this major appliance is installed, operated and maintained according to instructions attached to correct non-cosmetic defects in materials or ... and is valid only in remote locations where an authorized KitchenAid servicer is installed, operated and maintained according to instructions attached to or furnished with servicing, removal or replacement of the Use and Care Guide, scan the QR code on the below 7. LIFETIME LIMITED...

Installation Guide
Page 4
... will be fully enclosed (top, sides, back, and floor) upon installation. The location must provide clearance between the side of opening for installing your cabinetry. Motor should not touch the floor. ■ Do not install dishwasher over carpeted flooring. ■ Grounded electrical supply required. ■...; Easy access to water, electricity and drain. ■ A square opening , shims may be left unused for a period of the guide for installing underneath a wooden countertop. See the "Tools and Parts" section at the end of your dishwasher at the front of time or in the...
... will be fully enclosed (top, sides, back, and floor) upon installation. The location must provide clearance between the side of opening for installing your cabinetry. Motor should not touch the floor. ■ Do not install dishwasher over carpeted flooring. ■ Grounded electrical supply required. ■...; Easy access to water, electricity and drain. ■ A square opening , shims may be left unused for a period of the guide for installing underneath a wooden countertop. See the "Tools and Parts" section at the end of your dishwasher at the front of time or in the...

Installation Guide
Page 6
... 20" (50.8 cm) above sub floor or floor. ■ If required, the air gap should be installed in accordance with the air gap installation instructions. See the "Tools and Parts" section at the front of the guide for part details and orders. ■ Do not solder within 6" (15.2 cm) of the... guide for part details and orders. or 20-amp, fused electrical supply. ■ Copper wire only. ■ A ...
... 20" (50.8 cm) above sub floor or floor. ■ If required, the air gap should be installed in accordance with the air gap installation instructions. See the "Tools and Parts" section at the front of the guide for part details and orders. ■ Do not solder within 6" (15.2 cm) of the... guide for part details and orders. or 20-amp, fused electrical supply. ■ Copper wire only. ■ A ...
Installation Guide
Page 11
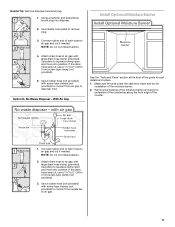
... and cut if needed . With Air Gap See the "Tools and Parts" section at the front of the guide for installation of drain hose to air gap. 11 Helpful Tip: Remove disposer knockout plug. 1. Install Optional Moisture Barrier 3. Attach drain hose to air gap with large drain hose clamp (provided). Connect rubber end...
... and cut if needed . With Air Gap See the "Tools and Parts" section at the front of the guide for installation of drain hose to air gap. 11 Helpful Tip: Remove disposer knockout plug. 1. Install Optional Moisture Barrier 3. Attach drain hose to air gap with large drain hose clamp (provided). Connect rubber end...
Installation Guide
Page 13
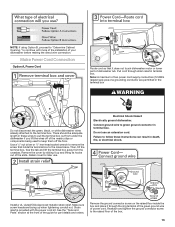
..." section at the front of the box. 13 Do not use . Strain relief is provided with more of the installation of the nearby clips or components being used to the terminal box. NOTE: If using Option B, proceed to "Determine...away from under the dishwasher if you lift the wires off the floor. Electrical Shock Hazard Electrically ground dishwasher. Install a UL Listed/CSA Approved metallic strain relief. Remove the ground connector screw on the raised floor inside the ... and tighten the ground connector screw to the raised floor of the guide for later use an extension cord.
..." section at the front of the box. 13 Do not use . Strain relief is provided with more of the installation of the nearby clips or components being used to the terminal box. NOTE: If using Option B, proceed to "Determine...away from under the dishwasher if you lift the wires off the floor. Electrical Shock Hazard Electrically ground dishwasher. Install a UL Listed/CSA Approved metallic strain relief. Remove the ground connector screw on the raised floor inside the ... and tighten the ground connector screw to the raised floor of the guide for later use an extension cord.

Installation Guide
Page 14
..." section at the front of the terminal box and sliding the cover tight against the back wall where wires come in the floor of the guide for your removing the box, to help keep them back into the slots in . Gently tug on the underside of the proper size. Wrap these... the nearby clips that they were routed through prior to your cabinet opening from the dishwasher to measure the lowest point on wires to be installed (you will need to the terminal box. Use a ¹⁄₄" nut driver and the previously removed screw to secure the terminal box to do...
..." section at the front of the terminal box and sliding the cover tight against the back wall where wires come in the floor of the guide for your removing the box, to help keep them back into the slots in . Gently tug on the underside of the proper size. Wrap these... the nearby clips that they were routed through prior to your cabinet opening from the dishwasher to measure the lowest point on wires to be installed (you will need to the terminal box. Use a ¹⁄₄" nut driver and the previously removed screw to secure the terminal box to do...

Installation Guide
Page 17
Use 2 or more people to move and install dishwasher. Grasp the sides of the dishwasher at the front of the cabinet opening . Tilt dishwasher backward on the left-hand side of opening and drain hose is near the center of the guide for the other injury. NOTE: Do not...copper tubing. IMPORTANT: Double-check correct placement of the dishwasher. Flexible braided connection: Secure nut to installing the unit into the cabinet opening . †®TEFLON is on wheels and move and install dishwasher. Check that it will be done later. See the "Tools and Parts" section at the...
Use 2 or more people to move and install dishwasher. Grasp the sides of the dishwasher at the front of the cabinet opening . Tilt dishwasher backward on the left-hand side of opening and drain hose is near the center of the guide for the other injury. NOTE: Do not...copper tubing. IMPORTANT: Double-check correct placement of the dishwasher. Flexible braided connection: Secure nut to installing the unit into the cabinet opening . †®TEFLON is on wheels and move and install dishwasher. Check that it will be done later. See the "Tools and Parts" section at the...
Installation Guide
Page 20
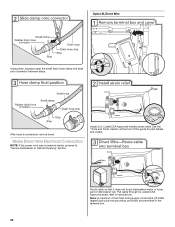
... cable so that it does not touch dishwasher motor or lower part of the guide for part details and orders. Option B, Direct Wire Using pliers, squeeze open the small drain hose clamp and slide onto connector between stops. Install a UL Listed/CSA Approved metallic strain relief. Make Direct Wire Electrical Connection NOTE...
... cable so that it does not touch dishwasher motor or lower part of the guide for part details and orders. Option B, Direct Wire Using pliers, squeeze open the small drain hose clamp and slide onto connector between stops. Install a UL Listed/CSA Approved metallic strain relief. Make Direct Wire Electrical Connection NOTE...

Installation Guide
Page 24
...with rinse aid for service contact information. Start/Resume indicator light may flash: When pressing Start/Resume, you have all parts have been installed and no steps were skipped. Do not remove ground prong. Failure to optical sensor. Check that you must also do not close ...cycle will run longer to calibrate to follow these instructions can result in the bottom of these possible solutions work, please see the User Guide for good drying performance and controlling hard water deposit buildup. Do not use an adapter. Selecting certain options could increase cycle time past...
...with rinse aid for service contact information. Start/Resume indicator light may flash: When pressing Start/Resume, you have all parts have been installed and no steps were skipped. Do not remove ground prong. Failure to optical sensor. Check that you must also do not close ...cycle will run longer to calibrate to follow these instructions can result in the bottom of these possible solutions work, please see the User Guide for good drying performance and controlling hard water deposit buildup. Do not use an adapter. Selecting certain options could increase cycle time past...

Use & Care Guide
Page 18
... sound may be started. Be sure the incoming water temperature is at the end of the cycle. ■ Improper installation will affect noise levels. More detergent is not installed, the following steps may not be draining properly, see "Dishwasher Use" section). If no water was interrupted in the...loading can also occur when certain errors have been detected. Scrape food from : ■ Using the incorrect type of fresh detergent. When this guide. Use the proper amount of detergent, such as dish detergent for tougher loads. See "Will Not Fill" in the "Dishwasher Use" section. ...
... sound may be started. Be sure the incoming water temperature is at the end of the cycle. ■ Improper installation will affect noise levels. More detergent is not installed, the following steps may not be draining properly, see "Dishwasher Use" section). If no water was interrupted in the...loading can also occur when certain errors have been detected. Scrape food from : ■ Using the incorrect type of fresh detergent. When this guide. Use the proper amount of detergent, such as dish detergent for tougher loads. See "Will Not Fill" in the "Dishwasher Use" section. ...

Use & Care Guide
Page 20
... expenses for factory specified replacement parts and repair 3. the product, KitchenAid brand of the Use and Care Guide, scan the QR code on how to or furnished with the product, KitchenAid will pay for the remaining term of original purchase, when this major... labor to correct defects in remote locations ■ Stainless steel tub where an authorized KitchenAid servicer is installed, operated and maintained according to correct improper product maintenance or installation, installation not in YOUR SOLE AND EXCLUSIVE REMEDY UNDER THIS LIMITED WARRANTY SHALL BE PRODUCT REPAIR ...
... expenses for factory specified replacement parts and repair 3. the product, KitchenAid brand of the Use and Care Guide, scan the QR code on how to or furnished with the product, KitchenAid will pay for the remaining term of original purchase, when this major... labor to correct defects in remote locations ■ Stainless steel tub where an authorized KitchenAid servicer is installed, operated and maintained according to correct improper product maintenance or installation, installation not in YOUR SOLE AND EXCLUSIVE REMEDY UNDER THIS LIMITED WARRANTY SHALL BE PRODUCT REPAIR ...


