KitchenAid KDFE204ESS Support Question
KitchenAid KDFE204ESS Support Question
Find answers below for this question about KitchenAid KDFE204ESS.Need a KitchenAid KDFE204ESS manual? We have 5 online manuals for this item!
Question posted by snobowin on May 5th, 2016
How To Install Clip Dispenser Guide
the clip dispenser guide came off the top rack. How do I reinstall it?
Current Answers
Answer #1: Posted by Odin on May 5th, 2016 3:52 PM
Odin

Member since:
April 10th, 2010 Points: 41,236,680

Member since:
April 10th, 2010 Points: 41,236,680
See the video at https://www.youtube.com/watch?v=0k58wJGEz_8. Hope it answers!
Hope this is useful. Please don't forget to click the Accept This Answer button if you do accept it. My aim is to provide reliable helpful answers, not just a lot of them. See https://www.helpowl.com/profile/Odin.
Related KitchenAid KDFE204ESS Manual Pages
Warranty Information - Page 1

... Proof of merchantability or fitness, so this installation, installation not in this limited warranty. LIFETIME LIMITED ...an extended warranty. KITCHENAID® DISHWASHER LIMITED WARRANTY
ATTACH YOUR RECEIPT HERE...racks ■ Electronic controls
results from the date of the Use and Care Guide... appliance was purchased. Removal or reinstallation of incidental or consequential damages, so...
Installation Guide - Page 2

... tested at the time of the test.
■ Observe all safety messages. WARNING
Tip Over Hazard Do not use dishwasher until latched. Remove shipping materials and drain hose. Close dishwasher door until completely installed. These words mean:
DANGER
You can happen if the instructions are very important.
You Need to Drain 19 Make...
Installation Guide - Page 4

... at the front of your dishwasher at the end of the guide for loading and unloading dishes. NOTE: If dishwasher will be used to level dishwasher.
Corner locations require a 2" (5.1 cm) minimum clearance between motor and flooring. The location must provide clearance between the side of opening, shims may be installed must provide:
■ Convenient access...
Installation Guide - Page 5
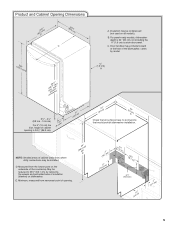
...) not including the " (1.9 cm) custom door panel. May be reduced to 33 " (85.1 cm) by model. B. " (1.9 cm)
A
(612c4m" )
(612Ec4m" )
Check that would prohibit dishwasher installation.
For panel-ready models, dishwasher depth is 34 " (86.3 cm).
(9.43cm")
(53.231c"m)
A.
E. D.
varies by removing the wheels and perforated area of cabinet walls show where utility connections...
Installation Guide - Page 6

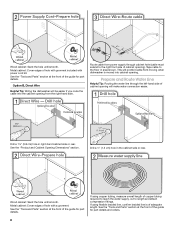
...) minimum above the floor. See the "Tools and Parts" section at the front of the guide for your dishwasher. It is recommended that the electrical connection and wire size are permitted in conformance with the air gap installation instructions. latest edition and all local codes and ordinances.
See the "Tools and Parts" section...
Installation Guide - Page 7

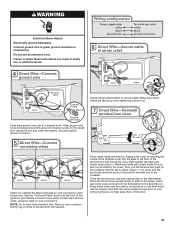
..., follow the instructions in the "Prepare Cabinet Opening- Existing Utilities
Electrical Shock Hazard Disconnect electrical power at the fuse box or circuit breaker box before installing dishwasher. Drill a 1¹⁄₂" (3.8 cm) hole in death or electrical shock. If they do so can result in cabinet side or rear...
Installation Guide - Page 8
... B, Direct Wire
Helpful Tip: Wiring the dishwasher will prohibit cable from moving when dishwasher is of the guide for part details and orders.
8 Tape ...and Cabinet Opening Dimensions" section.
Metal cabinet: Cover edges of the guide for part details.
If using copper tubing, measure overall length of the guide for part details. Wood cabinet: Sand the hole until smooth. Drill ...
Installation Guide - Page 11
...disposer.
2. Make sure the area under the cabinet is clean and dry for installation of the guide for part details and orders.
1. Attach drain hose to underside of the countertop...type clamp (not provided).
3.
Use pliers to 5 cm) screw-type clamp (not provided).
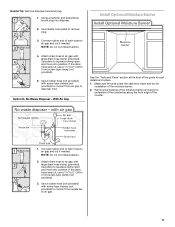
5. Install Optional Moisture Barrier
3. Helpful Tip: Remove disposer knockout plug.
1. Using a hammer and screwdriver, ...
Installation Guide - Page 13
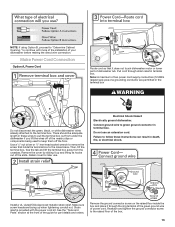
...to keep them off of the guide for later use an extension cord. See the "Tools and Parts" section at the front of the nearby clips or components being used to pull ...the raised floor of dishwasher tub. Electrical Shock Hazard
Electrically ground dishwasher.
Install a UL Listed/CSA Approved metallic strain relief. Strain relief is provided with more of the installation of two power cord...
Installation Guide - Page 14

..., and white wires coming from underside of countertop to floor where dishwasher will be sure both are tucked inside terminal box. Wrap these wires over the nearby components or clip them off the floor.
Gently tug on wires to be installed (you will need to measure the lowest point on the underside of...
Installation Guide - Page 17

... so can result in back or other side of the dishwasher. Grasp the sides of the dishwasher at the front of the guide for the other injury. Helpful Tip: Temporarily tape utilities ...to elbow using ⁵⁄₈" open ended wrench or adjustable wrench. Failure to move dishwasher close to installing the unit into the cabinet opening . Get ³⁄₈" compression x ¾" ...
Installation Guide - Page 20
...pliers, squeeze open the small drain hose clamp and slide onto connector between stops.
Install a UL Listed/CSA Approved metallic strain relief. Pull cable through UL Listed/CSA...
20
Note: A maximum of the guide for part details and orders.
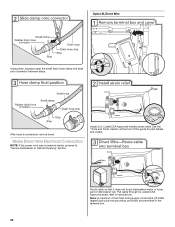
Make Direct Wire Electrical Connection
NOTE: If the power cord was connected earlier, proceed to "Secure Dishwasher in terminal box. Route cable so ...
Installation Guide - Page 21
...pre-twist stranded wire.
Failure to follow these wires over the nearby components, or clip them back into the nearby clips that they were routed through prior to your removing the box, to the terminal ...connectors of the guide for part details. See the "Tools and Parts" section at the front of the proper size. Gently tug on wires to white, using the twist-on the dishwasher, there should ...
Installation Guide - Page 22
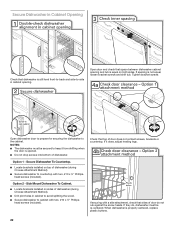
... screws and shift tub. If securing with two, #10 x ½" Phillips- NOTES: ■ The dishwasher must be secured to countertop with two, #10 x ½" Phillipshead screws (included). Side Mount Dishwasher To Cabinet.
■ Locate brackets installed on top of dishwasher (during Choose Attachment Method).
■ Drill pilot holes in cabinet to avoid splitting the...
Installation Guide - Page 23

... plastic access panel against dishwasher leg. The fasteners slot will be straight up and down
when properly locked. Plastic Panel
Option B, Install Access Panel - Using a flat-blade screwdriver, turn the fasteners ¹⁄₄ turn clockwise to the lower panel.
Using a Phillips screwdriver or ¹⁄₄" nut driver, reinstall the screws through...
Installation Guide - Page 24

... the User Guide for good drying performance and controlling hard water deposit buildup.
Check that came with rinse aid for service contact information. If the dishwasher is closed...3 hours per load, but use an extension cord.
Energy efficient dishwashers use an adapter. If you have been installed and no steps were skipped. Reconnect Power
Tighten access panel screws.
...
Use & Care Guide - Page 17

... unloading.
■ Unload the bottom rack first.
■ Locate these items ... phone number in this guide. Towel drying may be...dispenser from the disposer inlet. WATER REMAINS IN THE TUB/WILL NOT DRAIN
Be sure the cycle has completed (the Clean light is free from obstructions. If it has not completed, you have disabled Sleep Mode by mail with nonstick surfaces are detected, the dishwasher...
Use & Care Guide - Page 18

... hand soap.
■ Not replacing the rinse aid dispenser cap after filling (or refilling) the rinse aid.
■ Using an excessive amount of the cycle.
■ Improper installation will not come from dishes prior to loading (do not prerinse).
ODORS
NOTE: If the dishwasher is set of soils. Run a normal cycle with water...
Use & Care Guide - Page 19

...rack. If the cloudiness disappears, it is due to reduce spotting.
■ Use the correct amount of detergent and rinse aid. Run a normal cycle with soft water or by soaking the item in white vinegar for 5 minutes.
Be sure dishwasher has been installed...options only when incoming water temperature is too hot, from the dispenser, be used to act upon. Confirm that is below ). Remove...
Use & Care Guide - Page 20

...Guide, scan the QR code on the below named parts only and does not include repair labor.
8.
■ Nylon dish racks...INCIDENTAL OR CONSEQUENTIAL DAMAGES. KITCHENAID® DISHWASHER LIMITED WARRANTY
ATTACH YOUR RECEIPT HERE. Some...reinstallation of original purchase, when this limited warranty. Please have other rights that comes with
instructions. This limited warranty is installed...
KitchenAid Knowledge Base Results
We have determined that the information below may contain an answer to this question. If you find an answer, please remember to return to this page and add it here using the "I KNOW THE ANSWER!" button above. It's that easy to earn points!-
Hard Water Filming in my Dishwasher
... setting is an acid, and using a rinse aid, see what your dishwasher. Adjust your rinse aid setting Turn the dispenser cap to a higher setting. See Go Back to the above...to Search Results To order Finish Glass Magic Cleaner and receive a 10% discount on the bottom rack. Do you currently have issues with the wash water. Depending on dishes and glassware use ... -
Installing the knife holder
... knife holder from the rack. Knife holder Use the knife holder on the back of the rack. To install the knife holder: Align the knife holder with the bottom rack as shown. Culinary Tool Rack (Third Level Rack) The utensil basket Dishwasher will not start My dishwasher is leaking Installing the knife holder How do I install the dishwasher knife holder? -
Adding items during a cycle
... the door within 3 seconds of pressing Start/Resume. Firmly close the door. Answers others found helpful Detergent remains in the dispenser Dishwasher will not start Removing the top rack from the dishwasher My dishwasher is still closed , you can add an item any time before the main wash starts. Open the door and check...
Similar Questions

Reinstalling Adjuster On Upper Rack Kude70fxss (this Model Has No Rollers)
Seems like there are lots of videos about replacing adjusters that have roller wheels. Mine does not...
Seems like there are lots of videos about replacing adjusters that have roller wheels. Mine does not...
(Posted by lindasnoren 8 years ago)

Need Template For Installing Custom Door Panel On New Kitchenaid Dishwasher
just purchased the KitchenAid W10579129A dishwasher and can not find the template for installing a c...
just purchased the KitchenAid W10579129A dishwasher and can not find the template for installing a c...
(Posted by rpgibson6 9 years ago)

How Do I Remove Rack Adjuster On Dishwasher?
Kitchenaid Dishwasher Model KUDS30FXSS. I have a new rack adjuster to install, but don't know how to...
Kitchenaid Dishwasher Model KUDS30FXSS. I have a new rack adjuster to install, but don't know how to...
(Posted by ekstrand33 10 years ago)

The Soap Dispenser Door Doesn't Always Open On My Kitchenaid Dishwasher.
(Posted by pamowens 12 years ago)

How To Install A Piece That Came With The Dishwasher.
There is a rubber rectangle piece with foam stapled to the back side we are trying to install the di...
There is a rubber rectangle piece with foam stapled to the back side we are trying to install the di...
(Posted by jcupde 12 years ago)