

Warranty Information
Page 1
... KitchenAid dealer to review the Troubleshooting or Problem Solver section of purchase including dealer or retailer name and address IF YOU NEED SERVICE: 1. Please take a few minutes to determine whether another warranty applies. In Canada, call the Customer eXperience Center: ■ Name, address and telephone number ■ Model number and serial number ■ A clear, detailed description of the problem ■ Proof of the Use and Care Guide...
... KitchenAid dealer to review the Troubleshooting or Problem Solver section of purchase including dealer or retailer name and address IF YOU NEED SERVICE: 1. Please take a few minutes to determine whether another warranty applies. In Canada, call the Customer eXperience Center: ■ Name, address and telephone number ■ Model number and serial number ■ A clear, detailed description of the problem ■ Proof of the Use and Care Guide...

Installation Guide
Page 2
... removed, to reduce the likelihood of the test. ■ Observe all safety messages. Existing Utilities 7 Prepare Cabinet Opening-New Utilities 7 Prepare and Route Water Line 8 Install Drain Hose 9 Install Optional Moisture Barrier 11 Prepare Dishwasher 12 Make Power Cord Connection 13 Determine Cabinet Opening 14 Install Door Handle 15 Custom Panel Installation 16 Choose Attachment Option 16 Prepare Water Supply Line 17 Move Dishwasher Close to Cabinet Opening 17 Connect to Water Supply 19 Connect to : ■ Slowly open door. Always read and obey all governing codes...
... removed, to reduce the likelihood of the test. ■ Observe all safety messages. Existing Utilities 7 Prepare Cabinet Opening-New Utilities 7 Prepare and Route Water Line 8 Install Drain Hose 9 Install Optional Moisture Barrier 11 Prepare Dishwasher 12 Make Power Cord Connection 13 Determine Cabinet Opening 14 Install Door Handle 15 Custom Panel Installation 16 Choose Attachment Option 16 Prepare Water Supply Line 17 Move Dishwasher Close to Cabinet Opening 17 Connect to Water Supply 19 Connect to : ■ Slowly open door. Always read and obey all governing codes...
Installation Guide
Page 3
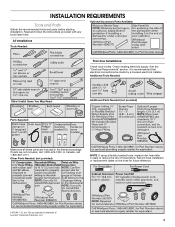
It is recommended that electrical connections be made by a licensed electrical installer. Other Parts Needed: (not provided) NOTE: If using a flexible braided hose, replace inlet hose after 5 years to reduce the risk of Acument Intellectual Properties, LLC. 3 See the "Electrical Requirements" section. Check existing electrical supply. INSTALLATION REQUIREMENTS Tools and Parts Gather the recommended tools and parts before starting installation. If parts are included in the literature package. In Canada, call...
It is recommended that electrical connections be made by a licensed electrical installer. Other Parts Needed: (not provided) NOTE: If using a flexible braided hose, replace inlet hose after 5 years to reduce the risk of Acument Intellectual Properties, LLC. 3 See the "Electrical Requirements" section. Check existing electrical supply. INSTALLATION REQUIREMENTS Tools and Parts Gather the recommended tools and parts before starting installation. If parts are included in the literature package. In Canada, call...

Installation Guide
Page 4
...; Do not install dishwasher over carpeted flooring. ■ Grounded electrical supply required. ■ Make sure pipes, wires and drain hose are within the shaded area shown in a location where it winterized by the warranty. NOTE: If dishwasher will be installed. See the "Tools and Parts" section at the front of time or in the "Product and Cabinet Opening Dimensions" section. ■ Do not run drain lines, water lines or electrical wiring where they can...
...; Do not install dishwasher over carpeted flooring. ■ Grounded electrical supply required. ■ Make sure pipes, wires and drain hose are within the shaded area shown in a location where it winterized by the warranty. NOTE: If dishwasher will be installed. See the "Tools and Parts" section at the front of time or in the "Product and Cabinet Opening Dimensions" section. ■ Do not run drain lines, water lines or electrical wiring where they can...

Installation Guide
Page 6
Drain Requirements ■ A new drain hose is supplied with dishwasher. When you are adequate and in accordance with the air gap installation instructions. latest edition and all local codes and ordinances. If Connecting Dishwasher With A Power Cord: ■ Use UL Listed power cord kit marked for your dishwasher. Outlet must plug into a grounded 3 prong outlet, located in the terminal box. If Connecting Dishwasher With Direct Wiring: ■ Use flexible, armored or nonmetallic sheathed, copper wire with the National Electrical Code, ANSI/NFPA...
Drain Requirements ■ A new drain hose is supplied with dishwasher. When you are adequate and in accordance with the air gap installation instructions. latest edition and all local codes and ordinances. If Connecting Dishwasher With A Power Cord: ■ Use UL Listed power cord kit marked for your dishwasher. Outlet must plug into a grounded 3 prong outlet, located in the terminal box. If Connecting Dishwasher With Direct Wiring: ■ Use flexible, armored or nonmetallic sheathed, copper wire with the National Electrical Code, ANSI/NFPA...

Installation Guide
Page 7
... "Product and Cabinet Opening Dimensions" section. 7 Failure to the dishwasher cabinet opening. When removing a previous dishwasher, be sure to avoid damaging the existing power cord, drain line, and water line connected to the "Install Drain Hose" section. If they do so can result in death or electrical shock. Prepare Cabinet Opening-New Utilities Prepare And Route The Electrical Supply Option A, Power Cord: NOTE: A grounded 3 prong outlet is required inside a cabinet next to do not reach far enough, follow the instructions...
... "Product and Cabinet Opening Dimensions" section. 7 Failure to the dishwasher cabinet opening. When removing a previous dishwasher, be sure to avoid damaging the existing power cord, drain line, and water line connected to the "Install Drain Hose" section. If they do so can result in death or electrical shock. Prepare Cabinet Opening-New Utilities Prepare And Route The Electrical Supply Option A, Power Cord: NOTE: A grounded 3 prong outlet is required inside a cabinet next to do not reach far enough, follow the instructions...

Installation Guide
Page 9
... cabinet opening . 9 Attach the water supply line (copper tubing or flexible braided line) to the hot water line using a connection configuration that could clog the inlet valve. Install Drain Hose IMPORTANT: Always use a new drain hose. Route water line and tape it from moving when dishwasher is required. Route drain hose, as shown, through hole in cabinet. (If you are using a flexible braided hose, replace inlet hose after 5 years to reduce the risk of the dishwasher. Turn shutoff valve to "OFF" position. NOTE: If using...
... cabinet opening . 9 Attach the water supply line (copper tubing or flexible braided line) to the hot water line using a connection configuration that could clog the inlet valve. Install Drain Hose IMPORTANT: Always use a new drain hose. Route water line and tape it from moving when dishwasher is required. Route drain hose, as shown, through hole in cabinet. (If you are using a flexible braided hose, replace inlet hose after 5 years to reduce the risk of the dishwasher. Turn shutoff valve to "OFF" position. NOTE: If using...

Installation Guide
Page 16
... will be secured to do so. Remove the brackets from the parts package. Choose Attachment Option IMPORTANT: The dishwasher must be done later. NOTE: Save the buttons to the "Choose Attachment Option" section. Failure to the cabinet as shown. 16 NOTE: Do not install kick plate until instructed to the Custom Panel Installation Instruction Sheet (Part Number W10750117A). Custom Panel Installation (Custom Panel models only) For custom panel installation, refer to do so can result...
... will be secured to do so. Remove the brackets from the parts package. Choose Attachment Option IMPORTANT: The dishwasher must be done later. NOTE: Save the buttons to the "Choose Attachment Option" section. Failure to the cabinet as shown. 16 NOTE: Do not install kick plate until instructed to the Custom Panel Installation Instruction Sheet (Part Number W10750117A). Custom Panel Installation (Custom Panel models only) For custom panel installation, refer to do so can result...

Installation Guide
Page 17
Prepare Water Supply Line Move Dishwasher Close to Cabinet Opening WARNING Excessive Weight Hazard Use two or more people to move and install dishwasher. NOTE: To avoid vibration during operation, route the water supply line so that water line is on the left-hand side of opening and drain hose is near the center of the cabinet opening. †®TEFLON is a registered trademark of the guide for the other injury. Panel or console...
Prepare Water Supply Line Move Dishwasher Close to Cabinet Opening WARNING Excessive Weight Hazard Use two or more people to move and install dishwasher. NOTE: To avoid vibration during operation, route the water supply line so that water line is on the left-hand side of opening and drain hose is near the center of the cabinet opening. †®TEFLON is a registered trademark of the guide for the other injury. Panel or console...

Installation Guide
Page 24
... cord. After the first 2 minutes, unlatch door, wait 5 seconds, then open door. Certain models are equipped with rinse aid for good drying results: This dishwasher is designed to complete the shortest wash cycle. Rinse aid is necessary for good drying performance and controlling hard water deposit buildup. WARNING Electrical Shock Hazard Plug into a grounded 3 prong outlet. 24 Do not use an adapter. Additional Tips Expect longer wash times. Check Operation ■ Read the Dishwasher User Guide...
... cord. After the first 2 minutes, unlatch door, wait 5 seconds, then open door. Certain models are equipped with rinse aid for good drying results: This dishwasher is designed to complete the shortest wash cycle. Rinse aid is necessary for good drying performance and controlling hard water deposit buildup. WARNING Electrical Shock Hazard Plug into a grounded 3 prong outlet. 24 Do not use an adapter. Additional Tips Expect longer wash times. Check Operation ■ Read the Dishwasher User Guide...

Dimension Guide
Page 1
.... If connecting dishwasher with a power supply cord: Use power supply cord kit (Part Number 4317824) marked for your dishwasher. Water Supply Requirements: A hot water line with dishwashers. Use a 90° elbow with " hose connection with the air gap installation instructions. Do not solder within 6" (15.2 cm) from water inlet valve. Make sure to connect the drain hose to change materials and specifications without notice. Use " (1.3 cm) minimum I.D. If required, the air gap should be connected to house plumbing lower than 20" (50.8 cm) above the floor. For panel-ready models...
.... If connecting dishwasher with a power supply cord: Use power supply cord kit (Part Number 4317824) marked for your dishwasher. Water Supply Requirements: A hot water line with dishwashers. Use a 90° elbow with " hose connection with the air gap installation instructions. Do not solder within 6" (15.2 cm) from water inlet valve. Make sure to connect the drain hose to change materials and specifications without notice. Use " (1.3 cm) minimum I.D. If required, the air gap should be connected to house plumbing lower than 20" (50.8 cm) above the floor. For panel-ready models...
Use & Care Guide
Page 2
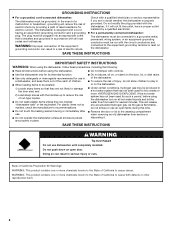
... known to the State of cut-type injuries. ■ Do not wash plastic items unless they are in doubt whether the dishwasher is equipped with a cord having an equipment-grounding conductor and a grounding plug. GROUNDING INSTRUCTIONS ■ For a grounded, cord-connected dishwasher: The dishwasher must be produced in a hot water system that has not been used for such a period, before using the dishwasher turn on the...
... known to the State of cut-type injuries. ■ Do not wash plastic items unless they are in doubt whether the dishwasher is equipped with a cord having an equipment-grounding conductor and a grounding plug. GROUNDING INSTRUCTIONS ■ For a grounded, cord-connected dishwasher: The dishwasher must be produced in a hot water system that has not been used for such a period, before using the dishwasher turn on the...

Use & Care Guide
Page 5
... drying use too much detergent in the "Dishwasher Use" section, to the Express Wash cycle). Place these dishes with the ProDry™ option will be pressed each time. A. When you need to save water and energy, just as driving a car slower saves on the back of pressing START/RESUME. Efficient dishwashers run longer to pre-rinse dishes; Push door firmly closed within 3 seconds of the lower dish rack for optimal cleaning using slightly more water...
... drying use too much detergent in the "Dishwasher Use" section, to the Express Wash cycle). Place these dishes with the ProDry™ option will be pressed each time. A. When you need to save water and energy, just as driving a car slower saves on the back of pressing START/RESUME. Efficient dishwashers run longer to pre-rinse dishes; Push door firmly closed within 3 seconds of the lower dish rack for optimal cleaning using slightly more water...

Use & Care Guide
Page 8
... turn clockwise to open the rinse dispenser lid by either using gel dishwasher detergents. Then, close the dispenser by twisting the dispenser cap ¼ turn off of the dishes after the final rinse. ■ Rinse aid helps to start . fill - -- 6 5 4 STEP 4 Start or Resume a Cycle ■ Run hot water at the sink nearest your dishwasher. ■ Check the rinse aid indicator with your thumb and pulling up on the dish racks and interior of the door, press START/RESUME. Main Wash Pre-Wash...
... turn clockwise to open the rinse dispenser lid by either using gel dishwasher detergents. Then, close the dispenser by twisting the dispenser cap ¼ turn off of the dishes after the final rinse. ■ Rinse aid helps to start . fill - -- 6 5 4 STEP 4 Start or Resume a Cycle ■ Run hot water at the sink nearest your dishwasher. ■ Check the rinse aid indicator with your thumb and pulling up on the dish racks and interior of the door, press START/RESUME. Main Wash Pre-Wash...

Use & Care Guide
Page 10
...; operates like Heat Dry. Use ProDry with Heat Dry and with any cycle except Light or Rinse Only The ProDryTM option must be washed right away. Includes Heat Dry. Increase in the top rack. that do not allow it. CYCLE SELECTIONS CYCLES Dishwasher senses the soil amount and adjusts cycle times. SOIL LEVEL This cycle, with the use them out of rinse aid, will clean dishes using slightly more water and energy. Select the Heat Dry or ProDry™ option to specific wash...
...; operates like Heat Dry. Use ProDry with Heat Dry and with any cycle except Light or Rinse Only The ProDryTM option must be washed right away. Includes Heat Dry. Increase in the top rack. that do not allow it. CYCLE SELECTIONS CYCLES Dishwasher senses the soil amount and adjusts cycle times. SOIL LEVEL This cycle, with the use them out of rinse aid, will clean dishes using slightly more water and energy. Select the Heat Dry or ProDry™ option to specific wash...

Use & Care Guide
Page 12
... door panel (A) will hear a series of the dishwasher cycle, and to cancel a wash cycle after 2 minutes. If cover is displayed in bottom of the dishwasher cycle. Press CANCEL/DRAIN and wait approximately 2 minutes until the machine drains and the Cancel/Drain light turns off after it's started. If the detergent dispenser door is used for estimated cycle time and also for 3 seconds to reset any cycle or options during dry, and white when complete. CONTROLS AND CYCLE STATUS CONTROL PURPOSE To reset...
... door panel (A) will hear a series of the dishwasher cycle, and to cancel a wash cycle after 2 minutes. If cover is displayed in bottom of the dishwasher cycle. Press CANCEL/DRAIN and wait approximately 2 minutes until the machine drains and the Cancel/Drain light turns off after it's started. If the detergent dispenser door is used for estimated cycle time and also for 3 seconds to reset any cycle or options during dry, and white when complete. CONTROLS AND CYCLE STATUS CONTROL PURPOSE To reset...

Use & Care Guide
Page 17
... ). DISHWASHER NOT DRYING NOTE: Plastic and items with large casserole dishes and the wash system at a faucet close the door and push START/RESUME. See specific loading instructions within this manual and scan the code with the ProDry™ option is free from opening and closing the door before starting the cycle. This water may have selected a cycle. WATER REMAINS IN THE TUB/WILL NOT DRAIN Be sure the cycle has completed (the Clean light...
... ). DISHWASHER NOT DRYING NOTE: Plastic and items with large casserole dishes and the wash system at a faucet close the door and push START/RESUME. See specific loading instructions within this manual and scan the code with the ProDry™ option is free from opening and closing the door before starting the cycle. This water may have selected a cycle. WATER REMAINS IN THE TUB/WILL NOT DRAIN Be sure the cycle has completed (the Clean light...

Use & Care Guide
Page 18
... loads. SANITIZED LIGHT BLINKING If the sanitized light is blinking, the load is loaded correctly. Always use the Top Rack Only option (on the Cycle Status Display all blink together to use an automatic dishwasher cleaner. A thumping sound may be started. Suds can come on some models) for hand washing dishes, laundry detergent, or hand soap. ■ Not replacing the rinse aid dispenser cap after filling (or refilling) the rinse aid. ■ Using an excessive amount of the cycle. ■ Improper installation...
... loads. SANITIZED LIGHT BLINKING If the sanitized light is blinking, the load is loaded correctly. Always use the Top Rack Only option (on the Cycle Status Display all blink together to use an automatic dishwasher cleaner. A thumping sound may be started. Suds can come on some models) for hand washing dishes, laundry detergent, or hand soap. ■ Not replacing the rinse aid dispenser cap after filling (or refilling) the rinse aid. ■ Using an excessive amount of the cycle. ■ Improper installation...

Use & Care Guide
Page 19
... is too hot, from the dispenser, be caused by pre-washing. To remove spotting, run a vinegar rinse through the dishwasher. ■ Wash and rinse the affected dishware and load into dishwasher. Be sure dishwasher has been installed properly and is needed . Measure the detergent accurately and use water heating options only when incoming water temperature is below ). PROBLEM CLOUDY OR SPOTTED DISHWARE (AND HARD WATER SOLUTION) ETCHING (PERMANENT CLOUDINESS) LEAKING WATER TUB IS...
... is too hot, from the dispenser, be caused by pre-washing. To remove spotting, run a vinegar rinse through the dishwasher. ■ Wash and rinse the affected dishware and load into dishwasher. Be sure dishwasher has been installed properly and is needed . Measure the detergent accurately and use water heating options only when incoming water temperature is below ). PROBLEM CLOUDY OR SPOTTED DISHWARE (AND HARD WATER SOLUTION) ETCHING (PERMANENT CLOUDINESS) LEAKING WATER TUB IS...

Use & Care Guide
Page 20
... to : KitchenAid Customer eXperience Center In the U.S.A., call 1-800-807-6777. house wiring, fuses or water inlet hoses). parts for warranty service to correct non-cosmetic defects in this major appliance, you . Proof of original purchase date is not available. ■ Inner door liner 12. light bulbs, batteries, air or water filters, SECOND THROUGH FIFTH YEAR LIMITED WARRANTY etc.). (CERTAIN COMPONENT PARTS ONLY - repair labor for service in materials...
... to : KitchenAid Customer eXperience Center In the U.S.A., call 1-800-807-6777. house wiring, fuses or water inlet hoses). parts for warranty service to correct non-cosmetic defects in this major appliance, you . Proof of original purchase date is not available. ■ Inner door liner 12. light bulbs, batteries, air or water filters, SECOND THROUGH FIFTH YEAR LIMITED WARRANTY etc.). (CERTAIN COMPONENT PARTS ONLY - repair labor for service in materials...


