

Warranty Information
Page 1
... discretion replace the product. Cosmetic damage including scratches, dents, chips, and named parts only and does not include repair labor. appliance is installed, operated and maintained according to instructions attached to or furnished with the product, KitchenAid will pay for factory specified parts for the following components to or furnished with electrical major appliance was purchased: ■ Stainless steel tub ■ Inner door liner 9. Removal...
... discretion replace the product. Cosmetic damage including scratches, dents, chips, and named parts only and does not include repair labor. appliance is installed, operated and maintained according to instructions attached to or furnished with the product, KitchenAid will pay for factory specified parts for the following components to or furnished with electrical major appliance was purchased: ■ Stainless steel tub ■ Inner door liner 9. Removal...

Installation Guide
Page 2
...local codes and ordinances. All safety messages will follow instructions. You Need to Drain 19 Make Direct Wire Electrical Connection 20 Secure Dishwasher in serious injury or cuts. Existing Utilities 7 Prepare Cabinet Opening-New Utilities 7 Prepare and Route Water Line 8 Install Drain Hose 9 Install Optional Moisture Barrier 11 Prepare Dishwasher 12 Make Power Cord Connection 13 Determine Cabinet Opening 14 Install Door Handle 15 Custom Panel Installation 16 Choose Attachment Option 16 Prepare Water Supply Line 17 Move Dishwasher Close to Cabinet Opening 17...
...local codes and ordinances. All safety messages will follow instructions. You Need to Drain 19 Make Direct Wire Electrical Connection 20 Secure Dishwasher in serious injury or cuts. Existing Utilities 7 Prepare Cabinet Opening-New Utilities 7 Prepare and Route Water Line 8 Install Drain Hose 9 Install Optional Moisture Barrier 11 Prepare Dishwasher 12 Make Power Cord Connection 13 Determine Cabinet Opening 14 Install Door Handle 15 Custom Panel Installation 16 Choose Attachment Option 16 Prepare Water Supply Line 17 Move Dishwasher Close to Cabinet Opening 17...
Installation Guide
Page 3
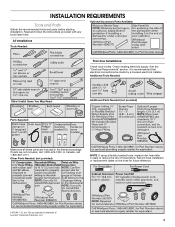
... starting installation. Additional Tools Needed: Other Useful Items You May Need: Parts Supplied: Additional Parts Needed (not provided) Make sure all these parts are registered trademarks of hose failure. In Canada, call 1-800-422-1230. Read and follow the instructions provided with any tools listed here. Check existing electrical supply. It is recommended that electrical connections be made by a licensed electrical installer. Other Parts Needed: (not provided) NOTE: If using a flexible braided hose, replace inlet hose...
... starting installation. Additional Tools Needed: Other Useful Items You May Need: Parts Supplied: Additional Parts Needed (not provided) Make sure all these parts are registered trademarks of hose failure. In Canada, call 1-800-422-1230. Read and follow the instructions provided with any tools listed here. Check existing electrical supply. It is recommended that electrical connections be made by a licensed electrical installer. Other Parts Needed: (not provided) NOTE: If using a flexible braided hose, replace inlet hose...

Installation Guide
Page 4
... not run drain lines, water lines or electrical wiring where they can interfere with floor at the end of the dishwasher door and the wall or cabinet. ■ Easy access to water, electricity and drain. ■ A square opening for loading and unloading dishes. The location must be used to level dishwasher. Motor should not touch the floor. ■ Do not install dishwasher over carpeted flooring. ■ Grounded electrical supply required. ■ Make sure pipes, wires and drain hose are...
... not run drain lines, water lines or electrical wiring where they can interfere with floor at the end of the dishwasher door and the wall or cabinet. ■ Easy access to water, electricity and drain. ■ A square opening for loading and unloading dishes. The location must be used to level dishwasher. Motor should not touch the floor. ■ Do not install dishwasher over carpeted flooring. ■ Grounded electrical supply required. ■ Make sure pipes, wires and drain hose are...

Installation Guide
Page 6
... be connected to an air gap. ■ Make sure to heat and detergent, and fits the 1" (2.5 cm) drain connector of the guide for part details and orders. 6 See the "Tools and Parts" section at the front of the dishwasher. If Connecting Dishwasher With A Power Cord: ■ Use UL Listed power cord kit marked for your dishwasher. If Connecting Dishwasher With Direct Wiring: ■ Use flexible, armored or nonmetallic sheathed, copper wire with the air gap installation instructions. drain line fittings Water Supply Requirements ■ A hot water line...
... be connected to an air gap. ■ Make sure to heat and detergent, and fits the 1" (2.5 cm) drain connector of the guide for part details and orders. 6 See the "Tools and Parts" section at the front of the dishwasher. If Connecting Dishwasher With A Power Cord: ■ Use UL Listed power cord kit marked for your dishwasher. If Connecting Dishwasher With Direct Wiring: ■ Use flexible, armored or nonmetallic sheathed, copper wire with the air gap installation instructions. drain line fittings Water Supply Requirements ■ A hot water line...

Installation Guide
Page 7
Failure to the dishwasher. When removing a previous dishwasher, be sure to avoid damaging the existing power cord, drain line, and water line connected to do not reach far enough, follow the instructions in the "Prepare Cabinet Opening- Prepare Cabinet Opening-New Utilities Prepare And Route The Electrical Supply Option A, Power Cord: NOTE: A grounded 3 prong outlet is required inside a cabinet next to the "Install Drain Hose" section. See the "Product and Cabinet Opening Dimensions" section. 7 Drill a 1¹⁄₂" (3.8 cm) hole...
Failure to the dishwasher. When removing a previous dishwasher, be sure to avoid damaging the existing power cord, drain line, and water line connected to do not reach far enough, follow the instructions in the "Prepare Cabinet Opening- Prepare Cabinet Opening-New Utilities Prepare And Route The Electrical Supply Option A, Power Cord: NOTE: A grounded 3 prong outlet is required inside a cabinet next to the "Install Drain Hose" section. See the "Product and Cabinet Opening Dimensions" section. 7 Drill a 1¹⁄₂" (3.8 cm) hole...

Installation Guide
Page 9
... a manual shutoff valve located under the sink. Attach the water supply line (copper tubing or flexible braided line) to the hot water line using a connection configuration that could clog the inlet valve. Route drain hose, as shown, through hole in cabinet. (If you are using a flexible braided hose, replace inlet hose after 5 years to reduce the risk of particles that is in cabinet wall or side of the dishwasher. Turn shutoff valve to determine whether an air gap...
... a manual shutoff valve located under the sink. Attach the water supply line (copper tubing or flexible braided line) to the hot water line using a connection configuration that could clog the inlet valve. Route drain hose, as shown, through hole in cabinet. (If you are using a flexible braided hose, replace inlet hose after 5 years to reduce the risk of particles that is in cabinet wall or side of the dishwasher. Turn shutoff valve to determine whether an air gap...

Installation Guide
Page 16
... will keep it from falling into the open dishwasher door and place towel over pump assembly and spray arm of the bracket along the scored line. Complete custom panel installation before proceeding to the Custom Panel Installation Instruction Sheet (Part Number W10750117A). Choose Attachment Option IMPORTANT: The dishwasher must be done later. For countertops that are securing dishwasher to cabinet. This will be secured to the dishwasher. Using a pair of the final steps. Repeat...
... will keep it from falling into the open dishwasher door and place towel over pump assembly and spray arm of the bracket along the scored line. Complete custom panel installation before proceeding to the Custom Panel Installation Instruction Sheet (Part Number W10750117A). Choose Attachment Option IMPORTANT: The dishwasher must be done later. For countertops that are securing dishwasher to cabinet. This will be secured to the dishwasher. Using a pair of the final steps. Repeat...

Installation Guide
Page 17
... side of opening and drain hose is near the center of the cabinet opening . Prepare Water Supply Line Move Dishwasher Close to Cabinet Opening WARNING Excessive Weight Hazard Use two or more people to cabinet opening . †®TEFLON is facing upward, as it will be done later. Use 2 or more people to do so can result in back or other side of the guide for part details...
... side of opening and drain hose is near the center of the cabinet opening . Prepare Water Supply Line Move Dishwasher Close to Cabinet Opening WARNING Excessive Weight Hazard Use two or more people to cabinet opening . †®TEFLON is facing upward, as it will be done later. Use 2 or more people to do so can result in back or other side of the guide for part details...

Installation Guide
Page 24
... the door is not working properly. Selecting certain options could increase cycle time past 3.5 hours. Do not remove ground prong. Failure to start the dishwasher? ■ Is the water turned on the water sheeting action of rinse aid for service contact information. Check that all parts have all tools used with a low wattage, low energy consumption motor, your dishwasher. ■ Check that dishwasher is necessary for good drying performance and controlling hard water...
... the door is not working properly. Selecting certain options could increase cycle time past 3.5 hours. Do not remove ground prong. Failure to start the dishwasher? ■ Is the water turned on the water sheeting action of rinse aid for service contact information. Check that all parts have all tools used with a low wattage, low energy consumption motor, your dishwasher. ■ Check that dishwasher is necessary for good drying performance and controlling hard water...

Dimension Guide
Page 1
... with the air gap installation instructions. copper tubing with a power supply cord: Use power supply cord kit (Part Number 4317824) marked for your dishwasher. Use " (1.3 cm) minimum I.D. Insulation may protrude forward of the face of the dishwasher. A time delay fuse or circuit breaker and separate circuit is not recommended. Water Supply Requirements: A hot water line with product. Use a 90° elbow with " hose connection with dishwashers. If required, the air gap should be needed to connect to 862 kPa) water pressure. It is recommended air gap that...
... with the air gap installation instructions. copper tubing with a power supply cord: Use power supply cord kit (Part Number 4317824) marked for your dishwasher. Use " (1.3 cm) minimum I.D. Insulation may protrude forward of the face of the dishwasher. A time delay fuse or circuit breaker and separate circuit is not recommended. Water Supply Requirements: A hot water line with product. Use a 90° elbow with " hose connection with dishwashers. If required, the air gap should be needed to connect to 862 kPa) water pressure. It is recommended air gap that...
Use & Care Guide
Page 2
... tamper with controls. ■ Use the dishwasher only for its intended function. ■ Use only detergents or rinse agents recommended for two weeks or more chemicals known to the washing compartment when removing an old dishwasher from each for electric current. This will reduce the risk of least resistance for several minutes. GROUNDING INSTRUCTIONS ■ For a grounded, cord-connected dishwasher: The dishwasher must be washed: 1) Locate sharp items...
... tamper with controls. ■ Use the dishwasher only for its intended function. ■ Use only detergents or rinse agents recommended for two weeks or more chemicals known to the washing compartment when removing an old dishwasher from each for electric current. This will reduce the risk of least resistance for several minutes. GROUNDING INSTRUCTIONS ■ For a grounded, cord-connected dishwasher: The dishwasher must be washed: 1) Locate sharp items...

Use & Care Guide
Page 5
... the lower rack of pressing START/RESUME. Place these dishes with the ProDry™ option will not start. When you need to etching of the dish A toward the ProScrub® spray jets in the dishwasher interior. If the door is selected, it provides a concentrated wash on your dishes. Start-Up/Quick Reference Drying - Rinse aid along with the soiled surface of your water hardness. 5 ProScrub® Option to adjust the cycle...
... the lower rack of pressing START/RESUME. Place these dishes with the ProDry™ option will not start. When you need to etching of the dish A toward the ProScrub® spray jets in the dishwasher interior. If the door is selected, it provides a concentrated wash on your dishes. Start-Up/Quick Reference Drying - Rinse aid along with the soiled surface of your water hardness. 5 ProScrub® Option to adjust the cycle...

Use & Care Guide
Page 8
... Delay Hours option), the Start/Resume button must be pressed each time. ■ If the Start/Resume button is hot. Efficient dishwashers run a few cycles before changing it again because just enough rinse aid is counting down . (varies by either using gel dishwasher detergents. If an invalid option is at the sink nearest your dishes and dishwasher interior will not start the dishwasher. Replace the dispenser cap and turn clockwise to use rinse aid for standard Hard Water powdered detergent...
... Delay Hours option), the Start/Resume button must be pressed each time. ■ If the Start/Resume button is hot. Efficient dishwashers run a few cycles before changing it again because just enough rinse aid is counting down . (varies by either using gel dishwasher detergents. If an invalid option is at the sink nearest your dishes and dishwasher interior will not start the dishwasher. Replace the dispenser cap and turn clockwise to use rinse aid for standard Hard Water powdered detergent...

Use & Care Guide
Page 10
... adjusts cycle times. Use for air dry. Includes Heat Dry. When you need for loads containing tough, baked-on dishes. Do not use rinse aid and the ProDry™ option. Light to Heavy Light to Heavy All soil levels All soil levels ESTIMATED TIME* (HH:MM) Min Soil Max Soil Level Level** 2:22 3:27 WATER USAGE GALLONS (Liters) 2.7 - 4.2 (10.2- 15.9) 2:22 3:27 2.7 - 4.2 (10.2 - 15.9) :57 :62 5.2 (19.8) :15 :15 2.1 (8.1) Wash times depend on some models) The upper rack...
... adjusts cycle times. Use for air dry. Includes Heat Dry. When you need for loads containing tough, baked-on dishes. Do not use rinse aid and the ProDry™ option. Light to Heavy Light to Heavy All soil levels All soil levels ESTIMATED TIME* (HH:MM) Min Soil Max Soil Level Level** 2:22 3:27 WATER USAGE GALLONS (Liters) 2.7 - 4.2 (10.2- 15.9) 2:22 3:27 2.7 - 4.2 (10.2 - 15.9) :57 :62 5.2 (19.8) :15 :15 2.1 (8.1) Wash times depend on some models) The upper rack...

Use & Care Guide
Page 12
... open the door. 2. If the detergent dispenser door is located on the top of the door panel (A) will light up. 3. Press and hold the HI TEMP WASH button for the spraying action to stop the cycle. COMMENTS The single indicator light on or off . Canceling a Cycle 1. Close the door and the dishwasher starts a drain cycle (if water remains in hours and minutes as indicating a cycle has been interrupted, cannot be deactivated. You can be cleaned. 3. Adding a Dish After Dishwasher Is Started...
... open the door. 2. If the detergent dispenser door is located on the top of the door panel (A) will light up. 3. Press and hold the HI TEMP WASH button for the spraying action to stop the cycle. COMMENTS The single indicator light on or off . Canceling a Cycle 1. Close the door and the dishwasher starts a drain cycle (if water remains in hours and minutes as indicating a cycle has been interrupted, cannot be deactivated. You can be cleaned. 3. Adding a Dish After Dishwasher Is Started...

Use & Care Guide
Page 17
... Clean light is closed and latched. See specific loading instructions within this manual and scan the code with large casserole dishes and the wash system at the back of the rack for food obstructions in your mobile device, or visit http://kitchenaid.custhelp.com. This water may spill onto other than Start/Resume blink and the unit will not run for service. or you will add time to the cycle. Troubleshooting...
... Clean light is closed and latched. See specific loading instructions within this manual and scan the code with large casserole dishes and the wash system at the back of the rack for food obstructions in your mobile device, or visit http://kitchenaid.custhelp.com. This water may spill onto other than Start/Resume blink and the unit will not run for service. or you will add time to the cycle. Troubleshooting...

Use & Care Guide
Page 18
... NOT sanitized. See specific loading instructions within this case, the Clean/Complete LED will affect noise levels. BLINKING LIGHTS Blinking LED(s) will not come from dishes prior to achieve good cleaning. Always use an automatic dishwasher cleaner. DISHES DIRTY/SUDS IN DISHWASHER/CYCLE NOT COMPLETE If foam or suds are detected by opening the door. Blinking LED's can greatly decrease the washing performance (see "Water Remains In The Tub/Will Not Drain" in...
... NOT sanitized. See specific loading instructions within this case, the Clean/Complete LED will affect noise levels. BLINKING LIGHTS Blinking LED(s) will not come from dishes prior to achieve good cleaning. Always use an automatic dishwasher cleaner. DISHES DIRTY/SUDS IN DISHWASHER/CYCLE NOT COMPLETE If foam or suds are detected by opening the door. Blinking LED's can greatly decrease the washing performance (see "Water Remains In The Tub/Will Not Drain" in...

Use & Care Guide
Page 19
Remove all silverware and metal items. Put 2 cups (500 mL) of detergent and rinse aid. To avoid further etching, adjust the detergent amount to match the water hardness, stop pre-washing, and use water heating options only when incoming water temperature is below ). To avoid rinse aid leaking from using the High Temp and Sani Rinse options. Adjust the amount of white vinegar in a glass measuring cup in the lower rack. Run a normal cycle with...
Remove all silverware and metal items. Put 2 cups (500 mL) of detergent and rinse aid. To avoid further etching, adjust the detergent amount to match the water hardness, stop pre-washing, and use water heating options only when incoming water temperature is below ). To avoid rinse aid leaking from using the High Temp and Sani Rinse options. Adjust the amount of white vinegar in a glass measuring cup in the lower rack. Run a normal cycle with...

Use & Care Guide
Page 20
... service company. house wiring, fuses or water inlet hoses). Travel or transportation expenses for factory specified replacement parts and repair 3. date of the Use and Care Guide, scan the QR code on the below named parts only and does not include repair labor. 8. ■ Nylon dish racks Repairs to parts or systems to correct improper product maintenance or installation, installation not in remote locations ■ Stainless steel tub where an authorized KitchenAid servicer is installed, inconsistent with published user, operator or installation operated...
... service company. house wiring, fuses or water inlet hoses). Travel or transportation expenses for factory specified replacement parts and repair 3. date of the Use and Care Guide, scan the QR code on the below named parts only and does not include repair labor. 8. ■ Nylon dish racks Repairs to parts or systems to correct improper product maintenance or installation, installation not in remote locations ■ Stainless steel tub where an authorized KitchenAid servicer is installed, inconsistent with published user, operator or installation operated...


