
Installation Guide
Page 2
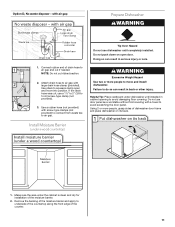
... and others are not followed. These words mean: DANGER You can result in this dishwasher as specified in Cabinet Opening 23 Complete Installation 24 Check Operation 26 If Dishwasher Does Not Operate 26 Additional Tips 26 DISHWASHER SAFETY Your safety and the safety of damage to reduce...symbol and either the word "DANGER" or "WARNING." WARNING: To reduce the risk of electric shock, fire, or injury to persons, the installer must be exercised when the appliance is , tell you how to Drain 21 Make Direct Wire Electrical Connection 22 Secure Dishwasher in these instructions. ...
... and others are not followed. These words mean: DANGER You can result in this dishwasher as specified in Cabinet Opening 23 Complete Installation 24 Check Operation 26 If Dishwasher Does Not Operate 26 Additional Tips 26 DISHWASHER SAFETY Your safety and the safety of damage to reduce...symbol and either the word "DANGER" or "WARNING." WARNING: To reduce the risk of electric shock, fire, or injury to persons, the installer must be exercised when the appliance is , tell you how to Drain 21 Make Direct Wire Electrical Connection 22 Secure Dishwasher in these instructions. ...
Installation Guide
Page 3
...follow the instructions provided with any tools listed here. Other parts you may also need : NOTES: ■ Moisture barrier tape is recommended when installing a dishwasher under a wood countertop. ■ Parts available for only ³⁄₄" thick wooden panel. Check existing electrical supply. See...recommended that electrical connections be the proper size to connect your household wiring to each other by a licensed electrical installer. All Installations Tools needed : Make sure all these parts are not included, call 1-800-807-6777. (4) #10 x ¹/₂" wood...
...follow the instructions provided with any tools listed here. Other parts you may also need : NOTES: ■ Moisture barrier tape is recommended when installing a dishwasher under a wood countertop. ■ Parts available for only ³⁄₄" thick wooden panel. Check existing electrical supply. See...recommended that electrical connections be the proper size to connect your household wiring to each other by a licensed electrical installer. All Installations Tools needed : Make sure all these parts are not included, call 1-800-807-6777. (4) #10 x ¹/₂" wood...
Installation Guide
Page 4
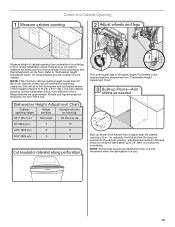
... shown in a location where it may be left unused for loading and unloading dishes. The location where the dishwasher will be installed must be securely attached to accurately measure dimensions and ensure dishwasher is level if the floor in the dishwasher opening , shims may be...accessory (Part Number 4396277) is not level with or contact dishwasher motor or legs. Helpful Tip: Be sure to the floor. Do not install dishwasher over carpeted flooring. If dishwasher will be subject to level dishwasher. If floor at rear of the dishwasher door and the wall or ...
... shown in a location where it may be left unused for loading and unloading dishes. The location where the dishwasher will be installed must be securely attached to accurately measure dimensions and ensure dishwasher is level if the floor in the dishwasher opening , shims may be...accessory (Part Number 4396277) is not level with or contact dishwasher motor or legs. Helpful Tip: Be sure to the floor. Do not install dishwasher over carpeted flooring. If dishwasher will be subject to level dishwasher. If floor at rear of the dishwasher door and the wall or ...

Installation Guide
Page 5
...(1.9 cm) custom door panel. NOTE: Shaded areas of cabinet walls show where utility connections may be compressed (not used on dishwasher. May be installed. Measured from narrowest point of insulation (blanket) on all models). 3¹⁄₂" - 4¹⁄₄" (8.8 cm - 10.6 cm...8324;" (9.4 cm) 21" (53.3 cm) 24" (61 cm) 24" (61 cm) E Check that all surfaces have no protrusions that would prohibit dishwasher installation. C. Product and Cabinet Opening Dimensions 24¹⁄₂" (62.2 cm) B 23⁷⁄₈" (62.6 cm) 27¹⁄₂" (68.8 ...
...(1.9 cm) custom door panel. NOTE: Shaded areas of cabinet walls show where utility connections may be compressed (not used on dishwasher. May be installed. Measured from narrowest point of insulation (blanket) on all models). 3¹⁄₂" - 4¹⁄₄" (8.8 cm - 10.6 cm...8324;" (9.4 cm) 21" (53.3 cm) 24" (61 cm) 24" (61 cm) E Check that all surfaces have no protrusions that would prohibit dishwasher installation. C. Product and Cabinet Opening Dimensions 24¹⁄₂" (62.2 cm) B 23⁷⁄₈" (62.6 cm) 27¹⁄₂" (68.8 ...

Installation Guide
Page 6
...of the dishwasher. ■ Make sure to connect drain hose to waste tee or disposer inlet above drain trap in accordance with the air gap installation instructions. copper tubing with 20 to 120 psi (138 to 862 kPa) water pressure can be obtained from: National Fire Protection Association 1 Batterymarch... within 6" (15.2 cm) of the water inlet valve. A copy of the above subfloor or floor. ■ If required, the air gap should be installed in house plumbing and 20" (50.8 cm) minimum above the floor. or 20-amp, fused electrical supply. ■ Copper wire only. Water Supply Requirements ...
...of the dishwasher. ■ Make sure to connect drain hose to waste tee or disposer inlet above drain trap in accordance with the air gap installation instructions. copper tubing with 20 to 120 psi (138 to 862 kPa) water pressure can be obtained from: National Fire Protection Association 1 Batterymarch... within 6" (15.2 cm) of the water inlet valve. A copy of the above subfloor or floor. ■ If required, the air gap should be installed in house plumbing and 20" (50.8 cm) minimum above the floor. or 20-amp, fused electrical supply. ■ Copper wire only. Water Supply Requirements ...

Installation Guide
Page 7
Existing Utilities Electrical Shock Hazard Disconnect electrical power at the fuse box or circuit breaker box before installing dishwasher. New Utilities" section. See "Product and Cabinet Opening Dimensions" section. 7 If the water line and the cable extend to the locations shown, proceed to ... Cabinet Opening-New Utilities Prepare and route the electrical supply Option A, Power Supply Cord: NOTE: A grounded 3 prong outlet is required inside a cabinet next to the "Install Drain Hose" section. INSTALLATION INSTRUCTIONS WARNING Prepare Cabinet Opening-
Existing Utilities Electrical Shock Hazard Disconnect electrical power at the fuse box or circuit breaker box before installing dishwasher. New Utilities" section. See "Product and Cabinet Opening Dimensions" section. 7 If the water line and the cable extend to the locations shown, proceed to ... Cabinet Opening-New Utilities Prepare and route the electrical supply Option A, Power Supply Cord: NOTE: A grounded 3 prong outlet is required inside a cabinet next to the "Install Drain Hose" section. INSTALLATION INSTRUCTIONS WARNING Prepare Cabinet Opening-

Installation Guide
Page 9
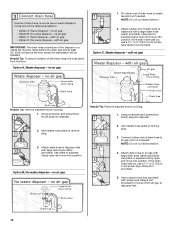
... ordinances. This will prohibit it from moving when dishwasher is moved into cabinet opening. Turn shutoff valve to determine whether an air gap is required. Install Drain Hose IMPORTANT: Always use a new drain hose. Route drain hose as shown through hole in cabinet wall or side of the opening closest to...
... ordinances. This will prohibit it from moving when dishwasher is moved into cabinet opening. Turn shutoff valve to determine whether an air gap is required. Install Drain Hose IMPORTANT: Always use a new drain hose. Route drain hose as shown through hole in cabinet wall or side of the opening closest to...
Installation Guide
Page 10
... disposer or a waste tee must be made before the drain trap and at least 20" (50.8 cm) above the floor where the dishwasher will be installed. IMPORTANT: The drain hose connection of the hose, keep the hose away from air gap to squeeze clamp open and move into disposer. 2. Use pliers...
... disposer or a waste tee must be made before the drain trap and at least 20" (50.8 cm) above the floor where the dishwasher will be installed. IMPORTANT: The drain hose connection of the hose, keep the hose away from air gap to squeeze clamp open and move into disposer. 2. Use pliers...
Installation Guide
Page 11
...Hazard Do not use a 1¹⁄₂" to 2" (3.8 to avoid scratching the door panel. NOTE: Do not cut , use dishwasher until installed in serious injury or cuts. Connect rubber end of the moisture barrier. 2. Use pliers to avoid damaging floor covering. Do not push down on its... back. 1. Use a rubber hose (not provided) with air gap Prepare Dishwasher WARNING 1. Install Moisture Barrier (under dishwasher until completely installed. Using 2 or more people to air gap. with screw-type clamps (not provided) to connect from waste tee to move...
...Hazard Do not use a 1¹⁄₂" to 2" (3.8 to avoid scratching the door panel. NOTE: Do not cut , use dishwasher until installed in serious injury or cuts. Connect rubber end of the moisture barrier. 2. Use pliers to avoid damaging floor covering. Do not push down on its... back. 1. Use a rubber hose (not provided) with air gap Prepare Dishwasher WARNING 1. Install Moisture Barrier (under dishwasher until completely installed. Using 2 or more people to air gap. with screw-type clamps (not provided) to connect from waste tee to move...

Installation Guide
Page 12
Plastic Panel Using a flat-blade screwdriver, turn the plastic fasteners ¹⁄₄ turn counterclockwise to dishwasher. Metal Panel Install a UL Listed/CSA Approved strain relief. Strain relief is provided with the installation of dishwasher tub. NOTE: If using Option B, proceed to "Determine Cabinet Opening," to the left when tightening conduit nut. Option...
Plastic Panel Using a flat-blade screwdriver, turn the plastic fasteners ¹⁄₄ turn counterclockwise to dishwasher. Metal Panel Install a UL Listed/CSA Approved strain relief. Strain relief is provided with the installation of dishwasher tub. NOTE: If using Option B, proceed to "Determine Cabinet Opening," to the left when tightening conduit nut. Option...
Installation Guide
Page 14
... rear wheels can be securely attached to floor to avoid movement when the dishwasher is less than the cabinet opening , but the dishwasher will be installed (you will allow the dishwasher and perforated section of turns needed. This will need to measure the lowest point on the underside of the countertop...
... rear wheels can be securely attached to floor to avoid movement when the dishwasher is less than the cabinet opening , but the dishwasher will be installed (you will allow the dishwasher and perforated section of turns needed. This will need to measure the lowest point on the underside of the countertop...

Installation Guide
Page 15
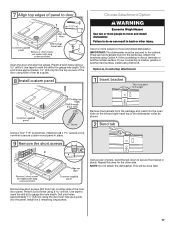
...injury. Failure to specific dimensions. IMPORTANT: Use a moisture-resistant sealer on mounting studs with Installation Instructions. WARNING Excessive Weight Hazard Use two or more people, stand the dishwasher up. Install the custom hardware handle(s) on some models) IMPORTANT: Do not scratch the front panel during...tightly against the door. Retain hex key with the setscrews facing down. If the handle is the customer's responsibility to move and install dishwasher. Using 2 or more people to obtain the proper length screws and adjust the pilot holes accordingly. It is attached from ...
...injury. Failure to specific dimensions. IMPORTANT: Use a moisture-resistant sealer on mounting studs with Installation Instructions. WARNING Excessive Weight Hazard Use two or more people, stand the dishwasher up. Install the custom hardware handle(s) on some models) IMPORTANT: Do not scratch the front panel during...tightly against the door. Retain hex key with the setscrews facing down. If the handle is the customer's responsibility to move and install dishwasher. Using 2 or more people to obtain the proper length screws and adjust the pilot holes accordingly. It is attached from ...
Installation Guide
Page 17
... edges. There are two brackets found in place. Attach the brackets using Option A if the countertop is marble, granite or another similar surface. Install the 2 remaining long screws. 17 Predrill 2 pilot holes using a drill bit. IMPORTANT: The dishwasher must be done later. Remove the short ... as shown. Repeat this step for the other injury. This will be secured to the cabinet. Use 2 or more people to move and install dishwasher. Using a pair of the inner door panel. Drill pilot holes approximately 1¹⁄₂" (3.8 cm) using hole in place. Choose...
... edges. There are two brackets found in place. Attach the brackets using Option A if the countertop is marble, granite or another similar surface. Install the 2 remaining long screws. 17 Predrill 2 pilot holes using a drill bit. IMPORTANT: The dishwasher must be done later. Remove the short ... as shown. Repeat this step for the other injury. This will be secured to the cabinet. Use 2 or more people to move and install dishwasher. Using a pair of the inner door panel. Drill pilot holes approximately 1¹⁄₂" (3.8 cm) using hole in place. Choose...

Installation Guide
Page 18
Prepare Water Supply Line Break off the end of E.I. NOTE: Save the buttons to installing the unit into the cabinet opening. Connect the ³⁄₈" compression fitting of the dishwasher to elbow using ⁵⁄₈" open dishwasher door ... wrench. With another person holding the rear of the 90° elbow to the water supply line prior to cover the holes after dishwasher is installed. Flexible braided connection: Secure nut to keep screws from the parts package. NOTE: Do not attach the dishwasher. This will be done later. †®...
Prepare Water Supply Line Break off the end of E.I. NOTE: Save the buttons to installing the unit into the cabinet opening. Connect the ³⁄₈" compression fitting of the dishwasher to elbow using ⁵⁄₈" open dishwasher door ... wrench. With another person holding the rear of the 90° elbow to the water supply line prior to cover the holes after dishwasher is installed. Flexible braided connection: Secure nut to keep screws from the parts package. NOTE: Do not attach the dishwasher. This will be done later. †®...

Installation Guide
Page 19
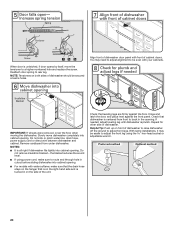
Use 2 or more people to move and install dishwasher. Helpful Tip: Temporarily tape utilities to the floor in the locations shown to prohibit them from the rear leg of the door panel. NOTE: ... cabinet opening . Grasp the sides of utilities. Move Dishwasher Close to Cabinet Opening WARNING Excessive Weight Hazard Use two or more people to move and install dishwasher. If the door closes by itself, move the tensioner to rear leg.
Use 2 or more people to move and install dishwasher. Helpful Tip: Temporarily tape utilities to the floor in the locations shown to prohibit them from the rear leg of the door panel. NOTE: ... cabinet opening . Grasp the sides of utilities. Move Dishwasher Close to Cabinet Opening WARNING Excessive Weight Hazard Use two or more people to move and install dishwasher. If the door closes by itself, move the tensioner to rear leg.
Installation Guide
Page 20
... and replace the screw. Do not remove insulation blanket - Helpful Tip: Push up on the hanger that dishwasher is tucked in the opening. With some installations, it may need to adjust alignment to be easier to adjust the front leg using power cord, make sure to back in on the right...
... and replace the screw. Do not remove insulation blanket - Helpful Tip: Push up on the hanger that dishwasher is tucked in the opening. With some installations, it may need to adjust alignment to be easier to adjust the front leg using power cord, make sure to back in on the right...

Installation Guide
Page 23
...). Make sure wires are not pinched. Open dishwasher door to prepare for animated representation of this step. Place wires inside box. Visit www.kitchenaid.com/electrical under FAQ tab. NOTES: ■ Do not drop screws into bottom of cover. The dishwasher must drill pilot holes in cabinet... opening. Secure Dishwasher in Cabinet Opening If needed, see website for securing the dishwasher to avoid splitting the wood before installing screws. Insert tabs on left side of dishwasher. ■ If side mounting, you must be secured to keep it from shifting when...
...). Make sure wires are not pinched. Open dishwasher door to prepare for animated representation of this step. Place wires inside box. Visit www.kitchenaid.com/electrical under FAQ tab. NOTES: ■ Do not drop screws into bottom of cover. The dishwasher must drill pilot holes in cabinet... opening. Secure Dishwasher in Cabinet Opening If needed, see website for securing the dishwasher to avoid splitting the wood before installing screws. Insert tabs on left side of dishwasher. ■ If side mounting, you must be secured to keep it from shifting when...

Installation Guide
Page 24
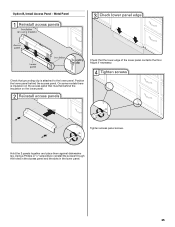
Place the plastic access panel against the screw heads. Visit www.kitchenaid.com/anchoring under FAQ tab. Check that space between dishwasher cabinet opening and tub is equal on both sides. If they do not rub against ... plastic buttons. If needed, see website for animated representation of door does not contact screws, brackets or countertop. If it does, adjust leveling legs. Complete Installation Option A, Install Access Panel - If securing with a side attachment, check that top of this step.
Place the plastic access panel against the screw heads. Visit www.kitchenaid.com/anchoring under FAQ tab. Check that space between dishwasher cabinet opening and tub is equal on both sides. If they do not rub against ... plastic buttons. If needed, see website for animated representation of door does not contact screws, brackets or countertop. If it does, adjust leveling legs. Complete Installation Option A, Install Access Panel - If securing with a side attachment, check that top of this step.
Installation Guide
Page 25
... access panel screws. Check that grounding clip is insulation on the access panel that the lower edge of the lower panel contacts the floor. Option B, Install Access Panel - Adjust if necessary.
... access panel screws. Check that grounding clip is insulation on the access panel that the lower edge of the lower panel contacts the floor. Option B, Install Access Panel - Adjust if necessary.

Installation Guide
Page 26
... your dishwasher washes longer to optical sensor. Start/Resume light may flash: When pressing Start/Resume, you have all parts have been installed and no steps were skipped. Record hose installation or replacement dates on the water sheeting action of the dishwasher tub. After the first 2 minutes, unlatch door, wait 5 seconds, then...
... your dishwasher washes longer to optical sensor. Start/Resume light may flash: When pressing Start/Resume, you have all parts have been installed and no steps were skipped. Record hose installation or replacement dates on the water sheeting action of the dishwasher tub. After the first 2 minutes, unlatch door, wait 5 seconds, then...


