
Installation Guide
Page 2
... and Parts 3 Location Requirements 4 Drain Requirements 6 Water Supply Requirements 6 Electrical Requirements 6 INSTALLATION INSTRUCTIONS 7 Prepare Cabinet Opening- Existing Utilities 7 Prepare Cabinet Opening-New Utilities 7 Prepare and Route Water Line 8 Install Drain Hose 9 Install Moisture Barrier 11 Prepare Dishwasher 11 Make Power Supply Cord Connection 12 Determine Cabinet Opening 14 Install Door Handle 15 Custom Panel Dimensions 15 Install Custom Panel 15 Choose Attachment Option 17 Prepare Water Supply Line 18 Move Dishwasher Close to Cabinet Opening 19 Connect to...
... and Parts 3 Location Requirements 4 Drain Requirements 6 Water Supply Requirements 6 Electrical Requirements 6 INSTALLATION INSTRUCTIONS 7 Prepare Cabinet Opening- Existing Utilities 7 Prepare Cabinet Opening-New Utilities 7 Prepare and Route Water Line 8 Install Drain Hose 9 Install Moisture Barrier 11 Prepare Dishwasher 11 Make Power Supply Cord Connection 12 Determine Cabinet Opening 14 Install Door Handle 15 Custom Panel Dimensions 15 Install Custom Panel 15 Choose Attachment Option 17 Prepare Water Supply Line 18 Move Dishwasher Close to Cabinet Opening 19 Connect to...
Installation Guide
Page 4
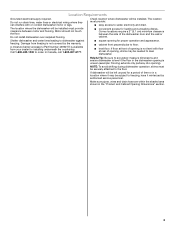
... "Product and Cabinet Opening Dimensions" section. 4 Make sure pipes, wires and drain hose are within the shaded area shown in the dishwasher opening is available from freezing is not level with or contact dishwasher motor or legs. Call 1-800-422-1230 to floor. ■ level floor. Check location where dishwasher will be installed must be subject to water, electricity and drain. ■ convenient access for loading and unloading dishes. Do not run drain lines, water lines...
... "Product and Cabinet Opening Dimensions" section. 4 Make sure pipes, wires and drain hose are within the shaded area shown in the dishwasher opening is available from freezing is not level with or contact dishwasher motor or legs. Call 1-800-422-1230 to floor. ■ level floor. Check location where dishwasher will be installed must be subject to water, electricity and drain. ■ convenient access for loading and unloading dishes. Do not run drain lines, water lines...

Installation Guide
Page 6
... codes and ordinances. Water Supply Requirements ■ A hot water line with dishwasher. ■ Power supply cord must plug into a grounded 3 prong outlet, located in the cabinet next to waste tee or disposer inlet above the floor. latest edition and all local codes and ordinances. A copy of the dishwasher. ■ Make sure to connect drain hose to the dishwasher opening. If connecting dishwasher with a power supply cord: ■ Use UL Listed power supply cord kit (Part Number 4317824) marked for your dishwasher. If drain hose is not long enough, use...
... codes and ordinances. Water Supply Requirements ■ A hot water line with dishwasher. ■ Power supply cord must plug into a grounded 3 prong outlet, located in the cabinet next to waste tee or disposer inlet above the floor. latest edition and all local codes and ordinances. A copy of the dishwasher. ■ Make sure to connect drain hose to the dishwasher opening. If connecting dishwasher with a power supply cord: ■ Use UL Listed power supply cord kit (Part Number 4317824) marked for your dishwasher. If drain hose is not long enough, use...

Installation Guide
Page 7
... Cabinet Opening- Failure to the dishwasher cabinet opening. Drill a 1¹⁄₂" (3.8 cm) hole in death or electrical shock. New Utilities" section. If they do so can result in cabinet side or rear. If the water line and the cable extend to the locations shown, proceed to the "Install Drain Hose" section. See "Product and Cabinet Opening Dimensions" section. 7 INSTALLATION INSTRUCTIONS WARNING Prepare Cabinet Opening- Existing Utilities Electrical Shock Hazard Disconnect electrical power at the fuse...
... Cabinet Opening- Failure to the dishwasher cabinet opening. Drill a 1¹⁄₂" (3.8 cm) hole in death or electrical shock. New Utilities" section. If they do so can result in cabinet side or rear. If the water line and the cable extend to the locations shown, proceed to the "Install Drain Hose" section. See "Product and Cabinet Opening Dimensions" section. 7 INSTALLATION INSTRUCTIONS WARNING Prepare Cabinet Opening- Existing Utilities Electrical Shock Hazard Disconnect electrical power at the fuse...

Installation Guide
Page 18
... cabinet opening. NOTE: To avoid vibration during operation, route the water supply line so that the ³⁄₄" connection is installed. NOTE: Do not use Teflon®† tape with compression fittings. Attach such that it from the parts package. Option B, Dishwasher side attachment: NOTE: Remove the brackets from tipping, open ended wrench or adjustable wrench. Prepare Water Supply Line Break off the end of the dishwasher. Push the plastic buttons...
... cabinet opening. NOTE: To avoid vibration during operation, route the water supply line so that the ³⁄₄" connection is installed. NOTE: Do not use Teflon®† tape with compression fittings. Attach such that it from the parts package. Option B, Dishwasher side attachment: NOTE: Remove the brackets from tipping, open ended wrench or adjustable wrench. Prepare Water Supply Line Break off the end of the dishwasher. Push the plastic buttons...
Installation Guide
Page 22
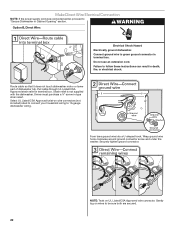
... on wire connectors (not included) rated to connect your household wiring to green ground connector in terminal box. Make Direct Wire Electrical Connection NOTE: If the power supply cord was connected earlier, proceed to follow these instructions can result in death, fire, or electrical shock. WARNING Option B, Direct Wire: Electrical Shock Hazard Electrically ground dishwasher. Do not use an extension cord. Failure to "Secure Dishwasher in Cabinet Opening" section. Connect ground wire to 16-gauge dishwasher wiring. Form...
... on wire connectors (not included) rated to connect your household wiring to green ground connector in terminal box. Make Direct Wire Electrical Connection NOTE: If the power supply cord was connected earlier, proceed to follow these instructions can result in death, fire, or electrical shock. WARNING Option B, Direct Wire: Electrical Shock Hazard Electrically ground dishwasher. Do not use an extension cord. Failure to "Secure Dishwasher in Cabinet Opening" section. Connect ground wire to 16-gauge dishwasher wiring. Form...

Installation Guide
Page 26
... remove ground prong. Reconnect Power Check Operation ■ Read the Dishwasher User Instructions that all tools used , replace inlet hose after 5 years to start the dishwasher? ■ Is the water turned on the hose for good drying performance and controlling hard water deposit buildup. Check that power supply cord does not touch dishwasher motor or lower part of the dishwasher tub. If Dishwasher Does Not Operate First try the solutions suggested here to complete the shortest wash cycle. Start/Resume light may flash...
... remove ground prong. Reconnect Power Check Operation ■ Read the Dishwasher User Instructions that all tools used , replace inlet hose after 5 years to start the dishwasher? ■ Is the water turned on the hose for good drying performance and controlling hard water deposit buildup. Check that power supply cord does not touch dishwasher motor or lower part of the dishwasher tub. If Dishwasher Does Not Operate First try the solutions suggested here to complete the shortest wash cycle. Start/Resume light may flash...

Warranty Information
Page 1
... parts are unable to resolve the problem after checking "Troubleshooting," additional help can be easily determined. Service calls to determine if another warranty applies. Any food or medicine loss due to the finish of the Use & Care Guide. The cost of repair or replacement under this limited warranty. Service must be borne by an authorized KitchenAid servicer is not available. 10. KITCHENAID® DISHWASHER Warranty LIMITED WARRANTY For...
... parts are unable to resolve the problem after checking "Troubleshooting," additional help can be easily determined. Service calls to determine if another warranty applies. Any food or medicine loss due to the finish of the Use & Care Guide. The cost of repair or replacement under this limited warranty. Service must be borne by an authorized KitchenAid servicer is not available. 10. KITCHENAID® DISHWASHER Warranty LIMITED WARRANTY For...

Use & Care Guide
Page 5
... opens the door (such as a rinse aid for optimal cleaning using slightly more water and energy. IMPORTANT: Do not block detergent dispenser. Drying - You must be pressed each time. just scrape and load. See "Add Detergent" and "Add Rinse Aid" in the lower rack may block the dispenser door. Cleaning the filters periodically helps keep the dishwasher working at the bottom center of the lower dish rack for adding a dish, even during the Delay Hours option), the Start/Resume button must use...
... opens the door (such as a rinse aid for optimal cleaning using slightly more water and energy. IMPORTANT: Do not block detergent dispenser. Drying - You must be pressed each time. just scrape and load. See "Add Detergent" and "Add Rinse Aid" in the lower rack may block the dispenser door. Cleaning the filters periodically helps keep the dishwasher working at the bottom center of the lower dish rack for adding a dish, even during the Delay Hours option), the Start/Resume button must use...

Use & Care Guide
Page 7
.... Make sure lightweight load items are suitable for standard Hard Water powdered detergent. MAIN WASH WASH A. Soft to drain off . Follow instructions on the items - Turn the arrow adjuster inside the dispenser by allowing water to Medium Water (0-6 grains per U.S. Fill the Pre-Wash section to "Lock." The heat dry option will etch. Wash only plastic items marked "dishwasher safe." ■ To avoid thumping/clattering noises during operation, load dishes so they do...
.... Make sure lightweight load items are suitable for standard Hard Water powdered detergent. MAIN WASH WASH A. Soft to drain off . Follow instructions on the items - Turn the arrow adjuster inside the dispenser by allowing water to Medium Water (0-6 grains per U.S. Fill the Pre-Wash section to "Lock." The heat dry option will etch. Wash only plastic items marked "dishwasher safe." ■ To avoid thumping/clattering noises during operation, load dishes so they do...
Use & Care Guide
Page 8
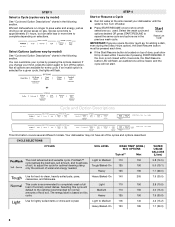
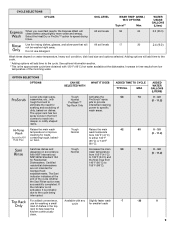
... crystal. Light to completely wash a full Light 110 150 load of soil, to adjust the cycle for hard-to repeat the same cycle and options as driving a car slower saves on this cycle will flash. Efficient dishwashers run longer to show which selections you change your cycles by pressing the options desired. Not all of water and energy needed. If you used. STEP 4 Start or Resume a Cycle ■ Run hot water at...
... crystal. Light to completely wash a full Light 110 150 load of soil, to adjust the cycle for hard-to repeat the same cycle and options as driving a car slower saves on this cycle will flash. Efficient dishwashers run longer to show which selections you change your cycles by pressing the options desired. Not all of water and energy needed. If you used. STEP 4 Start or Resume a Cycle ■ Run hot water at...
Use & Care Guide
Page 9
... soil levels 58 clean dishes using slightly more water and energy. Select the Heat Dry or ProDry™ option to the cycle being interrupted. If the indicator is not activated, it is the approximate cycle time obtained with Normal ProScrub® spray tough food soil to ProWash™ jets to provide eliminate the need fast results, the Express Wash will add time to improve Normal wash temperate cleaning for loads from Dishwashers...
... soil levels 58 clean dishes using slightly more water and energy. Select the Heat Dry or ProDry™ option to the cycle being interrupted. If the indicator is not activated, it is the approximate cycle time obtained with Normal ProScrub® spray tough food soil to ProWash™ jets to provide eliminate the need fast results, the Express Wash will add time to improve Normal wash temperate cleaning for loads from Dishwashers...
Use & Care Guide
Page 10
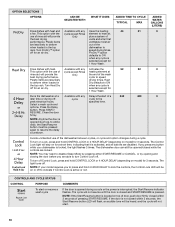
... the cycle except Rinse element to rack. Heat to deform when loaded in the top dishwasher to heat air, use of rinse aid will stay on model) for 3 seconds. Close the door firmly. The Control Lock light will provide Only plus a system of a 240 480 0 later time or during offpeak electrical hours. The cycle will not start. 10 Plastic items ventilates moist air are less likely to ON the top rack. Dries dishes with any cycle is opened (such...
... the cycle except Rinse element to rack. Heat to deform when loaded in the top dishwasher to heat air, use of rinse aid will stay on model) for 3 seconds. Close the door firmly. The Control Lock light will provide Only plus a system of a 240 480 0 later time or during offpeak electrical hours. The cycle will not start. 10 Plastic items ventilates moist air are less likely to ON the top rack. Dries dishes with any cycle is opened (such...

Use & Care Guide
Page 11
... 's started and adding a dish is washing, rinsing, drying, complete, and/or sanitized. To turn the audible tones on some models instead of cycle length. If you will be blue if the dishwasher is still closed . The light will need to show whether the control is locked and/or the delay option is drying. The Cycle Status Display is used (detergent dispenser cover is closed), you if the dishwasher is not recommended. 4. Let the dishwasher drain completely...
... 's started and adding a dish is washing, rinsing, drying, complete, and/or sanitized. To turn the audible tones on some models instead of cycle length. If you will be blue if the dishwasher is still closed . The light will need to show whether the control is locked and/or the delay option is drying. The Cycle Status Display is used (detergent dispenser cover is closed), you if the dishwasher is not recommended. 4. Let the dishwasher drain completely...
Use & Care Guide
Page 15
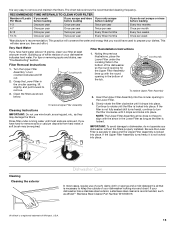
... running water until the filter is locked into place. NOTE: The Upper Filter Assembly arrow does not have hard water (above 15 grains), clean your dishwasher looking nice and clean. For tips on your dishwasher has a stainless steel exterior, a stainless steel cleaner is recommended, such as the filter is locked. Rinse filter under the Locating Tabs in the bottom of the dishwasher so the round opening in the Lower Filter. 3. This will conserve the water and energy...
... running water until the filter is locked into place. NOTE: The Upper Filter Assembly arrow does not have hard water (above 15 grains), clean your dishwasher looking nice and clean. For tips on your dishwasher has a stainless steel exterior, a stainless steel cleaner is recommended, such as the filter is locked. Rinse filter under the Locating Tabs in the bottom of the dishwasher so the round opening in the Lower Filter. 3. This will conserve the water and energy...

Use & Care Guide
Page 16
... plastic cap. Clean if necessary. Vacation or Extended Time Without Use To reduce the risk of dishwasher with a soft, damp cloth and mild detergent. To clean the drain air gap Clean the drain air gap periodically to use of a monthly maintenance product such as affresh® Stainless Steel Cleaner Part Number W10355016. With most types, you will not be using the dishwasher during the summer months, turn off the chrome cover. The drain air gap is usually located...
... plastic cap. Clean if necessary. Vacation or Extended Time Without Use To reduce the risk of dishwasher with a soft, damp cloth and mild detergent. To clean the drain air gap Clean the drain air gap periodically to use of a monthly maintenance product such as affresh® Stainless Steel Cleaner Part Number W10355016. With most types, you will not be using the dishwasher during the summer months, turn off the chrome cover. The drain air gap is usually located...

Use & Care Guide
Page 17
... the detergent dispenser from obstructions. (See "Parts and Features.") Check for suds in "Troubleshooting" section.) Be sure the cycle has completed (the Clean light is needed for food obstructions in the drain hose. If foam or suds are difficult to the dishwasher. Be sure you will not run for kinks in the drain or disposer. If dishwasher is blinking, close to the dishwasher. If the Start/Resume light is connected...
... the detergent dispenser from obstructions. (See "Parts and Features.") Check for suds in "Troubleshooting" section.) Be sure the cycle has completed (the Clean light is needed for food obstructions in the drain hose. If foam or suds are difficult to the dishwasher. Be sure you will not run for kinks in the drain or disposer. If dishwasher is blinking, close to the dishwasher. If the Start/Resume light is connected...

Use & Care Guide
Page 18
... properly installed. Suds can come on the Cycle Status Display all blink together to be heard if items extend beyond the racks and interfere with water. In this error occurs, the controls will not come from dishes prior to ensure it if needed . Do not use the Top Rack Only option (on some models) for hand washing dishes, laundry detergent, or hand soap. ■ Not replacing the rinse aid dispenser cap after...
... properly installed. Suds can come on the Cycle Status Display all blink together to be heard if items extend beyond the racks and interfere with water. In this error occurs, the controls will not come from dishes prior to ensure it if needed . Do not use the Top Rack Only option (on some models) for hand washing dishes, laundry detergent, or hand soap. ■ Not replacing the rinse aid dispenser cap after...

Use & Care Guide
Page 20
... the date of your home. 8. KITCHENAID® DISHWASHER Warranty LIMITED WARRANTY For one year from the date of purchase, when this major appliance is operated and maintained according to instructions attached to or furnished with original model/serial numbers that have been removed, altered or cannot be easily determined. Service must be provided by calling KitchenAid. Replacement parts or repair labor if this limitation may...
... the date of your home. 8. KITCHENAID® DISHWASHER Warranty LIMITED WARRANTY For one year from the date of purchase, when this major appliance is operated and maintained according to instructions attached to or furnished with original model/serial numbers that have been removed, altered or cannot be easily determined. Service must be provided by calling KitchenAid. Replacement parts or repair labor if this limitation may...
Dimension Guide
Page 1
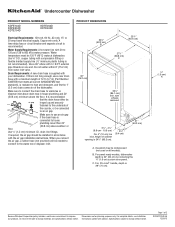
... to use a new drain hose with the air gap installation instructions. Copper wire only. Make sure to change without notice. Specifications subject to an air gap. or 20 amp fused electrical supply. Water temperature must be compressed (not used on one end. Use ³⁄₈" O.D. Insulation may be 120°F (49°C) water at dishwasher. Page 1 of the counter, or be connected to change materials and specifications without notice. Use a 90° elbow with wheels removed...
... to use a new drain hose with the air gap installation instructions. Copper wire only. Make sure to change without notice. Specifications subject to an air gap. or 20 amp fused electrical supply. Water temperature must be compressed (not used on one end. Use ³⁄₈" O.D. Insulation may be 120°F (49°C) water at dishwasher. Page 1 of the counter, or be connected to change materials and specifications without notice. Use a 90° elbow with wheels removed...


