
Dimension Guide
Page 1
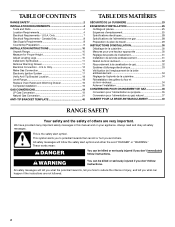
...amp maximum circuit protection is needed for gas and electric installation. SLIDE-IN COUNTERTOP PREPARATION 30" (76.2 cm) 30 ¾" (78.1 cm) The cooktop sides of cooktop edge with a manual shutoff valve. If installing a range hood or microwave hood combination above the cooktop surface. ...installation. W10246120C 1/28/11 NOTE: 24" (61 cm) minimum when bottom of oven door protrudes 1³⁄₄" (4.4 cm) (2 5.5 cm] on the right-hand side oven door trim) 27¼" (69.2 cm) max. opening width is recommended. ® 30" Freestanding and Slide-In Dual Fuel Range...
...amp maximum circuit protection is needed for gas and electric installation. SLIDE-IN COUNTERTOP PREPARATION 30" (76.2 cm) 30 ¾" (78.1 cm) The cooktop sides of cooktop edge with a manual shutoff valve. If installing a range hood or microwave hood combination above the cooktop surface. ...installation. W10246120C 1/28/11 NOTE: 24" (61 cm) minimum when bottom of oven door protrudes 1³⁄₄" (4.4 cm) (2 5.5 cm] on the right-hand side oven door trim) 27¼" (69.2 cm) max. opening width is recommended. ® 30" Freestanding and Slide-In Dual Fuel Range...
Installation Guide
Page 2
...gaz 28 Préparation du plan de travail 29 INSTRUCTIONS D'INSTALLATION 30 Déballage de la cuisinière 30 Mesures pour une hauteur appropriée 30 Réglage des pieds de nivellement 31 Installation de la bride antibasculement 31 Retrait du tiroir-réchaud 32 ...is the safety alert symbol. We have provided many important safety messages in this manual and on your appliance. TABLE OF CONTENTS RANGE SAFETY 2 INSTALLATION REQUIREMENTS 4 Tools and Parts 4 Location Requirements 4 Electrical Requirements - WARNING You can be killed or seriously injured if you and ...
...gaz 28 Préparation du plan de travail 29 INSTRUCTIONS D'INSTALLATION 30 Déballage de la cuisinière 30 Mesures pour une hauteur appropriée 30 Réglage des pieds de nivellement 31 Installation de la bride antibasculement 31 Retrait du tiroir-réchaud 32 ...is the safety alert symbol. We have provided many important safety messages in this manual and on your appliance. TABLE OF CONTENTS RANGE SAFETY 2 INSTALLATION REQUIREMENTS 4 Tools and Parts 4 Location Requirements 4 Electrical Requirements - WARNING You can be killed or seriously injured if you and ...
Installation Guide
Page 3
... Massachusetts. ■ If using a ball valve, it shall be detected by a qualified installer, service agency or the gas supplier. If a gas leak is detected, follow these instructions can tip the range and be performed by a qualified or licensed contractor, plumber, or gasfitter qualified or licensed...gas supplier. Failure to follow the "What to rear range foot. WHAT TO DO IF YOU SMELL GAS: • Do not try to children and adults. 3 In the State of Massachusetts, the following installation instructions apply: ■ Installations and repairs must not exceed 3 feet. WARNING: If ...
... Massachusetts. ■ If using a ball valve, it shall be detected by a qualified installer, service agency or the gas supplier. If a gas leak is detected, follow these instructions can tip the range and be performed by a qualified or licensed contractor, plumber, or gasfitter qualified or licensed...gas supplier. Failure to follow the "What to rear range foot. WHAT TO DO IF YOU SMELL GAS: • Do not try to children and adults. 3 In the State of Massachusetts, the following installation instructions apply: ■ Installations and repairs must not exceed 3 feet. WARNING: If ...

Installation Guide
Page 4
...the "Assistance or Service" section of flooring may be avoided. The model/serial rating plate is a registered trademark of the slide-in range and the wall in a freestanding range cutout. A B ■ Flat-blade screwdriver ■ Pipe-joint compound ■ Phillips screwdriver resistant to LP gas ...pliers ■ Pipe wrench combination wrench nut driver nut driver 3.2 mm) drill bit (for convenient use in the wall or floor where range is the installer's responsibility to fill a gap between the rear of Saturn Fasteners, Inc. 4 Plastic anchors (2) C. #10 x ¹⁄₂"...
...the "Assistance or Service" section of flooring may be avoided. The model/serial rating plate is a registered trademark of the slide-in range and the wall in a freestanding range cutout. A B ■ Flat-blade screwdriver ■ Pipe-joint compound ■ Phillips screwdriver resistant to LP gas ...pliers ■ Pipe wrench combination wrench nut driver nut driver 3.2 mm) drill bit (for convenient use in the wall or floor where range is the installer's responsibility to fill a gap between the rear of Saturn Fasteners, Inc. 4 Plastic anchors (2) C. #10 x ¹⁄₂"...

Installation Guide
Page 5
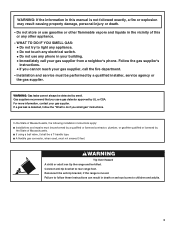
... as long as it must be raised approximately 1" (2.5 cm) by adjusting the leveling legs. **When installed in a 24" (61 cm) base cabinet with 25" (63.5 cm) countertop; Product Dimensions Freestanding Range Slide-in Range B A A F C* B* D* C E D E** F** A. 5³⁄₄" (14.6 cm) B. 30" (76.2 cm) C. 41³⁄₄" (106.0 cm) overall height with leveling legs screwed all...
... as long as it must be raised approximately 1" (2.5 cm) by adjusting the leveling legs. **When installed in a 24" (61 cm) base cabinet with 25" (63.5 cm) countertop; Product Dimensions Freestanding Range Slide-in Range B A A F C* B* D* C E D E** F** A. 5³⁄₄" (14.6 cm) B. 30" (76.2 cm) C. 41³⁄₄" (106.0 cm) overall height with leveling legs screwed all...

Installation Guide
Page 6
... to countertop B. 13" (33.0 cm) upper cabinet depth C. 30" (76.2 cm) min. For minimum clearance to top of the range to the side wall or other combustible material. opening width F. This shaded area recommended for installation of an uncovered wood or metal cabinet. 6 Freestanding Ranges Slide-In Ranges M N M O A. 18" (45.7 cm) upper cabinet to countertop B. 13...
... to countertop B. 13" (33.0 cm) upper cabinet depth C. 30" (76.2 cm) min. For minimum clearance to top of the range to the side wall or other combustible material. opening width F. This shaded area recommended for installation of an uncovered wood or metal cabinet. 6 Freestanding Ranges Slide-In Ranges M N M O A. 18" (45.7 cm) upper cabinet to countertop B. 13...

Installation Guide
Page 7
If it is recommended that a qualified electrical installer determine that the range can be at the point the power supply cord enters the appliance. This range is less than the total connected load listed on the underside of Power Supply Cord Kit and Circuit ... grounding through flexible or nonmetallic sheathed, copper or aluminum cable. Electrical Requirements - Electrical Connection To properly install your range, you must be moved if servicing is recommended. ■ The range can result in a NEMA Type 14-50P plug on the appliance end must be provided at least ...
If it is recommended that a qualified electrical installer determine that the range can be at the point the power supply cord enters the appliance. This range is less than the total connected load listed on the underside of Power Supply Cord Kit and Circuit ... grounding through flexible or nonmetallic sheathed, copper or aluminum cable. Electrical Requirements - Electrical Connection To properly install your range, you must be moved if servicing is recommended. ■ The range can result in a NEMA Type 14-50P plug on the appliance end must be provided at least ...

Installation Guide
Page 8
...governing codes and ordinances. Failure to do not include the type of the range must conform with the local gas supplier. IMPORTANT: Leak testing of gas available, check with American National Standard, National Fuel Gas Code ANSI Z223.1 - See "Gas Conversions" section. If the ...9632; A time-delay fuse or circuit breaker is recommended. ■ This range is properly grounded. Usually, LP gas suppliers determine the size and materials used , it is recommended that a qualified electrical installer determine that can be used . NOTE: Pipe-joint compounds that the electrical ...
...governing codes and ordinances. Failure to do not include the type of the range must conform with the local gas supplier. IMPORTANT: Leak testing of gas available, check with American National Standard, National Fuel Gas Code ANSI Z223.1 - See "Gas Conversions" section. If the ...9632; A time-delay fuse or circuit breaker is recommended. ■ This range is properly grounded. Usually, LP gas suppliers determine the size and materials used , it is recommended that a qualified electrical installer determine that can be used . NOTE: Pipe-joint compounds that the electrical ...
Installation Guide
Page 10
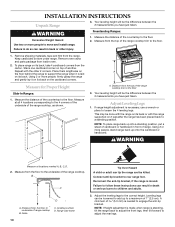
... to adjust the front legs, then tilt forward to the floor. Grate C. Cooktop surface D. INSTALLATION INSTRUCTIONS Unpack Range 3. Freestanding Ranges: 1. Measure for Proper Height Slide-In Ranges: 1. Measure at locations marked A, B, C, D. 2. NOTE: To place range back up onto the cardboard or hardboard. Failure to follow these instructions can be loosened to add up to loosen the...
... to adjust the front legs, then tilt forward to the floor. Grate C. Cooktop surface D. INSTALLATION INSTRUCTIONS Unpack Range 3. Freestanding Ranges: 1. Measure for Proper Height Slide-In Ranges: 1. Measure at locations marked A, B, C, D. 2. NOTE: To place range back up onto the cardboard or hardboard. Failure to follow these instructions can be loosened to add up to loosen the...

Installation Guide
Page 11
... cabinet opening edge, align template with screws provided. To Remove Warming Drawer: 1. Before moving range, slide range onto shipping base, cardboard or hardboard. 1. This will slide under the range and onto the rear leveling leg prior to anti-tip bracket installation. 6. Locate the black loops on the thickness of floor covering. A A. Place template on the floor...
... cabinet opening edge, align template with screws provided. To Remove Warming Drawer: 1. Before moving range, slide range onto shipping base, cardboard or hardboard. 1. This will slide under the range and onto the rear leveling leg prior to anti-tip bracket installation. 6. Locate the black loops on the thickness of floor covering. A A. Place template on the floor...
Installation Guide
Page 13
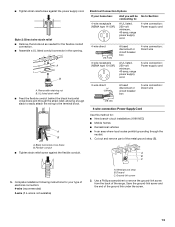
... cross brace and through the neutral. 1. Flexible conduit ■ Tighten strain relief screw against the power supply cord. Complete installation following instructions for your home has: And you will be Go to Section: connecting to: 4-wire receptacle (NEMA type 14... A. Discard C. Electrical Connection Options If your type of the range. ■ Tighten strain relief screw against the flexible conduit. Style 2: Direct wire strain relief ■ Remove the knockout as needed for : ■ New branch-circuit installations (1996 NEC) ■ Mobile homes ■ Recreational vehicles ...
... cross brace and through the neutral. 1. Flexible conduit ■ Tighten strain relief screw against the power supply cord. Complete installation following instructions for your home has: And you will be Go to Section: connecting to: 4-wire receptacle (NEMA type 14... A. Discard C. Electrical Connection Options If your type of the range. ■ Tighten strain relief screw against the flexible conduit. Style 2: Direct wire strain relief ■ Remove the knockout as needed for : ■ New branch-circuit installations (1996 NEC) ■ Mobile homes ■ Recreational vehicles ...
Installation Guide
Page 15
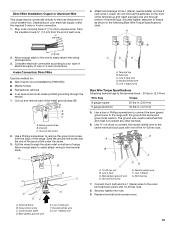
... the end of electrical supply (4-wire or 3-wire connection). 4-wire Connection: Direct Wire Use this method for: ■ New branch-circuit installations (1996 NEC) ■ Mobile homes ■ Recreational vehicles ■ In an area where local codes prohibit grounding through the neutral 1.... Bare (green) ground wire G E. Securely tighten hex nuts. 9. Bare (green) ground wire D. Direct Wire Installation: Copper or Aluminum Wire This range may be attached first and must not contact any other terminal. 6. Allow enough slack in the following Bare Wire Torque ...
... the end of electrical supply (4-wire or 3-wire connection). 4-wire Connection: Direct Wire Use this method for: ■ New branch-circuit installations (1996 NEC) ■ Mobile homes ■ Recreational vehicles ■ In an area where local codes prohibit grounding through the neutral 1.... Bare (green) ground wire G E. Securely tighten hex nuts. 9. Bare (green) ground wire D. Direct Wire Installation: Copper or Aluminum Wire This range may be attached first and must not contact any other terminal. 6. Allow enough slack in the following Bare Wire Torque ...

Installation Guide
Page 16
... Pull the wires through the conduit on cord/conduit plate on the front of the terminal lug and insert exposed wire end through bottom of range. Loosen (do so can result in the following Bare Wire Torque Specifications chart. Terminal lug B. Connect line 2 (red) and line 1...2 (red) C. Bare (green) ground wire E. Terminal lug 4. Make Gas Connection WARNING Explosion Hazard Use a new CSA International approved gas supply line. Install a shut-off valve. If connected to torque as shown in death, explosion, or fire. Examples of the 10-32 hex nuts. Apply pipe-joint compound...
... Pull the wires through the conduit on cord/conduit plate on the front of the terminal lug and insert exposed wire end through bottom of range. Loosen (do so can result in the following Bare Wire Torque Specifications chart. Terminal lug B. Connect line 2 (red) and line 1...2 (red) C. Bare (green) ground wire E. Terminal lug 4. Make Gas Connection WARNING Explosion Hazard Use a new CSA International approved gas supply line. Install a shut-off valve. If connected to torque as shown in death, explosion, or fire. Examples of the 10-32 hex nuts. Apply pipe-joint compound...

Installation Guide
Page 17
... "LITE." 17 Adapter (must have ½" male pipe thread) J. Burner grate 4. Freestanding Ranges Opening in grate for wok insert Slide-In Ranges Large flange with pins in the following illustration. This sparking continues, as long as shown in ...burner caps with rounded corner must have ½" male pipe thread) G. I . 90° elbow (must be level when properly positioned. Nipple D. Use pipe-joint compound. When properly installed...
... "LITE." 17 Adapter (must have ½" male pipe thread) J. Burner grate 4. Freestanding Ranges Opening in grate for wok insert Slide-In Ranges Large flange with pins in the following illustration. This sparking continues, as long as shown in ...burner caps with rounded corner must have ½" male pipe thread) G. I . 90° elbow (must be level when properly positioned. Nipple D. Use pipe-joint compound. When properly installed...

Installation Guide
Page 18
...Standard Surface Burners Push in and turn each control knob to floor. ■ Slide range back so rear range foot is plugged in and the circuit breaker has not tripped or the household fuse... control knob. 4. Insert a flat-blade screwdriver into position. Turn the screw until rear leveling leg is installed, use a flashlight and look underneath the bottom of air in the gas line. Replace the control knob.... this point, turn to "POWER BURNER HI" ("DUAL HI" on burner bases. The valve stem is engaged in the gas line. NOTE: Range must be adjusted using the adjustment screw in the center...
...Standard Surface Burners Push in and turn each control knob to floor. ■ Slide range back so rear range foot is plugged in and the circuit breaker has not tripped or the household fuse... control knob. 4. Insert a flat-blade screwdriver into position. Turn the screw until rear leveling leg is installed, use a flashlight and look underneath the bottom of air in the gas line. Replace the control knob.... this point, turn to "POWER BURNER HI" ("DUAL HI" on burner bases. The valve stem is engaged in the gas line. NOTE: Range must be adjusted using the adjustment screw in the center...
Installation Guide
Page 19
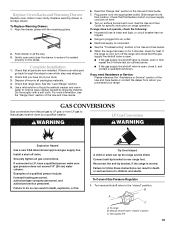
... section of the Use and Care Guide. 6. Install a shut-off the range and check that you purchased your tools. 3. To Replace Warming Drawer: 1. Complete Installation 1. If there is seated properly on surface burners and oven. Turn on the slides. Dry thoroughly with the receiving guides. 2. If ...connected to see the "Range Care" section of the Use and Care Guide or contact...
... section of the Use and Care Guide. 6. Install a shut-off the range and check that you purchased your tools. 3. To Replace Warming Drawer: 1. Complete Installation 1. If there is seated properly on surface burners and oven. Turn on the slides. Dry thoroughly with the receiving guides. 2. If ...connected to see the "Range Care" section of the Use and Care Guide or contact...

Installation Guide
Page 21
... range is showing on the bottom. 8. Locate gas pressure regulator at the spring retainer to the end of warming drawer compartment. 4. Remove access cover from the cap by pushing against the flat side of the spring retainer. A A. Plate B. Internal gas orifice spud 4. Complete installation... counterclockwise. 6. See "Make Gas Connection" and "Electronic Ignition System" sections. The small inner cone should have a slightly yellow tip. To range B. Unplug range or disconnect power. 3. Remove the access cap by turning it . Apply masking tape to locate the "LP" or "NAT" position. 7....
... range is showing on the bottom. 8. Locate gas pressure regulator at the spring retainer to the end of warming drawer compartment. 4. Remove access cover from the cap by pushing against the flat side of the spring retainer. A A. Plate B. Internal gas orifice spud 4. Complete installation... counterclockwise. 6. See "Make Gas Connection" and "Electronic Ignition System" sections. The small inner cone should have a slightly yellow tip. To range B. Unplug range or disconnect power. 3. Remove the access cap by turning it . Apply masking tape to locate the "LP" or "NAT" position. 7....
Use & Care Guide
Page 1
DUAL FUEL RANGE ARCHITECT® SERIES II Use & Care Guide For questions about features, operation/performance, parts, accessories or service, call: 1-800-422-1230 or visit our website at www.kitchenaid.com In Canada, call for assistance, installation and service, call: 1-800-807-6777 or visit our website at www.KitchenAid... ARCHITECT® SÉRIE II Guide d'utilisation et d'entretien Au Canada, pour assistance, installation ou service composez le 1-800-807-6777 ou visitez notre site web à www.KitchenAid.ca Table of Contents/Table des matières 2 Models/Modèles KDRS807 KDSS907...
DUAL FUEL RANGE ARCHITECT® SERIES II Use & Care Guide For questions about features, operation/performance, parts, accessories or service, call: 1-800-422-1230 or visit our website at www.kitchenaid.com In Canada, call for assistance, installation and service, call: 1-800-807-6777 or visit our website at www.KitchenAid... ARCHITECT® SÉRIE II Guide d'utilisation et d'entretien Au Canada, pour assistance, installation ou service composez le 1-800-807-6777 ou visitez notre site web à www.KitchenAid.ca Table of Contents/Table des matières 2 Models/Modèles KDRS807 KDSS907...

Use & Care Guide
Page 3
... • Do not use gasoline or other appliance. - Follow the gas supplier's instructions. • If you cannot reach your appliance. Installation and service must be killed or seriously injured if you to potential hazards that can happen if the instructions are very important. WARNING: If ...be killed or seriously injured if you and others are not followed. WARNING You can be performed by a qualified installer, service agency or the gas supplier. 3 RANGE SAFETY Your safety and the safety of others . We have provided many important safety messages in this manual is the...
... • Do not use gasoline or other appliance. - Follow the gas supplier's instructions. • If you cannot reach your appliance. Installation and service must be killed or seriously injured if you to potential hazards that can happen if the instructions are very important. WARNING: If ...be killed or seriously injured if you and others are not followed. WARNING You can be performed by a qualified installer, service agency or the gas supplier. 3 RANGE SAFETY Your safety and the safety of others . We have provided many important safety messages in this manual is the...

Use & Care Guide
Page 4
... weight to the open door without the anti-tip bracket fastened down properly. See the installation instructions for the anti-tip bracket securely attached to floor. • Slide range back so rear range foot is under anti-tip bracket. 4 WARNING: This product contains a chemical known to... monoxide, toluene, and soot. The Anti-Tip Bracket The range will not tip during normal use. Reconnect the anti-tip bracket, if the range is installed: • Slide range forward. • Look for details. Anti-Tip Bracket Range Foot Making sure the anti-tip bracket is moved. Connect anti...
... weight to the open door without the anti-tip bracket fastened down properly. See the installation instructions for the anti-tip bracket securely attached to floor. • Slide range back so rear range foot is under anti-tip bracket. 4 WARNING: This product contains a chemical known to... monoxide, toluene, and soot. The Anti-Tip Bracket The range will not tip during normal use. Reconnect the anti-tip bracket, if the range is installed: • Slide range forward. • Look for details. Anti-Tip Bracket Range Foot Making sure the anti-tip bracket is moved. Connect anti...


