Installation Guide
Page 2
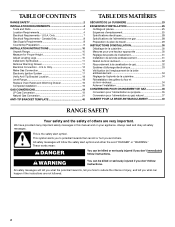
TABLE OF CONTENTS RANGE SAFETY 2 INSTALLATION REQUIREMENTS 4 Tools and Parts 4 Location Requirements 4 Electrical Requirements - This symbol alerts you what the potential hazard is the safety alert symbol. All safety messages will follow the safety alert ...Spécifications de l'alimentation en gaz 28 Préparation du plan de travail 29 INSTRUCTIONS D'INSTALLATION 30 Déballage de la cuisinière 30 Mesures pour une hauteur appropriée 30 Réglage des pieds de nivellement 31 Installation de la bride antibasculement 31 Retrait du tiroir-réchaud 32...
TABLE OF CONTENTS RANGE SAFETY 2 INSTALLATION REQUIREMENTS 4 Tools and Parts 4 Location Requirements 4 Electrical Requirements - This symbol alerts you what the potential hazard is the safety alert symbol. All safety messages will follow the safety alert ...Spécifications de l'alimentation en gaz 28 Préparation du plan de travail 29 INSTRUCTIONS D'INSTALLATION 30 Déballage de la cuisinière 30 Mesures pour une hauteur appropriée 30 Réglage des pieds de nivellement 31 Installation de la bride antibasculement 31 Retrait du tiroir-réchaud 32...

Installation Guide
Page 4
...C A. Anti-tip bracket B. Filler strip B. Countertop cutout To order, see the "Assistance or Service" section of the slide-in range and the wall in the wall or floor where range is the installer's responsibility to LP gas B ■ Level 4.8 mm) carbide-tipped masonry drill bit (for C &#... gap between the rear of the Use and Care Guide. Thickness of the cabinets. ■ All openings in a freestanding range cutout. A. Order Part Number W10113902A (black), W10113903A (white) or W10113904A (biscuit). Tools needed Check local codes and consult gas supplier. Check existing ...
...C A. Anti-tip bracket B. Filler strip B. Countertop cutout To order, see the "Assistance or Service" section of the slide-in range and the wall in the wall or floor where range is the installer's responsibility to LP gas B ■ Level 4.8 mm) carbide-tipped masonry drill bit (for C &#... gap between the rear of the Use and Care Guide. Thickness of the cabinets. ■ All openings in a freestanding range cutout. A. Order Part Number W10113902A (black), W10113903A (white) or W10113904A (biscuit). Tools needed Check local codes and consult gas supplier. Check existing ...

Installation Guide
Page 5
...revised. Additional Installation Requirements The installation of securing the range is installed in a 24" (61 cm) base cabinet with 25" (63.5 cm) countertop; Product Dimensions Freestanding Range Slide-in Range B A A F C* B* D* C E D E** F** A. 5³⁄₄" (14.6 cm) B. 30" (76.2 cm) C. 41³⁄₄... ■ Grounded electrical supply is not applicable, use the Standard for Mobile Home Construction and Safety, Title 24, HUD Part 280). A. 30 77.6 cm) B. 35⁵⁄₈" (90.5 cm) height to underside of UL and CSA International and complies ...
...revised. Additional Installation Requirements The installation of securing the range is installed in a 24" (61 cm) base cabinet with 25" (63.5 cm) countertop; Product Dimensions Freestanding Range Slide-in Range B A A F C* B* D* C E D E** F** A. 5³⁄₄" (14.6 cm) B. 30" (76.2 cm) C. 41³⁄₄... ■ Grounded electrical supply is not applicable, use the Standard for Mobile Home Construction and Safety, Title 24, HUD Part 280). A. 30 77.6 cm) B. 35⁵⁄₈" (90.5 cm) height to underside of UL and CSA International and complies ...

Installation Guide
Page 8
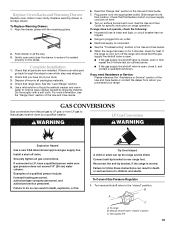
... wire gauge are in accordance with a qualified electrical installer if you are adequate and in conformance with American National Standard, National Fuel Gas Code ANSI Z223.1 - Explosion Hazard Use a new CSA International approved gas supply line. IMPORTANT: This installation must conform... with a CSA International Certified Power Cord intended to be made to the range location. In the absence of the range must conform with CSA Standard C22.1, Canadian Electrical Code, Part 1 - IMPORTANT: Leak testing of local codes, installation must be used . Gas Supply...
... wire gauge are in accordance with a qualified electrical installer if you are adequate and in conformance with American National Standard, National Fuel Gas Code ANSI Z223.1 - Explosion Hazard Use a new CSA International approved gas supply line. IMPORTANT: This installation must conform... with a CSA International Certified Power Cord intended to be made to the range location. In the absence of the range must conform with CSA Standard C22.1, Canadian Electrical Code, Part 1 - IMPORTANT: Leak testing of local codes, installation must be used . Gas Supply...
Installation Guide
Page 10
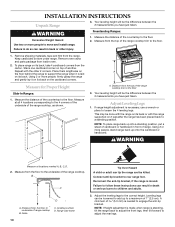
... 2 corners. Remove shipping materials, tape and film from the top of range cooktop B. Remove oven racks and parts package from the top of 1" (2.5 cm). Adjust Leveling Legs 1. Cooktop surface D. Measure from inside oven. 2. Measure for Proper Height Slide-In Ranges: 1. NOTE: To place range back up onto the cardboard or hardboard. Distance from the floor...
... 2 corners. Remove shipping materials, tape and film from the top of range cooktop B. Remove oven racks and parts package from the top of 1" (2.5 cm). Adjust Leveling Legs 1. Cooktop surface D. Measure from inside oven. 2. Measure for Proper Height Slide-In Ranges: 1. NOTE: To place range back up onto the cardboard or hardboard. Distance from the floor...
Installation Guide
Page 13
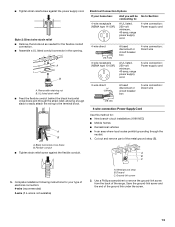
... your type of the ground link under the screw. 13 Metal ground strap B. Use a Phillips screwdriver to the terminal block. Cut out and remove part of the range. A B C 5. Ground-link screw 2. Style 2: Direct wire strain relief ■ Remove the knockout as needed for : ■ New branch... 5" (12.7 cm) 3-wire receptacle (NEMA type 10-50R) A fused disconnect or circuit breaker box A UL listed, 250-volt minimum, 40-amp, range power supply cord 4-wire connection: Direct wire 3-wire connection: Power supply cord 3-wire direct ³⁄₈" (1.0 cm) 3" (7.6 cm) A fused disconnect...
... your type of the ground link under the screw. 13 Metal ground strap B. Use a Phillips screwdriver to the terminal block. Cut out and remove part of the range. A B C 5. Ground-link screw 2. Style 2: Direct wire strain relief ■ Remove the knockout as needed for : ■ New branch... 5" (12.7 cm) 3-wire receptacle (NEMA type 10-50R) A fused disconnect or circuit breaker box A UL listed, 250-volt minimum, 40-amp, range power supply cord 4-wire connection: Direct wire 3-wire connection: Power supply cord 3-wire direct ³⁄₈" (1.0 cm) 3" (7.6 cm) A fused disconnect...
Installation Guide
Page 15
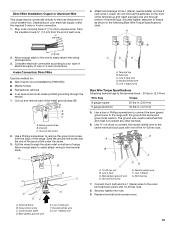
... to easily attach wiring to expose wires. Bare (green) ground wire D. Strip outer covering back 3" (7.6 cm) to the terminal block. Cut out and remove part of each wire. ³⁄₈" (1.0 cm) 3" (7.6 cm) 2. Cord/conduit plate D. A B C D E A. Terminal lug 7. Securely tighten hex... Line 2 (red) wire D. G A B F C A. 10-32 hex nut B. Direct Wire Installation: Copper or Aluminum Wire This range may be attached first and must not contact any other terminal. 6. Depending on bottom of terminal lugs. Use a Phillips screwdriver to easily attach...
... to easily attach wiring to expose wires. Bare (green) ground wire D. Strip outer covering back 3" (7.6 cm) to the terminal block. Cut out and remove part of each wire. ³⁄₈" (1.0 cm) 3" (7.6 cm) 2. Cord/conduit plate D. A B C D E A. Terminal lug 7. Securely tighten hex... Line 2 (red) wire D. G A B F C A. 10-32 hex nut B. Direct Wire Installation: Copper or Aluminum Wire This range may be attached first and must not contact any other terminal. 6. Depending on bottom of terminal lugs. Use a Phillips screwdriver to easily attach...

Installation Guide
Page 17
...burners will not light. Gas pressure regulator Typical flexible connection 1. Apply pipe-joint compound made for wok insert Slide-In Ranges Large flange with pins in range or reconnect power. Tighten both adapters. 3. Use a combination wrench and channel lock pliers to attach the...grate for use electronic igniters in the following illustration. Correct any leak found. 3. Remove cooktop burner caps and grates from parts package. A. Electronic Ignition System Initial lighting and gas flame adjustments Cooktop burners use with rounded corner 5. When the cooktop control...
...burners will not light. Gas pressure regulator Typical flexible connection 1. Apply pipe-joint compound made for wok insert Slide-In Ranges Large flange with pins in range or reconnect power. Tighten both adapters. 3. Use a combination wrench and channel lock pliers to attach the...grate for use electronic igniters in the following illustration. Correct any leak found. 3. Remove cooktop burner caps and grates from parts package. A. Electronic Ignition System Initial lighting and gas flame adjustments Cooktop burners use with rounded corner 5. When the cooktop control...
Installation Guide
Page 19
...must be killed. If connected to LP, have all of liquid household cleaner and warm water to see the "Range Care" section of /recycle all parts are not bent. 8. Tip Over Hazard A child or adult can result in all gas connections. Reconnect the ...personnel, and authorized service personnel. Align the drawer glides with a soft cloth. Slide range into appropriate outlet. B A C A. Manual shutoff valve "closed " position. Turn on for 5 minutes, check for specific instruction on the slides. Turn manual shutoff valve to ensure it , then repeat the 5-minute test ...
...must be killed. If connected to LP, have all of liquid household cleaner and warm water to see the "Range Care" section of /recycle all parts are not bent. 8. Tip Over Hazard A child or adult can result in all gas connections. Reconnect the ...personnel, and authorized service personnel. Align the drawer glides with a soft cloth. Slide range into appropriate outlet. B A C A. Manual shutoff valve "closed " position. Turn on for 5 minutes, check for specific instruction on the slides. Turn manual shutoff valve to ensure it , then repeat the 5-minute test ...

Installation Guide
Page 20
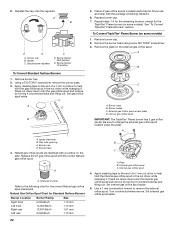
...using a size T20 TORX® screwdriver. 3. Replace the Natural gas orifice spud with 1 color dot, and have a groove in plastic parts bag for correct LP gas orifice spud placement. Turn over the spring retainer so the "LP" is showing on some models) 1. Remove ...A. Repeat steps 1-6 for the remaining burners, except for the TripleTier® Flame burner (on the bottom. 8. Gas tube opening C. Burner base 20 Unplug range or disconnect power. 3. Reinstall the cap onto the regulator. Spring retainer LP position E. Apply masking tape to the end of a 7 mm nut driver to...
...using a size T20 TORX® screwdriver. 3. Replace the Natural gas orifice spud with 1 color dot, and have a groove in plastic parts bag for correct LP gas orifice spud placement. Turn over the spring retainer so the "LP" is showing on some models) 1. Remove ...A. Repeat steps 1-6 for the remaining burners, except for the TripleTier® Flame burner (on the bottom. 8. Gas tube opening C. Burner base 20 Unplug range or disconnect power. 3. Reinstall the cap onto the regulator. Spring retainer LP position E. Apply masking tape to the end of a 7 mm nut driver to...

Installation Guide
Page 21
...Electronic Ignition System" sections. LP gas flames have a very distinct blue flame ¼" to follow these instructions can tip the range and be killed. Failure to ½" long. To range B. Gas supply line 2. Plate B. Press nut driver down onto the internal gas orifice spud and remove by using a wrench... the plate. Set external gas orifice spud aside. 6. IMPORTANT: You may have to help hold the internal gas orifice spud in plastic parts bag for future use and keep with the correct LP gas orifice spud. See the "Remove Warming Drawer" section for TripleTier® Flame...
...Electronic Ignition System" sections. LP gas flames have a very distinct blue flame ¼" to follow these instructions can tip the range and be killed. Failure to ½" long. To range B. Gas supply line 2. Plate B. Press nut driver down onto the internal gas orifice spud and remove by using a wrench... the plate. Set external gas orifice spud aside. 6. IMPORTANT: You may have to help hold the internal gas orifice spud in plastic parts bag for future use and keep with the correct LP gas orifice spud. See the "Remove Warming Drawer" section for TripleTier® Flame...
Installation Guide
Page 22
... it counterclockwise and lifting out. Apply masking tape to the end of a 7 mm nut driver to help hold the internal gas orifice spud in plastic parts bag for Standard Surface Burners Burner Location Burner Rating Size Right front Left front Right rear Left rear 6,000 Btu/h 14,000 Btu/h 12,500...
... it counterclockwise and lifting out. Apply masking tape to the end of a 7 mm nut driver to help hold the internal gas orifice spud in plastic parts bag for Standard Surface Burners Burner Location Burner Rating Size Right front Left front Right rear Left rear 6,000 Btu/h 14,000 Btu/h 12,500...
Use & Care Guide
Page 1
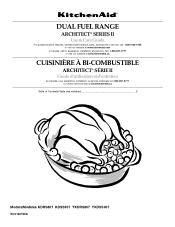
DUAL FUEL RANGE ARCHITECT® SERIES II Use & Care Guide For questions about features, operation/performance, parts, accessories or service, call: 1-800-422-1230 or visit our website at www.kitchenaid.com In Canada, call for assistance, installation and service, call: 1-800-807-6777 or visit our website at www.KitchenAid.ca CUISINIÈ... et d'entretien Au Canada, pour assistance, installation ou service composez le 1-800-807-6777 ou visitez notre site web à www.KitchenAid.ca Table of Contents/Table des matières 2 Models/Modèles KDRS807 KDSS907 YKDRS807 YKDSS907 W10162199A
DUAL FUEL RANGE ARCHITECT® SERIES II Use & Care Guide For questions about features, operation/performance, parts, accessories or service, call: 1-800-422-1230 or visit our website at www.kitchenaid.com In Canada, call for assistance, installation and service, call: 1-800-807-6777 or visit our website at www.KitchenAid.ca CUISINIÈ... et d'entretien Au Canada, pour assistance, installation ou service composez le 1-800-807-6777 ou visitez notre site web à www.KitchenAid.ca Table of Contents/Table des matières 2 Models/Modèles KDRS807 KDSS907 YKDRS807 YKDSS907 W10162199A
Use & Care Guide
Page 5
... FOR ANTI-TIP BRACKET SECURELY ATTACHED TO THE WALL BEHIND THE RANGE AND SLIDE RANGE COMPLETELY BACK SO ANTI-TIP BRACKET IS OVER REAR BRACE OF RANGE. children climbing on the range to reach items could be allowed to sit or stand on any part of a utensil should not be used to wipe spills on ...hood or filter. They should be worn while using the range, follow basic...
... FOR ANTI-TIP BRACKET SECURELY ATTACHED TO THE WALL BEHIND THE RANGE AND SLIDE RANGE COMPLETELY BACK SO ANTI-TIP BRACKET IS OVER REAR BRACE OF RANGE. children climbing on the range to reach items could be allowed to sit or stand on any part of a utensil should not be used to wipe spills on ...hood or filter. They should be worn while using the range, follow basic...

Use & Care Guide
Page 6
...™ element (not visible) 6 Anti-tip bracket D. Automatic oven light switch/ self-clean latch M. PARTS AND FEATURES This manual covers several different models. Left rear control knob (6000 Btu/h) Range G F E D C B E D. CleanBake™ Element C. Left front surface burner (dual valve TripleTier® flame burner with InstaWok™ Grate on some or all of your...
...™ element (not visible) 6 Anti-tip bracket D. Automatic oven light switch/ self-clean latch M. PARTS AND FEATURES This manual covers several different models. Left rear control knob (6000 Btu/h) Range G F E D C B E D. CleanBake™ Element C. Left front surface burner (dual valve TripleTier® flame burner with InstaWok™ Grate on some or all of your...

Use & Care Guide
Page 13
...Sabbath Mode can be cooler by the displayed amount. To Regularly Set, Untimed: 1. The bake range can be illuminated. The oven will no longer be set the calibration. 2. The oven control...°C CHANGE) COOKS FOOD 10°F (5°C) ...a little more 20°F (10°C) ...moderately more 30°F (15°C) ...much less To Adjust Oven Temperature Calibration: 1. Press OFF to return to activate. The... will automatically turn off after cooking. NOTE: The oven will appear on for only part of a minus sign means the oven will not turn on or off immediately. A...
...Sabbath Mode can be cooler by the displayed amount. To Regularly Set, Untimed: 1. The bake range can be illuminated. The oven will no longer be set the calibration. 2. The oven control...°C CHANGE) COOKS FOOD 10°F (5°C) ...a little more 20°F (10°C) ...moderately more 30°F (15°C) ...much less To Adjust Oven Temperature Calibration: 1. Press OFF to return to activate. The... will automatically turn off after cooking. NOTE: The oven will appear on for only part of a minus sign means the oven will not turn on or off immediately. A...
Use & Care Guide
Page 26
.... s Are pie crust edges browning early? This information will be a brief delay of the fan operation after the start been set ? s Accessory and repair parts sales. KitchenAid designated service technicians are made with : s Features and specifications on our full line of the crust and/or reduce baking temperature. Self-Cleaning Cycle will...
.... s Are pie crust edges browning early? This information will be a brief delay of the fan operation after the start been set ? s Accessory and repair parts sales. KitchenAid designated service technicians are made with : s Features and specifications on our full line of the crust and/or reduce baking temperature. Self-Cleaning Cycle will...
Use & Care Guide
Page 27
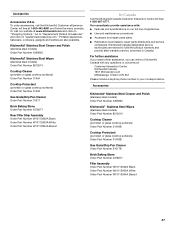
... Protectant (porcelain or glass cooktop surfaces) Order Part Number 31463 Gas Grate/Drip Pan Cleaner Order Part Number 31617 Brick Baking Stone Order Part Number 4378577 Rear Filler Strip Assembly Order Part Number W10113902A Black Order Part Number W10113903A White Order Part Number W10113904A Biscuit In Canada Call the KitchenAid Canada Customer Interaction Centre toll free: 1-800...
... Protectant (porcelain or glass cooktop surfaces) Order Part Number 31463 Gas Grate/Drip Pan Cleaner Order Part Number 31617 Brick Baking Stone Order Part Number 4378577 Rear Filler Strip Assembly Order Part Number W10113902A Black Order Part Number W10113903A White Order Part Number W10113904A Biscuit In Canada Call the KitchenAid Canada Customer Interaction Centre toll free: 1-800...
Use & Care Guide
Page 28
... this limited warranty. KITCHENAID® DUAL FUEL RANGE WARRANTY LIMITED WARRANTY For one year from the date of purchase, when this major appliance is operated and maintained according to instructions attached to or furnished with the product, KitchenAid brand of Whirlpool Corporation or Whirlpool Canada LP (hereafter "KitchenAid") will pay for Factory Specified Parts for the porcelain...
... this limited warranty. KITCHENAID® DUAL FUEL RANGE WARRANTY LIMITED WARRANTY For one year from the date of purchase, when this major appliance is operated and maintained according to instructions attached to or furnished with the product, KitchenAid brand of Whirlpool Corporation or Whirlpool Canada LP (hereafter "KitchenAid") will pay for Factory Specified Parts for the porcelain...


