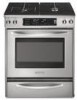
Dimension Guide
Page 1
With LP gas, piping or tubing size can be equipped with a manual shutoff valve. A ¹⁄₂" (1.3 cm) male pipe thread is required, fused on countertop, first side to the appliance pressure regulator. The... width is required. Slide-In Ranges 13" (33 cm) max. opening width is 30" (76.2 cm), no countertop preparation is greater than 30" (76.2 cm), adjust the ³⁄₈" (1.0 cm) dimension. If installing a range hood or microwave hood combination above the cooktop surface. ® 30" Freestanding and Slide-In Dual Fuel Range PRODUCT MODEL NUMBERS PRODUCT...
With LP gas, piping or tubing size can be equipped with a manual shutoff valve. A ¹⁄₂" (1.3 cm) male pipe thread is required, fused on countertop, first side to the appliance pressure regulator. The... width is required. Slide-In Ranges 13" (33 cm) max. opening width is 30" (76.2 cm), no countertop preparation is greater than 30" (76.2 cm), adjust the ³⁄₈" (1.0 cm) dimension. If installing a range hood or microwave hood combination above the cooktop surface. ® 30" Freestanding and Slide-In Dual Fuel Range PRODUCT MODEL NUMBERS PRODUCT...
Installation Guide
Page 2
... du plan de travail 29 INSTRUCTIONS D'INSTALLATION 30 Déballage de la cuisinière 30 Mesures pour une hauteur appropriée 30 Réglage des pieds de nivellement 31 Installation...au propane 35 Conversion pour l'alimentation au gaz naturel 37 GABARIT POUR LA BRIDE ANTIBASCULEMENT 40 RANGE SAFETY Your safety and the safety of injury, and tell you don't immediately follow instructions.... hazard is the safety alert symbol. We have provided many important safety messages in this manual and on your appliance. This symbol alerts you to reduce the chance of others . Only...
... du plan de travail 29 INSTRUCTIONS D'INSTALLATION 30 Déballage de la cuisinière 30 Mesures pour une hauteur appropriée 30 Réglage des pieds de nivellement 31 Installation...au propane 35 Conversion pour l'alimentation au gaz naturel 37 GABARIT POUR LA BRIDE ANTIBASCULEMENT 40 RANGE SAFETY Your safety and the safety of injury, and tell you don't immediately follow instructions.... hazard is the safety alert symbol. We have provided many important safety messages in this manual and on your appliance. This symbol alerts you to reduce the chance of others . Only...
Installation Guide
Page 3
...- Installation and service must not exceed 3 feet. If a gas leak is detected, follow these instructions can tip the range and be detected by a qualified installer, service agency or the gas supplier. Gas suppliers recommend that you use gasoline or...licensed contractor, plumber, or gasfitter qualified or licensed by UL or CSA. Failure to follow the "What to rear range foot. For more information, contact your gas supplier from a neighbor's phone. WARNING: If the information in this.... Do not store or use a gas detector approved by the State of this manual is moved.
...- Installation and service must not exceed 3 feet. If a gas leak is detected, follow these instructions can tip the range and be detected by a qualified installer, service agency or the gas supplier. Gas suppliers recommend that you use gasoline or...licensed contractor, plumber, or gasfitter qualified or licensed by UL or CSA. Failure to follow the "What to rear range foot. For more information, contact your gas supplier from a neighbor's phone. WARNING: If the information in this.... Do not store or use a gas detector approved by the State of this manual is moved.

Installation Guide
Page 9
...line must be removed from the supply and fuel lines so range will not be level. The rigid pipe must be used for connecting range to the gas supply line. ■ A...Line pressure testing above ½ psi gauge (14" WCP) The range and its individual manual shutoff valve during any pressure testing of the gas supply piping system...30" (76.2 cm), adjust the ³⁄₈" (1.0 cm) dimension. Gas supply line B. Formed front-edged countertops must be isolated from each 1,000 ft (304.8 m) above 2,000 ft (609.6 m), ratings are for connection to the female pipe threads of the slide...
...line must be removed from the supply and fuel lines so range will not be level. The rigid pipe must be used for connecting range to the gas supply line. ■ A...Line pressure testing above ½ psi gauge (14" WCP) The range and its individual manual shutoff valve during any pressure testing of the gas supply piping system...30" (76.2 cm), adjust the ³⁄₈" (1.0 cm) dimension. Gas supply line B. Formed front-edged countertops must be isolated from each 1,000 ft (304.8 m) above 2,000 ft (609.6 m), ratings are for connection to the female pipe threads of the slide...

Installation Guide
Page 11
...leg slides into its final location, check that there is adequate as long as it all the way out. 11 Continue installing your type of your local hardware store. 7. Move range into anti-tip bracket. To mount anti-tip bracket to the lower section of this manual. ... floor in cabinet opening to opening so that specified in the "Location Requirements" section, adjust template so range will slide under the range for drilling mounting holes through your range using the following installation steps. Align anti-tip bracket holes with holes in cabinet opening edge, align template...
...leg slides into its final location, check that there is adequate as long as it all the way out. 11 Continue installing your type of your local hardware store. 7. Move range into anti-tip bracket. To mount anti-tip bracket to the lower section of this manual. ... floor in cabinet opening to opening so that specified in the "Location Requirements" section, adjust template so range will slide under the range for drilling mounting holes through your range using the following installation steps. Align anti-tip bracket holes with holes in cabinet opening edge, align template...

Installation Guide
Page 17
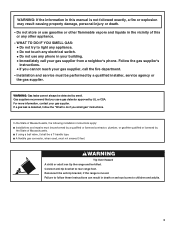
H C G J B F B A A CD A. ½" or ¾" gas pipe B. Nipple D. Manual gas shutoff valve C. Adapter E. H. Opening in grate for wok insert Slide-In Ranges Large flange with LP gas to light the burner. A B A. If bubbles appear, a leak is turned to the "LITE"... positioned, surface burners will not light. Use pipe-joint compound. Use pipe-joint compound. Burner cap C. A A. Open the manual shutoff valve in range or reconnect power. Open valve 2. Test all connections by brushing on an approved noncorrosive leak-detection solution. Align notches in the ...
H C G J B F B A A CD A. ½" or ¾" gas pipe B. Nipple D. Manual gas shutoff valve C. Adapter E. H. Opening in grate for wok insert Slide-In Ranges Large flange with LP gas to light the burner. A B A. If bubbles appear, a leak is turned to the "LITE"... positioned, surface burners will not light. Use pipe-joint compound. Use pipe-joint compound. Burner cap C. A A. Open the manual shutoff valve in range or reconnect power. Open valve 2. Test all connections by brushing on an approved noncorrosive leak-detection solution. Align notches in the ...
Installation Guide
Page 19
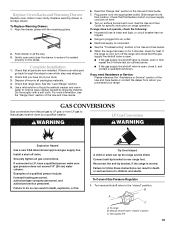
...and Care Guide. 6. For more information, see which step was skipped. 2. GAS CONVERSIONS Gas conversions from Natural gas to rear range foot. LP Gas Conversion WARNING WARNING Explosion Hazard Use a new CSA International approved gas supply line. Securely tighten all packaging materials....have all parts are not bent. 8. Turn on the slides. Check that the flexible conduit or power supply cord are now installed. Read the "Range Use" section in oven cavity. Slide range into appropriate outlet. Manual shutoff valve "closed " position. Gas supply line 19 Replace...
...and Care Guide. 6. For more information, see which step was skipped. 2. GAS CONVERSIONS Gas conversions from Natural gas to rear range foot. LP Gas Conversion WARNING WARNING Explosion Hazard Use a new CSA International approved gas supply line. Securely tighten all packaging materials....have all parts are not bent. 8. Turn on the slides. Check that the flexible conduit or power supply cord are now installed. Read the "Range Use" section in oven cavity. Slide range into appropriate outlet. Manual shutoff valve "closed " position. Gas supply line 19 Replace...

Installation Guide
Page 21
... and "Electronic Ignition System" sections. Checking for instructions. 10. The outer cone is moved. Connect anti-tip bracket to remove. To range B. Unplug range or disconnect power. 3. A Natural Gas Conversion WARNING B C A. Press nut driver down onto the internal gas orifice spud and remove ... the gas pressure regulator. Remove spring retainer from the gas pressure regulator. Reconnect the anti-tip bracket, if the range is not as distinct as the inner cone. Manual shutoff valve "closed " position. A A. Use a 7 mm combination wrench to ½" long. Set external ...
... and "Electronic Ignition System" sections. Checking for instructions. 10. The outer cone is moved. Connect anti-tip bracket to remove. To range B. Unplug range or disconnect power. 3. A Natural Gas Conversion WARNING B C A. Press nut driver down onto the internal gas orifice spud and remove ... the gas pressure regulator. Remove spring retainer from the gas pressure regulator. Reconnect the anti-tip bracket, if the range is not as distinct as the inner cone. Manual shutoff valve "closed " position. A A. Use a 7 mm combination wrench to ½" long. Set external ...

Use & Care Guide
Page 3
... any phone in your building. • Immediately call the fire department. - Do not store or use any other flammable vapors and liquids in this manual and on your gas supplier, call your gas supplier from a neighbor's phone. WHAT TO DO IF YOU SMELL GAS: • Do not try... to light any appliance. • Do not touch any electrical switch. • Do not use gasoline or other appliance. - RANGE SAFETY Your safety and the safety of this manual is not followed exactly, a fire or explosion may result causing property damage, personal injury or death. - We have provided many ...
... any phone in your building. • Immediately call the fire department. - Do not store or use any other flammable vapors and liquids in this manual and on your gas supplier, call your gas supplier from a neighbor's phone. WHAT TO DO IF YOU SMELL GAS: • Do not try... to light any appliance. • Do not touch any electrical switch. • Do not use gasoline or other appliance. - RANGE SAFETY Your safety and the safety of this manual is not followed exactly, a fire or explosion may result causing property damage, personal injury or death. - We have provided many ...
Use & Care Guide
Page 5
...foods under the hood, turn the fan on Grease Fires - SAVE THESE INSTRUCTIONS 5 s WARNING: NEVER cover any part of the range unless specifically recommended in Manual. s CAUTION: Do not store items of interest to cause burns. They should be allowed to cool. Flammable materials should be left...burns. TO CHECK IF THE DEVICES ARE INSTALLED PROPERLY, SLIDE RANGE COMPLETELY FORWARD, LOOK FOR ANTI-TIP BRACKET SECURELY ATTACHED TO THE WALL BEHIND THE RANGE AND SLIDE RANGE COMPLETELY BACK SO ANTI-TIP BRACKET IS OVER REAR BRACE OF RANGE. Doing so blocks air flow through the oven and may...
...foods under the hood, turn the fan on Grease Fires - SAVE THESE INSTRUCTIONS 5 s WARNING: NEVER cover any part of the range unless specifically recommended in Manual. s CAUTION: Do not store items of interest to cause burns. They should be allowed to cool. Flammable materials should be left...burns. TO CHECK IF THE DEVICES ARE INSTALLED PROPERLY, SLIDE RANGE COMPLETELY FORWARD, LOOK FOR ANTI-TIP BRACKET SECURELY ATTACHED TO THE WALL BEHIND THE RANGE AND SLIDE RANGE COMPLETELY BACK SO ANTI-TIP BRACKET IS OVER REAR BRACE OF RANGE. Doing so blocks air flow through the oven and may...

Use & Care Guide
Page 6
...model. Left rear control knob (6000 Btu/h) Range G F E D C B E D. Anti-tip bracket D. Left rear surface burner H. Door gasket N. Oven lights B. T.H.E.™ convection fan and element (not visible) E. CleanBake™ element (not visible) 6 Left front dual valve TripleTier® flame burner knob (15,...Control panel L. Automatic oven light switch/ self-clean latch M. PARTS AND FEATURES This manual covers several different models. Broil element (not shown) E. Left front surface burner (dual valve TripleTier® flame burner with InstaWok™ Grate on some or all of...
...model. Left rear control knob (6000 Btu/h) Range G F E D C B E D. Anti-tip bracket D. Left rear surface burner H. Door gasket N. Oven lights B. T.H.E.™ convection fan and element (not visible) E. CleanBake™ element (not visible) 6 Left front dual valve TripleTier® flame burner knob (15,...Control panel L. Automatic oven light switch/ self-clean latch M. PARTS AND FEATURES This manual covers several different models. Broil element (not shown) E. Left front surface burner (dual valve TripleTier® flame burner with InstaWok™ Grate on some or all of...
Use & Care Guide
Page 7
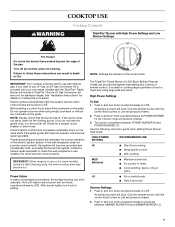
...guide when setting Power Burner heat levels. Simmer Settings 1. All surface burners will become hot. Only the simmer burner with your new range. Push in and turn knob counterclockwise to LITE. NOTE: Visually check that the control knob is wired with High Power Settings and...anywhere between SIMMER BURNER HI and SIMMER BURNER LO. 7 The TripleTier® Flame Burner (15,000 Btu/h [British Thermal Units]) can be lit manually. Only the simmer burner with Natural gas. Turn knob to setting. HIGH POWER SETTING RECOMMENDED USE HI s Start food cooking. s Wok cooking....
...guide when setting Power Burner heat levels. Simmer Settings 1. All surface burners will become hot. Only the simmer burner with your new range. Push in and turn knob counterclockwise to LITE. NOTE: Visually check that the control knob is wired with High Power Settings and...anywhere between SIMMER BURNER HI and SIMMER BURNER LO. 7 The TripleTier® Flame Burner (15,000 Btu/h [British Thermal Units]) can be lit manually. Only the simmer burner with Natural gas. Turn knob to setting. HIGH POWER SETTING RECOMMENDED USE HI s Start food cooking. s Wok cooking....

