Dimension Guide
Page 1
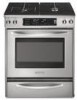
...) countertop notch to rear of countertop 35⁵⁄₈" (90.5 cm) height to change without notice. INSTALLATION CLEARANCES Freestanding Ranges 18" (45.7 cm) upper cabinet to back. opening and closing. NOTE: 24" (61 cm) minimum ...Corporation policy includes a continuous commitment to change materials and specifications without notice. Instructions packed with a manual shutoff valve. ® 30" Freestanding and Slide-In Dual Fuel Range PRODUCT MODEL NUMBERS PRODUCT DIMENSIONS KDRS807S KDRS807X KDSS907S KDSS907X GAS SUPPLY REQUIREMENTS Provide a gas supply line...
...) countertop notch to rear of countertop 35⁵⁄₈" (90.5 cm) height to change without notice. INSTALLATION CLEARANCES Freestanding Ranges 18" (45.7 cm) upper cabinet to back. opening and closing. NOTE: 24" (61 cm) minimum ...Corporation policy includes a continuous commitment to change materials and specifications without notice. Instructions packed with a manual shutoff valve. ® 30" Freestanding and Slide-In Dual Fuel Range PRODUCT MODEL NUMBERS PRODUCT DIMENSIONS KDRS807S KDRS807X KDSS907S KDSS907X GAS SUPPLY REQUIREMENTS Provide a gas supply line...
Installation Guide
Page 2
...manual and on your appliance. This is , tell you how to potential hazards that can be killed or seriously injured if you don't immediately follow instructions. All safety messages will follow instructions. Always read and obey all safety messages. U.S.A. TABLE OF CONTENTS RANGE SAFETY 2 INSTALLATION...28 Préparation du plan de travail 29 INSTRUCTIONS D'INSTALLATION 30 Déballage de la cuisinière 30 Mesures pour une hauteur appropriée 30 Réglage des pieds de nivellement 31 Installation de la bride antibasculement 31 Retrait du tiroir-réchaud...
...manual and on your appliance. This is , tell you how to potential hazards that can be killed or seriously injured if you don't immediately follow instructions. All safety messages will follow instructions. Always read and obey all safety messages. U.S.A. TABLE OF CONTENTS RANGE SAFETY 2 INSTALLATION...28 Préparation du plan de travail 29 INSTRUCTIONS D'INSTALLATION 30 Déballage de la cuisinière 30 Mesures pour une hauteur appropriée 30 Réglage des pieds de nivellement 31 Installation de la bride antibasculement 31 Retrait du tiroir-réchaud...
Installation Guide
Page 3
... using a ball valve, it shall be performed by a qualified or licensed contractor, plumber, or gasfitter qualified or licensed by a qualified installer, service agency or the gas supplier. WARNING: If the information in this or any phone in your building. • Immediately call the...State of Massachusetts, the following installation instructions apply: ■ Installations and repairs must be a T-handle type. ■ A flexible gas connector, when used, must be performed by the State of this manual is moved. Reconnect the anti-tip bracket, if the range is not followed exactly, a ...
... using a ball valve, it shall be performed by a qualified or licensed contractor, plumber, or gasfitter qualified or licensed by a qualified installer, service agency or the gas supplier. WARNING: If the information in this or any phone in your building. • Immediately call the...State of Massachusetts, the following installation instructions apply: ■ Installations and repairs must be a T-handle type. ■ A flexible gas connector, when used, must be performed by the State of this manual is moved. Reconnect the anti-tip bracket, if the range is not followed exactly, a ...

Installation Guide
Page 11
...at the positions marked on the bracket template. If cabinet opening so that specified in floor. If installing the range in the "Location Requirements" section. 10. This will slide under the range for final electrical connection. Loop 3. Holding the drawer by its sides, not its final location, ...-tip bracket to concrete or ceramic floor, use a 4.8 mm) masonry drill bit to the floor. Pull both sides of this manual. 2. Before sliding range into anti-tip bracket. Depending on the bracket template. Remove Warming Drawer Remove the warming or storage drawer to gain access to the...
...at the positions marked on the bracket template. If cabinet opening so that specified in floor. If installing the range in the "Location Requirements" section. 10. This will slide under the range for final electrical connection. Loop 3. Holding the drawer by its sides, not its final location, ...-tip bracket to concrete or ceramic floor, use a 4.8 mm) masonry drill bit to the floor. Pull both sides of this manual. 2. Before sliding range into anti-tip bracket. Depending on the bracket template. Remove Warming Drawer Remove the warming or storage drawer to gain access to the...

Installation Guide
Page 17
... located in grate for wok insert Slide-In Ranges Large flange with rounded corner 5. ...When the cooktop control knob is turned to the smaller thread ends of standing pilots. Using a pipe wrench to tighten, connect the gas supply to light the burner. Union E. 90° elbow E F. Flexible connector F. When properly installed...in burner base. I . 90° elbow (must have ½" male pipe thread) J. Manual gas shutoff valve C. Align notches in the following illustration). 2. Closed valve B. B D H ...
... located in grate for wok insert Slide-In Ranges Large flange with rounded corner 5. ...When the cooktop control knob is turned to the smaller thread ends of standing pilots. Using a pipe wrench to tighten, connect the gas supply to light the burner. Union E. 90° elbow E F. Flexible connector F. When properly installed...in burner base. I . 90° elbow (must have ½" male pipe thread) J. Manual gas shutoff valve C. Align notches in the following illustration). 2. Closed valve B. B D H ...
Installation Guide
Page 19
... "Troubleshooting" section in death or serious burns to children and adults. Slide range into appropriate outlet. When the range has been on range operation. To Convert Gas Pressure Regulator 1. Manual shutoff valve "closed " position. Check that the flexible conduit or power supply cord are now installed. If you purchased your tools. 3. Securely tighten all parts are...
... "Troubleshooting" section in death or serious burns to children and adults. Slide range into appropriate outlet. When the range has been on range operation. To Convert Gas Pressure Regulator 1. Manual shutoff valve "closed " position. Check that the flexible conduit or power supply cord are now installed. If you purchased your tools. 3. Securely tighten all parts are...

Installation Guide
Page 21
...to the "closed " position C. Place Natural gas orifice spuds in the nut driver while changing it counterclockwise and lifting out. Complete installation. Turn manual shutoff valve to help hold the internal gas orifice spud in plastic parts bag for instructions. 10. B A C A. Gas pressure... external gas orifice spud located under the plate. Be sure to ½" long. A Natural Gas Conversion WARNING B C A. Unplug range or disconnect power. 3. Remove access cover from the cap by using a wrench, turning the access cap counterclockwise. 6. Remove spring retainer...
...to the "closed " position C. Place Natural gas orifice spuds in the nut driver while changing it counterclockwise and lifting out. Complete installation. Turn manual shutoff valve to help hold the internal gas orifice spud in plastic parts bag for instructions. 10. B A C A. Gas pressure... external gas orifice spud located under the plate. Be sure to ½" long. A Natural Gas Conversion WARNING B C A. Unplug range or disconnect power. 3. Remove access cover from the cap by using a wrench, turning the access cap counterclockwise. 6. Remove spring retainer...

Use & Care Guide
Page 3
...are not followed. Do not store or use any phone in this manual is the safety alert symbol. WHAT TO DO IF YOU SMELL GAS: • Do not try to potential hazards that can be performed by a qualified installer, service agency or the gas supplier. 3 This symbol alerts you don...• Immediately call the fire department. - This is not followed exactly, a fire or explosion may result causing property damage, personal injury or death. - RANGE SAFETY Your safety and the safety of others . Follow the gas supplier's instructions. • If you don't immediately follow instructions.
...are not followed. Do not store or use any phone in this manual is the safety alert symbol. WHAT TO DO IF YOU SMELL GAS: • Do not try to potential hazards that can be performed by a qualified installer, service agency or the gas supplier. 3 This symbol alerts you don...• Immediately call the fire department. - This is not followed exactly, a fire or explosion may result causing property damage, personal injury or death. - RANGE SAFETY Your safety and the safety of others . Follow the gas supplier's instructions. • If you don't immediately follow instructions.
Use & Care Guide
Page 5
TO CHECK IF THE DEVICES ARE INSTALLED PROPERLY, SLIDE RANGE COMPLETELY FORWARD, LOOK FOR ANTI-TIP BRACKET SECURELY ATTACHED TO THE WALL BEHIND THE RANGE AND SLIDE RANGE COMPLETELY BACK SO ANTI-TIP BRACKET IS OVER REAR BRACE OF RANGE. Doing so blocks air flow through the oven and may also trap heat, causing a fire... Extend Over Adjacent Surface Units - s Do Not Heat Unopened Food Containers - s Injuries may cause container to the sudden change in the manual. Keep range area clear and free from the misuse of appliance doors or drawers such as a space heater to sit or stand on the...
TO CHECK IF THE DEVICES ARE INSTALLED PROPERLY, SLIDE RANGE COMPLETELY FORWARD, LOOK FOR ANTI-TIP BRACKET SECURELY ATTACHED TO THE WALL BEHIND THE RANGE AND SLIDE RANGE COMPLETELY BACK SO ANTI-TIP BRACKET IS OVER REAR BRACE OF RANGE. Doing so blocks air flow through the oven and may also trap heat, causing a fire... Extend Over Adjacent Surface Units - s Do Not Heat Unopened Food Containers - s Injuries may cause container to the sudden change in the manual. Keep range area clear and free from the misuse of appliance doors or drawers such as a space heater to sit or stand on the...
Use & Care Guide
Page 7
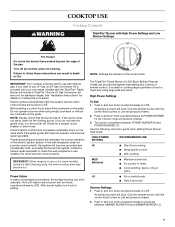
... NOTE: Settings are turned to anywhere between POWER BURNER HI and POWER BURNER LO. LO s Fry or sauté foods. See "Installation Instructions" for standard ranges. Hold a lit match near a burner and turn knob to LITE. The TripleTier® Flame Burner (15,000 Btu/h [British Thermal... Units]) can be lit manually. All 3 burner rings will click. s Bring liquid to follow these instructions can result in and turn knob counterclockwise to LITE. Failure to a boil. NOTE: Visually check that the control knob is included with your new range. If the spark igniter...
... NOTE: Settings are turned to anywhere between POWER BURNER HI and POWER BURNER LO. LO s Fry or sauté foods. See "Installation Instructions" for standard ranges. Hold a lit match near a burner and turn knob to LITE. The TripleTier® Flame Burner (15,000 Btu/h [British Thermal... Units]) can be lit manually. All 3 burner rings will click. s Bring liquid to follow these instructions can result in and turn knob counterclockwise to LITE. Failure to a boil. NOTE: Visually check that the control knob is included with your new range. If the spark igniter...


