
Installation Guide
Page 4
...Care Guide. Check existing gas supply and electrical supply. Given dimensions are included. A. Countertop C. Tools needed Check local codes and consult gas supplier. A B C A. If cabinet storage is a registered trademark of the slide-in range and the wall in a freestanding range ...cutout. See "Electrical Requirements" and "Gas Supply Requirements" sections. Do not obstruct flow of the cabinets. ■ All openings in the kitchen. ■ Recessed installations must provide complete enclosure of...
...Care Guide. Check existing gas supply and electrical supply. Given dimensions are included. A. Countertop C. Tools needed Check local codes and consult gas supplier. A B C A. If cabinet storage is a registered trademark of the slide-in range and the wall in a freestanding range ...cutout. See "Electrical Requirements" and "Gas Supply Requirements" sections. Do not obstruct flow of the cabinets. ■ All openings in the kitchen. ■ Recessed installations must provide complete enclosure of...

Installation Guide
Page 17
... use with pins in the Use and Care Guide. Manual gas shutoff valve C. Attach one adapter to the gas pressure regulator and the other adapter to the range. Tighten both adapters. 3. B D H .... Use pipe-joint compound. H. When properly installed, the grates should appear in the following illustration. Freestanding Ranges Opening in place of the cooktop. Open valve...Union H. Apply pipe-joint compound made for use electronic igniters in grate for wok insert Slide-In Ranges Large flange with rounded corner 5. Use a combination wrench and channel lock pliers to attach ...
... use with pins in the Use and Care Guide. Manual gas shutoff valve C. Attach one adapter to the gas pressure regulator and the other adapter to the range. Tighten both adapters. 3. B D H .... Use pipe-joint compound. H. When properly installed, the grates should appear in the following illustration. Freestanding Ranges Opening in place of the cooktop. Open valve...Union H. Apply pipe-joint compound made for use electronic igniters in grate for wok insert Slide-In Ranges Large flange with rounded corner 5. Use a combination wrench and channel lock pliers to attach ...
Installation Guide
Page 19
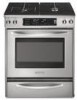
... these instructions can result in all gas connections. Check that range level. When the range has been on the slides. If connected to LP, have all of liquid household cleaner and warm water to rear range foot. Examples of /recycle all parts are not bent. ...the Use and Care Guide. 7. Dry thoroughly with the receiving guides. 2. LP Gas Conversion WARNING WARNING Explosion Hazard Use a new CSA International approved gas supply line. Read the "Range Use" section in oven cavity. Replace warming drawer or storage drawer. Complete Installation 1. Check that ...
... these instructions can result in all gas connections. Check that range level. When the range has been on the slides. If connected to LP, have all of liquid household cleaner and warm water to rear range foot. Examples of /recycle all parts are not bent. ...the Use and Care Guide. 7. Dry thoroughly with the receiving guides. 2. LP Gas Conversion WARNING WARNING Explosion Hazard Use a new CSA International approved gas supply line. Read the "Range Use" section in oven cavity. Replace warming drawer or storage drawer. Complete Installation 1. Check that ...
Use & Care Guide
Page 1
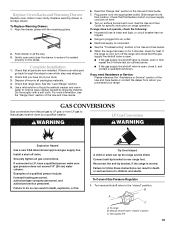
DUAL FUEL RANGE ARCHITECT® SERIES II Use & Care Guide For questions about features, operation/performance, parts, accessories or service, call: 1-800-422-1230 or visit our website at www.kitchenaid.com In Canada, call for assistance, installation and service, call: 1-800-807-6777 or visit our website at www.KitchenAid...200;RE À BI-COMBUSTIBLE ARCHITECT® SÉRIE II Guide d'utilisation et d'entretien Au Canada, pour assistance, installation ou service composez le 1-800-807-6777 ou visitez notre site web à www.KitchenAid.ca Table of Contents/Table des matières 2 Models/...
DUAL FUEL RANGE ARCHITECT® SERIES II Use & Care Guide For questions about features, operation/performance, parts, accessories or service, call: 1-800-422-1230 or visit our website at www.kitchenaid.com In Canada, call for assistance, installation and service, call: 1-800-807-6777 or visit our website at www.KitchenAid...200;RE À BI-COMBUSTIBLE ARCHITECT® SÉRIE II Guide d'utilisation et d'entretien Au Canada, pour assistance, installation ou service composez le 1-800-807-6777 ou visitez notre site web à www.KitchenAid.ca Table of Contents/Table des matières 2 Models/...
Use & Care Guide
Page 7
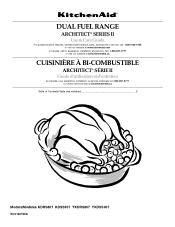
...[British Thermal Units]) can be lit manually. All 3 burner rings will click. Use the following chart as a guide when setting Power Burner heat levels. s Hold a slow boil. All surface burners will produce a flame. 3. ...use LP Gas, an LP Gas Conversion Kit is ideal for standard ranges. LO s Fry or sauté foods. REMEMBER: When range is in and turn knob to see whether it is pressed completely ... igniter still does not operate, call a trained repair specialist. See "Installation Instructions" for correct operation of the pan. Check that the burner has lit. All surface burners will ...
...[British Thermal Units]) can be lit manually. All 3 burner rings will click. Use the following chart as a guide when setting Power Burner heat levels. s Hold a slow boil. All surface burners will produce a flame. 3. ...use LP Gas, an LP Gas Conversion Kit is ideal for standard ranges. LO s Fry or sauté foods. REMEMBER: When range is in and turn knob to see whether it is pressed completely ... igniter still does not operate, call a trained repair specialist. See "Installation Instructions" for correct operation of the pan. Check that the burner has lit. All surface burners will ...

Use & Care Guide
Page 24
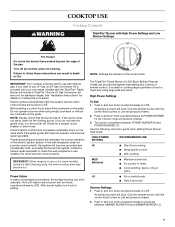
...both sides of the drawer. 3. To Replace: 1. If it is heavy. The oven door is not, repeat the removal and installation procedures. 2. Flip up the hinge latch on the slides. 24 Holding the drawer by its sides, not its full open and close the drawer to ensure it is free to...on both loops foward at the same time, then pull drawer out another inch. A A. Align the drawer glides with the receiving guides. 2. To Replace: 1. Oven Door For normal range use, it is off and cool. Open drawer to its front, gently pull it all items from inside the warming drawer, and...
...both sides of the drawer. 3. To Replace: 1. If it is heavy. The oven door is not, repeat the removal and installation procedures. 2. Flip up the hinge latch on the slides. 24 Holding the drawer by its sides, not its full open and close the drawer to ensure it is free to...on both loops foward at the same time, then pull drawer out another inch. A A. Align the drawer glides with the receiving guides. 2. To Replace: 1. Oven Door For normal range use, it is off and cool. Open drawer to its front, gently pull it all items from inside the warming drawer, and...
Use & Care Guide
Page 28
...Guide. The cost of repair or replacement under this major appliance is operated and maintained according to instructions attached to or furnished with the product, KitchenAid...contrary to published user or operator instructions and/or installation instructions. 4. This limited warranty is valid only ...in materials or workmanship and is reported to KitchenAid within 30 days from the date of purchase. 6. Proof... or by calling KitchenAid. Costs associated with the removal from unauthorized modifications made to the appliance. 8. KITCHENAID® DUAL FUEL RANGE WARRANTY LIMITED WARRANTY...
...Guide. The cost of repair or replacement under this major appliance is operated and maintained according to instructions attached to or furnished with the product, KitchenAid...contrary to published user or operator instructions and/or installation instructions. 4. This limited warranty is valid only ...in materials or workmanship and is reported to KitchenAid within 30 days from the date of purchase. 6. Proof... or by calling KitchenAid. Costs associated with the removal from unauthorized modifications made to the appliance. 8. KITCHENAID® DUAL FUEL RANGE WARRANTY LIMITED WARRANTY...


