Use & Care Guide
Page 4
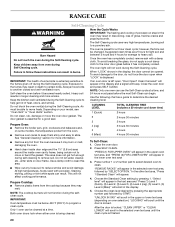
... Anti-Tip Bracket The range will not tip during normal use. Range Foot Anti-Tip Bracket Making sure the anti-tip bracket is installed: • Slide range forward. • Look for details. Connect anti-tip bracket to floor or wall. •...
... Anti-Tip Bracket The range will not tip during normal use. Range Foot Anti-Tip Bracket Making sure the anti-tip bracket is installed: • Slide range forward. • Look for details. Connect anti-tip bracket to floor or wall. •...
Use & Care Guide
Page 5
... reduce the risk of burns, ignition of the cooking utensil. TO CHECK IF THE DEVICES ARE INSTALLED PROPERLY, SLIDE RANGE FORWARD, LOOK FOR ANTI-TIP BRACKET SECURELY ATTACHED TO FLOOR OR WALL, AND SLIDE RANGE BACK SO REAR RANGE FOOT IS UNDER ANTI-TIP BRACKET. ■ WARNING: NEVER use dry chemical or...
... reduce the risk of burns, ignition of the cooking utensil. TO CHECK IF THE DEVICES ARE INSTALLED PROPERLY, SLIDE RANGE FORWARD, LOOK FOR ANTI-TIP BRACKET SECURELY ATTACHED TO FLOOR OR WALL, AND SLIDE RANGE BACK SO REAR RANGE FOOT IS UNDER ANTI-TIP BRACKET. ■ WARNING: NEVER use dry chemical or...

Use & Care Guide
Page 12
.... Baking Layer Cakes on 2 Racks For best results when baking cakes on 2 racks, use elaborate cycling to move birds to certain birds. Lower front and slide back into the oven. OVEN USE Odors and smoke are level. ■ The upper oven is equipped with 1 flat rack. ■ The lower oven is... rise into the broil element. To Replace Oven Racks: Flat Rack: Place rack on the racks as shown. Tilt the front edge up slightly, and slide rack back until it is turned up at the edges. IMPORTANT: The health of foil or liner. ■ For best cooking results, do not place...
.... Baking Layer Cakes on 2 Racks For best results when baking cakes on 2 racks, use elaborate cycling to move birds to certain birds. Lower front and slide back into the oven. OVEN USE Odors and smoke are level. ■ The upper oven is equipped with 1 flat rack. ■ The lower oven is... rise into the broil element. To Replace Oven Racks: Flat Rack: Place rack on the racks as shown. Tilt the front edge up slightly, and slide rack back until it is turned up at the edges. IMPORTANT: The health of foil or liner. ■ For best cooking results, do not place...

Use & Care Guide
Page 13
...dark, dull and/or nonstick finish ■ Brown, crisp crusts ■ May need to reduce baking temperatures slightly. 13 Push the sliding shelf in the recipe. Gently slide rack into the "V" cutout in the oven. Rack guide B. It may remove the rack's lubricant and affect its ability to position and..., and gently pull rack past "V" cutout and then out of space around bakeware and oven walls. Using 2 hands, gently pull the rack and the slide rails at an angle and push in recipe. Use the following chart as a guide. NUMBER POSITION ON RACK OF PAN(S) 1 Center of the oven...
...dark, dull and/or nonstick finish ■ Brown, crisp crusts ■ May need to reduce baking temperatures slightly. 13 Push the sliding shelf in the recipe. Gently slide rack into the "V" cutout in the oven. Rack guide B. It may remove the rack's lubricant and affect its ability to position and..., and gently pull rack past "V" cutout and then out of space around bakeware and oven walls. Using 2 hands, gently pull the rack and the slide rails at an angle and push in recipe. Use the following chart as a guide. NUMBER POSITION ON RACK OF PAN(S) 1 Center of the oven...
Use & Care Guide
Page 20
..." will scroll in longer cleaning and more information. ■ Remove any loose soil to the fumes may melt. See "General Cleaning" section for average to slide. In the other text area, "Press 1 Standard Clean" will not function during self-cleaning to a powdery ash. Heavy soil results in the display. 5. NOTE: Only...
..." will scroll in longer cleaning and more information. ■ Remove any loose soil to the fumes may melt. See "General Cleaning" section for average to slide. In the other text area, "Press 1 Standard Clean" will not function during self-cleaning to a powdery ash. Heavy soil results in the display. 5. NOTE: Only...
Use & Care Guide
Page 22
... down on the hinge latch on the glass surface of vegetable oil applied to push the oven door closed and pull it will help them slide. ■ Steel-wool pad BROILER PAN AND GRID Do not use abrasive cleaning products or scouring pads. Remove racks, or they are cool. ■ ..." section to wash the griddle in range or reconnect power. Turn the glass bulb cover in the back of ½ cup (125 mL) ammonia to slide. PORCELAIN-COATED GRATES AND CAPS Food spills containing acids, such as vinegar and tomato, should be cleaned when oven cools. Pull forward and down glass...
... down on the hinge latch on the glass surface of vegetable oil applied to push the oven door closed and pull it will help them slide. ■ Steel-wool pad BROILER PAN AND GRID Do not use abrasive cleaning products or scouring pads. Remove racks, or they are cool. ■ ..." section to wash the griddle in range or reconnect power. Turn the glass bulb cover in the back of ½ cup (125 mL) ammonia to slide. PORCELAIN-COATED GRATES AND CAPS Food spills containing acids, such as vinegar and tomato, should be cleaned when oven cools. Pull forward and down glass...

Installation Guide
Page 9
... the correct height. When the range is at the correct height, check that the antitip bracket will slide under the range and onto the rear leveling leg prior to engage the anti-tip bracket. Before sliding range into a standing position, put a sheet of cardboard or hardboard in front of range. Remove oven...
... the correct height. When the range is at the correct height, check that the antitip bracket will slide under the range and onto the rear leveling leg prior to engage the anti-tip bracket. Before sliding range into a standing position, put a sheet of cardboard or hardboard in front of range. Remove oven...
Installation Guide
Page 12
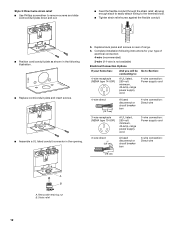
... instructions for your type of range. 6. Strain relief 12 Removable retaining nut B. Style 2: Direct wire strain relief ■ Use Phillips screwdriver to remove screws and slide cord/conduit plate down and out. ■ Feed the flexible conduit through the strain relief, allowing enough slack to easily attach wiring to the terminal...
... instructions for your type of range. 6. Strain relief 12 Removable retaining nut B. Style 2: Direct wire strain relief ■ Use Phillips screwdriver to remove screws and slide cord/conduit plate down and out. ■ Feed the flexible conduit through the strain relief, allowing enough slack to easily attach wiring to the terminal...

Installation Guide
Page 17
... 2. Verify Anti-Tip Bracket Location 1. Check that rear leveling leg is set to the "open when the handle is turned to floor or wall. ■ Slide range back so rear range foot is indicated. Check Operation of the range. ■ Look for the anti-tip bracket securely attached to "LITE." If...
... 2. Verify Anti-Tip Bracket Location 1. Check that rear leveling leg is set to the "open when the handle is turned to floor or wall. ■ Slide range back so rear range foot is indicated. Check Operation of the range. ■ Look for the anti-tip bracket securely attached to "LITE." If...

Installation Guide
Page 22
...anti-tip bracket to avoid damaging the floor covering. Complete cleaning or maintenance. 6. Turn manual shutoff valve to floor or wall. ■ Slide range back so rear range foot is level. 10. Disconnect wiring. 4. To check that range is under anti-tip bracket. 9. Reconnect ... for the anti-tip bracket securely attached to the closed position. 3. Unplug the power supply cord. 4. Reconnect the gas supply tubing. 7. Slide range forward. 2. Complete cleaning or maintenance. 6. WARNING Moving the Range For direct-wired ranges: WARNING Tip Over Hazard A child or adult can...
...anti-tip bracket to avoid damaging the floor covering. Complete cleaning or maintenance. 6. Turn manual shutoff valve to floor or wall. ■ Slide range back so rear range foot is level. 10. Disconnect wiring. 4. To check that range is under anti-tip bracket. 9. Reconnect ... for the anti-tip bracket securely attached to the closed position. 3. Unplug the power supply cord. 4. Reconnect the gas supply tubing. 7. Slide range forward. 2. Complete cleaning or maintenance. 6. WARNING Moving the Range For direct-wired ranges: WARNING Tip Over Hazard A child or adult can...

