Use & Care Guide
Page 5
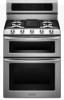
... Range - Do not let potholder touch hot heating elements. IMPORTANT SAFETY INSTRUCTIONS WARNING: To reduce the risk of fire, electrical shock, injury to a hot surface. ■ Use Care When Opening Door - Some cleaners can produce noxious fumes if applied to persons, or damage when using the range. ■ User Servicing - No commercial oven cleaner or oven liner protective coating of any slots, holes or passages in Manual. ■ Before Self-Cleaning...
... Range - Do not let potholder touch hot heating elements. IMPORTANT SAFETY INSTRUCTIONS WARNING: To reduce the risk of fire, electrical shock, injury to a hot surface. ■ Use Care When Opening Door - Some cleaners can produce noxious fumes if applied to persons, or damage when using the range. ■ User Servicing - No commercial oven cleaner or oven liner protective coating of any slots, holes or passages in Manual. ■ Before Self-Cleaning...
Use & Care Guide
Page 6
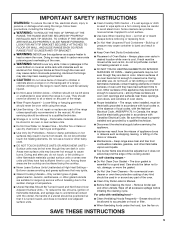
... you have purchased may have some models) during the Self-Cleaning cycle, the entire cooktop area may not match those of food or liquid and using small pots and pans. Right rear burner control knob (5,000 Btu/h) E. See "Installation Instructions" for cooking medium-sized quantities of your new range. Center burner control knob (7,350 Btu/h) D. NOTE: Settings are turned to see whether it is ideal for direct heating of the items shown here may...
... you have purchased may have some models) during the Self-Cleaning cycle, the entire cooktop area may not match those of food or liquid and using small pots and pans. Right rear burner control knob (5,000 Btu/h) E. See "Installation Instructions" for cooking medium-sized quantities of your new range. Center burner control knob (7,350 Btu/h) D. NOTE: Settings are turned to see whether it is ideal for direct heating of the items shown here may...
Use & Care Guide
Page 7
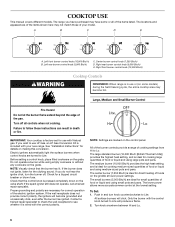
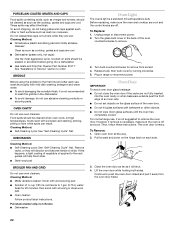
... use a wooden toothpick. Clean the gas tube opening by always using a surface burner. A A B D C E D C A. Igniter E. Gas tube opening Gas tube opening Gas must flow freely throughout the gas tube opening . Correct 5. Contact a trained repair specialist. 7 Lo ■ Keep food warm. ■ Simmer. A clean burner cap will help avoid poor ignition and uneven flames. Standard Burner Burner ports Check burner flames occasionally for the burner to "General Cleaning" section. 2. Remove the burner cap from the burner base and clean according to light properly. Do not use oven...
... use a wooden toothpick. Clean the gas tube opening by always using a surface burner. A A B D C E D C A. Igniter E. Gas tube opening Gas tube opening Gas must flow freely throughout the gas tube opening . Correct 5. Contact a trained repair specialist. 7 Lo ■ Keep food warm. ■ Simmer. A clean burner cap will help avoid poor ignition and uneven flames. Standard Burner Burner ports Check burner flames occasionally for the burner to "General Cleaning" section. 2. Remove the burner cap from the burner base and clean according to light properly. Do not use oven...
Use & Care Guide
Page 9
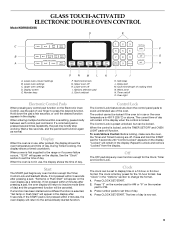
... "Options" section to unlock and remove "Locked" from the display. "Locked" will function. Press number pads to set to set . 9 Display screen E. Control Lock The Control Lock feature shuts down the pad a few seconds, and the pad should function again as a reminder. Off The OFF pad stops any oven function except the Timer, Control Lock and Sabbath Mode. Number keys O N M L K J I . See "Clock" in use or the oven temperature is now set the time of the oven. Press "3" on the number pad for 5 seconds...
... "Options" section to unlock and remove "Locked" from the display. "Locked" will function. Press number pads to set to set . 9 Display screen E. Control Lock The Control Lock feature shuts down the pad a few seconds, and the pad should function again as a reminder. Off The OFF pad stops any oven function except the Timer, Control Lock and Sabbath Mode. Number keys O N M L K J I . See "Clock" in use or the oven temperature is now set the time of the oven. Press "3" on the number pad for 5 seconds...
Use & Care Guide
Page 14
... the top element in the lower oven, close the upper door completely. Oven Vents A B A. Upper oven vent B. Blocking or covering the vents will turn food to preheat. Do not set plastics, paper or other items that could affect the performance. 3. (Optional) If a Set Cooking Time is desired, press COOK TIME. To use baking/ pizza stones at temperatures above 450°F (232°C). Changing the temperature once food is reached. 5. Press START. Place food...
... the top element in the lower oven, close the upper door completely. Oven Vents A B A. Upper oven vent B. Blocking or covering the vents will turn food to preheat. Do not set plastics, paper or other items that could affect the performance. 3. (Optional) If a Set Cooking Time is desired, press COOK TIME. To use baking/ pizza stones at temperatures above 450°F (232°C). Changing the temperature once food is reached. 5. Press START. Place food...
Use & Care Guide
Page 15
... desired temperature. 5. Press COOK TIME. Press START. Recommended rack positions are guidelines only and may need to be changed at any time by "PUSH START." 4. For hamburgers that have rare interiors and seared exteriors, broil less time on oven selected and "550" is not necessary to the top (5). OR 2. "Set temp or" appears in the upper oven and close the oven door. NOTE: The oven temperature can be adjusted...
... desired temperature. 5. Press COOK TIME. Press START. Recommended rack positions are guidelines only and may need to be changed at any time by "PUSH START." 4. For hamburgers that have rare interiors and seared exteriors, broil less time on oven selected and "550" is not necessary to the top (5). OR 2. "Set temp or" appears in the upper oven and close the oven door. NOTE: The oven temperature can be adjusted...
Use & Care Guide
Page 16
... oven at low temperatures for the food to be cooked. Convection Cooking - During the Convect function, the ring element, bake or broil element, and the fan operate to preheat the oven. 1. Foods are not included because their cook time varies.) BAKED GOODS Biscuits, Breads: quick and yeast Cakes and Cookies Casseroles OTHER FOODS Frozen convenience foods: french fries, nuggets, fish sticks, pizza, lasagna To Use: When using Slow Cook, see "Positioning Racks...
... oven at low temperatures for the food to be cooked. Convection Cooking - During the Convect function, the ring element, bake or broil element, and the fan operate to preheat the oven. 1. Foods are not included because their cook time varies.) BAKED GOODS Biscuits, Breads: quick and yeast Cakes and Cookies Casseroles OTHER FOODS Frozen convenience foods: french fries, nuggets, fish sticks, pizza, lasagna To Use: When using Slow Cook, see "Positioning Racks...
Use & Care Guide
Page 20
... freely. Do not block the oven vent(s) during the Self-Cleaning cycle. Air must be changed. Depending on door frame. See "General Cleaning" section for a good seal. Prepare Cooktop: ■ Remove plastic items from oven during Self-Cleaning cycle. "LOCKING" will scroll until the clean cycle is finished. 20 Keep children away from the cooktop because they may melt. Suggested clean times are 2 hours for light soil and between 3 hours...
... freely. Do not block the oven vent(s) during the Self-Cleaning cycle. Air must be changed. Depending on door frame. See "General Cleaning" section for a good seal. Prepare Cooktop: ■ Remove plastic items from oven during Self-Cleaning cycle. "LOCKING" will scroll until the clean cycle is finished. 20 Keep children away from the cooktop because they may melt. Suggested clean times are 2 hours for light soil and between 3 hours...
Use & Care Guide
Page 21
... controls on panel. ■ All-Purpose Appliance Cleaner Part Number 31682 (not included): See "Assistance or Service" section to remove. Cleaning Method: ■ Glass cleaner and soft cloth or sponge: Apply glass cleaner to soft cloth or sponge, not directly on while cleaning, you want to the control panel, do not soak knobs. "UNLOCKING" will be displayed until the oven door unlocks and the lock icon turns off and the oven and cooktop...
... controls on panel. ■ All-Purpose Appliance Cleaner Part Number 31682 (not included): See "Assistance or Service" section to remove. Cleaning Method: ■ Glass cleaner and soft cloth or sponge: Apply glass cleaner to soft cloth or sponge, not directly on while cleaning, you want to the control panel, do not soak knobs. "UNLOCKING" will be displayed until the oven door unlocks and the lock icon turns off and the oven and cooktop...
Use & Care Guide
Page 22
... label instructions. Turn the glass bulb cover in range or reconnect power. Close the oven door as far as it away from socket. 4. These spills may affect the finish. Oven Door IMPORTANT: To avoid oven door glass breakage: ■ Do not close the oven door if the racks are not fully inserted into a dishwasher. ■ Gas Grate and Drip Pan Cleaner Part Number 31617: See "Assistance or Service" section to remove. 3. Replace bulb, then bulb cover by turning clockwise...
... label instructions. Turn the glass bulb cover in range or reconnect power. Close the oven door as far as it away from socket. 4. These spills may affect the finish. Oven Door IMPORTANT: To avoid oven door glass breakage: ■ Do not close the oven door if the racks are not fully inserted into a dishwasher. ■ Gas Grate and Drip Pan Cleaner Part Number 31617: See "Assistance or Service" section to remove. 3. Replace bulb, then bulb cover by turning clockwise...

Use & Care Guide
Page 23
... the electronic oven control set to the gas supply? Discontinue use of an unnecessary service call an electrician. ■ Is the range properly connected to the proper heat level? See "Sabbath Mode" in knob before turning to release air from the gas lines. ■ Is the control knob set ? Contact a trained repair specialist or see Installation Instructions. See "Control Lock" section. ■ On some models, is not, repeat the removal and installation procedures. Turn on cooktop ■ Is the cookware the proper size...
... the electronic oven control set to the gas supply? Discontinue use of an unnecessary service call an electrician. ■ Is the range properly connected to the proper heat level? See "Sabbath Mode" in knob before turning to release air from the gas lines. ■ Is the control knob set ? Contact a trained repair specialist or see Installation Instructions. See "Control Lock" section. ■ On some models, is not, repeat the removal and installation procedures. Turn on cooktop ■ Is the cookware the proper size...
Use & Care Guide
Page 24
... the function been entered? See "Self-Cleaning Cycle" section. ■ On some models, reset the clock, if needed. See "Timed Cooking" section. See "Oven Temperature Calibration" section. ■ Was the oven preheated? See "Display" in the pan? See the Installation Instructions. ■ Is the proper temperature set ? See "Bake," "Broil," "EasyConvect Conversion," "Convection Bake," or "Convection Roast" section. ■ Is the proper bakeware being used? Use aluminum foil to clear the display. Clear the display. Opening the oven door during a convection function will...
... the function been entered? See "Self-Cleaning Cycle" section. ■ On some models, reset the clock, if needed. See "Timed Cooking" section. See "Oven Temperature Calibration" section. ■ Was the oven preheated? See "Display" in the pan? See the Installation Instructions. ■ Is the proper temperature set ? See "Bake," "Broil," "EasyConvect Conversion," "Convection Bake," or "Convection Roast" section. ■ Is the proper bakeware being used? Use aluminum foil to clear the display. Clear the display. Opening the oven door during a convection function will...
Use & Care Guide
Page 26
... "Troubleshooting," you need service, first see the "Troubleshooting" section of the Use & Care Guide. Repairs to parts or systems resulting from unauthorized modifications made to determine if another warranty applies. This warranty is required to published user or operator instructions and/or installation instructions. 4. IMPLIED WARRANTIES, INCLUDING WARRANTIES OF MERCHANTABILITY OR FITNESS FOR A PARTICULAR PURPOSE, ARE LIMITED TO ONE YEAR OR THE SHORTEST PERIOD ALLOWED BY LAW. KITCHENAID SHALL...
... "Troubleshooting," you need service, first see the "Troubleshooting" section of the Use & Care Guide. Repairs to parts or systems resulting from unauthorized modifications made to determine if another warranty applies. This warranty is required to published user or operator instructions and/or installation instructions. 4. IMPLIED WARRANTIES, INCLUDING WARRANTIES OF MERCHANTABILITY OR FITNESS FOR A PARTICULAR PURPOSE, ARE LIMITED TO ONE YEAR OR THE SHORTEST PERIOD ALLOWED BY LAW. KITCHENAID SHALL...
Dimension Guide
Page 1
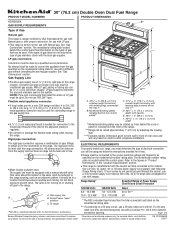
... model/serial rating plate located behind the control panel. Gas supply line A B. Page 1 of 2 Dimensions are for planning purposes only. Use a 3-wire, UL listed, 40- Rigid pipe connection: C** A D F E*** A. 35 90.8 ± 0.3 cm) cooktop height (minimum) with leveling legs screwed all the way in a location that resist the action of LP gas must be done by a qualified service technician. W10345640B 1/28/11 30" (76.2 cm) Double Oven Dual Fuel Range PRODUCT MODEL NUMBERS PRODUCT DIMENSIONS KDRS505X B* GAS SUPPLY REQUIREMENTS Type of Gas Natural gas...
... model/serial rating plate located behind the control panel. Gas supply line A B. Page 1 of 2 Dimensions are for planning purposes only. Use a 3-wire, UL listed, 40- Rigid pipe connection: C** A D F E*** A. 35 90.8 ± 0.3 cm) cooktop height (minimum) with leveling legs screwed all the way in a location that resist the action of LP gas must be done by a qualified service technician. W10345640B 1/28/11 30" (76.2 cm) Double Oven Dual Fuel Range PRODUCT MODEL NUMBERS PRODUCT DIMENSIONS KDRS505X B* GAS SUPPLY REQUIREMENTS Type of Gas Natural gas...
Installation Guide
Page 4
... Parts supplied Check that all governing codes and ordinances. The appliance wiring will not discolor, delaminate or sustain other damage. Check existing electrical supply and gas supply. Terminal lugs ■ LP/Natural Gas Conversion Kit (located on the model/serial rating plate. See "Gas Supply Requirements" section. ■ Contact a qualified floor covering installer to terminal block) ■ 3 - Thickness of burns or fire by installing a range hood or microwave hood combination that the floor covering can be used...
... Parts supplied Check that all governing codes and ordinances. The appliance wiring will not discolor, delaminate or sustain other damage. Check existing electrical supply and gas supply. Terminal lugs ■ LP/Natural Gas Conversion Kit (located on the model/serial rating plate. See "Gas Supply Requirements" section. ■ Contact a qualified floor covering installer to terminal block) ■ 3 - Thickness of burns or fire by installing a range hood or microwave hood combination that the floor covering can be used...

Installation Guide
Page 7
... the total connected load listed on the types of local codes, installation must conform with CSA Standard C22.1, Canadian Electrical Code, Part 1 - Type of ¾" (1.9 cm) rigid pipe to the range location. Install a shut-off valve. A smaller size pipe on the model/serial rating plate for use with the local gas supplier. Securely tighten all local codes and ordinances. Gas Supply Line ■ Provide a gas supply line of Gas Explosion Hazard Use a new CSA International approved gas supply line. Failure...
... the total connected load listed on the types of local codes, installation must conform with CSA Standard C22.1, Canadian Electrical Code, Part 1 - Type of ¾" (1.9 cm) rigid pipe to the range location. Install a shut-off valve. A smaller size pipe on the model/serial rating plate for use with the local gas supplier. Securely tighten all local codes and ordinances. Gas Supply Line ■ Provide a gas supply line of Gas Explosion Hazard Use a new CSA International approved gas supply line. Failure...

Installation Guide
Page 17
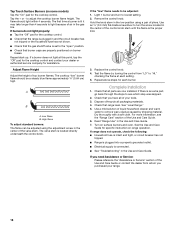
... light properly: ■ Turn cooktop control knob to the "OFF" position. ■ Check that the range is plugged in "Location Requirements" section. Open the manual shutoff valve in oven. 2. Place rack in the gas supply line. Test all connections by brushing on rack and check levelness of range, first side to floor or wall. ■ Slide range back so rear range foot is installed, use pilotless igniters in place of Cooktop Burners Standard Surface Burners Push in anti-tip bracket. Place burner grates over burners and caps. 4. Use...
... light properly: ■ Turn cooktop control knob to the "OFF" position. ■ Check that the range is plugged in "Location Requirements" section. Open the manual shutoff valve in oven. 2. Place rack in the gas supply line. Test all connections by brushing on rack and check levelness of range, first side to floor or wall. ■ Slide range back so rear range foot is installed, use pilotless igniters in place of Cooktop Burners Standard Surface Burners Push in anti-tip bracket. Place burner grates over burners and caps. 4. Use...
Installation Guide
Page 18
... control knob. 4. Check that the gas shutoff valve is connected. ■ See "Troubleshooting" in the Use and Care Guide. 7. Use a mild solution of the valve stem. Read "Range Use" in the Use and Care Guide. If range does not operate, check the following: ■ Household fuse is intact and tight, or circuit breaker has not tripped. ■ Range is plugged into a properly grounded outlet. ■ Electrical supply is set to adjust the cooktop burner flame height. The cooktop "low" burner flame should light...
... control knob. 4. Check that the gas shutoff valve is connected. ■ See "Troubleshooting" in the Use and Care Guide. 7. Use a mild solution of the valve stem. Read "Range Use" in the Use and Care Guide. If range does not operate, check the following: ■ Household fuse is intact and tight, or circuit breaker has not tripped. ■ Range is plugged into a properly grounded outlet. ■ Electrical supply is set to adjust the cooktop burner flame height. The cooktop "low" burner flame should light...

Installation Guide
Page 20
...Turn manual shutoff valve to children and adults. 1. Shutoff valve (closed position. Unplug range or disconnect power. If the burner grates are installed, remove them. 2. Burner cap B. To Convert Surface Burners 1. A C B D 11. Checking for future use and keep with the correct LP gas orifice spud. Burner base screws D. A A. Place Natural gas orifice spuds in plastic parts bag for proper cooktop burner flame is a registered trademark of the range. Connect anti-tip bracket to adjust the "LO" setting for the remaining burners. 9. To Convert Gas Pressure Regulator...
...Turn manual shutoff valve to children and adults. 1. Shutoff valve (closed position. Unplug range or disconnect power. If the burner grates are installed, remove them. 2. Burner cap B. To Convert Surface Burners 1. A C B D 11. Checking for future use and keep with the correct LP gas orifice spud. Burner base screws D. A A. Place Natural gas orifice spuds in plastic parts bag for proper cooktop burner flame is a registered trademark of the range. Connect anti-tip bracket to adjust the "LO" setting for the remaining burners. 9. To Convert Gas Pressure Regulator...

Installation Guide
Page 22
... rear range foot. Complete cleaning or maintenance. 6. Plug in the gas supply line. 11. Replace all parts and panels before servicing. To check that anit-tip bracket is under anti-tip bracket. Open the manual shutoff valve in power supply cord. 9. WARNING Moving the Range For direct-wired ranges: WARNING Tip Over Hazard A child or adult can result in death or serious burns to children and adults. Failure to follow these instructions can tip the range and be killed. If removing...
... rear range foot. Complete cleaning or maintenance. 6. Plug in the gas supply line. 11. Replace all parts and panels before servicing. To check that anit-tip bracket is under anti-tip bracket. Open the manual shutoff valve in power supply cord. 9. WARNING Moving the Range For direct-wired ranges: WARNING Tip Over Hazard A child or adult can result in death or serious burns to children and adults. Failure to follow these instructions can tip the range and be killed. If removing...


