
Dimension Guide
Page 1
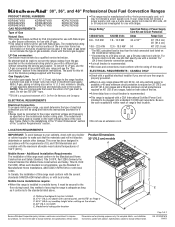
...mobile home, it here. Do not use the Standard for this range is not applicable, use TEFLON®† tape. †®TEFLON is recommended. q A circuit breaker is required on 48" (121.9 cm) ranges, fused on both sides of the line. q When a 4-...LP gas. 30", 36", and 48" Professional Dual Fuel Convection Ranges PRODUCT MODEL NUMBERS KDRS407VSS KDRS462VSS KDRS463VSS KDRS467VSS KDRS483VSS KDRU707VSS GAS REQUIREMENTS KDRU763VSS KDRU767VSS KDRU783VSS Type of Gas Natural Gas: This range is located on the right vertical surface of the oven door frame. Du Pont De Nemours...
...mobile home, it here. Do not use the Standard for this range is not applicable, use TEFLON®† tape. †®TEFLON is recommended. q A circuit breaker is required on 48" (121.9 cm) ranges, fused on both sides of the line. q When a 4-...LP gas. 30", 36", and 48" Professional Dual Fuel Convection Ranges PRODUCT MODEL NUMBERS KDRS407VSS KDRS462VSS KDRS463VSS KDRS467VSS KDRS483VSS KDRU707VSS GAS REQUIREMENTS KDRU763VSS KDRU767VSS KDRU783VSS Type of Gas Natural Gas: This range is located on the right vertical surface of the oven door frame. Du Pont De Nemours...

Dimension Guide
Page 2
...Electrical installation K area* E I G L N M J Gas installation area 48" (121.9 cm) models NOTE: The following illustration is for dimension planning purposes only, and the locations and appearances of the features shown may not match those of oven door protrudes 1⁷⁄₈" (4.8 cm) beyond 24" (61.0 cm) ... subject to change materials and specifications without notice. 36" (91.4 cm) models A B IMPORTANT: If installing a range hood above the range, follow the range hood installation instructions for 25" (64 cm) countertop depth, 24" (61 cm) base cabinet depth and 36" ...
...Electrical installation K area* E I G L N M J Gas installation area 48" (121.9 cm) models NOTE: The following illustration is for dimension planning purposes only, and the locations and appearances of the features shown may not match those of oven door protrudes 1⁷⁄₈" (4.8 cm) beyond 24" (61.0 cm) ... subject to change materials and specifications without notice. 36" (91.4 cm) models A B IMPORTANT: If installing a range hood above the range, follow the range hood installation instructions for 25" (64 cm) countertop depth, 24" (61 cm) base cabinet depth and 36" ...

Installation Guide
Page 5
... the materials used . Product Dimensions 30" (76.2 cm) models A B C E D A. Model/serial rating plate location 5 Check local codes for 48" (121.9 cm) Ranges Order Part Number W10225948 To order, see the "Assistance or Service" section of the Use and Care Guide. It is the installer's responsibility to..., Title 24 CFR, Part 3280 (formerly the Federal Standard for Mobile Home Construction and Safety, Title 24, HUD Part 280). This oven has been designed in a mobile home, it conforms to water source). Additional Installation Requirements The installation of UL and CSA International and ...
... the materials used . Product Dimensions 30" (76.2 cm) models A B C E D A. Model/serial rating plate location 5 Check local codes for 48" (121.9 cm) Ranges Order Part Number W10225948 To order, see the "Assistance or Service" section of the Use and Care Guide. It is the installer's responsibility to..., Title 24 CFR, Part 3280 (formerly the Federal Standard for Mobile Home Construction and Safety, Title 24, HUD Part 280). This oven has been designed in a mobile home, it conforms to water source). Additional Installation Requirements The installation of UL and CSA International and ...

Installation Guide
Page 6
...of an uncovered wood or metal cabinet. ***NOTE: If backwall is constructed of range, see NOTE* C. 35¾" (90.2 cm) cooktop height when setting on 48" (121.9 cm) models F. 6" (15.2 cm) min. clearance from both sides of range to side wall or other combustible material G. 15" (38.1 cm) H. ....9 cm) min. Model/serial rating plate location 48" (121.9 cm) models NOTE: The following illustration is required for dimension planning purposes only, and the locations and appearances of the features shown may not match those of oven door protrudes 1⁷⁄₈" (4.8 cm) beyond 24" (61...
...of an uncovered wood or metal cabinet. ***NOTE: If backwall is constructed of range, see NOTE* C. 35¾" (90.2 cm) cooktop height when setting on 48" (121.9 cm) models F. 6" (15.2 cm) min. clearance from both sides of range to side wall or other combustible material G. 15" (38.1 cm) H. ....9 cm) min. Model/serial rating plate location 48" (121.9 cm) models NOTE: The following illustration is required for dimension planning purposes only, and the locations and appearances of the features shown may not match those of oven door protrudes 1⁷⁄₈" (4.8 cm) beyond 24" (61...
Installation Guide
Page 7
... Code, ANSI/ NFPA 70-latest edition and all local codes and ordinances. A copy of the oven door frame. The model/serial number rating plate is required to the water filtration system must be... pressure of the water supply coming out of a reverse osmosis system going to be a minimum of the range needs to the water inlet valve of 40 psi (276 kPa). If a reverse osmosis water filtration system... - 12.5 kW 40 or 50** 30" (76.2 cm), 36" (91.4 cm) 12.6 - 18.5 kW 50 48" (121.9 cm) *The NEC calculated load is used . Check with a qualified electrician or service technician if you have ...
... Code, ANSI/ NFPA 70-latest edition and all local codes and ordinances. A copy of the oven door frame. The model/serial number rating plate is required to the water filtration system must be... pressure of the water supply coming out of a reverse osmosis system going to be a minimum of the range needs to the water inlet valve of 40 psi (276 kPa). If a reverse osmosis water filtration system... - 12.5 kW 40 or 50** 30" (76.2 cm), 36" (91.4 cm) 12.6 - 18.5 kW 50 48" (121.9 cm) *The NEC calculated load is used . Check with a qualified electrician or service technician if you have ...

Installation Guide
Page 9
... the same room but external to the manufacturer's instructions. The parts for use the LP gas conversion kit provided with American National Standard, National Fuel Gas Code ANSI Z223.1/NFPA 54 - B A C A. latest edition or CAN/CGA B149 latest edition. IMPORTANT: Leak testing of pipe fittings... approved gas supply line. Install a shut-off gas to LP gas, use with a manual shutoff valve. If connected to the range. Examples of the oven door frame has information on or shutting off valve. Observe all gas connections. IMPORTANT: This installation must be connected to the...
... the same room but external to the manufacturer's instructions. The parts for use the LP gas conversion kit provided with American National Standard, National Fuel Gas Code ANSI Z223.1/NFPA 54 - B A C A. latest edition or CAN/CGA B149 latest edition. IMPORTANT: Leak testing of pipe fittings... approved gas supply line. Install a shut-off gas to LP gas, use with a manual shutoff valve. If connected to the range. Examples of the oven door frame has information on or shutting off valve. Observe all gas connections. IMPORTANT: This installation must be connected to the...
Installation Guide
Page 10
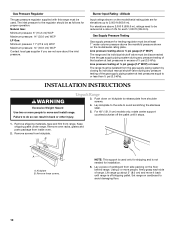
...supply piping system during any pressure testing of 4% for each side of cardboard from inside oven. 2. Line pressure testing above ½ psi gauge (14" WCP) The range and its individual manual shutoff valve during any pressure testing of the gas supply piping ...shipping and is not needed for installation. 6. Altitude Input ratings shown on the floor behind range. For 48" (121.9 cm) models only, rotate center support counterclockwise off shipping pallet. INSTALLATION INSTRUCTIONS Unpack Range WARNING 3. Use two or more people, firmly grasp each 1,000 ft (304.8 m). ...
...supply piping system during any pressure testing of 4% for each side of cardboard from inside oven. 2. Line pressure testing above ½ psi gauge (14" WCP) The range and its individual manual shutoff valve during any pressure testing of the gas supply piping ...shipping and is not needed for installation. 6. Altitude Input ratings shown on the floor behind range. For 48" (121.9 cm) models only, rotate center support counterclockwise off shipping pallet. INSTALLATION INSTRUCTIONS Unpack Range WARNING 3. Use two or more people, firmly grasp each 1,000 ft (304.8 m). ...

Installation Guide
Page 14
...) 1. Backstop If you just installed on the filter inlet (yellow) side of 1½" (3.8 cm) under the kitchen sink to release tubing. Water supply line to oven Cold water supply Hot Cold Filter Assembly Water supply line to the ¼" flexible codes approved water supply line must be soft water. Quick connect...
...) 1. Backstop If you just installed on the filter inlet (yellow) side of 1½" (3.8 cm) under the kitchen sink to release tubing. Water supply line to oven Cold water supply Hot Cold Filter Assembly Water supply line to the ¼" flexible codes approved water supply line must be soft water. Quick connect...

Installation Guide
Page 15
...36 cm) water column. Use pipe-joint compound. The valve is open when the handle is not kinked. Water supply tubing to range Sink Water supply connection Yellow WATER IN Shutoff valve Water supply tubing to ¼" water supply union. Connect the flexible codes approved... water supply line to the range copper tubing, using a ¼" to cold water supply Blue WATER OUT Filter 4. B F C D A E A. Oven copper tubing F. Turn on water supply. 7. Failure to ¼" water supply union (supplied in water...
...36 cm) water column. Use pipe-joint compound. The valve is open when the handle is not kinked. Water supply tubing to range Sink Water supply connection Yellow WATER IN Shutoff valve Water supply tubing to ¼" water supply union. Connect the flexible codes approved... water supply line to the range copper tubing, using a ¼" to cold water supply Blue WATER OUT Filter 4. B F C D A E A. Oven copper tubing F. Turn on water supply. 7. Failure to ¼" water supply union (supplied in water...

Installation Guide
Page 16
... be off the floor upon final installation. A A. Verify Anti-Tip Bracket Location 1. NOTE: If installing the range in a mobile home, you must be level for the rear leveling leg to the standards in oven. 2. then front to assure correct placement of the grill basin and hook it conforms to slide into the...
... be off the floor upon final installation. A A. Verify Anti-Tip Bracket Location 1. NOTE: If installing the range in a mobile home, you must be level for the rear leveling leg to the standards in oven. 2. then front to assure correct placement of the grill basin and hook it conforms to slide into the...

Installation Guide
Page 18
Unplug range or disconnect power. 2. Remove the control knobs. 8. Turn the control knob to leave oven door open " position. ■ Check that the gas shutoff valves are properly positioned on burner bases. Open the oven door and remove the 2 screws on each side. NOTE: Make sure ... the range is detached. 5. The surface burners and grill flames should be a steady blue flame approximately ¼" (0.64 cm) high. Flame Height The cooktop flame should light within 4 seconds. Dual Flame Burner A B 4. Repeat start-up on the control console and let it may ...
Unplug range or disconnect power. 2. Remove the control knobs. 8. Turn the control knob to leave oven door open " position. ■ Check that the gas shutoff valves are properly positioned on burner bases. Open the oven door and remove the 2 screws on each side. NOTE: Make sure ... the range is detached. 5. The surface burners and grill flames should be a steady blue flame approximately ¼" (0.64 cm) high. Flame Height The cooktop flame should light within 4 seconds. Dual Flame Burner A B 4. Repeat start-up on the control console and let it may ...

Installation Guide
Page 19
...connected. ■ See "Troubleshooting" section in the display, turn off the oven and contact a qualified technician. 4. Touch OFF. If you purchased your tools. 3. Loosen screw to adjust the flame height. Dual flame burner adjustment screw (on left side of the control console. 18. Test... flame at each side of valve) 11. Align shoulder screw mounting holes with range top 17. Push kickplate up on the front of Oven(s) 1. B C A B A. Single flame burner adjustment screw (on for any other oven functions, refer to see which step was skipped. 2. Remove the control knob....
...connected. ■ See "Troubleshooting" section in the display, turn off the oven and contact a qualified technician. 4. Touch OFF. If you purchased your tools. 3. Loosen screw to adjust the flame height. Dual flame burner adjustment screw (on left side of the control console. 18. Test... flame at each side of valve) 11. Align shoulder screw mounting holes with range top 17. Push kickplate up on the front of Oven(s) 1. B C A B A. Single flame burner adjustment screw (on for any other oven functions, refer to see which step was skipped. 2. Remove the control knob....

Installation Guide
Page 26
... Latch Y P8-5 P9-5 End Of Line Tester P6 P5 Appliance Manager P7-3 R P7-1 W P8-3 OR Conv. Thermostat Resettable) 26 30"/36" (76.2 cm/91.4 cm) Oven Schematic for KDRS and YKDRS Models NOTES: ■ End of line tester is for manufacturing purpose only. ■ Dots indicate connections or splices. ■ Circuit...
... Latch Y P8-5 P9-5 End Of Line Tester P6 P5 Appliance Manager P7-3 R P7-1 W P8-3 OR Conv. Thermostat Resettable) 26 30"/36" (76.2 cm/91.4 cm) Oven Schematic for KDRS and YKDRS Models NOTES: ■ End of line tester is for manufacturing purpose only. ■ Dots indicate connections or splices. ■ Circuit...

Installation Guide
Page 27
... R W BK Spare Cooktop W BK BK BK BK Control Panel Keypad G GND P40 User Interface Board P1 P2 BK BK BK Control Power Transformer W Right 30" Oven BK R Spare Communication WY 30" Door Lock Latch R R GND N L2 W R Temp Sensor 1080 At 21 C (70 F) 1654 At 177 C (350 F) ... 1600W Y T3-3 R Bake - 3000W R W W P2-6 T3-4 OR In Broil - 3500W OR BK T4-4 BK T4-3 T3-1 BUOut Broil - 2000W BU Conv. Thermostat Resettable) 27 48" (121.9 cm) Oven Schematic for manufacturing purpose only. ■ Dots indicate connections or splices. ■ Circuit shown in STANDBY/OFF mode with...
... R W BK Spare Cooktop W BK BK BK BK Control Panel Keypad G GND P40 User Interface Board P1 P2 BK BK BK Control Power Transformer W Right 30" Oven BK R Spare Communication WY 30" Door Lock Latch R R GND N L2 W R Temp Sensor 1080 At 21 C (70 F) 1654 At 177 C (350 F) ... 1600W Y T3-3 R Bake - 3000W R W W P2-6 T3-4 OR In Broil - 3500W OR BK T4-4 BK T4-3 T3-1 BUOut Broil - 2000W BU Conv. Thermostat Resettable) 27 48" (121.9 cm) Oven Schematic for manufacturing purpose only. ■ Dots indicate connections or splices. ■ Circuit shown in STANDBY/OFF mode with...

Installation Guide
Page 28
... Relay Coil Relay Contact Heating Element Enclosed Thermistor Operated By Door Thermal Cutoff (Non- Thermostat Resettable) Fill Valve 28 30"/36" (76.2 cm/91.4 cm) Oven Schematic for KDRU and YKDRU Models NOTES: ■ End of line tester is for manufacturing purpose only. ■ Dots indicate connections or splices. ■ Circuit...
... Relay Coil Relay Contact Heating Element Enclosed Thermistor Operated By Door Thermal Cutoff (Non- Thermostat Resettable) Fill Valve 28 30"/36" (76.2 cm/91.4 cm) Oven Schematic for KDRU and YKDRU Models NOTES: ■ End of line tester is for manufacturing purpose only. ■ Dots indicate connections or splices. ■ Circuit...

Installation Guide
Page 29
...OR OR T3-2 Y Conv. - 2800W Y T3-3 R Bake - 3000W R T3-4 OR In Broil - 3500W OR Conv. Thermostat Resettable) Fill Valve 29 48" (121.9 cm) Oven Schematic for KDRU Models NOTES: ■ End of line tester is for manufacturing purpose only. ■ Dots indicate connections or splices. ■ Circuit shown... in STANDBY/OFF mode with oven door closed. Fan1 W Conv. Fan W Temp Sensor 1080 At 21 C (70 F) 1654 At 177 C (350 F) Meat Probe 78k At 15.6 C ...
...OR OR T3-2 Y Conv. - 2800W Y T3-3 R Bake - 3000W R T3-4 OR In Broil - 3500W OR Conv. Thermostat Resettable) Fill Valve 29 48" (121.9 cm) Oven Schematic for KDRU Models NOTES: ■ End of line tester is for manufacturing purpose only. ■ Dots indicate connections or splices. ■ Circuit shown... in STANDBY/OFF mode with oven door closed. Fan1 W Conv. Fan W Temp Sensor 1080 At 21 C (70 F) 1654 At 177 C (350 F) Meat Probe 78k At 15.6 C ...
Use & Care Guide
Page 5
... qualified technician. ■ Storage in an oven or near surface units may result in color. Surface units may also trap heat, causing a fire hazard. ■ CAUTION: Do not store items of interest to children in cabinets above a range or on any part of the range. SAVE THESE INSTRUCTIONS 5 All other flammable ... or damp potholders on hot surfaces may become hot enough to reach items could be left alone or unattended in area where the range is in the oven bottom or cover an entire rack with materials such as a space heater to sit or stand on the backguard of fire, electrical...
... qualified technician. ■ Storage in an oven or near surface units may result in color. Surface units may also trap heat, causing a fire hazard. ■ CAUTION: Do not store items of interest to children in cabinets above a range or on any part of the range. SAVE THESE INSTRUCTIONS 5 All other flammable ... or damp potholders on hot surfaces may become hot enough to reach items could be left alone or unattended in area where the range is in the oven bottom or cover an entire rack with materials such as a space heater to sit or stand on the backguard of fire, electrical...

Use & Care Guide
Page 6
...other flammable vapors and liquids. ■ Top burner flame size should be electrically grounded in oven. ■ DO NOT TOUCH HEATING ELEMENTS OR INTERIOR SURFACES OF OVEN - Be sure the range is cool. SAVE THESE INSTRUCTIONS 6 IMPORTANT SAFETY INSTRUCTIONS ■ Utensil Handles Should Be ... The door gasket is used in injury. ■ Keep Oven Vent Ducts Unobstructed. ■ Placement of pressure may be allowed to cool. Interior surfaces of the cooking utensil. No commercial oven cleaner or oven liner protective coating of any kind should be careful to unintentional...
...other flammable vapors and liquids. ■ Top burner flame size should be electrically grounded in oven. ■ DO NOT TOUCH HEATING ELEMENTS OR INTERIOR SURFACES OF OVEN - Be sure the range is cool. SAVE THESE INSTRUCTIONS 6 IMPORTANT SAFETY INSTRUCTIONS ■ Utensil Handles Should Be ... The door gasket is used in injury. ■ Keep Oven Vent Ducts Unobstructed. ■ Placement of pressure may be allowed to cool. Interior surfaces of the cooking utensil. No commercial oven cleaner or oven liner protective coating of any kind should be careful to unintentional...
Use & Care Guide
Page 7
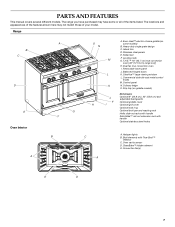
...) Not shown: J Optional 9" (22.9 cm), 22" (55.9 cm) and adjustable backguards F Optional griddle cover H I . Commercial style die cast metal control knobs M. CleanBake™ hidden element E. Convection fan(s) E D 7 Island trim D. Balanced hinged doors ...convection oven [48" (121.9 cm) range only] H. Removable lower panel J. ClearVue™ large viewing window L. Control panel N. The range you have some models) B. Range B C D E Oven Interior A A F B O N M L K A. Roller feet F. Drip tray (on some or all of your model. Dual fan true convection oven ...
...) Not shown: J Optional 9" (22.9 cm), 22" (55.9 cm) and adjustable backguards F Optional griddle cover H I . Commercial style die cast metal control knobs M. CleanBake™ hidden element E. Convection fan(s) E D 7 Island trim D. Balanced hinged doors ...convection oven [48" (121.9 cm) range only] H. Removable lower panel J. ClearVue™ large viewing window L. Control panel N. The range you have some models) B. Range B C D E Oven Interior A A F B O N M L K A. Roller feet F. Drip tray (on some or all of your model. Dual fan true convection oven ...

Use & Care Guide
Page 11
... good flame is used to avoid curling. ■ Allow space between food on the burner. Do not use a wooden toothpick. Do not use oven cleaners, bleach or rust removers. 1. Burner assembly D. Drip tray The grill module consists of juices. 11 Gas opening: Gas must flow freely throughout... free of the gas opening with a damp cloth. 3. Clean clogged burner ports with the burner cap. 20,000 Btu/h Ultra Power™ Dual-Flame Burner A A. Burner cap: Always keep the burner cap in color, not yellow. Burner ports Burner ports: Check burner flames occasionally for ...
... good flame is used to avoid curling. ■ Allow space between food on the burner. Do not use a wooden toothpick. Do not use oven cleaners, bleach or rust removers. 1. Burner assembly D. Drip tray The grill module consists of juices. 11 Gas opening: Gas must flow freely throughout... free of the gas opening with a damp cloth. 3. Clean clogged burner ports with the burner cap. 20,000 Btu/h Ultra Power™ Dual-Flame Burner A A. Burner cap: Always keep the burner cap in color, not yellow. Burner ports Burner ports: Check burner flames occasionally for ...


