

Installation Guide
Page 3
.... • Do not touch any electrical switch. • Do not use gasoline or other appliance. - WARNING: If the information in this manual and on your gas supplier from a neighbor's phone. Installation and service must not exceed 3 feet. 3 For more information, contact your building. • Immediately call the fire department. - Do not store... You can happen if the instructions are very important. We have provided many important safety messages in this or any phone in your gas supplier. RANGE SAFETY Your safety and the safety of others .
.... • Do not touch any electrical switch. • Do not use gasoline or other appliance. - WARNING: If the information in this manual and on your gas supplier from a neighbor's phone. Installation and service must not exceed 3 feet. 3 For more information, contact your building. • Immediately call the fire department. - Do not store... You can happen if the instructions are very important. We have provided many important safety messages in this or any phone in your gas supplier. RANGE SAFETY Your safety and the safety of others .

Installation Guide
Page 9
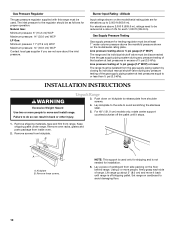
... oven door frame has information on longer runs may be equipped with the range. ■ Must include a manual shutoff valve: The supply line must be used . The model/ serial ... in death, explosion, or fire. B A C A. Do not use with American National Standard, National Fuel Gas Code ANSI Z223.1/NFPA 54 - Type of opening , such as an adjacent cabinet. Shutoff valve ...approved gas supply line. Install a shut-off gas to the range. If connected to the range opening and closing. IMPORTANT: Leak testing of gas available, check with your range and see the "Gas...
... oven door frame has information on longer runs may be equipped with the range. ■ Must include a manual shutoff valve: The supply line must be used . The model/ serial ... in death, explosion, or fire. B A C A. Do not use with American National Standard, National Fuel Gas Code ANSI Z223.1/NFPA 54 - Type of opening , such as an adjacent cabinet. Shutoff valve ...approved gas supply line. Install a shut-off gas to the range. If connected to the range opening and closing. IMPORTANT: Leak testing of gas available, check with your range and see the "Gas...
Installation Guide
Page 10
...not sure about 3" (8.0 cm) and move and install range. For elevations above 2,000 ft (609.6 m), ratings need to be reduced at least 1" water column pressure above ½ psi gauge (14" WCP) The range and its individual manual shutoff valve during any pressure testing of the gas ...supply piping system at test pressures in back or other injury. 5. For 48" (121.9 cm) models only, rotate center support counterclockwise off shipping...
...not sure about 3" (8.0 cm) and move and install range. For elevations above 2,000 ft (609.6 m), ratings need to be reduced at least 1" water column pressure above ½ psi gauge (14" WCP) The range and its individual manual shutoff valve during any pressure testing of the gas ...supply piping system at test pressures in back or other injury. 5. For 48" (121.9 cm) models only, rotate center support counterclockwise off shipping...

Installation Guide
Page 15
... through undersink cabinet and oven cabinet cutout. 5. Turn on water supply. 7. Install a shut-off valve. Examples of cabinet cutout C. Failure to do so can...No flushing or conditioning of the water filter is parallel to the smaller thread ends of the range. 2. Attach one adapter to the gas pressure regulator and the other adapter to cold water...pipe-joint compound made for leaks. Tighten both adapters. 4. A BC D E A. Closed valve B. Open the manual shutoff valve in water filter kit) E. Open valve 15 Gas pressure regulator B. Flexible connector HG F E. H. ...
... through undersink cabinet and oven cabinet cutout. 5. Turn on water supply. 7. Install a shut-off valve. Examples of cabinet cutout C. Failure to do so can...No flushing or conditioning of the water filter is parallel to the smaller thread ends of the range. 2. Attach one adapter to the gas pressure regulator and the other adapter to cold water...pipe-joint compound made for leaks. Tighten both adapters. 4. A BC D E A. Closed valve B. Open the manual shutoff valve in water filter kit) E. Open valve 15 Gas pressure regulator B. Flexible connector HG F E. H. ...

Installation Guide
Page 20
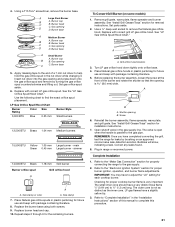
... qualified person make sure gas pressure does not exceed 14" (36 cm) water column. Turn the manual shutoff valve to remove the burner head of the large dual burners. 20 If the burner grates are installed, remove them. 2. NOTE: A ⁷⁄₈" socket must be isolated from the gas supply...fire. The inlet pressure to locate the "NAT" or "LP" position. Line pressure testing at ½ psi gauge (14" WCP) or lower The range must be killed. Gas supply line To Convert Surface Burners 1. GAS CONVERSIONS IMPORTANT: Gas conversions from Natural gas to or less than ½ psi (3.5...
... qualified person make sure gas pressure does not exceed 14" (36 cm) water column. Turn the manual shutoff valve to remove the burner head of the large dual burners. 20 If the burner grates are installed, remove them. 2. NOTE: A ⁷⁄₈" socket must be isolated from the gas supply...fire. The inlet pressure to locate the "NAT" or "LP" position. Line pressure testing at ½ psi gauge (14" WCP) or lower The range must be killed. Gas supply line To Convert Surface Burners 1. GAS CONVERSIONS IMPORTANT: Gas conversions from Natural gas to or less than ½ psi (3.5...
Installation Guide
Page 21
...location 3. Apply masking tape to the end of this manual to remove the Natural gas orifice hood. Open shutoff valve in range or reconnect power. Insert nut driver into the gas ...lifting out. 4. Using a T15 Torx® screwdriver, remove the burner base. A Large Dual Burner B C A. Gas opening C C. Gas opening and press down tightly onto orifice base....indicating a leak. Refer to the "Make Gas Connection" section for properly connecting the range to adjust the "LO" setting for installation instructions. 7. IMPORTANT: You may have a very distinct blue flame ¼" (0.64...
...location 3. Apply masking tape to the end of this manual to remove the Natural gas orifice hood. Open shutoff valve in range or reconnect power. Insert nut driver into the gas ...lifting out. 4. Using a T15 Torx® screwdriver, remove the burner base. A Large Dual Burner B C A. Gas opening C C. Gas opening and press down tightly onto orifice base....indicating a leak. Refer to the "Make Gas Connection" section for properly connecting the range to adjust the "LO" setting for installation instructions. 7. IMPORTANT: You may have a very distinct blue flame ¼" (0.64...

Installation Guide
Page 22
... shutoff valve must be at test pressures in death or serious burns to locate the "LP" or "NAT" position. If the burner grates are installed, remove them. 2. NOTE: A ⁷⁄₈" socket must be used to or less than ½ psi (3.5 kPa). Look at a... flat side of ½ psi (3.5 kPa). Turn manual shutoff valve to rear range foot. B A C A. Line pressure testing above ½ psi gauge (14" WCP) The range and its individual manual shutoff valve during any pressure testing of the large dual burners. 4. A B A Large Dual Burner B C A. Burner base A Medium Burner A....
... shutoff valve must be at test pressures in death or serious burns to locate the "LP" or "NAT" position. If the burner grates are installed, remove them. 2. NOTE: A ⁷⁄₈" socket must be used to or less than ½ psi (3.5 kPa). Look at a... flat side of ½ psi (3.5 kPa). Turn manual shutoff valve to rear range foot. B A C A. Line pressure testing above ½ psi gauge (14" WCP) The range and its individual manual shutoff valve during any pressure testing of the large dual burners. 4. A B A Large Dual Burner B C A. Burner base A Medium Burner A....

Installation Guide
Page 23
... burners. LP gas flames have to help hold the gas orifice spud in plastic parts bag for properly connecting the range to complete this manual to the gas supply. 2. Refer to "Complete Installation" in plastic parts bag for proper burner ignition, operation, and burner flame adjustments. Insert nut driver into the gas opening...
... burners. LP gas flames have to help hold the gas orifice spud in plastic parts bag for properly connecting the range to complete this manual to the gas supply. 2. Refer to "Complete Installation" in plastic parts bag for proper burner ignition, operation, and burner flame adjustments. Insert nut driver into the gas opening...

Use & Care Guide
Page 3
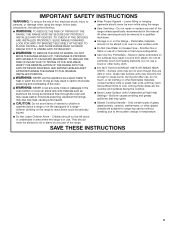
RANGE SAFETY Your safety and the safety of injury, and tell you what ... appliance. • Do not touch any electrical switch. • Do not use any other flammable vapors and liquids in this manual and on your gas supplier from a neighbor's phone. WARNING: Gas leaks cannot always be a T-handle type. ■ A... supplier's instructions. • If you and others are not followed. In the State of Massachusetts, the following installation instructions apply: ■ Installations and repairs must be killed or seriously injured if you smell gas" instructions. Do not store or use a ...
RANGE SAFETY Your safety and the safety of injury, and tell you what ... appliance. • Do not touch any electrical switch. • Do not use any other flammable vapors and liquids in this manual and on your gas supplier from a neighbor's phone. WARNING: Gas leaks cannot always be a T-handle type. ■ A... supplier's instructions. • If you and others are not followed. In the State of Massachusetts, the following installation instructions apply: ■ Installations and repairs must be killed or seriously injured if you smell gas" instructions. Do not store or use a ...
Use & Care Guide
Page 5
... on any slots, holes or passages in the manual. They should not be allowed to sit or stand on Grease Fires - IMPORTANT SAFETY INSTRUCTIONS WARNING: To reduce the risk of fire, electrical shock, injury to persons, or damage when using the range. ■ User Servicing - Do not use ... TO REDUCE THE RISK OF INJURY DUE TO TIPPING OF THE APPLIANCE, VERIFY THE REINSTALLATION OF THE RANGE INTO THE ANTI-TIP DEVICE PROVIDED, AND EXTEND LEVELING FEET AFTER RETURNING THE RANGE TO THE ORIGINAL INSTALLED POSITION. ■ WARNING: NEVER use , do not touch, or let clothing or other bulky cloth...
... on any slots, holes or passages in the manual. They should not be allowed to sit or stand on Grease Fires - IMPORTANT SAFETY INSTRUCTIONS WARNING: To reduce the risk of fire, electrical shock, injury to persons, or damage when using the range. ■ User Servicing - Do not use ... TO REDUCE THE RISK OF INJURY DUE TO TIPPING OF THE APPLIANCE, VERIFY THE REINSTALLATION OF THE RANGE INTO THE ANTI-TIP DEVICE PROVIDED, AND EXTEND LEVELING FEET AFTER RETURNING THE RANGE TO THE ORIGINAL INSTALLED POSITION. ■ WARNING: NEVER use , do not touch, or let clothing or other bulky cloth...

Use & Care Guide
Page 6
... spills on a hot cooking area, be adjusted so it is cool. No commercial oven cleaner or oven liner protective coating of the cooking utensil. To reduce the... and does not extend over adjacent surface units. ■ Clean Cooktop With Caution - The range, when installed, must be electrically grounded in the absence of oven until they are oven vent openings and...and after use, do not let potholder contact hot heating element in Manual. ■ Before Self-Cleaning the Oven - SAVE THESE INSTRUCTIONS 6 For self-cleaning ranges - ■ Do Not Clean Door Gasket - Wipe off all...
... spills on a hot cooking area, be adjusted so it is cool. No commercial oven cleaner or oven liner protective coating of the cooking utensil. To reduce the... and does not extend over adjacent surface units. ■ Clean Cooktop With Caution - The range, when installed, must be electrically grounded in the absence of oven until they are oven vent openings and...and after use, do not let potholder contact hot heating element in Manual. ■ Before Self-Cleaning the Oven - SAVE THESE INSTRUCTIONS 6 For self-cleaning ranges - ■ Do Not Clean Door Gasket - Wipe off all...


