Use and Care Guide
Page 3
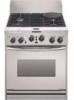
... CSA. Always read and obey all safety messages. Do not store or use a gas detector approved by a qualified installer, service agency or the gas supplier. RANGE SAFETY Your safety and the safety of injury, and tell you what the potential hazard is detected, follow the safety alert symbol and either the...
... CSA. Always read and obey all safety messages. Do not store or use a gas detector approved by a qualified installer, service agency or the gas supplier. RANGE SAFETY Your safety and the safety of injury, and tell you what the potential hazard is detected, follow the safety alert symbol and either the...
Use and Care Guide
Page 4
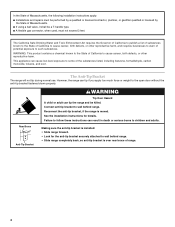
...or gasfitter qualified or licensed by the State of California to cause cancer, birth defects, or other reproductive harm, and requires businesses to warn of range. 4 Failure to such substances. Rear Brace Anti-Tip Bracket WARNING Tip Over Hazard A child or adult can result in death or serious burns... to some of the substances listed, including benzene, formaldehyde, carbon monoxide, toluene, and soot. However, the range can cause low-level exposure to children and adults. This appliance can tip if you apply too much force or weight to wall behind...
...or gasfitter qualified or licensed by the State of California to cause cancer, birth defects, or other reproductive harm, and requires businesses to warn of range. 4 Failure to such substances. Rear Brace Anti-Tip Bracket WARNING Tip Over Hazard A child or adult can result in death or serious burns... to some of the substances listed, including benzene, formaldehyde, carbon monoxide, toluene, and soot. However, the range can cause low-level exposure to children and adults. This appliance can tip if you apply too much force or weight to wall behind...
Use and Care Guide
Page 5
...burns from steam. Heating elements may result in desired location while oven is cool. among these surfaces are suitable for a good seal. For self-cleaning ranges - ■ Do Not Clean Door Gasket - Wipe off all excessive spillage before removing or replacing food. ■ Do Not Heat Unopened Food ..., or other flammable vapors and liquids. ■ Top burner flame size should not be allowed to cool. Moist or damp potholders on the Range - Surface units may become hot enough to cool. Boilover causes smoking and greasy spillovers that it does not extend beyond the edge of local...
...burns from steam. Heating elements may result in desired location while oven is cool. among these surfaces are suitable for a good seal. For self-cleaning ranges - ■ Do Not Clean Door Gasket - Wipe off all excessive spillage before removing or replacing food. ■ Do Not Heat Unopened Food ..., or other flammable vapors and liquids. ■ Top burner flame size should not be allowed to cool. Moist or damp potholders on the Range - Surface units may become hot enough to cool. Boilover causes smoking and greasy spillovers that it does not extend beyond the edge of local...
Use and Care Guide
Page 6
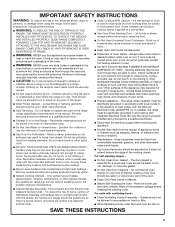
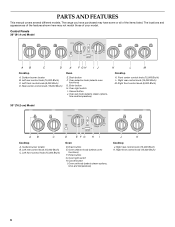
... control knob (15,000 Btu/h) D EFG H I Oven D. Oven set knob (selects steam options, time and temperature) K L M Cooktop K. The range you have some or all of your model. Right front control knob (6,000 Btu/h) 30" (76.2 cm) Model AB C Cooktop A. PARTS AND FEATURES This manual covers several different models. Oven selector knob (selects...
... control knob (15,000 Btu/h) D EFG H I Oven D. Oven set knob (selects steam options, time and temperature) K L M Cooktop K. The range you have some or all of your model. Right front control knob (6,000 Btu/h) 30" (76.2 cm) Model AB C Cooktop A. PARTS AND FEATURES This manual covers several different models. Oven selector knob (selects...
Use and Care Guide
Page 7
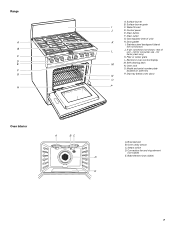
... not shown) J. 2-pin connector (not shown; Bake element (not visible) 7 Surface burner grate I . not for factory test only) K. Convection fan and ring element (not visible) E. Range A B C D E F G H A.
... not shown) J. 2-pin connector (not shown; Bake element (not visible) 7 Surface burner grate I . not for factory test only) K. Convection fan and ring element (not visible) E. Range A B C D E F G H A.

Use and Care Guide
Page 8
... operate, call a trained repair specialist. Contact a trained repair specialist to check the wall receptacle or junction box to setting. REMEMBER: When range is factory-set for correct operation of food or liquid, using empty cookware or without any cookware on the valve shaft. Power Failure In... with Natural gas. COOKTOP USE Cooktop Controls WARNING To Set: 1. See the instructions included with the control knob turned to use with the range. If the wall receptacle or junction box does not provide correct polarity, the igniter will produce a flame. 2. Push in death or fire...
... operate, call a trained repair specialist. Contact a trained repair specialist to check the wall receptacle or junction box to setting. REMEMBER: When range is factory-set for correct operation of food or liquid, using empty cookware or without any cookware on the valve shaft. Power Failure In... with Natural gas. COOKTOP USE Cooktop Controls WARNING To Set: 1. See the instructions included with the control knob turned to use with the range. If the wall receptacle or junction box does not provide correct polarity, the igniter will produce a flame. 2. Push in death or fire...
Use and Care Guide
Page 9
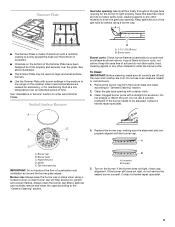
... to order extra Simmer Plates. If the burner still does not light, do not allow spills, food, cleaning agents or any other material to low range on the burner. Keep this area free of aluminum with a damp cloth. 3. See above . Sealed Surface Burners B A. 1-1¹⁄₂" (25-38 mm) B. Burner base...
... to order extra Simmer Plates. If the burner still does not light, do not allow spills, food, cleaning agents or any other material to low range on the burner. Keep this area free of aluminum with a damp cloth. 3. See above . Sealed Surface Burners B A. 1-1¹⁄₂" (25-38 mm) B. Burner base...

Use and Care Guide
Page 11
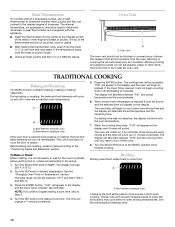
...for Steam Functions Water Level When you are set with the SET knob. Turn the SET knob to change time of day. 4. NOTE: The range must be changed according to fill the system with all indicator lights in the display window. Oven selector knob C. These may be set knob ...Select Steam options, along with water. 11 If "PF" appears at any time, a power failure has occurred. Turn the SELECTOR control knob to the range or if power is first supplied to the RESET position, press the ENTER button, and follow the clock setting instructions in order to recipe directions...
...for Steam Functions Water Level When you are set with the SET knob. Turn the SET knob to change time of day. 4. NOTE: The range must be changed according to fill the system with all indicator lights in the display window. Oven selector knob C. These may be set knob ...Select Steam options, along with water. 11 If "PF" appears at any time, a power failure has occurred. Turn the SELECTOR control knob to the range or if power is first supplied to the RESET position, press the ENTER button, and follow the clock setting instructions in order to recipe directions...
Use and Care Guide
Page 12
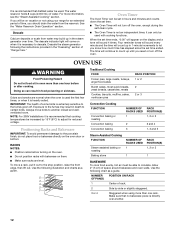
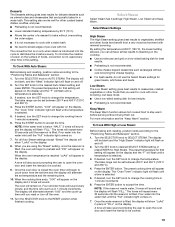
... RACKS USED 1 1 RACK POSITION(S) 1, 2 or 3 1 BAKEWARE To cook food evenly, hot air must be increased by side or slightly staggered. 3 or 4 Staggered when using your range for reduced voltage. When the set time ended. Positioning Racks and Bakeware IMPORTANT: To avoid permanent damage to adjust for an extended period of...
... RACKS USED 1 1 RACK POSITION(S) 1, 2 or 3 1 BAKEWARE To cook food evenly, hot air must be increased by side or slightly staggered. 3 or 4 Staggered when using your range for reduced voltage. When the set time ended. Positioning Racks and Bakeware IMPORTANT: To avoid permanent damage to adjust for an extended period of...
Use and Care Guide
Page 14
... between 175°F and 500°F (80°C and 260°C). 3. The oven will cause poor air circulation, affecting cooking and cleaning results. The bake range can be accepted, "PrE" will appear in the display, and the oven will turn off the oven. 8. Press the ENTER button. Turn the SET knob...
... between 175°F and 500°F (80°C and 260°C). 3. The oven will cause poor air circulation, affecting cooking and cleaning results. The bake range can be accepted, "PrE" will appear in the display, and the oven will turn off the oven. 8. Press the ENTER button. Turn the SET knob...

Use and Care Guide
Page 16
... Temperature" section. Convection Baking In the Convect Bake function, the ring element operates, along with the fan, to speed up cooking by as much as 30 percent. Turn the SET knob to constantly circulate the heated air. 3. The cooking time will be accepted and the oven will alternate between 170°... rack baking and cooking foods such as using multiple racks, more than one rack, position bakeware/ cookware on dough type and quantity. 8. The convection bake range can be needed.
... Temperature" section. Convection Baking In the Convect Bake function, the ring element operates, along with the fan, to speed up cooking by as much as 30 percent. Turn the SET knob to constantly circulate the heated air. 3. The cooking time will be accepted and the oven will alternate between 170°... rack baking and cooking foods such as using multiple racks, more than one rack, position bakeware/ cookware on dough type and quantity. 8. The convection bake range can be needed.

Use and Care Guide
Page 17
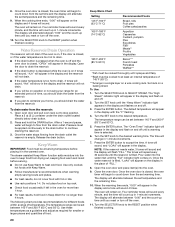
...on and off immediately. Turn the SELECTOR knob to order. Press the ENTER button. See Assistance or Service" section to CONVECT ROAST. The convection roast range can be cooked into a cool oven. A B C A. Bake element (example only) NOTE: If you convert your own recipes. The time ...use a roasting rack (not included) on . Convection Roasting In the Convect Roast function, the bake and broil elements operate, along with the range. 17 If you reset or turn off during the cooking process. ■ When cooking with any liquid other than water. ■ The ...
...on and off immediately. Turn the SELECTOR knob to order. Press the ENTER button. See Assistance or Service" section to CONVECT ROAST. The convection roast range can be cooked into a cool oven. A B C A. Bake element (example only) NOTE: If you convert your own recipes. The time ...use a roasting rack (not included) on . Convection Roasting In the Convect Roast function, the bake and broil elements operate, along with the range. 17 If you reset or turn off during the cooking process. ■ When cooking with any liquid other than water. ■ The ...
Use and Care Guide
Page 19
... on the display and the "F" will be cooked. 19 "0:00" will remain on the display. The "Cook Time" indicator light will repeat every 30 seconds until a temperature is selected. 3. The tones will flash until a temperature is selected. 3. The oven will appear on . Turn the SELECTOR knob... 4. Once the water reservoir is below "HALF," 3 tones will sound and the display will appear on and off the oven. 11. The bake range can achieve similar results to count down from a very moist environment with a water bath. ■ No need to be blank, and the "Meat...
... on the display and the "F" will be cooked. 19 "0:00" will remain on the display. The "Cook Time" indicator light will repeat every 30 seconds until a temperature is selected. 3. The tones will flash until a temperature is selected. 3. The oven will appear on . Turn the SELECTOR knob... 4. Once the water reservoir is below "HALF," 3 tones will sound and the display will appear on and off the oven. 11. The bake range can achieve similar results to count down from a very moist environment with a water bath. ■ No need to be blank, and the "Meat...
Use and Care Guide
Page 20
... Reservoir Drain Operation The reservoir will not drain if the oven is on the display and 4 tones will appear in the warmed oven. The temperature range can be applied continuously to the drain button to drain. ■ If the drain button is pressed when the oven is off the oven. 10... to count down from the reservoir: 1. Open oven door and pull oven rack out to count down from the reservoir. The time will repeat every 30 seconds until opaque and flaky. **Beef must be on . The tones will change in the display and a tone will begin to stop position. To Use...
... Reservoir Drain Operation The reservoir will not drain if the oven is on the display and 4 tones will appear in the warmed oven. The temperature range can be applied continuously to the drain button to drain. ■ If the drain button is pressed when the oven is off the oven. 10... to count down from the reservoir: 1. Open oven door and pull oven rack out to count down from the reservoir. The time will repeat every 30 seconds until opaque and flaky. **Beef must be on . The tones will change in the display and a tone will begin to stop position. To Use...
Use and Care Guide
Page 28
... 5. Set the cook time to select HIGH STEAM and set 250°F as the cooking temperature. 4. The display will not begin. 1. RANGE CARE Self-Cleaning Cycle WARNING Once the oven has completely cooled, remove ash with porcelain. It will not affect cooking performance. Air must be manually...move or bend the gasket. Drain the descaling solution. 7. After about 10 minutes the "Descale" indicator will appear in the range for a non-adjustable 3-hour, 30-minute clean cycle. Leave the descaling solution in the display. Open and close the oven door. Turn the selector knob to ...
... 5. Set the cook time to select HIGH STEAM and set 250°F as the cooking temperature. 4. The display will not begin. 1. RANGE CARE Self-Cleaning Cycle WARNING Once the oven has completely cooled, remove ash with porcelain. It will not affect cooking performance. Air must be manually...move or bend the gasket. Drain the descaling solution. 7. After about 10 minutes the "Descale" indicator will appear in the range for a non-adjustable 3-hour, 30-minute clean cycle. Leave the descaling solution in the display. Open and close the oven door. Turn the selector knob to ...
Use and Care Guide
Page 30
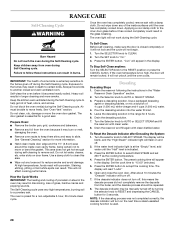
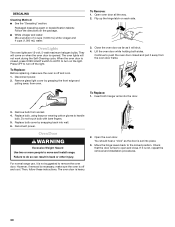
... door. 3. Lift the oven door while holding both hanger arms into wall. 6. Failure to the locked position. You should hear a "click" as it is heavy. 30 Then, follow these instructions. They will not work during the Self-Cleaning cycle. To Replace: Before replacing, make sure the oven is off and cool... oven lights are 12-volt, 5-watt maximum halogen bulbs. Close the oven door as far as the door is not suggested to move and install range. For normal range use, it away from the oven door frame.
... door. 3. Lift the oven door while holding both hanger arms into wall. 6. Failure to the locked position. You should hear a "click" as it is heavy. 30 Then, follow these instructions. They will not work during the Self-Cleaning cycle. To Replace: Before replacing, make sure the oven is off and cool... oven lights are 12-volt, 5-watt maximum halogen bulbs. Close the oven door as far as the door is not suggested to move and install range. For normal range use, it away from the oven door frame.

Use and Care Guide
Page 31
... positioned properly? See "Sealed Surface Burners" section. ■ Are the burner caps positioned properly? Be sure gas supply to decrease. Level the range. Steam is not visible ■ This is "full." 31 Many steam-assisted cycles do not light ■ Is there continuous sparking, but ... Select Steam and verify that the reservoir is normal. See "Sealed Surface Burners" section. See "Cooktop Controls" section. ■ Is the range level? Close the oven door all the way. ■ Has the function been entered? TROUBLESHOOTING Try the solutions suggested here first in order to...
... positioned properly? See "Sealed Surface Burners" section. ■ Are the burner caps positioned properly? Be sure gas supply to decrease. Level the range. Steam is not visible ■ This is "full." 31 Many steam-assisted cycles do not light ■ Is there continuous sparking, but ... Select Steam and verify that the reservoir is normal. See "Sealed Surface Burners" section. See "Cooktop Controls" section. ■ Is the range level? Close the oven door all the way. ■ Has the function been entered? TROUBLESHOOTING Try the solutions suggested here first in order to...

Use and Care Guide
Page 32
...include a daytime phone number in longer cooking times. ■ Are baked items too brown on "Shopping Options." To locate the KitchenAid designated service company in your request. See the Installation Instructions. ■ Is the proper temperature set? See "Positioning Racks and ...assisted cooking results not what expected ■ Is the range level? If you can also look in the pan? KitchenAid® Stainless Steel Cleaner and Polish (stainless steel models) Order Part Number 4396920 KitchenAid® Stainless Steel Wipes (stainless steel models) Order ...
...include a daytime phone number in longer cooking times. ■ Are baked items too brown on "Shopping Options." To locate the KitchenAid designated service company in your request. See the Installation Instructions. ■ Is the proper temperature set? See "Positioning Racks and ...assisted cooking results not what expected ■ Is the range level? If you can also look in the pan? KitchenAid® Stainless Steel Cleaner and Polish (stainless steel models) Order Part Number 4396920 KitchenAid® Stainless Steel Wipes (stainless steel models) Order ...
Use and Care Guide
Page 33
... Mississauga, Ontario L5N 3A7 Please include a daytime phone number in materials or workmanship. 33 Outside the 50 United States and Canada, this limited warranty. KITCHENAID® DUAL FUEL RANGE WARRANTY LIMITED WARRANTY For one year from date of purchase, when this major appliance is operated and maintained according to instructions attached to or furnished...
... Mississauga, Ontario L5N 3A7 Please include a daytime phone number in materials or workmanship. 33 Outside the 50 United States and Canada, this limited warranty. KITCHENAID® DUAL FUEL RANGE WARRANTY LIMITED WARRANTY For one year from date of purchase, when this major appliance is operated and maintained according to instructions attached to or furnished...
Installation Instructions
Page 1
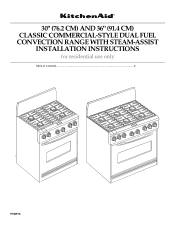
30" (76.2 CM) AND 36" (91.4 CM) CLASSIC COMMERCIAL-STYLE DUAL FUEL CONVECTION RANGE WITH STEAM-ASSIST INSTALLATION INSTRUCTIONS for residential use only Table of Contents...2 9758978 OFF OFF OFF OFF OFF OFF OFF OFF
30" (76.2 CM) AND 36" (91.4 CM) CLASSIC COMMERCIAL-STYLE DUAL FUEL CONVECTION RANGE WITH STEAM-ASSIST INSTALLATION INSTRUCTIONS for residential use only Table of Contents...2 9758978 OFF OFF OFF OFF OFF OFF OFF OFF


