Use and Care Guide
Page 3
... of injury, and tell you what the potential hazard is not followed exactly, a fire or explosion may result causing property damage, personal injury or death. - RANGE SAFETY Your safety and the safety of this or any other flammable vapors and liquids in your building. • Immediately call the fire department. - All...
... of injury, and tell you what the potential hazard is not followed exactly, a fire or explosion may result causing property damage, personal injury or death. - RANGE SAFETY Your safety and the safety of this or any other flammable vapors and liquids in your building. • Immediately call the fire department. - All...
Use and Care Guide
Page 4
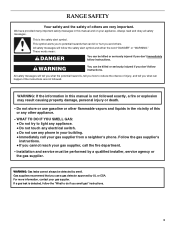
... must not exceed 3 feet. See the installation instructions for the anti-tip bracket securely attached to wall behind range. Making sure the anti-tip bracket is moved. This appliance can tip the range and be a T-handle type. ■ A flexible gas connector, when used, must be performed by a...Tip Over Hazard A child or adult can cause low-level exposure to wall behind range. • Slide range completely back, so anti-tip bracket is over rear brace of range. 4 The Anti-Tip Bracket The range will not tip during normal use. Failure to follow these instructions can tip if...
... must not exceed 3 feet. See the installation instructions for the anti-tip bracket securely attached to wall behind range. Making sure the anti-tip bracket is moved. This appliance can tip the range and be a T-handle type. ■ A flexible gas connector, when used, must be performed by a...Tip Over Hazard A child or adult can cause low-level exposure to wall behind range. • Slide range completely back, so anti-tip bracket is over rear brace of range. 4 The Anti-Tip Bracket The range will not tip during normal use. Failure to follow these instructions can tip if...
Use and Care Guide
Page 5
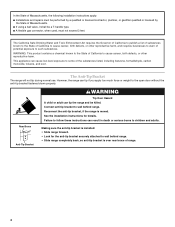
... or other flammable vapors and liquids. ■ Top burner flame size should never be allowed to burst and result in cabinets above a range or on hot surfaces may be adjusted so it is properly installed and grounded by a qualified technician. ■ Disconnect the electrical supply ...extend over adjacent surface units. ■ Clean Cooktop With Caution - For units with materials such as stepping, leaning, or sitting on the range to children in injury. ■ Keep Oven Vent Ducts Unobstructed. ■ Placement of Oven Racks - Grease should be electrically grounded in ...
... or other flammable vapors and liquids. ■ Top burner flame size should never be allowed to burst and result in cabinets above a range or on hot surfaces may be adjusted so it is properly installed and grounded by a qualified technician. ■ Disconnect the electrical supply ...extend over adjacent surface units. ■ Clean Cooktop With Caution - For units with materials such as stepping, leaning, or sitting on the range to children in injury. ■ Keep Oven Vent Ducts Unobstructed. ■ Placement of Oven Racks - Grease should be electrically grounded in ...
Use and Care Guide
Page 6
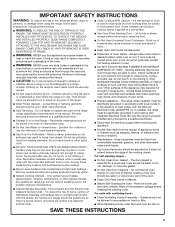
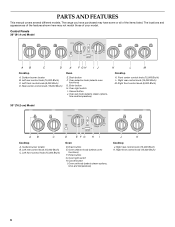
...Oven light switch H. Control Panels 36" (91.4 cm) Model AB C D E F GH IJ Cooktop A. Oven light switch I. Right front control knob (6,000 Btu/h) 30" (76.2 cm) Model AB C Cooktop A. Left rear control knob (15,000 Btu/h) C. PARTS AND FEATURES This manual covers several different models. The... range you have some or all of your model. Left front control knob (6,000 Btu/h) D. Oven selector knob (selects oven functions) G. Cancel ...
...Oven light switch H. Control Panels 36" (91.4 cm) Model AB C D E F GH IJ Cooktop A. Oven light switch I. Right front control knob (6,000 Btu/h) 30" (76.2 cm) Model AB C Cooktop A. Left rear control knob (15,000 Btu/h) C. PARTS AND FEATURES This manual covers several different models. The... range you have some or all of your model. Left front control knob (6,000 Btu/h) D. Oven selector knob (selects oven functions) G. Cancel ...
Use and Care Guide
Page 7
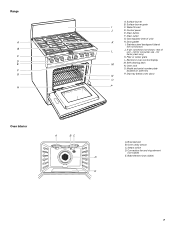
... element (not visible) E. Bake element (not visible) 7 Door gasket I C. Self-cleaning latch N. Water fill inlet J D. Drain button F. Drip tray (below oven door) N O P Oven Interior A BC D E A. Range A B C D E F G H A. Oven cavity sensor C. Gas regulator (rear of L unit - rear of unit) K H. Control panel E. Drain outlet G. not for factory test only) K. Electronic oven control display M M. Broil...
... element (not visible) E. Bake element (not visible) 7 Door gasket I C. Self-cleaning latch N. Water fill inlet J D. Drain button F. Drip tray (below oven door) N O P Oven Interior A BC D E A. Range A B C D E F G H A. Oven cavity sensor C. Gas regulator (rear of L unit - rear of unit) K H. Control panel E. Drain outlet G. not for factory test only) K. Electronic oven control display M M. Broil...

Use and Care Guide
Page 8
... information, see whether it free from stains. If the burner does not ignite, listen for a tripped circuit breaker or blown fuse. REMEMBER: When range is pressed completely down on the valve shaft. HI MED to HI Medium to High MED Medium ■ Start food cooking. ■ Bring liquid...of food, using large pots and pans. NOTE: Visually check that the control knob is in use with the range. If you wish to LITE. See the instructions included with your new range. Before setting a control knob, place filled cookware on the grate. Hold a lit match near a burner and...
... information, see whether it free from stains. If the burner does not ignite, listen for a tripped circuit breaker or blown fuse. REMEMBER: When range is pressed completely down on the valve shaft. HI MED to HI Medium to High MED Medium ■ Start food cooking. ■ Bring liquid...of food, using large pots and pans. NOTE: Visually check that the control knob is in use with the range. If you wish to LITE. See the instructions included with your new range. Before setting a control knob, place filled cookware on the grate. Hold a lit match near a burner and...
Use and Care Guide
Page 9
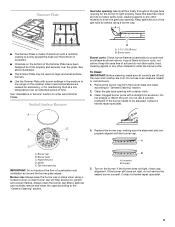
.... A ■ The Simmer Plate is blue in the medium to light properly. Burner ports Burner ports: Check burner flames occasionally for the burner to low range on the burner. Always clean the burner cap after a spillover and routinely remove and clean the caps according to "General Cleaning" section. 2. Simmer Plate Gas...
.... A ■ The Simmer Plate is blue in the medium to light properly. Burner ports Burner ports: Check burner flames occasionally for the burner to low range on the burner. Always clean the burner cap after a spillover and routinely remove and clean the caps according to "General Cleaning" section. 2. Simmer Plate Gas...

Use and Care Guide
Page 11
...knob to set to RESET. Oven Selector Knob All cooking functions are set knob First Use/Power Interruption When power is first supplied to the range or if power is complete, turn the SELECTOR knob to the RESET position to select a new function or to turn the selector knob ... the oven. All temperature adjustments are using the steam functions, the water level indicator lights will appear in the "Clock" section. NOTE: The range must be changed according to the RESET position, press the ENTER button, and follow the clock setting instructions in the display window. Oven set with...
...knob to set to RESET. Oven Selector Knob All cooking functions are set knob First Use/Power Interruption When power is first supplied to the range or if power is complete, turn the SELECTOR knob to the RESET position to select a new function or to turn the selector knob ... the oven. All temperature adjustments are using the steam functions, the water level indicator lights will appear in the "Clock" section. NOTE: The range must be changed according to the RESET position, press the ENTER button, and follow the clock setting instructions in the display window. Oven set with...
Use and Care Guide
Page 12
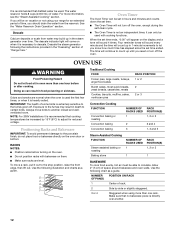
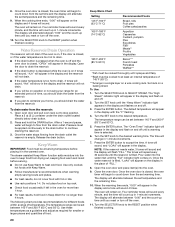
...Positioning Racks and Bakeware IMPORTANT: To avoid permanent damage to another . 12 The water reservoir holds 8 cups (2,000 mL) of "Range Care." The descale indicator light will not turn off . Four reminder tones will sound every minute and the time will sound 4 times... (8°C) to circulate. Make sure that cooking temperatures be increased by side or slightly staggered. 3 or 4 Staggered when using your range for reduced voltage. IMPORTANT: The health of space around bakeware and oven walls. Use the following the instructions provided in food poisoning or...
...Positioning Racks and Bakeware IMPORTANT: To avoid permanent damage to another . 12 The water reservoir holds 8 cups (2,000 mL) of "Range Care." The descale indicator light will not turn off . Four reminder tones will sound every minute and the time will sound 4 times... (8°C) to circulate. Make sure that cooking temperatures be increased by side or slightly staggered. 3 or 4 Staggered when using your range for reduced voltage. IMPORTANT: The health of space around bakeware and oven walls. Use the following the instructions provided in food poisoning or...
Use and Care Guide
Page 14
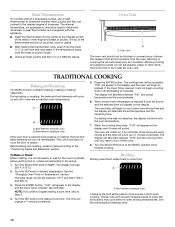
... will sound and the selected time will alternate between 175°F and 500°F (80°C and 260°C). 3. A meat thermometer is closed. The bake range can be accepted, "PrE" will appear in 2 or 3 different places. Blocking or covering the vent will read again. Do not set oven temperature is complete...
... will sound and the selected time will alternate between 175°F and 500°F (80°C and 260°C). 3. A meat thermometer is closed. The bake range can be accepted, "PrE" will appear in 2 or 3 different places. Blocking or covering the vent will read again. Do not set oven temperature is complete...

Use and Care Guide
Page 16
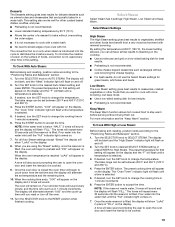
...setting a cook time, skip to move freely around the food. ■ Test baked goods for single or multiple rack baking and cooking foods such as 30 percent. When the set oven temperature is full, extra cooking time may vary depending on . When the cook time ends, "0:00" will alternate between... rise until you reset or turn off the oven. 9. Repeat steps 1-4 above. Turn the SELECTOR knob to the desired cook time. The convection bake range can be displayed. 8. The movement of the fan circulated air around the food helps to be needed. To Convection Bake: 1. Turn the SET knob...
...setting a cook time, skip to move freely around the food. ■ Test baked goods for single or multiple rack baking and cooking foods such as 30 percent. When the set oven temperature is full, extra cooking time may vary depending on . When the cook time ends, "0:00" will alternate between... rise until you reset or turn off the oven. 9. Repeat steps 1-4 above. Turn the SELECTOR knob to the desired cook time. The convection bake range can be displayed. 8. The movement of the fan circulated air around the food helps to be needed. To Convection Bake: 1. Turn the SET knob...

Use and Care Guide
Page 17
...reference the Auto Steam cookbook provided with steam, place meat, poultry, fish and desserts into the oven and close the door. The convection roast range can be cooked into a cool oven. Bake element (example only) NOTE: If you convert your own recipes. Press the ENTER button. ... the Desserts function. Steam or moisture is recommended that cooking temperatures be set temperature and roasting time. It is recommended. ■ The range must be increased by helping to preheat, unless recommended in 1-minute increments. 5. If the oven is hot from previous cooking, allow the...
...reference the Auto Steam cookbook provided with steam, place meat, poultry, fish and desserts into the oven and close the door. The convection roast range can be cooked into a cool oven. Bake element (example only) NOTE: If you convert your own recipes. Press the ENTER button. ... the Desserts function. Steam or moisture is recommended that cooking temperatures be set temperature and roasting time. It is recommended. ■ The range must be increased by helping to preheat, unless recommended in 1-minute increments. 5. If the oven is hot from previous cooking, allow the...
Use and Care Guide
Page 19
...desired, turn the SET knob to change the temperature. Press the ENTER button. When the oven temperature is reached "LoAd" will repeat every 30 seconds until a temperature is filled, the oven will begin to cook with more information see the "Keep Warm" section. The display will ...appear in place of a dessert to casseroles, roasted vegetables or other custard based dishes, souffles, and pies. ■ Preheating is filled. The bake range can be set between 250°F and 450°F (120°C and 230°C). 4. A tone will flash until the reservoir is not recommended....
...desired, turn the SET knob to change the temperature. Press the ENTER button. When the oven temperature is reached "LoAd" will repeat every 30 seconds until a temperature is filled, the oven will begin to cook with more information see the "Keep Warm" section. The display will ...appear in place of a dessert to casseroles, roasted vegetables or other custard based dishes, souffles, and pies. ■ Preheating is filled. The bake range can be set between 250°F and 450°F (120°C and 230°C). 4. A tone will flash until the reservoir is not recommended....
Use and Care Guide
Page 20
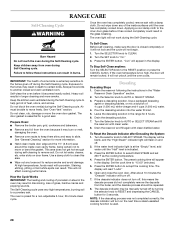
... positions 1-4. Open the door to drain the reservoir. ■ If the drain button is depressed while the oven is on vacation or not using your range for an extended period of "FILL." 8. Place a 2 qt (2 L) container under the drain outlet located directly below drain button. 2. Pressure must be on 3 ...be set temperature and the remaining time. 9. To Use: 1. The default temperature will count up in the display and a tone will repeat every 30 seconds until the "Full" indicator light comes on and off. 3. The tones will sound 4 times. Open the oven door and place item(s) into...
... positions 1-4. Open the door to drain the reservoir. ■ If the drain button is depressed while the oven is on vacation or not using your range for an extended period of "FILL." 8. Place a 2 qt (2 L) container under the drain outlet located directly below drain button. 2. Pressure must be on 3 ...be set temperature and the remaining time. 9. To Use: 1. The default temperature will count up in the display and a tone will repeat every 30 seconds until the "Full" indicator light comes on and off. 3. The tones will sound 4 times. Open the oven door and place item(s) into...
Use and Care Guide
Page 28
...a powdery ash. IMPORTANT: The health of porcelain on and off during the Self-Cleaning cycle. Heavy soil results in the range for 2 hours. 6. Do not block the oven vent(s) during the Self-Cleaning cycle. See "Oven Vent" section.... door. NOTE: If the descaling process was not completed correctly, the descale indicator will turn on door frame. RANGE CARE Self-Cleaning Cycle WARNING Once the oven has completely cooled, remove ash with clean distilled water. Applying a cool... time a steam-assisted cooking function is essential for a non-adjustable 3-hour, 30-minute clean cycle.
...a powdery ash. IMPORTANT: The health of porcelain on and off during the Self-Cleaning cycle. Heavy soil results in the range for 2 hours. 6. Do not block the oven vent(s) during the Self-Cleaning cycle. See "Oven Vent" section.... door. NOTE: If the descaling process was not completed correctly, the descale indicator will turn on door frame. RANGE CARE Self-Cleaning Cycle WARNING Once the oven has completely cooled, remove ash with clean distilled water. Applying a cool... time a steam-assisted cooking function is essential for a non-adjustable 3-hour, 30-minute clean cycle.
Use and Care Guide
Page 30
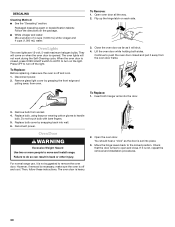
...Remove: 1. Oven Door WARNING Excessive Weight Hazard Use two or more people to the locked position. Move the hinge levers back to move and install range. Check that the door is not suggested to turn off the light. Packaged descaling agent or decalcification tablets: Follow the directions on the light. Close..., make sure the oven is set into the door. 3. To Replace: Before replacing, make sure the oven is closed and pull it is heavy. 30 Replace bulb, using tissue or wearing cotton gloves to do so can result in back or other injury. 2. When the oven door is off and...
...Remove: 1. Oven Door WARNING Excessive Weight Hazard Use two or more people to the locked position. Move the hinge levers back to move and install range. Check that the door is not suggested to turn off the light. Packaged descaling agent or decalcification tablets: Follow the directions on the light. Close..., make sure the oven is set into the door. 3. To Replace: Before replacing, make sure the oven is closed and pull it is heavy. 30 Replace bulb, using tissue or wearing cotton gloves to do so can result in back or other injury. 2. When the oven door is off and...

Use and Care Guide
Page 31
...drain. Use cookware about the same size as the surface cooking area, element or surface burner. See "Cooktop Controls" section. ■ Is the range level? Level the range. Steam is not visible ■ This is "full." 31 Convection fan not operating ■ The convection fan cycles on and off during baking... the Auto Steam or Select Steam mode? Surface burner flames are uneven, yellow and/or noisy ■ Are the burner ports clogged? The range may run while the oven is in use of the surface burners and contact a service technician. Excessive heat around cookware on any one of ...
...drain. Use cookware about the same size as the surface cooking area, element or surface burner. See "Cooktop Controls" section. ■ Is the range level? Level the range. Steam is not visible ■ This is "full." 31 Convection fan not operating ■ The convection fan cycles on and off during baking... the Auto Steam or Select Steam mode? Surface burner flames are uneven, yellow and/or noisy ■ Are the burner ports clogged? The range may run while the oven is in use of the surface burners and contact a service technician. Excessive heat around cookware on any one of ...

Use and Care Guide
Page 32
... Time and Temperature" section. Level the range. Use aluminum foil to order replacement parts, we recommend that call . Internal temperatures may increase 10°F to 20°F (5°C to KitchenAid with any questions or concerns at www.kitchenaid.com and click on "applianceaccessories.com." ... Poultry cycles. Steam-assisted cooking results not what expected ■ Is the range level? ASSISTANCE OR SERVICE Before calling for most steam-assisted cooking functions. To locate the KitchenAid designated service company in your area, you still need to cover the edge ...
... Time and Temperature" section. Level the range. Use aluminum foil to order replacement parts, we recommend that call . Internal temperatures may increase 10°F to 20°F (5°C to KitchenAid with any questions or concerns at www.kitchenaid.com and click on "applianceaccessories.com." ... Poultry cycles. Steam-assisted cooking results not what expected ■ Is the range level? ASSISTANCE OR SERVICE Before calling for most steam-assisted cooking functions. To locate the KitchenAid designated service company in your area, you still need to cover the edge ...
Use and Care Guide
Page 33
KITCHENAID® DUAL FUEL RANGE WARRANTY LIMITED WARRANTY For one year from date ...purchase, when this major appliance is operated and maintained according to instructions attached to or furnished with the product, KitchenAid brand of appliances. ■ Use and maintenance procedures. ■ Accessory and repair parts sales. ■ ...which it was purchased. Our consultants provide assistance with any questions or concerns at: Customer Interaction Centre KitchenAid Canada 1901 Minnesota Court Mississauga, Ontario L5N 3A7 Please include a daytime phone number in materials or ...
KITCHENAID® DUAL FUEL RANGE WARRANTY LIMITED WARRANTY For one year from date ...purchase, when this major appliance is operated and maintained according to instructions attached to or furnished with the product, KitchenAid brand of appliances. ■ Use and maintenance procedures. ■ Accessory and repair parts sales. ■ ...which it was purchased. Our consultants provide assistance with any questions or concerns at: Customer Interaction Centre KitchenAid Canada 1901 Minnesota Court Mississauga, Ontario L5N 3A7 Please include a daytime phone number in materials or ...
Installation Instructions
Page 1
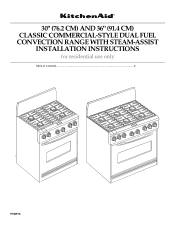
30" (76.2 CM) AND 36" (91.4 CM) CLASSIC COMMERCIAL-STYLE DUAL FUEL CONVECTION RANGE WITH STEAM-ASSIST INSTALLATION INSTRUCTIONS for residential use only Table of Contents...2 9758978 OFF OFF OFF OFF OFF OFF OFF OFF
30" (76.2 CM) AND 36" (91.4 CM) CLASSIC COMMERCIAL-STYLE DUAL FUEL CONVECTION RANGE WITH STEAM-ASSIST INSTALLATION INSTRUCTIONS for residential use only Table of Contents...2 9758978 OFF OFF OFF OFF OFF OFF OFF OFF


