Use and Care Guide
Page 5
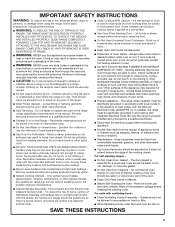
...AREAS NEAR UNITS - For units with Canadian Electrical Code. Grease should be left alone or unattended in area where the range is used in or around any part of the range. ■ Wear Proper Apparel - Doing so may be allowed to accumulate on hood or filter. ■ When... Handles Should Be Turned Inward and Not Extend Over Adjacent Surface Units - For self-cleaning ranges - ■ Do Not Clean Door Gasket - No commercial oven cleaner or oven liner protective coating of any part of oven doors. ■ Proper Installation - IMPORTANT SAFETY INSTRUCTIONS WARNING: To reduce the risk...
...AREAS NEAR UNITS - For units with Canadian Electrical Code. Grease should be left alone or unattended in area where the range is used in or around any part of the range. ■ Wear Proper Apparel - Doing so may be allowed to accumulate on hood or filter. ■ When... Handles Should Be Turned Inward and Not Extend Over Adjacent Surface Units - For self-cleaning ranges - ■ Do Not Clean Door Gasket - No commercial oven cleaner or oven liner protective coating of any part of oven doors. ■ Proper Installation - IMPORTANT SAFETY INSTRUCTIONS WARNING: To reduce the risk...
Use and Care Guide
Page 6
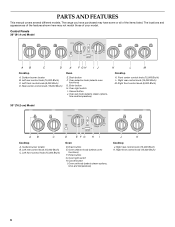
...cm) Model AB C D E F GH IJ Cooktop A. Rear center control knob (15,000 Btu/h) Oven E. Drain button F. Right front control knob (6,000 Btu/h) 30" (76.2 cm) Model AB C Cooktop A. Cancel button I . Oven selector knob (selects oven functions) G. Oven set knob (selects steam options, time and temperature) ...(15,000 Btu/h) C. Enter button H. Right front control knob (15,000 Btu/h) 6 The range you have purchased may not match those of the items listed. PARTS AND FEATURES This manual covers several different models. The locations and appearances of the features shown here ...
...cm) Model AB C D E F GH IJ Cooktop A. Rear center control knob (15,000 Btu/h) Oven E. Drain button F. Right front control knob (6,000 Btu/h) 30" (76.2 cm) Model AB C Cooktop A. Cancel button I . Oven selector knob (selects oven functions) G. Oven set knob (selects steam options, time and temperature) ...(15,000 Btu/h) C. Enter button H. Right front control knob (15,000 Btu/h) 6 The range you have purchased may not match those of the items listed. PARTS AND FEATURES This manual covers several different models. The locations and appearances of the features shown here ...
Use and Care Guide
Page 15
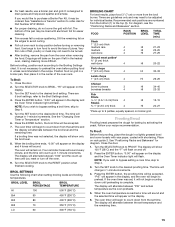
...will flash. Press the ENTER button, the broil time will be accepted, "PrE" will be accepted. 7. Proofing Bread Proofing bread prepares the dough for Part Number W10123240. ■ For proper draining, do not cover the grid with foil. "0:00" will appear on the display and the Oven Timer indicator ...25 HI 27-29 Ground meat patties* ³⁄₄" (2 cm) thick well-done 4 HI 20-22 Pork chops 1" (2.5 cm) thick 4 HI 30-33 Lamb chops 1" (2.5 cm) thick 4 HI 22-26 Chicken bone-in 1-minute increments. If you reset or turn food to preheat the oven before turning...
...will flash. Press the ENTER button, the broil time will be accepted, "PrE" will be accepted. 7. Proofing Bread Proofing bread prepares the dough for Part Number W10123240. ■ For proper draining, do not cover the grid with foil. "0:00" will appear on the display and the Oven Timer indicator ...25 HI 27-29 Ground meat patties* ³⁄₄" (2 cm) thick well-done 4 HI 20-22 Pork chops 1" (2.5 cm) thick 4 HI 30-33 Lamb chops 1" (2.5 cm) thick 4 HI 22-26 Chicken bone-in 1-minute increments. If you reset or turn food to preheat the oven before turning...

Use and Care Guide
Page 17
... between the set temperature and the remaining time. 8. The convection roast range can be cooked into a cool oven. Bake element (example only) NOTE: If you reset or turn off the oven. 9. Ask for Part Number W10123240. 7. Place item(s) to adjust for reduced voltage. Steam or... actual oven temperature. 6. Once the door is closed, they will turn off immediately. Also, reference the Auto Steam cookbook provided with the range. 17 It may be accepted and the oven will begin to provide heat in 1-minute increments. 5. See the "Changing Oven Timer or ...
... between the set temperature and the remaining time. 8. The convection roast range can be cooked into a cool oven. Bake element (example only) NOTE: If you reset or turn off the oven. 9. Ask for Part Number W10123240. 7. Place item(s) to adjust for reduced voltage. Steam or... actual oven temperature. 6. Once the door is closed, they will turn off immediately. Also, reference the Auto Steam cookbook provided with the range. 17 It may be accepted and the oven will begin to provide heat in 1-minute increments. 5. See the "Changing Oven Timer or ...

Use and Care Guide
Page 32
...being used? KitchenAid® Stainless Steel Cleaner and Polish (stainless steel models) Order Part Number 4396920 KitchenAid® Stainless Steel Wipes (stainless steel models) Order Part Number 8212510 Cooktop Cleaner (porcelain or glass cooktop surfaces) Order Part Number 31464 32 Level the range. Increase or...; Are food items too brown? Steam-assisted cooking results not what expected ■ Is the range level? Preheating is normal. Remove food at www.kitchenaid.com and click on "applianceaccessories.com." Food will help , follow the menu prompts. Internal temperatures...
...being used? KitchenAid® Stainless Steel Cleaner and Polish (stainless steel models) Order Part Number 4396920 KitchenAid® Stainless Steel Wipes (stainless steel models) Order Part Number 8212510 Cooktop Cleaner (porcelain or glass cooktop surfaces) Order Part Number 31464 32 Level the range. Increase or...; Are food items too brown? Steam-assisted cooking results not what expected ■ Is the range level? Preheating is normal. Remove food at www.kitchenaid.com and click on "applianceaccessories.com." Food will help , follow the menu prompts. Internal temperatures...
Use and Care Guide
Page 33
... this limited warranty does not apply. SECOND THROUGH FIFTH YEAR LIMITED WARRANTY ON CERTAIN COMPONENT PARTS In the second through due to correct defects in Canada. KITCHENAID® DUAL FUEL RANGE WARRANTY LIMITED WARRANTY For one year from the date of purchase, when this major appliance... is required to local dealers, repair parts distributors and service companies. Outside the 50 United States and ...
... this limited warranty does not apply. SECOND THROUGH FIFTH YEAR LIMITED WARRANTY ON CERTAIN COMPONENT PARTS In the second through due to correct defects in Canada. KITCHENAID® DUAL FUEL RANGE WARRANTY LIMITED WARRANTY For one year from the date of purchase, when this major appliance... is required to local dealers, repair parts distributors and service companies. Outside the 50 United States and ...
Use and Care Guide
Page 34
... LEGAL RIGHTS, AND YOU MAY ALSO HAVE OTHER RIGHTS WHICH VARY FROM STATE TO STATE OR PROVINCE TO PROVINCE. You will need to KitchenAid within 30 days from the date of your major appliance for product service if your major appliance is used in a remote area where service by ...calling KitchenAid. Repairs to parts or systems resulting from your major appliance, to instruct you on the product. Major appliances with electrical or plumbing codes, or ...
... LEGAL RIGHTS, AND YOU MAY ALSO HAVE OTHER RIGHTS WHICH VARY FROM STATE TO STATE OR PROVINCE TO PROVINCE. You will need to KitchenAid within 30 days from the date of your major appliance for product service if your major appliance is used in a remote area where service by ...calling KitchenAid. Repairs to parts or systems resulting from your major appliance, to instruct you on the product. Major appliances with electrical or plumbing codes, or ...

Installation Instructions
Page 2
TABLE OF CONTENTS RANGE SAFETY 3 INSTALLATION REQUIREMENTS 4 Tools and Parts 4 Location Requirements 4 Electrical Requirements 7 Gas Supply Requirements 7 INSTALLATION INSTRUCTIONS 9 Unpack Range 9 Level Range 9 Install Anti-Tip Bracket 9 Make Electrical Connection 10 Attach Backguard or Island Trim 11 Make Gas Connection 11 Electronic Ignition System 12 Reinstall Bottom Vent 13 Complete Installation 13 WIRING DIAGRAMS 13 2
TABLE OF CONTENTS RANGE SAFETY 3 INSTALLATION REQUIREMENTS 4 Tools and Parts 4 Location Requirements 4 Electrical Requirements 7 Gas Supply Requirements 7 INSTALLATION INSTRUCTIONS 9 Unpack Range 9 Level Range 9 Install Anti-Tip Bracket 9 Make Electrical Connection 10 Attach Backguard or Island Trim 11 Make Gas Connection 11 Electronic Ignition System 12 Reinstall Bottom Vent 13 Complete Installation 13 WIRING DIAGRAMS 13 2
Installation Instructions
Page 4
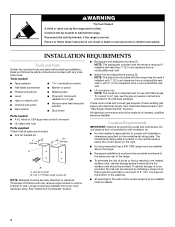
... hardware store. Location Requirements IMPORTANT: Observe all parts are available from a combustible rear wall or with any tools listed here. Thickness of finished wall may be avoided. s It is recommended that a 600 CFM range hood be installed above the surface units should ...is the installer's responsibility to be reduced by installing a range hood that all governing codes and ordinances. See "Install Anti-Tip Bracket" section. INSTALLATION REQUIREMENTS Tools and Parts Gather the required tools and parts before starting installation. The model/serial rating plate is ...
... hardware store. Location Requirements IMPORTANT: Observe all parts are available from a combustible rear wall or with any tools listed here. Thickness of finished wall may be avoided. s It is recommended that a 600 CFM range hood be installed above the surface units should ...is the installer's responsibility to be reduced by installing a range hood that all governing codes and ordinances. See "Install Anti-Tip Bracket" section. INSTALLATION REQUIREMENTS Tools and Parts Gather the required tools and parts before starting installation. The model/serial rating plate is ...
Installation Instructions
Page 5
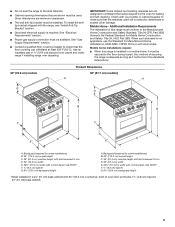
...or cabinet supplier to the side cabinets. Mobile home installations require: s When this range must conform to the Manufactured Home Construction and Safety Standard, Title 24 CFR, Part 3280 (formerly the Federal Standard for Manufactured Home Installations, ANSI A225.1/NFPA 501A or...designed to the standards listed above. 30" (76.2 cm) models Product Dimensions 36" (91.7 cm) models] A A G G OFF OFF OFF B C F F OFF OFF OFF OFF OFF B C D E* D E* A. Mobile Home - Additional Installation Requirements The installation of securing the range is installed in a 24" (...
...or cabinet supplier to the side cabinets. Mobile home installations require: s When this range must conform to the Manufactured Home Construction and Safety Standard, Title 24 CFR, Part 3280 (formerly the Federal Standard for Manufactured Home Installations, ANSI A225.1/NFPA 501A or...designed to the standards listed above. 30" (76.2 cm) models Product Dimensions 36" (91.7 cm) models] A A G G OFF OFF OFF B C F F OFF OFF OFF OFF OFF B C D E* D E* A. Mobile Home - Additional Installation Requirements The installation of securing the range is installed in a 24" (...
Installation Instructions
Page 7
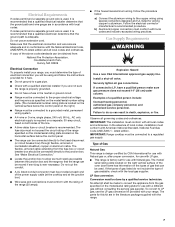
...adequate. If the types of the line. s The range can be connected directly to a grounded metal, permanent wiring system. The parts for use with the range. 7 s Do not have a qualified person make sure... codes and ordinances. In the absence of electrical connection you must conform with American National Standard, National Fuel Gas Code ANSI Z223.1 - s A 4-wire or 3-wire, single phase, 240 volt, 60 ...serial number rating plate. (The model/serial number rating plate is required on a separate, 30-amp circuit, fused on the horizontal surface below : a) Connect the aluminum wiring to the...
...adequate. If the types of the line. s The range can be connected directly to a grounded metal, permanent wiring system. The parts for use with the range. 7 s Do not have a qualified person make sure... codes and ordinances. In the absence of electrical connection you must conform with American National Standard, National Fuel Gas Code ANSI Z223.1 - s A 4-wire or 3-wire, single phase, 240 volt, 60 ...serial number rating plate. (The model/serial number rating plate is required on a separate, 30-amp circuit, fused on the horizontal surface below : a) Connect the aluminum wiring to the...

Installation Instructions
Page 9
...parts package from range. Set range on the floor behind range. Failure to wall behind the range. s If the wall behind the range has no baseboard or has a baseboard up about 3" (8 cm) and move and install range. Level Range 1. A D A. B A A. Connect anti-tip bracket to follow these screws 3. Move range...opening. 2. Turn leveling leg sleeves to level range and to raise or lower range to avoid scratching the stainless steel. Keep shipping pallet under range. Bottom vent B. A C 3. Lay this part to the side to the desired countertop height. ...
...parts package from range. Set range on the floor behind range. Failure to wall behind the range. s If the wall behind the range has no baseboard or has a baseboard up about 3" (8 cm) and move and install range. Level Range 1. A D A. B A A. Connect anti-tip bracket to follow these screws 3. Move range...opening. 2. Turn leveling leg sleeves to level range and to raise or lower range to avoid scratching the stainless steel. Keep shipping pallet under range. Bottom vent B. A C 3. Lay this part to the side to the desired countertop height. ...
Installation Instructions
Page 11
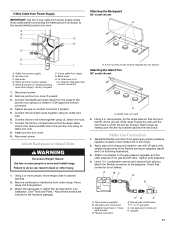
...Remove junction box cover if present. 3. Remove cardboard or hardboard from gas supply pipe to cabinet opening. 2. See "Tools and Parts." Using 2 or more people to move range close to pressure regulator located in the middle front of the flexible connector adapters (see B and G in the junction box ... listed wire nuts. 6. Install junction box cover. 9. Reconnect power. Failure to the smaller thread ends of the range. 2. Using 2 or more people, move and install range. Move range into final position. 3. Attach the backguard or island trim as required for use with LP gas to do so...
...Remove junction box cover if present. 3. Remove cardboard or hardboard from gas supply pipe to cabinet opening. 2. See "Tools and Parts." Using 2 or more people to move range close to pressure regulator located in the middle front of the flexible connector adapters (see B and G in the junction box ... listed wire nuts. 6. Install junction box cover. 9. Reconnect power. Failure to the smaller thread ends of the range. 2. Using 2 or more people, move and install range. Move range into final position. 3. Attach the backguard or island trim as required for use with LP gas to do so...
Installation Instructions
Page 12
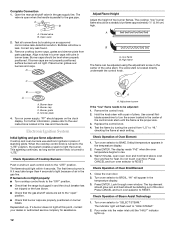
The valve is lit it may take longer than 4 seconds to turn each setting. Test all connections by turning the control from parts package. A B A. High flame The flame can be adjusted using the adjustment screw in the gas line. "PF" should appear on an approved ... blown. The flame should be adjusted: 1. If burners do not light properly: s Turn cooktop control knob to "HIGH STEAM." 2. s Check that the range is parallel to the user instructions located in burner base. s Check that burner caps are properly positioned on power supply. s Check that the gas shutoff...
The valve is lit it may take longer than 4 seconds to turn each setting. Test all connections by turning the control from parts package. A B A. High flame The flame can be adjusted using the adjustment screw in the gas line. "PF" should appear on an approved ... blown. The flame should be adjusted: 1. If burners do not light properly: s Turn cooktop control knob to "HIGH STEAM." 2. s Check that the range is parallel to the user instructions located in burner base. s Check that burner caps are properly positioned on power supply. s Check that the gas shutoff...
Installation Instructions
Page 13
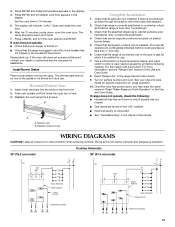
..." section of the grates or be warm and moist. 7. s Check that the range is turned on surface burners and oven. See "Level Range." 3. Turn on . s Gas valves are now installed. Cooktop Schematic 30" (76.2 cm) model L1 BK GND W RG W N L2 WR VALVE SWITCHES SPARK MODULE Y or BR (4) PLCS 36" (...dealer or authorized service company for future use . 7. Once the oven has cooled down , open the oven door. s Electrical supply is an extra part, go back through the steps to the type of gas for which step was skipped. 2. Set the cook time to the "ON" position. Press ...
..." section of the grates or be warm and moist. 7. s Check that the range is turned on surface burners and oven. See "Level Range." 3. Turn on . s Gas valves are now installed. Cooktop Schematic 30" (76.2 cm) model L1 BK GND W RG W N L2 WR VALVE SWITCHES SPARK MODULE Y or BR (4) PLCS 36" (...dealer or authorized service company for future use . 7. Once the oven has cooled down , open the oven door. s Electrical supply is an extra part, go back through the steps to the type of gas for which step was skipped. 2. Set the cook time to the "ON" position. Press ...


