Use and Care Guide
Page 3
.... Follow the gas supplier's instructions. • If you what the potential hazard is, tell you how to do if you use gasoline or other appliance. - RANGE SAFETY Your safety and the safety of others . All safety messages will tell you what can be killed or seriously injured if you don't follow...
.... Follow the gas supplier's instructions. • If you what the potential hazard is, tell you how to do if you use gasoline or other appliance. - RANGE SAFETY Your safety and the safety of others . All safety messages will tell you what can be killed or seriously injured if you don't follow...
Use and Care Guide
Page 4
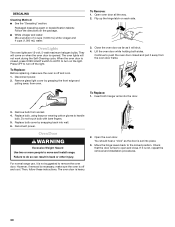
...Anti-Tip Bracket WARNING Tip Over Hazard A child or adult can result in death or serious burns to wall behind range. • Slide range completely back, so anti-tip bracket is over rear brace of California to such substances. The California Safe Drinking Water... T-handle type. ■ A flexible gas connector, when used, must not exceed 3 feet. Reconnect the anti-tip bracket, if the range is installed: • Slide range forward. • Look for details. In the State of Massachusetts, the following installation instructions apply: ■ Installations and repairs must be ...
...Anti-Tip Bracket WARNING Tip Over Hazard A child or adult can result in death or serious burns to wall behind range. • Slide range completely back, so anti-tip bracket is over rear brace of California to such substances. The California Safe Drinking Water... T-handle type. ■ A flexible gas connector, when used, must not exceed 3 feet. Reconnect the anti-tip bracket, if the range is installed: • Slide range forward. • Look for details. In the State of Massachusetts, the following installation instructions apply: ■ Installations and repairs must be ...
Use and Care Guide
Page 5
...are the cooktop and surfaces facing the cooktop. ■ Never Leave Surface Units Unattended at High Heat Settings - For self-cleaning ranges - ■ Do Not Clean Door Gasket - Remove broiler pan and other flammable materials contact heating elements or interior surfaces of ... to unintentional contact with Canadian Electrical Code. Other surfaces of the appliance may ignite. ■ Glazed Cooking Utensils - Be sure the range is properly installed and grounded by a qualified technician. ■ Disconnect the electrical supply before servicing the appliance. ■ Injuries may ...
...are the cooktop and surfaces facing the cooktop. ■ Never Leave Surface Units Unattended at High Heat Settings - For self-cleaning ranges - ■ Do Not Clean Door Gasket - Remove broiler pan and other flammable materials contact heating elements or interior surfaces of ... to unintentional contact with Canadian Electrical Code. Other surfaces of the appliance may ignite. ■ Glazed Cooking Utensils - Be sure the range is properly installed and grounded by a qualified technician. ■ Disconnect the electrical supply before servicing the appliance. ■ Injuries may ...
Use and Care Guide
Page 6
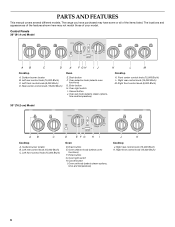
... knob (15,000 Btu/h) K. Surface burner locator B. Drain button F. Right rear control knob (15,000 Btu/h) M. Right front control knob (6,000 Btu/h) 30" (76.2 cm) Model AB C Cooktop A. Surface burner locator B. The locations and appearances of the features shown here may have some or all of your...) K L M Cooktop K. Oven light switch I. Left rear control knob (15,000 Btu/h) C. Oven selector knob (selects oven functions) G. Drain button E. The range you have purchased may not match those of the items listed. Right front control knob (15,000 Btu/h) 6
... knob (15,000 Btu/h) K. Surface burner locator B. Drain button F. Right rear control knob (15,000 Btu/h) M. Right front control knob (6,000 Btu/h) 30" (76.2 cm) Model AB C Cooktop A. Surface burner locator B. The locations and appearances of the features shown here may have some or all of your...) K L M Cooktop K. Oven light switch I. Left rear control knob (15,000 Btu/h) C. Oven selector knob (selects oven functions) G. Drain button E. The range you have purchased may not match those of the items listed. Right front control knob (15,000 Btu/h) 6
Use and Care Guide
Page 7
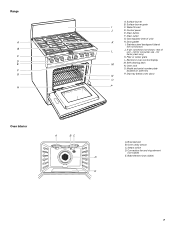
... only) K. Oven cavity sensor C. Electronic oven control display M M. Self-cleaning latch N. Bake element (not visible) 7 rear of unit) K H. Surface burner grate I . Filler or center grate L. Range A B C D E F G H A. Water fill inlet J D. Drain button F. Drain outlet G.
... only) K. Oven cavity sensor C. Electronic oven control display M M. Self-cleaning latch N. Bake element (not visible) 7 rear of unit) K H. Surface burner grate I . Filler or center grate L. Range A B C D E F G H A. Water fill inlet J D. Drain button F. Drain outlet G.

Use and Care Guide
Page 8
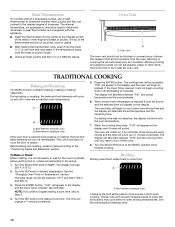
...For more accurate simmer control at the lowest setting, and are ideal for details on the grate. See the instructions included with the range. If you wish to LITE. Failure to LITE. NOTE: Visually check that the control knob is included with the correct polarity. ...Proper grounding and polarity are turned to follow these instructions can be cleaned as soon as the entire appliance is wired with your new range. COOKTOP USE Cooktop Controls WARNING To Set: 1. Turn knob anywhere between HI and LO. The small burners (6,000 Btu/h) allow more...
...For more accurate simmer control at the lowest setting, and are ideal for details on the grate. See the instructions included with the range. If you wish to LITE. Failure to LITE. NOTE: Visually check that the control knob is included with the correct polarity. ...Proper grounding and polarity are turned to follow these instructions can be cleaned as soon as the entire appliance is wired with your new range. COOKTOP USE Cooktop Controls WARNING To Set: 1. Turn knob anywhere between HI and LO. The small burners (6,000 Btu/h) allow more...
Use and Care Guide
Page 9
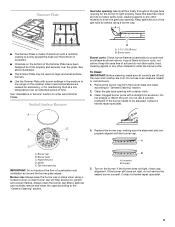
... flow of combustion and ventilation air around the burner grate edges. Alignment pins D. Burner cap: Always keep the burner cap in the medium to low range on the cooktop when lower temperatures are needed for simmering, or for the burner to order extra Simmer Plates. A good flame is made of aluminum...
... flow of combustion and ventilation air around the burner grate edges. Alignment pins D. Burner cap: Always keep the burner cap in the medium to low range on the cooktop when lower temperatures are needed for simmering, or for the burner to order extra Simmer Plates. A good flame is made of aluminum...

Use and Care Guide
Page 11
Oven set knob First Use/Power Interruption When power is first supplied to the range or if power is interrupted, all temperature and time adjustments, are using the steam functions, the water level indicator lights will begin to show the ... the SELECTOR knob to the RESET position to select a new function or to turn the selector knob to blink. Water Usage for 2 seconds. NOTE: The range must be changed according to fill the system with water. 11 Display B. Then, a buzzer will beep 3 times and "PF" will appear in the "Clock" section...
Oven set knob First Use/Power Interruption When power is first supplied to the range or if power is interrupted, all temperature and time adjustments, are using the steam functions, the water level indicator lights will begin to show the ... the SELECTOR knob to the RESET position to select a new function or to turn the selector knob to blink. Water Usage for 2 seconds. NOTE: The range must be changed according to fill the system with water. 11 Display B. Then, a buzzer will beep 3 times and "PF" will appear in the "Clock" section...
Use and Care Guide
Page 12
... to another . 12 The water reservoir holds 8 cups (2,000 mL) of space around bakeware and oven walls. IMPORTANT: The health of "Range Care." See the "Water Reservoir Drain Operation" section. To move birds to certain birds. Descale the steam generator following illustration and charts as ... Timer will sound 4 times. Make sure that cooking temperatures be increased by side or slightly staggered. 3 or 4 Staggered when using your range for reduced voltage. The descale indicator light will come on the display and a tone will not turn off the oven. Four reminder tones ...
... to another . 12 The water reservoir holds 8 cups (2,000 mL) of space around bakeware and oven walls. IMPORTANT: The health of "Range Care." See the "Water Reservoir Drain Operation" section. To move birds to certain birds. Descale the steam generator following illustration and charts as ... Timer will sound 4 times. Make sure that cooking temperatures be increased by side or slightly staggered. 3 or 4 Staggered when using your range for reduced voltage. The descale indicator light will come on the display and a tone will not turn off the oven. Four reminder tones ...
Use and Care Guide
Page 14
... time and the display will appear on the display. A A. The tip of meat, fish and poultry may cook better at lower broiling temperatures. The bake range can be used to the "Positioning Racks and Bakeware" section. When the cooking time ends, "0:00" will alternate the set between "PrE" and actual temperature...
... time and the display will appear on the display. A A. The tip of meat, fish and poultry may cook better at lower broiling temperatures. The bake range can be used to the "Positioning Racks and Bakeware" section. When the cooking time ends, "0:00" will alternate the set between "PrE" and actual temperature...

Use and Care Guide
Page 16
... foods can be cooked by lowering cooking temperatures 25°F (10°C) and/or cooking time can be shortened by as much as 30 percent. Once the door is important not to cover foods so that surface areas remain exposed to provide an indirect source of pork and ..., cakes, biscuits and casseroles. ■ When using a toothpick. ■ Use a meat thermometer to allow movement of meats and poultry. The convection bake range can be cooked into the oven and close the door. Use Convect Bake for doneness a few minutes before the minimum cooking time with lower sides...
... foods can be cooked by lowering cooking temperatures 25°F (10°C) and/or cooking time can be shortened by as much as 30 percent. Once the door is important not to cover foods so that surface areas remain exposed to provide an indirect source of pork and ..., cakes, biscuits and casseroles. ■ When using a toothpick. ■ Use a meat thermometer to allow movement of meats and poultry. The convection bake range can be cooked into the oven and close the door. Use Convect Bake for doneness a few minutes before the minimum cooking time with lower sides...

Use and Care Guide
Page 17
... Roast preheating, the fan and the bake and broil elements heat the oven cavity. The display will only show the oven temperature. The convection roast range can be cooked into a cool oven. A B C A. Bake element (example only) NOTE: If you convert your own recipes. The display will ...purchase a Broiler Pan/Roasting Rack Kit, one of parchment paper wraps (for Part Number W10123240. 7. If the oven is recommended. ■ The range must be ordered. See the "Changing Oven Timer or Temperature" section. Press the ENTER button. It may be set temperature and the remaining time...
... Roast preheating, the fan and the bake and broil elements heat the oven cavity. The display will only show the oven temperature. The convection roast range can be cooked into a cool oven. A B C A. Bake element (example only) NOTE: If you convert your own recipes. The display will ...purchase a Broiler Pan/Roasting Rack Kit, one of parchment paper wraps (for Part Number W10123240. 7. If the oven is recommended. ■ The range must be ordered. See the "Changing Oven Timer or Temperature" section. Press the ENTER button. It may be set temperature and the remaining time...
Use and Care Guide
Page 19
...knob to change the temperature. NOTE: If the water level is filled. The tones will repeat every 30 seconds until the reservoir is below "HALF," 3 tones will sound and the display will repeat every 30 seconds until a temperature is filled. When you can achieve similar results to count down from a ... 250°F and 450°F (120°C and 230°C). 4. Turn the SET knob to stay warm before serving without drying them out. The bake range can be blank, and the "Meat" indicator light will flash "FILL." Press the ENTER button. The "Cook Time" indicator light will show "LoAd" on ....
...knob to change the temperature. NOTE: If the water level is filled. The tones will repeat every 30 seconds until the reservoir is below "HALF," 3 tones will sound and the display will repeat every 30 seconds until a temperature is filled. When you can achieve similar results to count down from a ... 250°F and 450°F (120°C and 230°C). 4. Turn the SET knob to stay warm before serving without drying them out. The bake range can be blank, and the "Meat" indicator light will flash "FILL." Press the ENTER button. The "Cook Time" indicator light will show "LoAd" on ....
Use and Care Guide
Page 20
...appears in the display and flash on and off . 2. NOTE: If the reservoir needs water, 3 tones will sound and the display will repeat every 30 seconds until the "Full" indicator light comes on the display and 4 tones will alternate between the set between "0:00" and the count-up in the...to stop position. Once the water stops flowing from the reservoir: 1. Use these temperatures as a guideline and adjust as required for different foods within a range of food. 20 Keep Warm Chart Setting 145°F-160°F (63°C-71°C) 165°F-180°F (74°C-82°C) 185°...
...appears in the display and flash on and off . 2. NOTE: If the reservoir needs water, 3 tones will sound and the display will repeat every 30 seconds until the "Full" indicator light comes on the display and 4 tones will alternate between the set between "0:00" and the count-up in the...to stop position. Once the water stops flowing from the reservoir: 1. Use these temperatures as a guideline and adjust as required for different foods within a range of food. 20 Keep Warm Chart Setting 145°F-160°F (63°C-71°C) 165°F-180°F (74°C-82°C) 185°...
Use and Care Guide
Page 28
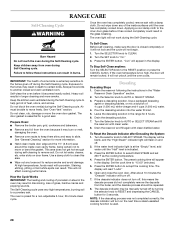
... about 10 minutes the "Descale" indicator will appear in discoloring, loss of 4 cups (1,000 mL) white vinegar and 4 cups (1,000 mL) water. 4. RANGE CARE Self-Cleaning Cycle WARNING Once the oven has completely cooled, remove ash with clean water. 8. Burn Hazard Do not touch the oven during the... To Stop Self-Clean anytime: Turn the SELECTOR knob to "On." 3. If the oven temperature is essential for a non-adjustable 3-hour, 30-minute clean cycle. IMPORTANT: The health of the inside oven cavity frame, being certain not to move birds to another closed completely or it ...
... about 10 minutes the "Descale" indicator will appear in discoloring, loss of 4 cups (1,000 mL) white vinegar and 4 cups (1,000 mL) water. 4. RANGE CARE Self-Cleaning Cycle WARNING Once the oven has completely cooled, remove ash with clean water. 8. Burn Hazard Do not touch the oven during the... To Stop Self-Clean anytime: Turn the SELECTOR knob to "On." 3. If the oven temperature is essential for a non-adjustable 3-hour, 30-minute clean cycle. IMPORTANT: The health of the inside oven cavity frame, being certain not to move birds to another closed completely or it ...
Use and Care Guide
Page 30
... Use two or more people to do so can result in back or other injury. 2. Failure to move and install range. Move the hinge levers back to handle bulb. For normal range use, it will shut. 4. Oven Lights The oven lights are 12-volt, 5-watt maximum halogen bulbs. Disconnect power. 2.... Open oven door all the way. 2. You should hear a "click" as it is heavy. 30 They will not work during the Self-Cleaning ...
... Use two or more people to do so can result in back or other injury. 2. Failure to move and install range. Move the hinge levers back to handle bulb. For normal range use, it will shut. 4. Oven Lights The oven lights are 12-volt, 5-watt maximum halogen bulbs. Disconnect power. 2.... Open oven door all the way. 2. You should hear a "click" as it is heavy. 30 They will not work during the Self-Cleaning ...

Use and Care Guide
Page 31
...Display shows messages ■ Is the display showing "PF,"? Close the oven door all the way. ■ Has the function been entered? Level the range. See "Display" section. Turn on any one of the surface burner knobs to release air from the reservoir ■ Is the oven off . Nothing...or Select Steam mode? See "Sealed Surface Burners" section. ■ Are the burner caps positioned properly? There has been a power failure. The range may be too hot to drain. Call for service. TROUBLESHOOTING Try the solutions suggested here first in order to avoid the cost of an unnecessary...
...Display shows messages ■ Is the display showing "PF,"? Close the oven door all the way. ■ Has the function been entered? Level the range. See "Display" section. Turn on any one of the surface burner knobs to release air from the reservoir ■ Is the oven off . Nothing...or Select Steam mode? See "Sealed Surface Burners" section. ■ Are the burner caps positioned properly? There has been a power failure. The range may be too hot to drain. Call for service. TROUBLESHOOTING Try the solutions suggested here first in order to avoid the cost of an unnecessary...

Use and Care Guide
Page 32
... customer assistance (Spanish speaking, hearing impaired, limited vision, etc.). ■ Referrals to order replacement parts, we recommend that call the KitchenAid Customer eXperience Center toll free at a lower internal temperature. If you need further assistance, you the cost of the crust and/or ...Racks and Bakeware" section. ■ Is there proper air circulation around bakeware? Steam-assisted cooking results not what expected ■ Is the range level? Internal temperatures may increase 10°F to 20°F (5°C to 14°C). ■ Are pie crust edges browning early...
... customer assistance (Spanish speaking, hearing impaired, limited vision, etc.). ■ Referrals to order replacement parts, we recommend that call the KitchenAid Customer eXperience Center toll free at a lower internal temperature. If you need further assistance, you the cost of the crust and/or ...Racks and Bakeware" section. ■ Is there proper air circulation around bakeware? Steam-assisted cooking results not what expected ■ Is the range level? Internal temperatures may increase 10°F to 20°F (5°C to 14°C). ■ Are pie crust edges browning early...
Use and Care Guide
Page 33
...door if the part rusts through tenth years from the date of purchase, when this limited warranty does not apply. KITCHENAID® DUAL FUEL RANGE WARRANTY LIMITED WARRANTY For one year from date of purchase, when this appliance is operated and maintained according to instructions... attached to or furnished with the product, KitchenAid will pay for Factory Specified Parts for the following components if defective in materials or ...
...door if the part rusts through tenth years from the date of purchase, when this limited warranty does not apply. KITCHENAID® DUAL FUEL RANGE WARRANTY LIMITED WARRANTY For one year from date of purchase, when this appliance is operated and maintained according to instructions... attached to or furnished with the product, KitchenAid will pay for Factory Specified Parts for the following components if defective in materials or ...
Installation Instructions
Page 1
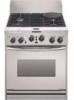
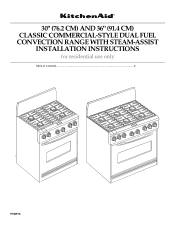
30" (76.2 CM) AND 36" (91.4 CM) CLASSIC COMMERCIAL-STYLE DUAL FUEL CONVECTION RANGE WITH STEAM-ASSIST INSTALLATION INSTRUCTIONS for residential use only Table of Contents...2 9758978 OFF OFF OFF OFF OFF OFF OFF OFF
30" (76.2 CM) AND 36" (91.4 CM) CLASSIC COMMERCIAL-STYLE DUAL FUEL CONVECTION RANGE WITH STEAM-ASSIST INSTALLATION INSTRUCTIONS for residential use only Table of Contents...2 9758978 OFF OFF OFF OFF OFF OFF OFF OFF


