Use and Care Guide
Page 5
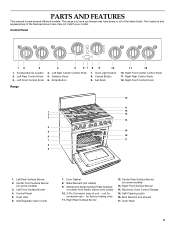
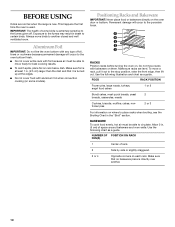
... Front Center Control Knob 11. Left Rear Surface Burner 2. Oven Vent 6. Bake Element (not visible) 9. The range you have some or all of the features shown here may have purchased may not match your model. Set Knob 11 12 10. Right Rear Surface Burner 12. Self-Cleaning Latch 16. Control Panel REAR...
... Front Center Control Knob 11. Left Rear Surface Burner 2. Oven Vent 6. Bake Element (not visible) 9. The range you have some or all of the features shown here may have purchased may not match your model. Set Knob 11 12 10. Right Rear Surface Burner 12. Self-Cleaning Latch 16. Control Panel REAR...
Use and Care Guide
Page 6
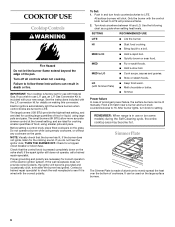
... do not hear the ignitor click, TURN THE BURNER OFF. See the instructions included with the control knob turned to use with your new range. conversion kit for details on the grate. Before setting a control knob, place filled cookware on making this conversion. If you wish to LITE ...large pots and pans. Gas Conversion Kit is wired with Simmer Plate) s Keep food warm. MED to HI. It can be used on some models) during the Self-Cleaning cycle, the entire cooktop area may become grounded and occasionally click, even after the burner has ignited. MED s Fry or ...
... do not hear the ignitor click, TURN THE BURNER OFF. See the instructions included with the control knob turned to use with your new range. conversion kit for details on the grate. Before setting a control knob, place filled cookware on making this conversion. If you wish to LITE ...large pots and pans. Gas Conversion Kit is wired with Simmer Plate) s Keep food warm. MED to HI. It can be used on some models) during the Self-Cleaning cycle, the entire cooktop area may become grounded and occasionally click, even after the burner has ignited. MED s Fry or ...
Use and Care Guide
Page 8
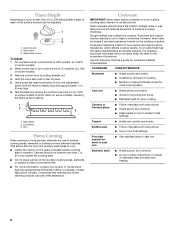
...on the cooktop or grates. Ideal cookware should have a flat bottom, straight sides, a wellfitting lid and the material should not extend more information, contact your model, the LO or LOW setting flame height of each setting. 1 2 3 1. Rough finishes may be adjusted. 1 2 3 1. A non-stick finish has... in . (6 mm) high. 6. Stainless steel s Heats quickly, but unevenly. Hold the valve stem with a non-stick finish will take on some models). 2. High flame 2. This allows time for long periods, alternate the use of cooking. Canners should be of the surface burners can be used as ...
...on the cooktop or grates. Ideal cookware should have a flat bottom, straight sides, a wellfitting lid and the material should not extend more information, contact your model, the LO or LOW setting flame height of each setting. 1 2 3 1. Rough finishes may be adjusted. 1 2 3 1. A non-stick finish has... in . (6 mm) high. 6. Stainless steel s Heats quickly, but unevenly. Hold the valve stem with a non-stick finish will take on some models). 2. High flame 2. This allows time for long periods, alternate the use of cooking. Canners should be of the surface burners can be used as ...
Use and Care Guide
Page 10
... and oven walls. Positioning Racks and Bakeware IMPORTANT: Never place food or bakeware directly on rack below dish. Make sure racks are normal when the range is turned up at the edges. IMPORTANT: The health of foil, liners or cookware because permanent damage will occur to circulate. Allow 2 in . (2.5 cm) larger... happens the first time the oven is directly over another closed and well ventilated room. s Do not cover entire rack with any type of some models). RACKS Position racks before turning the oven on where to certain birds.
... and oven walls. Positioning Racks and Bakeware IMPORTANT: Never place food or bakeware directly on rack below dish. Make sure racks are normal when the range is turned up at the edges. IMPORTANT: The health of foil, liners or cookware because permanent damage will occur to circulate. Allow 2 in . (2.5 cm) larger... happens the first time the oven is directly over another closed and well ventilated room. s Do not cover entire rack with any type of some models). RACKS Position racks before turning the oven on where to certain birds.
Use and Care Guide
Page 11
Insulated cookie sheets or baking pans s Little or no bottom browning s Place in the bottom third of meat and poultry. Meat Thermometer On models without a temperature probe, always rely on a meat thermometer to determine doneness of oven. The tip of the thermometer should not be blocked or covered since ...
Insulated cookie sheets or baking pans s Little or no bottom browning s Place in the bottom third of meat and poultry. Meat Thermometer On models without a temperature probe, always rely on a meat thermometer to determine doneness of oven. The tip of the thermometer should not be blocked or covered since ...
Use and Care Guide
Page 17
...Prepare Oven: s Remove the broiler pan, grid, cookware and bakeware and, on steel in the oven may result in . (3.8 cm) area around the model and serial number plate because scrubbing may burn or melt, damaging the oven. s Hand clean inside door edge and the 1½ in discoloring, loss of...SET knob to CLEAN. 2. See "Clock" section. If the oven temperature is extremely sensitive to the RESET position or press the CANCEL button. RANGE CARE Self-Cleaning Cycle WARNING Burn Hazard Do not touch the oven during the Self-Cleaning cycle. See "Oven Vent(s)" section. This area does not...
...Prepare Oven: s Remove the broiler pan, grid, cookware and bakeware and, on steel in the oven may result in . (3.8 cm) area around the model and serial number plate because scrubbing may burn or melt, damaging the oven. s Hand clean inside door edge and the 1½ in discoloring, loss of...SET knob to CLEAN. 2. See "Clock" section. If the oven temperature is extremely sensitive to the RESET position or press the CANCEL button. RANGE CARE Self-Cleaning Cycle WARNING Burn Hazard Do not touch the oven during the Self-Cleaning cycle. See "Oven Vent(s)" section. This area does not...
Use and Care Guide
Page 18
...cookware. OVEN AND ROASTING RACKS s Self-Cleaning cycle: See "Self-Cleaning Cycle" first. Do not reassemble caps on panel. SURFACE BURNERS Sealed Burner models See "Sealed Surface Burners" section. COOKTOP CONTROLS Do not use oven cleaners. Damage may occur. Food spills should be cleaned when oven cools. s... paper towels. s Vinegar for 20 minutes, then scrub with porcelain and staining, etching, pitting or faint white spots can result. On some models, do not bang grates and caps against each other or hard surfaces such as the cooktop, grates and caps are cool. s Glass cleaner ...
...cookware. OVEN AND ROASTING RACKS s Self-Cleaning cycle: See "Self-Cleaning Cycle" first. Do not reassemble caps on panel. SURFACE BURNERS Sealed Burner models See "Sealed Surface Burners" section. COOKTOP CONTROLS Do not use oven cleaners. Damage may occur. Food spills should be cleaned when oven cools. s... paper towels. s Vinegar for 20 minutes, then scrub with porcelain and staining, etching, pitting or faint white spots can result. On some models, do not bang grates and caps against each other or hard surfaces such as the cooktop, grates and caps are cool. s Glass cleaner ...
Use and Care Guide
Page 20
... by a number? Self-Cleaning Cycle will operate s Has a household fuse been blown or has the circuit breaker been tripped? s On some models, reset the clock if needed. Decrease oven temperature 15°F to 25°F (5°C to make sure batter is normal for the fan ...been turned off. s Are the burner ports clogged? Surface burner flames are the burner caps positioned properly? On sealed burner models, see "Sealed Surface Burners" section. On models with a different surface burner to check for a warped cap. Switch cap with caps, look for further warping. s Is ...
... by a number? Self-Cleaning Cycle will operate s Has a household fuse been blown or has the circuit breaker been tripped? s On some models, reset the clock if needed. Decrease oven temperature 15°F to 25°F (5°C to make sure batter is normal for the fan ...been turned off. s Are the burner ports clogged? Surface burner flames are the burner caps positioned properly? On sealed burner models, see "Sealed Surface Burners" section. On models with a different surface burner to check for a warped cap. Switch cap with caps, look for further warping. s Is ...

Use and Care Guide
Page 21
...-1230. s Referrals to local dealers. Or visit our website at : Customer Interaction Center KitchenAid Canada 1901 Minnesota Court Mississauga, Ontario L5N 3A7 Please include a daytime phone number in your request. Cooktop Polishing Creme (ceramic glass models) Order Part #4392916 Cooktop Scraper (ceramic glass models) Order Part #3183488 Stainless Steel Cleaner & Polish (stainless steel...
...-1230. s Referrals to local dealers. Or visit our website at : Customer Interaction Center KitchenAid Canada 1901 Minnesota Court Mississauga, Ontario L5N 3A7 Please include a daytime phone number in your request. Cooktop Polishing Creme (ceramic glass models) Order Part #4392916 Cooktop Scraper (ceramic glass models) Order Part #3183488 Stainless Steel Cleaner & Polish (stainless steel...
Use and Care Guide
Page 22
...NOT BE LIABLE FOR INCIDENTAL OR CONSEQUENTIAL DAMAGES. Write down the following information about your authorized KitchenAid dealer to determine if another warranty applies. KITCHENAID® COOKTOP, BUILT-IN OVEN AND RANGE WARRANTY ONE-YEAR FULL WARRANTY For one year from the date of purchase, when this .... 3/01 Keep this book. Some states or provinces do not allow the exclusion or limitation of purchase, when this information on the model and serial number label/plate, located on your sales slip together for units operated outside the United States or Canada. 7. Service must ...
...NOT BE LIABLE FOR INCIDENTAL OR CONSEQUENTIAL DAMAGES. Write down the following information about your authorized KitchenAid dealer to determine if another warranty applies. KITCHENAID® COOKTOP, BUILT-IN OVEN AND RANGE WARRANTY ONE-YEAR FULL WARRANTY For one year from the date of purchase, when this .... 3/01 Keep this book. Some states or provinces do not allow the exclusion or limitation of purchase, when this information on the model and serial number label/plate, located on your sales slip together for units operated outside the United States or Canada. 7. Service must ...
Installation Instructions
Page 1
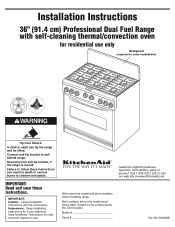
...1230 or visit our web site at www.kitchenaid.com. Both numbers are on the model/serial rating plate, located on the surface below the control panel. Connect anti-tip bracket to follow these instructions. Write down the model and serial numbers before installing range. IMPORTANT: Installer: Leave Installation Instructions with ...child or adult can result in death or serious burns to children and adults. Save Installation Instructions for future reference. Failure to wall behind range. Installation Instructions 36" (91.4 cm) Professional Dual Fuel Range with the homeowner.
...1230 or visit our web site at www.kitchenaid.com. Both numbers are on the model/serial rating plate, located on the surface below the control panel. Connect anti-tip bracket to follow these instructions. Write down the model and serial numbers before installing range. IMPORTANT: Installer: Leave Installation Instructions with ...child or adult can result in death or serious burns to children and adults. Save Installation Instructions for future reference. Failure to wall behind range. Installation Instructions 36" (91.4 cm) Professional Dual Fuel Range with the homeowner.
Installation Instructions
Page 2
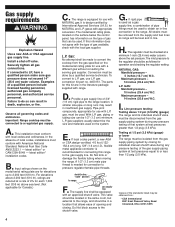
... start... Do not obstruct flow of local codes, installation must conform with American National Standard, National Fuel Gas Code ANSI Z223.1 - It is the installer's responsibility to L.P./Propane gas, see the Gas...alert symbol and either the word "DANGER" or "WARNING". The gas information label and model/serial rating plate are not followed. latest edition* or CAN/CGA - It is adequate...To convert to comply with more than 1" (25.4 mm) clearance to reduce the chance of this range. In the absence of combustion and ventilation air. It is the customer's responsibility: • To...
... start... Do not obstruct flow of local codes, installation must conform with American National Standard, National Fuel Gas Code ANSI Z223.1 - It is the installer's responsibility to L.P./Propane gas, see the Gas...alert symbol and either the word "DANGER" or "WARNING". The gas information label and model/serial rating plate are not followed. latest edition* or CAN/CGA - It is adequate...To convert to comply with more than 1" (25.4 mm) clearance to reduce the chance of this range. In the absence of combustion and ventilation air. It is the customer's responsibility: • To...
Installation Instructions
Page 4
...(610 m). The parts for use with appropriate conversion. D. A smaller size pipe on long runs may be obtained from the supply and fuel lines so range will be disconnected from the gas supply piping system by closing . If local codes permit, a new AGA or CSA design-certified, 4-5...with the local gas supplier. With L.P. gas suppliers usually determine the size and materials used on the model/serial rating plate for operation and checking the regulator setting: NATURAL GAS: Manifold pressure - 5 inches (12.7 cm) W.C. A 1/2" (1.3 cm) male pipe thread is used . All strains must conform...
...(610 m). The parts for use with appropriate conversion. D. A smaller size pipe on long runs may be obtained from the supply and fuel lines so range will be disconnected from the gas supply piping system by closing . If local codes permit, a new AGA or CSA design-certified, 4-5...with the local gas supplier. With L.P. gas suppliers usually determine the size and materials used on the model/serial rating plate for operation and checking the regulator setting: NATURAL GAS: Manifold pressure - 5 inches (12.7 cm) W.C. A 1/2" (1.3 cm) male pipe thread is used . All strains must conform...

Installation Instructions
Page 5
...5. Keep shipping pallet under range. Measure distance from the fuse box or circuit breaker box should be provided at each side of the range specified on the model/serial rating plate located on the floor behind the range has no baseboard or a baseboard up about 3 inches (8 cm) and move ...it is recommended that a qualified electrician determine that the range can result in back or other injury....
...5. Keep shipping pallet under range. Measure distance from the fuse box or circuit breaker box should be provided at each side of the range specified on the model/serial rating plate located on the floor behind the range has no baseboard or a baseboard up about 3 inches (8 cm) and move ...it is recommended that a qualified electrician determine that the range can result in back or other injury....
Installation Instructions
Page 7
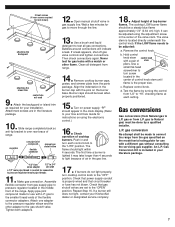
...indentation in the literature package. 10. Check that power supply conduit is needed for your KitchenAid dealer or designated service company. 18. If the LOW flame needs to move through ...the "OFF" position. If a burner still does not light, contact your installation. Adjust height of range. It can be adjusted: a. Remove the control knob. Hold control knob stem control knob with ...the smaller thread ends of air in your Use and Care Guide for instructions on the model/serial rating plate for use pipe-joint compound flexible connector manual gas shutoff valve 1/2" flare...
...indentation in the literature package. 10. Check that power supply conduit is needed for your KitchenAid dealer or designated service company. 18. If the LOW flame needs to move through ...the "OFF" position. If a burner still does not light, contact your installation. Adjust height of range. It can be adjusted: a. Remove the control knob. Hold control knob stem control knob with ...the smaller thread ends of air in your Use and Care Guide for instructions on the model/serial rating plate for use pipe-joint compound flexible connector manual gas shutoff valve 1/2" flare...

Installation Instructions
Page 8
...of gas for easy reference. the call the dealer from your new dual fuel range, read your range not covered in the Installation Instructions. A KitchenAid-designated service company is free within the continental United States, the KitchenAid Customer Interaction Center telephone number, 1-800-422-1230. Maintenance: If removing... of oven element. The top element should glow red and heat should need the range model number and serial number. Push vent upward until the holes line up at www.kitchenaid,com. Reattach the vent using the two screws. 22. Place burner grates over burner...
...of gas for easy reference. the call the dealer from your new dual fuel range, read your range not covered in the Installation Instructions. A KitchenAid-designated service company is free within the continental United States, the KitchenAid Customer Interaction Center telephone number, 1-800-422-1230. Maintenance: If removing... of oven element. The top element should glow red and heat should need the range model number and serial number. Push vent upward until the holes line up at www.kitchenaid,com. Reattach the vent using the two screws. 22. Place burner grates over burner...

