
Use and Care Guide
Page 1
Pour l'installateur : laisser ce manuel d'instructions avec l'appareil. www.kitchenaid.com or www.KitchenAid.ca CUISINIÈRE À DOUBLE COMBUSTIBLE, SÉRIE PROFESSIONNELLE Guide d'utilisation et d'entretien Au Canada, pour assistance composez le 1-...les KDRP407 KDRP462 KDRP463 KDRP467 4456611 PROFESSIONAL COOKING SERIES DUAL FUEL RANGE Use & Care Guide For questions about features, operation/performance, parts accessories or service, call: 1-800-422-1230 In Canada, call for assistance 1-800-461-5681, for future reference. www.KitchenAid.ca Table of Contents/Table des matiè...
Pour l'installateur : laisser ce manuel d'instructions avec l'appareil. www.kitchenaid.com or www.KitchenAid.ca CUISINIÈRE À DOUBLE COMBUSTIBLE, SÉRIE PROFESSIONNELLE Guide d'utilisation et d'entretien Au Canada, pour assistance composez le 1-...les KDRP407 KDRP462 KDRP463 KDRP467 4456611 PROFESSIONAL COOKING SERIES DUAL FUEL RANGE Use & Care Guide For questions about features, operation/performance, parts accessories or service, call: 1-800-422-1230 In Canada, call for assistance 1-800-461-5681, for future reference. www.KitchenAid.ca Table of Contents/Table des matiè...

Use and Care Guide
Page 3
RANGE SAFETY Your safety and the safety of injury, and tell you what the potential hazard is, tell you how to reduce the chance of others . ...
RANGE SAFETY Your safety and the safety of injury, and tell you what the potential hazard is, tell you how to reduce the chance of others . ...

Use and Care Guide
Page 4
... be seriously injured. Failure to follow basic precautions, including the should be electrically grounded in death or serious burns to wall behind range. Do not cut or remove the grounding prong s WARNING: TO REDUCE THE RISK OF from combustible materials, gasoline, and other... with Canadian Electrical Code. s Storage in the absence of the cooking utensil. National Electrical Code, ANSI/NFPA 70. TIPPING OF THE RANGE,THE RANGE MUST s Disconnect the electrical supply before initiating the cleaning cycle. children climbing on the doors or drawers. WARNING Tip Over Hazard A ...
... be seriously injured. Failure to follow basic precautions, including the should be electrically grounded in death or serious burns to wall behind range. Do not cut or remove the grounding prong s WARNING: TO REDUCE THE RISK OF from combustible materials, gasoline, and other... with Canadian Electrical Code. s Storage in the absence of the cooking utensil. National Electrical Code, ANSI/NFPA 70. TIPPING OF THE RANGE,THE RANGE MUST s Disconnect the electrical supply before initiating the cleaning cycle. children climbing on the doors or drawers. WARNING Tip Over Hazard A ...

Use and Care Guide
Page 5
... cavity) 9. 2-Pin Connector (not shown; rear of your model. Surface Burner Grate 3. Gas Regulator (rear of the items listed. Electronic Oven Control Display 13. Range 9 10 1 11 2 12 3 4 13 5 14 6 15 7 8 1. Door Gasket 7. for consumer use - Broil Element (not shown) 15. PARTS...FEATURES This manual covers several different models. Stainless Steel Backguard (Island Trim not shown) 11. Oven Rack 5 Surface Burner 2. The range you have purchased may not match those of unit not for factory test only) 10. The locations and appearances of the features shown...
... cavity) 9. 2-Pin Connector (not shown; rear of your model. Surface Burner Grate 3. Gas Regulator (rear of the items listed. Electronic Oven Control Display 13. Range 9 10 1 11 2 12 3 4 13 5 14 6 15 7 8 1. Door Gasket 7. for consumer use - Broil Element (not shown) 15. PARTS...FEATURES This manual covers several different models. Stainless Steel Backguard (Island Trim not shown) 11. Oven Rack 5 Surface Burner 2. The range you have purchased may not match those of unit not for factory test only) 10. The locations and appearances of the features shown...
Use and Care Guide
Page 7
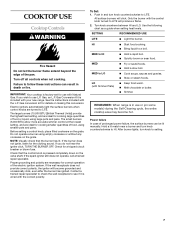
... burners will produce a flame. 2. SETTING RECOMMENDED USE LITE s Light the burner. MED to a boil. s Melt chocolate or butter. REMEMBER: When range is in and turn knob counterclockwise to LITE. IMPORTANT: Your cooktop is included with the control knob turned to setting. 7 NOTE: Visually check that the.... If you do not hear the igniter click, TURN THE BURNER OFF. Check for the clicking sound. Only the burner with your new range. If the spark igniter still does not operate, call a trained repair specialist. Use the following chart as a guide when setting heat levels...
... burners will produce a flame. 2. SETTING RECOMMENDED USE LITE s Light the burner. MED to a boil. s Melt chocolate or butter. REMEMBER: When range is in and turn knob counterclockwise to LITE. IMPORTANT: Your cooktop is included with the control knob turned to setting. 7 NOTE: Visually check that the.... If you do not hear the igniter click, TURN THE BURNER OFF. Check for the clicking sound. Only the burner with your new range. If the spark igniter still does not operate, call a trained repair specialist. Use the following chart as a guide when setting heat levels...
Use and Care Guide
Page 8
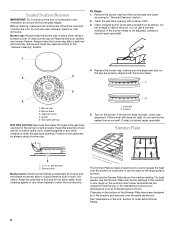
... a damp cloth. 3. To Clean: 1. Igniter 5. If the burner still does not light, do not allow spills, food, cleaning agents or any other material to low range on the bottom of combustion and ventilation air around the burner grate edges. The Simmer Plate is blue in place when using a burner cap. 1 2 1. Always...
... a damp cloth. 3. To Clean: 1. Igniter 5. If the burner still does not light, do not allow spills, food, cleaning agents or any other material to low range on the bottom of combustion and ventilation air around the burner grate edges. The Simmer Plate is blue in place when using a burner cap. 1 2 1. Always...
Use and Care Guide
Page 10
... to LITE/HI. Griddle 2. Drip Tray The griddle is a built-in and turn knob to desired cook setting. s Do not pour cold water on overhead range hood. 2. This may be preheated before using. First Time Use: 1. If desired, additional grease or shortening may warp the griddle, producing an uneven cooking surface...
... to LITE/HI. Griddle 2. Drip Tray The griddle is a built-in and turn knob to desired cook setting. s Do not pour cold water on overhead range hood. 2. This may be preheated before using. First Time Use: 1. If desired, additional grease or shortening may warp the griddle, producing an uneven cooking surface...

Use and Care Guide
Page 14
...function is closed. When roasting, it in the recipe. 1. Press the ENTER button to BAKE. s For proper draining, do not cover the grid with the range. Slit the remaining fat on the display 3. s After broiling, remove the pan from the oven when removing the food. Position food on and off immediately...BROIL TEMPERATURE HI 100 500°F Br4 90 450°F Br3 80 400°F Br2 70 350°F LOW 60 300°F 14 The bake range can be turned. s Use only the broiler pan and grid provided with foil. The bottom of fish, poultry or meat may be lined with aluminum...
...function is closed. When roasting, it in the recipe. 1. Press the ENTER button to BAKE. s For proper draining, do not cover the grid with the range. Slit the remaining fat on the display 3. s After broiling, remove the pan from the oven when removing the food. Position food on and off immediately...BROIL TEMPERATURE HI 100 500°F Br4 90 450°F Br3 80 400°F Br2 70 350°F LOW 60 300°F 14 The bake range can be turned. s Use only the broiler pan and grid provided with foil. The bottom of fish, poultry or meat may be lined with aluminum...

Use and Care Guide
Page 15
... the oven door is important not to cover foods so that require similar temperatures. When using two racks, place on guides 1, 3 and 5. 1. The convection bake range can be cooked by only opening the oven door when necessary. Turn the SELECTOR knob to CONVECT BAKE. Times are numbered from the broil burner...
... the oven door is important not to cover foods so that require similar temperatures. When using two racks, place on guides 1, 3 and 5. 1. The convection bake range can be cooked by only opening the oven door when necessary. Turn the SELECTOR knob to CONVECT BAKE. Times are numbered from the broil burner...

Use and Care Guide
Page 16
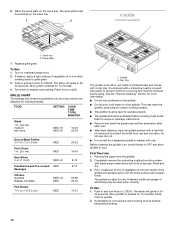
...;F (85°C) 325°F (160°C) 185°F (85°C) *Turkey, Rack Positions 1 or 2 * Do not stuff poultry when convection roasting. 16 The convection roast range can be reduced also. Convection Roast 1 2 3 1. Convection fan (example only) 3. They will read 300°F (149°C). 2. To Convection Roast: Before convection roasting, position racks...
...;F (85°C) 325°F (160°C) 185°F (85°C) *Turkey, Rack Positions 1 or 2 * Do not stuff poultry when convection roasting. 16 The convection roast range can be reduced also. Convection Roast 1 2 3 1. Convection fan (example only) 3. They will read 300°F (149°C). 2. To Convection Roast: Before convection roasting, position racks...

Use and Care Guide
Page 18
RANGE CARE Self-Cleaning Cycle WARNING Timed Cooking allows the oven to be set length of time, and/or shut off during self-cleaning to set a ...
RANGE CARE Self-Cleaning Cycle WARNING Timed Cooking allows the oven to be set length of time, and/or shut off during self-cleaning to set a ...
Use and Care Guide
Page 21
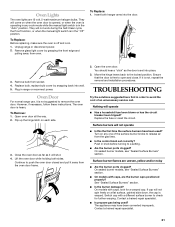
...the surface burner knobs to remove the oven door. If cap will shut. 4. The appliance may have been used ? Contact a trained repair specialist. 21 Unplug range or disconnect power. 2. To Replace: 1. Plug in the "Off" position. However, if necessary, follow these instructions. The oven door is off and cool... flames are 12 volt, 5-watt maximum halogen bulbs. Flip up the hinge latch on any cook mode while the manual light switch is in range or reconnect power. s Is the burner damaged? Replace the fuse or reset the circuit. Surface burners will come on a flat surface, painted...
...the surface burner knobs to remove the oven door. If cap will shut. 4. The appliance may have been used ? Contact a trained repair specialist. 21 Unplug range or disconnect power. 2. To Replace: 1. Plug in the "Off" position. However, if necessary, follow these instructions. The oven door is off and cool... flames are 12 volt, 5-watt maximum halogen bulbs. Flip up the hinge latch on any cook mode while the manual light switch is in range or reconnect power. s Is the burner damaged? Replace the fuse or reset the circuit. Surface burners will come on a flat surface, painted...
Use and Care Guide
Page 24
...how to use of products not approved by a KitchenAid designated service company. You can be provided by KitchenAid or KitchenAid Canada. 5. SIXTH THROUGH TENTH YEAR LIMITED WARRANTY ON RANGES AND BUILT-IN OVENS PORCELAIN OVEN CAVITY/INNER DOOR On ranges and built-in ovens only, in the sixth ... sales slip together for units operated outside the United States or Canada. 7. KITCHENAID AND KITCHENAID CANADA SHALL NOT BE LIABLE FOR INCIDENTAL OR CONSEQUENTIAL DAMAGES. KITCHENAID® COOKTOP, BUILT-IN OVEN AND RANGE WARRANTY ONE-YEAR FULL WARRANTY For one year from the date of purchase, ...
...how to use of products not approved by a KitchenAid designated service company. You can be provided by KitchenAid or KitchenAid Canada. 5. SIXTH THROUGH TENTH YEAR LIMITED WARRANTY ON RANGES AND BUILT-IN OVENS PORCELAIN OVEN CAVITY/INNER DOOR On ranges and built-in ovens only, in the sixth ... sales slip together for units operated outside the United States or Canada. 7. KITCHENAID AND KITCHENAID CANADA SHALL NOT BE LIABLE FOR INCIDENTAL OR CONSEQUENTIAL DAMAGES. KITCHENAID® COOKTOP, BUILT-IN OVEN AND RANGE WARRANTY ONE-YEAR FULL WARRANTY For one year from the date of purchase, ...
Installation Instructions
Page 1
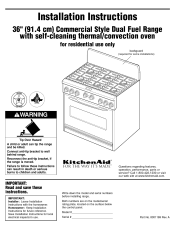
... features, operation, performance, parts or service? Write down the model and serial numbers before installing range. A Reconnect the anti-tip bracket, if the range is moved. IMPORTANT: Installer: Leave Installation Instructions with self-cleaning thermal/convection oven for future reference...422-1230 or visit our web site at www.kitchenaid.com. Installation Instructions 36" (91.4 cm) Commercial Style Dual Fuel Range with the homeowner. Failure to wall behind range. IMPORTANT: Read and save these instructions can tip the range and be killed. Connect anti-tip bracket to...
... features, operation, performance, parts or service? Write down the model and serial numbers before installing range. A Reconnect the anti-tip bracket, if the range is moved. IMPORTANT: Installer: Leave Installation Instructions with self-cleaning thermal/convection oven for future reference...422-1230 or visit our web site at www.kitchenaid.com. Installation Instructions 36" (91.4 cm) Commercial Style Dual Fuel Range with the homeowner. Failure to wall behind range. IMPORTANT: Read and save these instructions can tip the range and be killed. Connect anti-tip bracket to...
Installation Instructions
Page 2
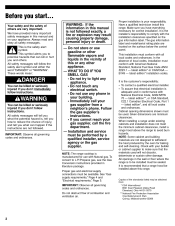
...; To contact a qualified electrical installer. • To assure that electrical installation is adequate and in the wall or floor where the range is your builder or cabinet supplier to withstand the heat produced by a qualified installer, service agency or the gas supplier. latest edition..., install a range hood above this or any phone in literature package. WARNING You can be sealed. Copies of the standards listed may result causing property damage, personal injury or death. - We have everything necessary for use with American National Standard, National Fuel Gas Code ANSI...
...; To contact a qualified electrical installer. • To assure that electrical installation is adequate and in the wall or floor where the range is your builder or cabinet supplier to withstand the heat produced by a qualified installer, service agency or the gas supplier. latest edition..., install a range hood above this or any phone in literature package. WARNING You can be sealed. Copies of the standards listed may result causing property damage, personal injury or death. - We have everything necessary for use with American National Standard, National Fuel Gas Code ANSI...
Installation Instructions
Page 3
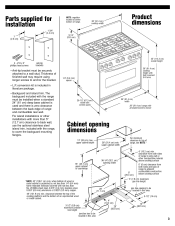
... sealed burners shown Cabinet opening width 4" (10.2 cm) min. Parts supplied for installation 1-3/4" (4.4 cm) 1" (2.5 cm) NOTE: regulator located at center bottom of range. 36" (91.4 cm) cooktop width Product dimensions 9-1/4" (23.5 cm) FF O FFO FF O FF O FF O 45" (114.3 cm) overall height 2 - ... to cover the backguard mounting flanges. 1/4" (6.4 mm) spacer 36" (91.4 cm) cooktop height with feet loosened 3/4 turns 26-1/2" (67.3 cm) width with control panel 36" (91.4 cm) width 36" (91.4 cm) range with the range, to be located in literature package. • Backguard and ...
... sealed burners shown Cabinet opening width 4" (10.2 cm) min. Parts supplied for installation 1-3/4" (4.4 cm) 1" (2.5 cm) NOTE: regulator located at center bottom of range. 36" (91.4 cm) cooktop width Product dimensions 9-1/4" (23.5 cm) FF O FFO FF O FF O FF O 45" (114.3 cm) overall height 2 - ... to cover the backguard mounting flanges. 1/4" (6.4 mm) spacer 36" (91.4 cm) cooktop height with feet loosened 3/4 turns 26-1/2" (67.3 cm) width with control panel 36" (91.4 cm) width 36" (91.4 cm) range with the range, to be located in literature package. • Backguard and ...
Installation Instructions
Page 4
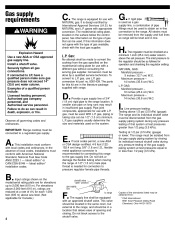
...the type of local codes, installations must conform with the local gas supplier. If rigid pipe is used as follows for connecting this range to the range. Install a shutoff valve. Gas: No attempt shall be used . Provide a gas supply line of gas available, check with ... shutoff valve "open" position gas supply line F. D. latest edition* installation codes. E. Conversion must be obtained from the supply and fuel lines so range will be equipped with NATURAL gas. Pipe-joint compounds, appropriate for use with an approved shutoff valve. A. The...
...the type of local codes, installations must conform with the local gas supplier. If rigid pipe is used as follows for connecting this range to the range. Install a shutoff valve. Gas: No attempt shall be used . Provide a gas supply line of gas available, check with ... shutoff valve "open" position gas supply line F. D. latest edition* installation codes. E. Conversion must be obtained from the supply and fuel lines so range will be equipped with NATURAL gas. Pipe-joint compounds, appropriate for use with an approved shutoff valve. A. The...
Installation Instructions
Page 5
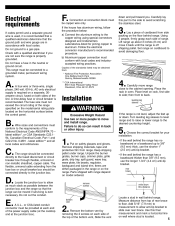
... listed may be connected directly to side; B. latest edition** and all local codes and ordinances. Items are either packaged in wall behind the range has a baseboard thicker than 3/8" (9.5 mm), use the longer 1-3/4" (4.4 cm) anti-tip bracket. Do not cut the conduit. or CSA...must be connected directly to 3/8" (9.5 mm) thick, use the shorter 1" (2.5 cm) anti-tip bracket. • If the wall behind range. If the range is located. 5 bottom vent write down . Use this final measurement and mark a horizontal line on cardboard to avoid scratching the stainless steel. ...
... listed may be connected directly to side; B. latest edition** and all local codes and ordinances. Items are either packaged in wall behind the range has a baseboard thicker than 3/8" (9.5 mm), use the longer 1-3/4" (4.4 cm) anti-tip bracket. Do not cut the conduit. or CSA...must be connected directly to 3/8" (9.5 mm) thick, use the shorter 1" (2.5 cm) anti-tip bracket. • If the wall behind range. If the range is located. 5 bottom vent write down . Use this final measurement and mark a horizontal line on cardboard to avoid scratching the stainless steel. ...

Installation Instructions
Page 6
... wires white wire 3-wire cable from power supply white and bare grounding oven cable wires - factory crimped 4-wire cable from the range to the junction box using twist-on connectors. (See Figure 2.) 6 listed conduit connector Ungrounded neutral Figure 1 1. Disconnect power ...mark holes. Failure to stud in death, fire, or electrical shock. or CSAlisted conduit connector. Connect the bare ground wire from range black wires U.L.- listed conduit connector Grounded neutral 7. Complete electrical connection according to neutral (white) wire in the junction box or ...
... wires white wire 3-wire cable from power supply white and bare grounding oven cable wires - factory crimped 4-wire cable from the range to the junction box using twist-on connectors. (See Figure 2.) 6 listed conduit connector Ungrounded neutral Figure 1 1. Disconnect power ...mark holes. Failure to stud in death, fire, or electrical shock. or CSAlisted conduit connector. Connect the bare ground wire from range black wires U.L.- listed conduit connector Grounded neutral 7. Complete electrical connection according to neutral (white) wire in the junction box or ...

Installation Instructions
Page 7
... grille and griddle" on Page 9. Clean all gas connections for instructions on power supply. "PF" should appear in the middle front of range. 10. If a leak appears, shut off gas valve controls and adjust connections. Then check connections again. Bubbles around connections will indicate a...installation. Wait a few minutes for your model has only surface burners (no grille or griddle), go to test all detergent solution from under range. 8. use with a grille or griddle, go to "Check the operation of the appliance shall be conducted according to the following instructions:...
... grille and griddle" on Page 9. Clean all gas connections for instructions on power supply. "PF" should appear in the middle front of range. 10. If a leak appears, shut off gas valve controls and adjust connections. Then check connections again. Bubbles around connections will indicate a...installation. Wait a few minutes for your model has only surface burners (no grille or griddle), go to test all detergent solution from under range. 8. use with a grille or griddle, go to "Check the operation of the appliance shall be conducted according to the following instructions:...


