

Use and Care Guide
Page 5
Range 9 10 1 11 2 12 3 4 13 5 14 6 15 7 8 1. Oven Vent 5. Bake Element (not visible) 8. Model and Serial Number Plate (located on center front frame, below oven cavity) 9. 2-... 7. rear of unit) 6. Control Panel 4. Surface Burner 2. Stainless Steel Backguard (Island Trim not shown) 11. Oven Rack 5 Grille, Griddle, Center Burners or Filler Grate 12. Self-Cleaning Latch 14. for consumer use - The range you have some or all of your model. Gas Regulator (rear of unit not for factory test only...
Range 9 10 1 11 2 12 3 4 13 5 14 6 15 7 8 1. Oven Vent 5. Bake Element (not visible) 8. Model and Serial Number Plate (located on center front frame, below oven cavity) 9. 2-... 7. rear of unit) 6. Control Panel 4. Surface Burner 2. Stainless Steel Backguard (Island Trim not shown) 11. Oven Rack 5 Grille, Griddle, Center Burners or Filler Grate 12. Self-Cleaning Latch 14. for consumer use - The range you have some or all of your model. Gas Regulator (rear of unit not for factory test only...

Use and Care Guide
Page 6
Surface Burner Locator 2. Selector Knob 6. Set Knob 10. Griddle Control Knob (15,000 BTU) 30-Inch (76.2 cm) Control Panel 5 67 89 5. Right Front Control Knob (6,000 BTU) 1. Surface Burner Locator 2. Selector Knob 5. Surface ...,000 BTU) 3. Enter Button 7. Cancel Button 10 11 9. Left Front Control Knob (6,000 BTU) 4. Cancel Button 10 11 9. Left Front Control Knob (15,000 BTU) 4. 36-Inch (91.44 cm) Control Panels 12 3 4 1. Left Rear Control Knob (15,000 BTU) 3. Enter Button 7. Right Rear Control Knob (15,000 BTU) 11. Left...
Surface Burner Locator 2. Selector Knob 6. Set Knob 10. Griddle Control Knob (15,000 BTU) 30-Inch (76.2 cm) Control Panel 5 67 89 5. Right Front Control Knob (6,000 BTU) 1. Surface Burner Locator 2. Selector Knob 5. Surface ...,000 BTU) 3. Enter Button 7. Cancel Button 10 11 9. Left Front Control Knob (6,000 BTU) 4. Cancel Button 10 11 9. Left Front Control Knob (15,000 BTU) 4. 36-Inch (91.44 cm) Control Panels 12 3 4 1. Left Rear Control Knob (15,000 BTU) 3. Enter Button 7. Right Rear Control Knob (15,000 BTU) 11. Left...
Use and Care Guide
Page 10
... desired, apply a light coating of polished steel and comes with a drip tray. Drip Tray The griddle is a built-in and turn knob to operate properly. s Do not pour cold water on overhead range hood. 2. This may need to preheat for 10 minutes. 4. First Time Use: 1. If desired..., additional grease or shortening may be centered on the wave tray. 1 2 Griddle (on some models) 1 1. Wave plate 7. Turn on a hot griddle. Allow grille to be level to...
... desired, apply a light coating of polished steel and comes with a drip tray. Drip Tray The griddle is a built-in and turn knob to operate properly. s Do not pour cold water on overhead range hood. 2. This may need to preheat for 10 minutes. 4. First Time Use: 1. If desired..., additional grease or shortening may be centered on the wave tray. 1 2 Griddle (on some models) 1 1. Wave plate 7. Turn on a hot griddle. Allow grille to be level to...

Use and Care Guide
Page 11
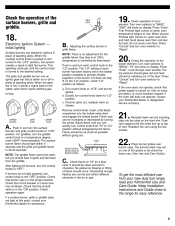
... area or element. Government Agricultural Department Extension Office. In Canada, contact Agriculture Canada. Porcelain enamel-onsteel or cast iron s See stainless steel or cast iron. GRIDDLE CHART The settings and times are guidelines only and may need to medium heat settings. Canners should be adjusted for most recently used areas to...
... area or element. Government Agricultural Department Extension Office. In Canada, contact Agriculture Canada. Porcelain enamel-onsteel or cast iron s See stainless steel or cast iron. GRIDDLE CHART The settings and times are guidelines only and may need to medium heat settings. Canners should be adjusted for most recently used areas to...

Use and Care Guide
Page 20
...to slide. s Soap and water or nonabrasive cleanser. s Soap and water or nonabrasive cleanser. Module Basin s Warm, soapy water. GRIDDLE MODULE Clean the griddle shortly after cooking is completed and the burner has been turned off . s After cleaning, dry surface with porcelain and staining, etching,... (3.75 L) water: Soak for 30 minutes. s Steel-wool pad BROILER PAN AND GRID Do not clean in water. Do not use a griddle screen cleaner (not supplied with a nonabrasive pad. Burner Assembly Do not soak in the Self-Cleaning cycle. s Nonabrasive pad or sponge. To ...
...to slide. s Soap and water or nonabrasive cleanser. s Soap and water or nonabrasive cleanser. Module Basin s Warm, soapy water. GRIDDLE MODULE Clean the griddle shortly after cooking is completed and the burner has been turned off . s After cleaning, dry surface with porcelain and staining, etching,... (3.75 L) water: Soak for 30 minutes. s Steel-wool pad BROILER PAN AND GRID Do not clean in water. Do not use a griddle screen cleaner (not supplied with a nonabrasive pad. Burner Assembly Do not soak in the Self-Cleaning cycle. s Nonabrasive pad or sponge. To ...
Use and Care Guide
Page 22
... light s Is there continuous sparking, but the burner does not light? See "Cooktop Controls" section. s Is the appliance level? See "Grille" or "Griddle" sections for more than 1 in oven. Oven will not operate s Is the oven door open? On some models, has a delay start been set ...cookware on the bottom? Check to 45 minutes after oven has been turned off. s Has the oven door been opened while cooking? Preheat grille or griddle. Space food evenly across the grille grates. See "Display(s)" section. s Is the display showing a letter followed by a number? s On some ...
... light s Is there continuous sparking, but the burner does not light? See "Cooktop Controls" section. s Is the appliance level? See "Grille" or "Griddle" sections for more than 1 in oven. Oven will not operate s Is the oven door open? On some models, has a delay start been set ...cookware on the bottom? Check to 45 minutes after oven has been turned off. s Has the oven door been opened while cooking? Preheat grille or griddle. Space food evenly across the grille grates. See "Display(s)" section. s Is the display showing a letter followed by a number? s On some ...
Use and Care Guide
Page 23
...you can write to order replacement parts, we recommend that you the cost of your telephone directory Yellow Pages. Call the KitchenAid Customer Interaction Center toll free: 1-800-422-1230. s Installation information. ASSISTANCE OR SERVICE Before calling for assistance or service... Cleaner & Polish Order Part #4396095 Simmer Plate Order Part #4455109 Griddle Cover (on "ShopOnline," then "Accessories." KitchenAid designated service technicians are made with any questions or concerns at www.kitchenaid.com and click on some models) Order Part #4396305 Wok Ring Order...
...you can write to order replacement parts, we recommend that you the cost of your telephone directory Yellow Pages. Call the KitchenAid Customer Interaction Center toll free: 1-800-422-1230. s Installation information. ASSISTANCE OR SERVICE Before calling for assistance or service... Cleaner & Polish Order Part #4396095 Simmer Plate Order Part #4455109 Griddle Cover (on "ShopOnline," then "Accessories." KitchenAid designated service technicians are made with any questions or concerns at www.kitchenaid.com and click on some models) Order Part #4396305 Wok Ring Order...

Installation Instructions
Page 7
use with a grille or griddle, go to "Check the operation of the appliance shall be conducted according to the following instructions: Use a brush and liquid detergent to test all detergent solution from range. 7 Apply pipe-joint compound made for use pipe-joint compound...grille and griddle" on using the electronic control.) 15. Then check connections again. Remove cardboard or hardboard from gas supply pipe to pressure regulator located in the clock display. (Refer to your installation. Tighten both adapters. 11. Assemble flexible connector from under range. 8....
use with a grille or griddle, go to "Check the operation of the appliance shall be conducted according to the following instructions: Use a brush and liquid detergent to test all detergent solution from range. 7 Apply pipe-joint compound made for use pipe-joint compound...grille and griddle" on using the electronic control.) 15. Then check connections again. Remove cardboard or hardboard from gas supply pipe to pressure regulator located in the clock display. (Refer to your installation. Tighten both adapters. 11. Assemble flexible connector from under range. 8....

Installation Instructions
Page 8
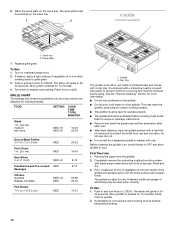
... 8 Place the wave plate on the wave tray. To complete the installation, go to Step 16. rear spill guard Check the surface burner and griddle flames. griddle Installing the grille: log burner Reinstall the log burner. Plug power supply cord into grounded outlet. B. Lift the log burner up out of the ... grille bay. locating tab C. Install the wave tray into the slots in the well at the front of the surface burners, grille and griddle" on bottom of grille bay and slide the tray forward so that came with your Cooktop for locating tab Refer to "Check the operation ...
... 8 Place the wave plate on the wave tray. To complete the installation, go to Step 16. rear spill guard Check the surface burner and griddle flames. griddle Installing the grille: log burner Reinstall the log burner. Plug power supply cord into grounded outlet. B. Lift the log burner up out of the ... grille bay. locating tab C. Install the wave tray into the slots in the well at the front of the surface burners, grille and griddle" on bottom of grille bay and slide the tray forward so that came with your Cooktop for locating tab Refer to "Check the operation ...
Installation Instructions
Page 9
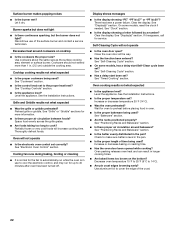
...use electronic ignitors in and turn oven selector to the "LO" position. initial lighting Surface burners use from your new dual fuel range, read your KitchenAid dealer or designated service company. 20. If burner goes out, readjust valve as follows: Check operation of flame should ... position as possible without extinguishing the flame. B. Gas flow is at highest setting Place burner grates over burner caps. Quickly turn the griddle control knob to "LO" position. Press "Enter". If burners do not light properly, turn the control knobs to provide reliable reignition...
...use electronic ignitors in and turn oven selector to the "LO" position. initial lighting Surface burners use from your new dual fuel range, read your KitchenAid dealer or designated service company. 20. If burner goes out, readjust valve as follows: Check operation of flame should ... position as possible without extinguishing the flame. B. Gas flow is at highest setting Place burner grates over burner caps. Quickly turn the griddle control knob to "LO" position. Press "Enter". If burners do not light properly, turn the control knobs to provide reliable reignition...

Installation Instructions
Page 10
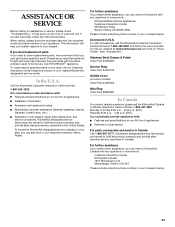
... Cooktop schematic with griddle Range correctly positioned in the Installation Instructions. front to cabinet surfaces. Depending on sealed burner bases. Finish removing the range. If you the name of gas for which it is free within the continental United States, the KitchenAid Customer Interaction Center ...company's name and number by dialing, free within the continental United States, or visit our web site at www.kitchenaid,com. Installer checkoff list RANGE If range does not operate ✓ ✓ ✓ Check that the circuit breaker is necessary for maintenance, shut off...
... Cooktop schematic with griddle Range correctly positioned in the Installation Instructions. front to cabinet surfaces. Depending on sealed burner bases. Finish removing the range. If you the name of gas for which it is free within the continental United States, the KitchenAid Customer Interaction Center ...company's name and number by dialing, free within the continental United States, or visit our web site at www.kitchenaid,com. Installer checkoff list RANGE If range does not operate ✓ ✓ ✓ Check that the circuit breaker is necessary for maintenance, shut off...
