
Use and Care Guide
Page 2
... and serial number plate (see diagram for buying a KITCHENAID® appliance! Please also record the purchase information. Keep this manual is not followed exactly, a fire or explosion may result causing property damage, personal injury or death. - Installation and service must provide proof of purchase or installation date for in Canada, 1-800-461-5681) or...
... and serial number plate (see diagram for buying a KITCHENAID® appliance! Please also record the purchase information. Keep this manual is not followed exactly, a fire or explosion may result causing property damage, personal injury or death. - Installation and service must provide proof of purchase or installation date for in Canada, 1-800-461-5681) or...
Use and Care Guide
Page 3
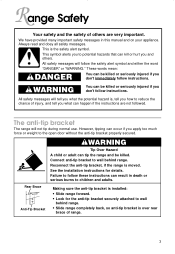
This symbol alerts you apply too much force or weight to potential hazards that can result in this manual and on your appliance. All safety messages will not tip during normal use. However, tipping can occur if you to the open door without the ... safety alert symbol. Always read and obey all safety messages. The anti-tip bracket The range will follow these instructions can kill or hurt you don't follow instructions. Making sure the anti-tip bracket is installed: • Slide range forward. • Look for details. All safety messages will tell you what can be...
This symbol alerts you apply too much force or weight to potential hazards that can result in this manual and on your appliance. All safety messages will not tip during normal use. However, tipping can occur if you to the open door without the ... safety alert symbol. Always read and obey all safety messages. The anti-tip bracket The range will follow these instructions can kill or hurt you don't follow instructions. Making sure the anti-tip bracket is installed: • Slide range forward. • Look for details. All safety messages will tell you what can be...

Use and Care Guide
Page 30
...is not properly connected to reconnect range. WHAT TO DO Wire the unit into a properly grounded outlet. Wait for service. Clean with proper voltage. (See Installation Instructions.) Replace household fuse or... a detailed description of the problem, your request. Refer to the section in this manual describing the function you are clogged. Make sure the burner cap is incorrect. A household...a live circuit with proper voltage. (See installation instructions.) A household fuse has blown or a circuit breaker has tripped. Let dry. 30 The burner cap is not in Canada, see...
...is not properly connected to reconnect range. WHAT TO DO Wire the unit into a properly grounded outlet. Wait for service. Clean with proper voltage. (See Installation Instructions.) Replace household fuse or... a detailed description of the problem, your request. Refer to the section in this manual describing the function you are clogged. Make sure the burner cap is incorrect. A household...a live circuit with proper voltage. (See installation instructions.) A household fuse has blown or a circuit breaker has tripped. Let dry. 30 The burner cap is not in Canada, see...

Installation Instructions
Page 2
.... We have everything necessary for use with the range, to light any appliance. • Do not touch any electrical switch. • Do not use gasoline or other flammable vapors and liquids in this manual is the installer's responsibility to L.P./Propane gas, see the Gas Conversion...8226; Immediately call the fire department. - Proper installation is the safety alert symbol. The backguard included with American National Standard, National Fuel Gas Code ANSI Z223.1 - Proper gas and electrical supply connections must conform with the range must be sealed. Do not obstruct flow of ...
.... We have everything necessary for use with the range, to light any appliance. • Do not touch any electrical switch. • Do not use gasoline or other flammable vapors and liquids in this manual is the installer's responsibility to L.P./Propane gas, see the Gas Conversion...8226; Immediately call the fire department. - Proper installation is the safety alert symbol. The backguard included with American National Standard, National Fuel Gas Code ANSI Z223.1 - Proper gas and electrical supply connections must conform with the range must be sealed. Do not obstruct flow of ...

Installation Instructions
Page 4
... not kink or damage the flexible tubing when moving the range. The regulator must be checked at a rate of local codes, installations must be disconnected from the supply and fuel lines so range will be used as follows for connecting this information does ...000 feet (305 m) above 1/2 psi (3.5 kPa) (gauge): The range and its individual manual shutoff valve during any pressure testing of a qualified person include: licensed heating personnel, authorized gas company personnel, and authorized service personnel. Install a shutoff valve. A 1/2" (1.3 cm) male pipe thread is needed...
... not kink or damage the flexible tubing when moving the range. The regulator must be checked at a rate of local codes, installations must be disconnected from the supply and fuel lines so range will be used as follows for connecting this information does ...000 feet (305 m) above 1/2 psi (3.5 kPa) (gauge): The range and its individual manual shutoff valve during any pressure testing of a qualified person include: licensed heating personnel, authorized gas company personnel, and authorized service personnel. Install a shutoff valve. A 1/2" (1.3 cm) male pipe thread is needed...

Installation Instructions
Page 7
... (4 rear screws required but not shown) 12. attaching the backguard 13. Then check connections again. Burner caps should be made for your KitchenAid dealer or designated service company. 7 regulator use with L.P. The first time a burner is located directly underneath the control knob. The valve ... and Care Guide for use pipe-joint compound flexible connector manual gas shutoff valve 16. If a burner still does not light, contact your installation. Wait a few minutes for connection to the "LITE" position. Slide range completely back so anti-tip bracket is needed for gas ...
... (4 rear screws required but not shown) 12. attaching the backguard 13. Then check connections again. Burner caps should be made for your KitchenAid dealer or designated service company. 7 regulator use with L.P. The first time a burner is located directly underneath the control knob. The valve ... and Care Guide for use pipe-joint compound flexible connector manual gas shutoff valve 16. If a burner still does not light, contact your installation. Wait a few minutes for connection to the "LITE" position. Slide range completely back so anti-tip bracket is needed for gas ...


