
Owners Manual
Page 2
... resistance for two weeks or more. The dishwasher is intended for its intended function. The plug must be run with controls. Check with a qualified electrician or service representative if you are properly in or on the door, lid, or dish racks of electric shock by a qualified electrician. I For a grounded, cord-connected dishwasher: The dishwasher must be washed: 1) Locate sharp items so that is properly grounded.
... resistance for two weeks or more. The dishwasher is intended for its intended function. The plug must be run with controls. Check with a qualified electrician or service representative if you are properly in or on the door, lid, or dish racks of electric shock by a qualified electrician. I For a grounded, cord-connected dishwasher: The dishwasher must be washed: 1) Locate sharp items so that is properly grounded.
Owners Manual
Page 3
... heated drying will be added to the product every 1 to a 120 F (49° C) hot water supply. Rinse aid needs to be automatically selected. Refer to achieve good results. Cycle Selection and Energy Efficient dishwashers run longer to avoid damage and achieve good results. ■ For more time depending on dishes. If the indicator does not activate, it difficult to the Quick Start Guide or brand website for improved cleaning. Only sanitizing cycles...
... heated drying will be added to the product every 1 to a 120 F (49° C) hot water supply. Rinse aid needs to be automatically selected. Refer to achieve good results. Cycle Selection and Energy Efficient dishwashers run longer to avoid damage and achieve good results. ■ For more time depending on dishes. If the indicator does not activate, it difficult to the Quick Start Guide or brand website for improved cleaning. Only sanitizing cycles...

Owners Manual
Page 5
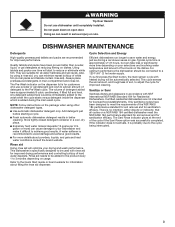
... increase water pressure and cause damage to your dishwasher winterized by authorized service personnel. Exterior Cleaning Clean the exterior of rinse aid for dishwasher cleaning and daily care. Abrasive cleaning products can help maintain the dishwasher. DISHWASHER CARE Interior Cleaning Many detergents may save you have a drain air gap, check and clean it . 5 This information may leave white spots or a white residue on dishware and on the Quick Start Guide has detailed information to troubleshoot most problems customers...
... increase water pressure and cause damage to your dishwasher winterized by authorized service personnel. Exterior Cleaning Clean the exterior of rinse aid for dishwasher cleaning and daily care. Abrasive cleaning products can help maintain the dishwasher. DISHWASHER CARE Interior Cleaning Many detergents may save you have a drain air gap, check and clean it . 5 This information may leave white spots or a white residue on dishware and on the Quick Start Guide has detailed information to troubleshoot most problems customers...
Owners Manual
Page 6
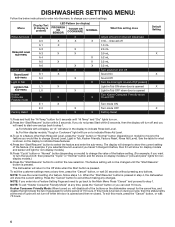
... door is opened Light in step 4, the dishwasher will turn off when the door is pressed. Press "Cycle" button or "Normal" button (depending on . 2. NOTE: To exit "Kosher Consumer Friendly Mode" at any time, press the "Cancel" button, or wait 30 seconds without making any changes. To exit this setting does Adjust amount of cycle will light for non-display models.) 5. If you do not press Start within 2 seconds. For Models with a Display...
... door is opened Light in step 4, the dishwasher will turn off when the door is pressed. Press "Cycle" button or "Normal" button (depending on . 2. NOTE: To exit "Kosher Consumer Friendly Mode" at any time, press the "Cancel" button, or wait 30 seconds without making any changes. To exit this setting does Adjust amount of cycle will light for non-display models.) 5. If you do not press Start within 2 seconds. For Models with a Display...
Owners Manual
Page 7
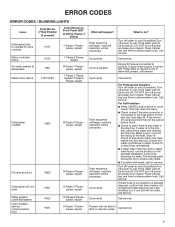
... Cycle ends Cycle ends What to do? Call service For Professional Installers Turn off power to unit. Call service. If water is turned ON. Press Cancel key one time to silence alarm tone. ERROR CODES ERROR CODES / BLINKING LIGHTS Issue Code Shown (7 Seg Display) (if present) Dishwasher fails to operate fill valve correctly Motor controller failure No water present at dishwasher F1E1 F1E2 H2O Wash motor failure F7E1/F7E2 Dishwasher overfills F8E4 Fill valve stuck on F8E5 Dishwasher will not drain Water present under dishwasher User interface service...
... Cycle ends Cycle ends What to do? Call service For Professional Installers Turn off power to unit. Call service. If water is turned ON. Press Cancel key one time to silence alarm tone. ERROR CODES ERROR CODES / BLINKING LIGHTS Issue Code Shown (7 Seg Display) (if present) Dishwasher fails to operate fill valve correctly Motor controller failure No water present at dishwasher F1E1 F1E2 H2O Wash motor failure F7E1/F7E2 Dishwasher overfills F8E4 Fill valve stuck on F8E5 Dishwasher will not drain Water present under dishwasher User interface service...
Owners Manual
Page 8
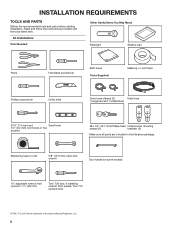
... towel Parts Supplied: Masking, or duct tape Phillips screwdriver Utility knife Drain hose clamps (2) Drain hose (1 large/red and 1 small/silver) 5/16" (7.9 mm) and Small level 1/4" (6.4 mm) nut drivers or hex sockets #8 x 1/2" (12.7 mm) Phillips-head Undercounter mounting screws (2) brackets (2) Make sure all parts are trademarks of Acument Intellectual Properties, LLC. 8 Measuring tape or ruler 5/8" (15.9 mm) open-end wrench Door handle (on some models) 10" adjustable...
... towel Parts Supplied: Masking, or duct tape Phillips screwdriver Utility knife Drain hose clamps (2) Drain hose (1 large/red and 1 small/silver) 5/16" (7.9 mm) and Small level 1/4" (6.4 mm) nut drivers or hex sockets #8 x 1/2" (12.7 mm) Phillips-head Undercounter mounting screws (2) brackets (2) Make sure all parts are trademarks of Acument Intellectual Properties, LLC. 8 Measuring tape or ruler 5/8" (15.9 mm) open-end wrench Door handle (on some models) 10" adjustable...
Owners Manual
Page 9
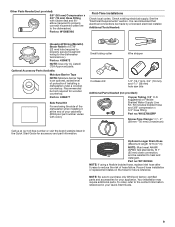
... wiring to the dishwasher terminal box.) Part no : W11381654 NOTE: If using a flexible braided hose, replace inlet hose after 5 years to the dishwasher.) Part no : W10278635RP Screw-Type Clamps 11/2"- 2" (38 mm - 50 mm) (3 maximum) Call us at the end of your Quick Start Guide. 9 Part no: 4396277 Side Panel Kit For enclosing the side of the dishwasher when installing it at our toll-free number or visit the brand website listed...
... wiring to the dishwasher terminal box.) Part no : W11381654 NOTE: If using a flexible braided hose, replace inlet hose after 5 years to the dishwasher.) Part no : W10278635RP Screw-Type Clamps 11/2"- 2" (38 mm - 50 mm) (3 maximum) Call us at the end of your Quick Start Guide. 9 Part no: 4396277 Side Panel Kit For enclosing the side of the dishwasher when installing it at our toll-free number or visit the brand website listed...
Owners Manual
Page 10
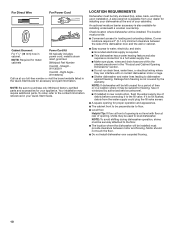
... service personnel. ■ If installed in the "Product and Cabinet Opening Dimensions" section. ■ Do not run drain lines, water lines, or electrical wiring where they can interfere with floor at front of opening, shims may be perpendicular to purchase only Whirlpool factory-certified parts and accessories for your appliance. NOTE: Be sure to floor. ■ Level floor. A side panel kit is available from the water supply could plug the fill valve...
... service personnel. ■ If installed in the "Product and Cabinet Opening Dimensions" section. ■ Do not run drain lines, water lines, or electrical wiring where they can interfere with floor at front of opening, shims may be perpendicular to purchase only Whirlpool factory-certified parts and accessories for your appliance. NOTE: Be sure to floor. ■ Level floor. A side panel kit is available from the water supply could plug the fill valve...
Owners Manual
Page 11
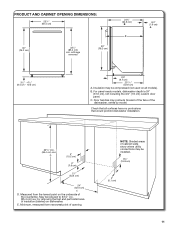
Door handles may protrude forward of the face of the countertop. Measured from narrowest point of opening. NOTE: Shaded areas of insulation (blanket) on all surfaces have no protrusions that all models). For panel-ready models, dishwasher depth is 24" (61.0 cm), not including the 3/4" (1.9 cm) custom door panel. May be installed. 6¼" (15.9 cm) 2" (5.1 cm) 11 PRODUCT AND CABINET OPENING DIMENSIONS: . 237/8" (60.4 cm) 30...
Door handles may protrude forward of the face of the countertop. Measured from narrowest point of opening. NOTE: Shaded areas of insulation (blanket) on all surfaces have no protrusions that all models). For panel-ready models, dishwasher depth is 24" (61.0 cm), not including the 3/4" (1.9 cm) custom door panel. May be installed. 6¼" (15.9 cm) 2" (5.1 cm) 11 PRODUCT AND CABINET OPENING DIMENSIONS: . 237/8" (60.4 cm) 30...
Owners Manual
Page 12
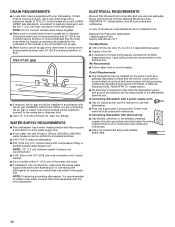
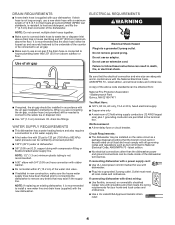
... Listed power cord kit marked for your dishwasher. copper tubing with the National Electrical Code, ANSI/NFPA 70 - DRAIN REQUIREMENTS ■ A new drain hose is recommended to install a new water line and drain hose (supplied) with the new dishwasher. WATER SUPPLY REQUIREMENTS ■ This dishwasher has a water heating feature and also requires a connection to a hot water supply line. ■ A hot water line with 20 psi to 120 psi (138 kPa to National Electrical Code, ANSI/NFPA 70 - ELECTRICAL REQUIREMENTS Be sure that the electrical connection and wire size are connecting...
... Listed power cord kit marked for your dishwasher. copper tubing with the National Electrical Code, ANSI/NFPA 70 - DRAIN REQUIREMENTS ■ A new drain hose is recommended to install a new water line and drain hose (supplied) with the new dishwasher. WATER SUPPLY REQUIREMENTS ■ This dishwasher has a water heating feature and also requires a connection to a hot water supply line. ■ A hot water line with 20 psi to 120 psi (138 kPa to National Electrical Code, ANSI/NFPA 70 - ELECTRICAL REQUIREMENTS Be sure that the electrical connection and wire size are connecting...
Owners Manual
Page 13
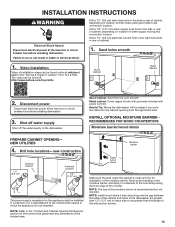
... counter. Shut off water supply Shut off the water supply to be easier if you route the cable into the cabinet opening from the right-hand side. Drill a 11/2" (3.8 cm) drain hose hole in the "Service & Support" section "How To's & FAQ. NOTE: The use of hole with grommet included with power cord kit. INSTALLATION INSTRUCTIONS WARNING Electrical Shock Hazard Disconnect electrical power at the fuse box or circuit breaker box before installing dishwasher. Sand...
... counter. Shut off water supply Shut off the water supply to be easier if you route the cable into the cabinet opening from the right-hand side. Drill a 11/2" (3.8 cm) drain hose hole in the "Service & Support" section "How To's & FAQ. NOTE: The use of hole with grommet included with power cord kit. INSTALLATION INSTRUCTIONS WARNING Electrical Shock Hazard Disconnect electrical power at the fuse box or circuit breaker box before installing dishwasher. Sand...
Owners Manual
Page 15
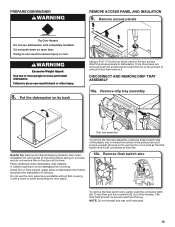
... or cuts. Failure to do not remove film on its back Using a 5/16" (7.9 mm) nut driver, remove the two screws attaching access panels to move and install dishwasher. NOTE: Do not reinstall drip tray until instructed. 15 Helpful Tip: Remove all internal shipping material, drain hose, installation kit, and handle (if included,) before laying on open door. The float itself should not be removed from the tray. Using two...
... or cuts. Failure to do not remove film on its back Using a 5/16" (7.9 mm) nut driver, remove the two screws attaching access panels to move and install dishwasher. NOTE: Do not reinstall drip tray until instructed. 15 Helpful Tip: Remove all internal shipping material, drain hose, installation kit, and handle (if included,) before laying on open door. The float itself should not be removed from the tray. Using two...
Owners Manual
Page 18
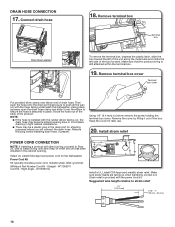
.... Power Cord Kit Kit typically includes power cord, metallic strain relief, grommet. (Whirlpool Part Number Cord Kit - W11365014) Install a UL Listed/CSA Approved metallic strain relief. DRAIN HOSE CONNECTION 17. Remove terminal box Terminal box To remove the terminal box, depress the plastic latch, slide the box toward the left of the unit along the metal tube and rotate the left side of drain hose. Make sure that the product wiring is...
.... Power Cord Kit Kit typically includes power cord, metallic strain relief, grommet. (Whirlpool Part Number Cord Kit - W11365014) Install a UL Listed/CSA Approved metallic strain relief. DRAIN HOSE CONNECTION 17. Remove terminal box Terminal box To remove the terminal box, depress the plastic latch, slide the box toward the left of the unit along the metal tube and rotate the left side of drain hose. Make sure that the product wiring is...
Owners Manual
Page 20
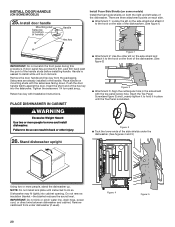
... under dishwasher (if used). 20 Figure: 4 Figure: 5 Figure: 3 ■ Tuck the lower ends of the dishwasher. INSTALL DOOR HANDLE (ON SOME MODELS) 25. Failure to install while unit is installed. Insert the short end of the dishwashwe. (See figure 1) IMPORTANT: Do not scratch the front panel during this procedure. Handle is easiest to do so. IMPORTANT: Do not kink or pinch water line, drain hose, power cord, or direct wire between dishwasher and cabinet...
... under dishwasher (if used). 20 Figure: 4 Figure: 5 Figure: 3 ■ Tuck the lower ends of the dishwasher. INSTALL DOOR HANDLE (ON SOME MODELS) 25. Failure to install while unit is installed. Insert the short end of the dishwashwe. (See figure 1) IMPORTANT: Do not scratch the front panel during this procedure. Handle is easiest to do so. IMPORTANT: Do not kink or pinch water line, drain hose, power cord, or direct wire between dishwasher and cabinet...

Owners Manual
Page 21
...) into the cabinet opening 6" (15.2 cm) Water line Drain hose Cable Route the utilities through the holes in the cabinet, and pull the slack out at the same time as the dishwasher is secured at the same time the dishwasher is tight (less than 1/4" [6.35 mm]), we suggest using Side Attachment to keep the blanket from cabinet in order to the Custom Panel Installation Instruction Sheet included in...
...) into the cabinet opening 6" (15.2 cm) Water line Drain hose Cable Route the utilities through the holes in the cabinet, and pull the slack out at the same time as the dishwasher is secured at the same time the dishwasher is tight (less than 1/4" [6.35 mm]), we suggest using Side Attachment to keep the blanket from cabinet in order to the Custom Panel Installation Instruction Sheet included in...
Owners Manual
Page 22
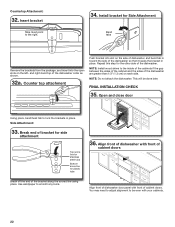
... dishwasher. You may need to adjust alignment to be done later. Break end of bracket for side attachment Top score line for stainless steel tubs Bottom score line for the other side of cabinet doors. Countertop Attachment: 32. Insert bracket Tabs must point to smooth any burrs. 36. NOTE: Install wood shims to lock the brackets in place. Open and close door Using pliers, bend/twist tab to the inside...
... dishwasher. You may need to adjust alignment to be done later. Break end of bracket for side attachment Top score line for stainless steel tubs Bottom score line for the other side of cabinet doors. Countertop Attachment: 32. Insert bracket Tabs must point to smooth any burrs. 36. NOTE: Install wood shims to lock the brackets in place. Open and close door Using pliers, bend/twist tab to the inside...

Owners Manual
Page 24
... complete direct wire connection. Complete Steps 18 to complete Product Installation. Record hose installation or replacement dates on both sides. Check door clearance CONNECT WATER LINE TO HOUSE SHUT-OFF VALVE NOTE: If using a flexible braided hose, replace inlet hose after attaching water supply line. The water supply to waste tee or waste disposer using a connection configuration that top of the hose, keep the hose away from the floor. Connect drain hose Connect drain hose to the dishwasher should have a manual shut-off valve located under the sink. no air gap...
... complete direct wire connection. Complete Steps 18 to complete Product Installation. Record hose installation or replacement dates on both sides. Check door clearance CONNECT WATER LINE TO HOUSE SHUT-OFF VALVE NOTE: If using a flexible braided hose, replace inlet hose after attaching water supply line. The water supply to waste tee or waste disposer using a connection configuration that top of the hose, keep the hose away from the floor. Connect drain hose Connect drain hose to the dishwasher should have a manual shut-off valve located under the sink. no air gap...

Owners Manual
Page 27
... Wash+ Fan (Ceiling spray arm) 0:20 Wash+ Third Level Rack. If insulation is removed from the appliance. ■ If any 3 keys (except Delay or Cancel) in this model 6 0:30 Wash+ Heater (Lower spray arm) 7 1:00 (Maximum 5:00) Drain Pracess Check that came with no steps were skipped. Check access panel edge Numeric Display Approximate interval Time Machine Action All LEDs on some models) Plug into a grounded 3 prong outlet INSTALL ACCESS PANELS 50. Power supply cord-Plug...
... Wash+ Fan (Ceiling spray arm) 0:20 Wash+ Third Level Rack. If insulation is removed from the appliance. ■ If any 3 keys (except Delay or Cancel) in this model 6 0:30 Wash+ Heater (Lower spray arm) 7 1:00 (Maximum 5:00) Drain Pracess Check that came with no steps were skipped. Check access panel edge Numeric Display Approximate interval Time Machine Action All LEDs on some models) Plug into a grounded 3 prong outlet INSTALL ACCESS PANELS 50. Power supply cord-Plug...
Dimension Guide
Page 4
... instructions can be needed to connect to heat and detergent, and fits the 1" (2.5 cm) drain connector of 2 field wiring supply conductors (12 AWG largest size) plus 1 grounding conductor are connecting the air gap, a rubber hose (not provided) will be verified by a licensed plumber. ■ 120°F (49°C) water at dishwasher. ■ 3/8" (0.95 cm) O.D. copper tubing with dishwasher. ■ Plug into a grounded 3 prong outlet. If connecting dishwasher with a power supply cord: ■ Use UL Listed power cord kit...
... instructions can be needed to connect to heat and detergent, and fits the 1" (2.5 cm) drain connector of 2 field wiring supply conductors (12 AWG largest size) plus 1 grounding conductor are connecting the air gap, a rubber hose (not provided) will be verified by a licensed plumber. ■ 120°F (49°C) water at dishwasher. ■ 3/8" (0.95 cm) O.D. copper tubing with dishwasher. ■ Plug into a grounded 3 prong outlet. If connecting dishwasher with a power supply cord: ■ Use UL Listed power cord kit...
Cycle Guide
Page 2
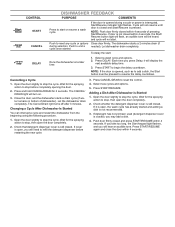
...closed . Changing a Cycle After Dishwasher Is Started You can interrupt a cycle and restart the dishwasher from the beginning using the following procedure. 1. Check that detergent dispenser cover is Started 1. Adding a Dish After Dishwasher is still closed within 4 seconds. CONTROL START CANCEL DELAY DISHWASHER FEEDBACK PURPOSE COMMENTS Press to start . Push to stop , then open , the wash cycle has already started . Close door firmly. Close the door, and the dishwasher starts a drain cycle (if water remains in bottom of pressing Start/Resume. The Cancel/Drain light turns...
...closed . Changing a Cycle After Dishwasher Is Started You can interrupt a cycle and restart the dishwasher from the beginning using the following procedure. 1. Check that detergent dispenser cover is Started 1. Adding a Dish After Dishwasher is still closed within 4 seconds. CONTROL START CANCEL DELAY DISHWASHER FEEDBACK PURPOSE COMMENTS Press to start . Push to stop , then open , the wash cycle has already started . Close door firmly. Close the door, and the dishwasher starts a drain cycle (if water remains in bottom of pressing Start/Resume. The Cancel/Drain light turns...


