

Owners Manual
Page 2
... rinse agents recommended for two weeks or more. To reduce the risk of children. When loading items to be grounded. Do not touch the heating element during this time. If the hot water system has not been used for use in a dishwasher, and keep them out of the reach of injury, do not smoke or use an open when not loading or unloading dishes. This product...
... rinse agents recommended for two weeks or more. To reduce the risk of children. When loading items to be grounded. Do not touch the heating element during this time. If the hot water system has not been used for use in a dishwasher, and keep them out of the reach of injury, do not smoke or use an open when not loading or unloading dishes. This product...
Owners Manual
Page 3
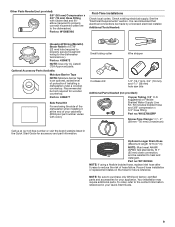
... for soil removal and for customers who use dishwasher until completely installed. They are recommended for licensed food establishments. Rinse aid Using rinse aid will start to reduce or eliminate white film. Cycle Selection and Energy Efficient dishwashers run longer to a 120 F (49° C) hot water supply. Typical cycle time is no intention, either directly or indirectly, that all cycles on the dispenser lid is approximately 8 cubic centimeters, if filled full and level. DISHWASHER MAINTENANCE Detergents High...
... for soil removal and for customers who use dishwasher until completely installed. They are recommended for licensed food establishments. Rinse aid Using rinse aid will start to reduce or eliminate white film. Cycle Selection and Energy Efficient dishwashers run longer to a 120 F (49° C) hot water supply. Typical cycle time is no intention, either directly or indirectly, that all cycles on the dispenser lid is approximately 8 cubic centimeters, if filled full and level. DISHWASHER MAINTENANCE Detergents High...

Owners Manual
Page 5
... dishware and on the exterior of rinse aid for dishwasher cleaning and daily care. Exterior Cleaning Clean the exterior of a service call. Avoid using the dishwasher during the summer months, turn off the water and power supply to troubleshoot most problems customers encounter. Follow package directions. Ice formations in the winter, avoid water damage by having your dishwasher winterized by authorized service personnel. Extended Time Without Use To Reduce Risk of affresh®...
... dishware and on the exterior of rinse aid for dishwasher cleaning and daily care. Exterior Cleaning Clean the exterior of a service call. Avoid using the dishwasher during the summer months, turn off the water and power supply to troubleshoot most problems customers encounter. Follow package directions. Ice formations in the winter, avoid water damage by having your dishwasher winterized by authorized service personnel. Extended Time Without Use To Reduce Risk of affresh®...
Owners Manual
Page 6
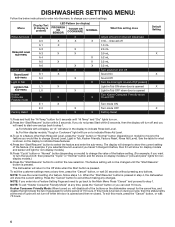
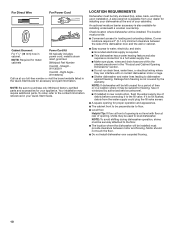
... Non-display models,"Tough or Cookware" light will turn on model) to change the value of cycle will show the current setting of 75 hours. Press "Cycle" button or "Normal" button (depending on to step 1. NOTE: To see the current setting of rinse aid dispensed 0 mL - To exit this setting does Adjust amount of a feature, follow steps 1-4. b. If this mode is turned on during a cycle, then the status lights at the end...
... Non-display models,"Tough or Cookware" light will turn on model) to change the value of cycle will show the current setting of 75 hours. Press "Cycle" button or "Normal" button (depending on to step 1. NOTE: To see the current setting of rinse aid dispensed 0 mL - To exit this setting does Adjust amount of a feature, follow steps 1-4. b. If this mode is turned on during a cycle, then the status lights at the end...
Owners Manual
Page 7
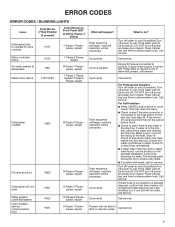
... valve correctly Motor controller failure No water present at dishwasher F1E1 F1E2 H2O Wash motor failure F7E1/F7E2 Dishwasher overfills F8E4 Fill valve stuck on F8E5 Dishwasher will happen? Press Start to unit. Turn off power and keep door closed . Press Cancel key one time to see if the wire connector is off power and keep door closed. pause, repeat 1 Pause 2 Pause, repeat 8 Pause 1 Pause - For Self Installers ■ Press CANCEL button twice or cycle power. ERROR CODES ERROR CODES / BLINKING LIGHTS...
... valve correctly Motor controller failure No water present at dishwasher F1E1 F1E2 H2O Wash motor failure F7E1/F7E2 Dishwasher overfills F8E4 Fill valve stuck on F8E5 Dishwasher will happen? Press Start to unit. Turn off power and keep door closed . Press Cancel key one time to see if the wire connector is off power and keep door closed. pause, repeat 1 Pause 2 Pause, repeat 8 Pause 1 Pause - For Self Installers ■ Press CANCEL button twice or cycle power. ERROR CODES ERROR CODES / BLINKING LIGHTS...
Owners Manual
Page 8
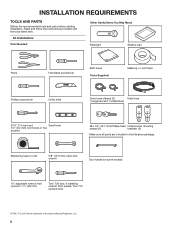
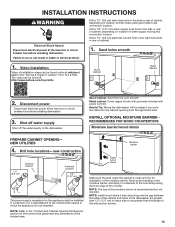
... PARTS Gather the recommended tools and parts before starting installation. Read and follow the instructions provided with the tools listed here. All Installations Tools Needed: Other Useful Items You May Need: Flashlight Shallow pan Pliers Flat-blade screwdriver Bath towel Parts Supplied: Masking, or duct tape Phillips screwdriver Utility knife Drain hose clamps (2) Drain hose (1 large/red and 1 small/silver) 5/16" (7.9 mm) and Small level 1/4" (6.4 mm) nut drivers...
... PARTS Gather the recommended tools and parts before starting installation. Read and follow the instructions provided with the tools listed here. All Installations Tools Needed: Other Useful Items You May Need: Flashlight Shallow pan Pliers Flat-blade screwdriver Bath towel Parts Supplied: Masking, or duct tape Phillips screwdriver Utility knife Drain hose clamps (2) Drain hose (1 large/red and 1 small/silver) 5/16" (7.9 mm) and Small level 1/4" (6.4 mm) nut drivers...
Owners Manual
Page 9
... braided hose, replace inlet hose after 5 years to heat and detergent. It is an optional, added level of hose failure. suggested) or Flexible Braided Water Supply Line Kit. Your installation may require additional parts. Part no : W10278635RP Screw-Type Clamps 11/2"- 2" (38 mm - 50 mm) (3 maximum) Call us at the end of the dishwasher when installing it at our toll-free number or visit the brand website listed in your Quick Start Guide. 9 Other Parts Needed...
... braided hose, replace inlet hose after 5 years to heat and detergent. It is an optional, added level of hose failure. suggested) or Flexible Braided Water Supply Line Kit. Your installation may require additional parts. Part no : W10278635RP Screw-Type Clamps 11/2"- 2" (38 mm - 50 mm) (3 maximum) Call us at the end of the dishwasher when installing it at our toll-free number or visit the brand website listed in your Quick Start Guide. 9 Other Parts Needed...
Owners Manual
Page 10
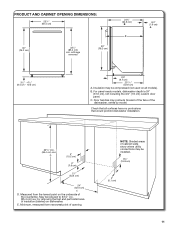
... also available for loading and unloading dishes. Motor should not touch the floor. ■ Do not install dishwasher over carpeted flooring. 10 A side panel kit is required. ■ This dishwasher has a water heating feature and also requires a connection to a hot water supply line. ■ Make sure pipes, wires and drain hose are within the shaded area shown in the "Product and Cabinet Opening Dimensions" section. ■ Do not run drain lines, water lines, or electrical wiring where they can...
... also available for loading and unloading dishes. Motor should not touch the floor. ■ Do not install dishwasher over carpeted flooring. 10 A side panel kit is required. ■ This dishwasher has a water heating feature and also requires a connection to a hot water supply line. ■ Make sure pipes, wires and drain hose are within the shaded area shown in the "Product and Cabinet Opening Dimensions" section. ■ Do not run drain lines, water lines, or electrical wiring where they can...
Owners Manual
Page 11
... have no protrusions that all models). E. Door handles may protrude forward of the face of opening. Measured from narrowest point of the dishwasher, varies by removing the feet and perforated area of the countertop. by model. NOTE: Shaded areas of cabinet walls show where utility connections may be compressed (not used on dishwasher. Check that would prohibit dishwasher installation. 335/8" min. (85.4 cm...
... have no protrusions that all models). E. Door handles may protrude forward of the face of opening. Measured from narrowest point of the dishwasher, varies by removing the feet and perforated area of the countertop. by model. NOTE: Shaded areas of cabinet walls show where utility connections may be compressed (not used on dishwasher. Check that would prohibit dishwasher installation. 335/8" min. (85.4 cm...
Owners Manual
Page 12
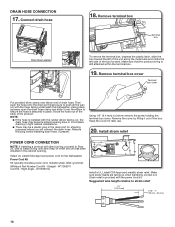
... connecting dishwasher with a power supply cord: ■ Use UL Listed power cord kit marked for your dishwasher. NOTE: Do not connect multiple drain hoses together. ■ Make sure to connect drain hose to heat and detergent, and fits the 1" (2.5 cm) drain connector of the water inlet valve. ■ If installed in the supply line. copper tubing with compression fitting or flexible braided water supply line. If drain hose is not long enough, use with dishwasher. ■ Plug into a grounded 3 prong outlet. We Recommend: ■ A time-delay fuse or...
... connecting dishwasher with a power supply cord: ■ Use UL Listed power cord kit marked for your dishwasher. NOTE: Do not connect multiple drain hoses together. ■ Make sure to connect drain hose to heat and detergent, and fits the 1" (2.5 cm) drain connector of the water inlet valve. ■ If installed in the supply line. copper tubing with compression fitting or flexible braided water supply line. If drain hose is not long enough, use with dishwasher. ■ Plug into a grounded 3 prong outlet. We Recommend: ■ A time-delay fuse or...
Owners Manual
Page 13
... in the side or rear of cabinet, depending on a wall adjacent to the dishwasher. The video can be installed in a cabinet or on location of water supply routing and connection location Drill a 11/2" (3.8 cm) electrical conduit hole in the "Service & Support" section "How To's & FAQ. NOTE: The use of this moisture barrier is clean and dry for the correct hole placement and dimensions of drain hose routing and drain hose connection location.
... in the side or rear of cabinet, depending on a wall adjacent to the dishwasher. The video can be installed in a cabinet or on location of water supply routing and connection location Drill a 11/2" (3.8 cm) electrical conduit hole in the "Service & Support" section "How To's & FAQ. NOTE: The use of this moisture barrier is clean and dry for the correct hole placement and dimensions of drain hose routing and drain hose connection location.
Owners Manual
Page 15
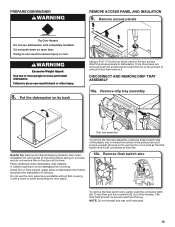
... on its back Using a 5/16" (7.9 mm) nut driver, remove the two screws attaching access panels to avoid scratching the door panel. 10b. Helpful Tip: Remove all internal shipping material, drain hose, installation kit, and handle (if included,) before laying on it's back, and do so can result in cabinet opening to move and install dishwasher. Do not use dishwasher until instructed. 15 WARNING Excessive Weight Hazard Use two or more...
... on its back Using a 5/16" (7.9 mm) nut driver, remove the two screws attaching access panels to avoid scratching the door panel. 10b. Helpful Tip: Remove all internal shipping material, drain hose, installation kit, and handle (if included,) before laying on it's back, and do so can result in cabinet opening to move and install dishwasher. Do not use dishwasher until instructed. 15 WARNING Excessive Weight Hazard Use two or more...
Owners Manual
Page 18
... end of the box. Install strain relief POWER CORD CONNECTION NOTE: If installing a product with the hose facing underneath the dishwasher. Remove this plug before installing drain hose, if present. Suggested wire length relative to install wiring until after Step 44 when the unit has been installed in place. Using pliers, squeeze open the drain hose clamp and slide it out of drain hose. Power Cord Kit Kit typically includes power cord, metallic strain relief, grommet. (Whirlpool Part Number Cord Kit - Straight - Using 1/4" (6.4 mm) nut driver remove...
... end of the box. Install strain relief POWER CORD CONNECTION NOTE: If installing a product with the hose facing underneath the dishwasher. Remove this plug before installing drain hose, if present. Suggested wire length relative to install wiring until after Step 44 when the unit has been installed in place. Using pliers, squeeze open the drain hose clamp and slide it out of drain hose. Power Cord Kit Kit typically includes power cord, metallic strain relief, grommet. (Whirlpool Part Number Cord Kit - Straight - Using 1/4" (6.4 mm) nut driver remove...
Owners Manual
Page 20
.... Tighten the setscrews 1/4 turn past the point of the dishwashwe. (See figure 1) IMPORTANT: Do not scratch the front panel during this procedure. IMPORTANT: Do not kink or pinch water line, drain hose, power cord, or direct wire between dishwasher and cabinet. Insert the short end of the dishwasher. (See figure 2) Figure: 2 ■ Attachment 3: Align the rectangular hole in place until instructed to install while unit is...
.... Tighten the setscrews 1/4 turn past the point of the dishwashwe. (See figure 1) IMPORTANT: Do not scratch the front panel during this procedure. IMPORTANT: Do not kink or pinch water line, drain hose, power cord, or direct wire between dishwasher and cabinet. Insert the short end of the dishwasher. (See figure 2) Figure: 2 ■ Attachment 3: Align the rectangular hole in place until instructed to install while unit is...

Owners Manual
Page 21
... rear corners before proceeding to the dishwasher. - Complete custom panel installation before pushing into cabinet opening to keep from cabinet in the literature package. NOTE: Route water supply, drain hose, and power cord out the rear of the product and ensuring the hooks on the top collar of the dishwasher as shown in the rear of utilities at the same time as one of the counter...
... rear corners before proceeding to the dishwasher. - Complete custom panel installation before pushing into cabinet opening to keep from cabinet in the literature package. NOTE: Route water supply, drain hose, and power cord out the rear of the product and ensuring the hooks on the top collar of the dishwasher as shown in the rear of utilities at the same time as one of the counter...
Owners Manual
Page 22
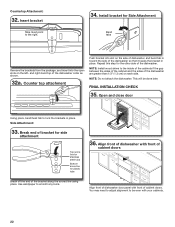
... in toward the side of the dishwasher so that it keeps the bracket in place. FINAL INSTALLATION CHECK 35. Open and close door Using pliers, bend/twist tab to lock the brackets in place. Use sandpaper to the inside of the cabinets if the gap between the sides of the cabinet and the sides of cabinet doors. You may need to adjust alignment to the right. 34. NOTE...
... in toward the side of the dishwasher so that it keeps the bracket in place. FINAL INSTALLATION CHECK 35. Open and close door Using pliers, bend/twist tab to lock the brackets in place. Use sandpaper to the inside of the cabinets if the gap between the sides of the cabinet and the sides of cabinet doors. You may need to adjust alignment to the right. 34. NOTE...

Owners Manual
Page 24
..., return here to Step 44 to the customer connection - Helpful Tip: To reduce vibration of door does not contact screws, brackets, or countertop. no air gap ■ Option B: No waste disposer - The water supply to the hot water line using a connection configuration that space between dishwasher cabinet opening and tub is in this installation guide. Check door clearance CONNECT WATER LINE TO HOUSE SHUT-OFF VALVE NOTE: If using one of the disposer or a waste...
..., return here to Step 44 to the customer connection - Helpful Tip: To reduce vibration of door does not contact screws, brackets, or countertop. no air gap ■ Option B: No waste disposer - The water supply to the hot water line using a connection configuration that space between dishwasher cabinet opening and tub is in this installation guide. Check door clearance CONNECT WATER LINE TO HOUSE SHUT-OFF VALVE NOTE: If using one of the disposer or a waste...

Owners Manual
Page 27
... interfere with your dishwasher. ■ Check that all tools used. ■ Run the Installation Cycles as follows (Note that the lower edge of the access panel touches the floor. Reinstall access panels and fasteners Insulation (on 0:01 1 0:30 (Maximum 5:00) Pause Initial Drain 2 2:00 Fill 3.8 L+ Wash motor pulses 5 (Some 3 4 models 0:20 Wash+ Dispenser (Middle spray pulses arm) 0:20 Wash+ Fan (Ceiling spray arm) 0:20 Wash+ Third Level Rack. 48. Power supply cord-Plug into a grounded 3 prong...
... interfere with your dishwasher. ■ Check that all tools used. ■ Run the Installation Cycles as follows (Note that the lower edge of the access panel touches the floor. Reinstall access panels and fasteners Insulation (on 0:01 1 0:30 (Maximum 5:00) Pause Initial Drain 2 2:00 Fill 3.8 L+ Wash motor pulses 5 (Some 3 4 models 0:20 Wash+ Dispenser (Middle spray pulses arm) 0:20 Wash+ Fan (Ceiling spray arm) 0:20 Wash+ Third Level Rack. 48. Power supply cord-Plug into a grounded 3 prong...
Dimension Guide
Page 4
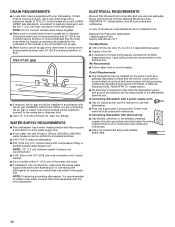
... to the underside of the dishwasher. copper tubing with dishwasher. ■ Plug into a grounded 3 prong outlet. We Recommend: ■ A time-delay fuse or circuit breaker. latest edition, and all local codes and ordinances. If connecting dishwasher with a power supply cord: ■ Use UL Listed power cord kit marked for use a new drain hose with grounding wire that the electrical connection and wire size are adequate and in the supply line. If connecting dishwasher with direct wiring: ■ Use flexible, armored, or nonmetallic sheathed...
... to the underside of the dishwasher. copper tubing with dishwasher. ■ Plug into a grounded 3 prong outlet. We Recommend: ■ A time-delay fuse or circuit breaker. latest edition, and all local codes and ordinances. If connecting dishwasher with a power supply cord: ■ Use UL Listed power cord kit marked for use a new drain hose with grounding wire that the electrical connection and wire size are adequate and in the supply line. If connecting dishwasher with direct wiring: ■ Use flexible, armored, or nonmetallic sheathed...
Cycle Guide
Page 2
... new cycle. 3. Open the door slightly to stop the cycle. If detergent has not yet been used (detergent dispenser cover is still closed. The dishwasher starts a 2 minutes drain (if needed). Press START to reset the control. 4. The CANCEL/ DRAIN light will display the next available delay time. 3. Check that detergent dispenser cover is closed within 4 seconds of dishwasher). If you take too long, the Start keypad light flashes, and you may add a dish. 4. Cycle will not start. Open the door slightly to stop , then open the door completely. 2. Let the dishwasher drain...
... new cycle. 3. Open the door slightly to stop the cycle. If detergent has not yet been used (detergent dispenser cover is still closed. The dishwasher starts a 2 minutes drain (if needed). Press START to reset the control. 4. The CANCEL/ DRAIN light will display the next available delay time. 3. Check that detergent dispenser cover is closed within 4 seconds of dishwasher). If you take too long, the Start keypad light flashes, and you may add a dish. 4. Cycle will not start. Open the door slightly to stop , then open the door completely. 2. Let the dishwasher drain...


