
Specification Sheet
Page 1
... Wash Arms Dimensions Product Dimensions (H x W x D) Depth with Door Open 90° Reference Material Dimension Guide Install Guide Use & Care Guide Energy Guide Warranty Built-In Front Tap Touch 5 6 46 2 Stainless Steel Filter Removable Filter 3 34-1/2" x 23-7/8" x 24-1/2" 49-1/2" *Per IEC standards. **Compared to Whirlpool® dishwashers without notice. ®/™ © 2020. For complete details, see Installation Instructions packed with Stemware Holders Filter-Based Wash System Sani-Rinse Option Express Wash Cycle Extended Heat Dry Option 2-4-8-Hour Delay Wash Electrical...
... Wash Arms Dimensions Product Dimensions (H x W x D) Depth with Door Open 90° Reference Material Dimension Guide Install Guide Use & Care Guide Energy Guide Warranty Built-In Front Tap Touch 5 6 46 2 Stainless Steel Filter Removable Filter 3 34-1/2" x 23-7/8" x 24-1/2" 49-1/2" *Per IEC standards. **Compared to Whirlpool® dishwashers without notice. ®/™ © 2020. For complete details, see Installation Instructions packed with Stemware Holders Filter-Based Wash System Sani-Rinse Option Express Wash Cycle Extended Heat Dry Option 2-4-8-Hour Delay Wash Electrical...

Owners Manual
Page 1
... instructions. DISHWASHER USER INSTRUCTIONS THANK YOU for purchasing this manual and on the righthand or left-hand side of your new dishwasher at www.kitchenaid.ca. Register your product model and serial numbers. In Canada, visit our website at register.kitchenaid.com. Model Number Serial Number Table of Contents DISHWASHER SAFETY 1 WHAT'S NEW IN YOUR DISHWASHER 3 PARTS AND FEATURES 4 START-UP/QUICK REFERENCE 5 QUICK STEPS 5 DISHWASHER USE 6 CYCLE AND OPTION DESCRIPTIONS 8 DISHWASHER FEATURES 11 FILTRATION SYSTEM 12 DISHWASHER CARE 13 TROUBLESHOOTING...
... instructions. DISHWASHER USER INSTRUCTIONS THANK YOU for purchasing this manual and on the righthand or left-hand side of your new dishwasher at www.kitchenaid.ca. Register your product model and serial numbers. In Canada, visit our website at register.kitchenaid.com. Model Number Serial Number Table of Contents DISHWASHER SAFETY 1 WHAT'S NEW IN YOUR DISHWASHER 3 PARTS AND FEATURES 4 START-UP/QUICK REFERENCE 5 QUICK STEPS 5 DISHWASHER USE 6 CYCLE AND OPTION DESCRIPTIONS 8 DISHWASHER FEATURES 11 FILTRATION SYSTEM 12 DISHWASHER CARE 13 TROUBLESHOOTING...

Owners Manual
Page 2
... 2) Load sharp knives with a cord having an equipment-grounding conductor and a grounding plug. If the hot water system has not been used for use dishwasher until completely installed. Do not operate the dishwasher unless all local codes and ordinances. The dishwasher is properly grounded. Do not touch the heating element during this time. Under certain conditions, hydrogen gas may be run with a qualified electrician or service...
... 2) Load sharp knives with a cord having an equipment-grounding conductor and a grounding plug. If the hot water system has not been used for use dishwasher until completely installed. Do not operate the dishwasher unless all local codes and ordinances. The dishwasher is properly grounded. Do not touch the heating element during this time. Under certain conditions, hydrogen gas may be run with a qualified electrician or service...
Owners Manual
Page 3
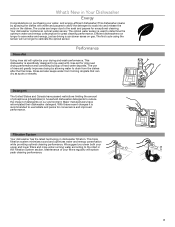
... improved performance. We suggest you clean both your drying and wash performance. SLIDE Filtration System Your dishwasher has the latest technology in dishwasher filtration. The optical water sensor is specifically designed to be used to reduce the impact of rinse aid greatly improves drying by spraying the dishes with rinse aid for exceptional cleaning. Performance Rinse Aid Using rinse aid will optimize your upper and lower filters and rinse under running water according to soak into and...
... improved performance. We suggest you clean both your drying and wash performance. SLIDE Filtration System Your dishwasher has the latest technology in dishwasher filtration. The optical water sensor is specifically designed to be used to reduce the impact of rinse aid greatly improves drying by spraying the dishes with rinse aid for exceptional cleaning. Performance Rinse Aid Using rinse aid will optimize your upper and lower filters and rinse under running water according to soak into and...

Owners Manual
Page 4
...fill protection float EQ Filtration System removes soil from water and improves cleaning action. Premium top rack adjusters FLEXI-FOLD DOWN™ adjustable tines (on some models) Upper spray arm TOP RACK Cup shelf Rack handle BOTTOM RACK Silverware basket 4 Parts and Features Side dry vent (on some models) Upper level wash Water feed tube Model and serial number label Water inlet opening Heating element Rinse aid dispenser reduces spotting and improves drying. Detergent dispenser (dispenser location varies by model) Pressurized spray nozzles provide effective...
...fill protection float EQ Filtration System removes soil from water and improves cleaning action. Premium top rack adjusters FLEXI-FOLD DOWN™ adjustable tines (on some models) Upper spray arm TOP RACK Cup shelf Rack handle BOTTOM RACK Silverware basket 4 Parts and Features Side dry vent (on some models) Upper level wash Water feed tube Model and serial number label Water inlet opening Heating element Rinse aid dispenser reduces spotting and improves drying. Detergent dispenser (dispenser location varies by model) Pressurized spray nozzles provide effective...

Owners Manual
Page 5
... removing and maintaining the filters. Press Start/RESUME every time you need fast results Efficient dishwashers run longer to save water and energy, just as , to add a dish, even during the Delay hours), the Start/ RESUME button must use the Extended Heated Dry option. When you need to pre-rinse dishes; ProWash™ cycle for information on gas. SLIDE SLIDE 3 Select a cycle and options (varies by model). 4 Start the dishwasher. If the door is not closed...
... removing and maintaining the filters. Press Start/RESUME every time you need fast results Efficient dishwashers run longer to save water and energy, just as , to add a dish, even during the Delay hours), the Start/ RESUME button must use the Extended Heated Dry option. When you need to pre-rinse dishes; ProWash™ cycle for information on gas. SLIDE SLIDE 3 Select a cycle and options (varies by model). 4 Start the dishwasher. If the door is not closed...

Owners Manual
Page 6
... water to flow up and some down to the spray as shown, and slide lid closed detergent container in each section of the dispenser. **A full main wash compartment contains 2 Tbsp (30 mL). 6 lower rack ■■ Check that when the dishwasher door is on dishes. Always place premeasured detergents in upper rack. NOTE: Follow instructions on the package when using a rinse aid, you can block the spray arms. STEP 2 Add Detergent...
... water to flow up and some down to the spray as shown, and slide lid closed detergent container in each section of the dispenser. **A full main wash compartment contains 2 Tbsp (30 mL). 6 lower rack ■■ Check that when the dishwasher door is on dishes. Always place premeasured detergents in upper rack. NOTE: Follow instructions on the package when using a rinse aid, you can block the spray arms. STEP 2 Add Detergent...

Owners Manual
Page 7
... rinse aid. SLIDE IMPORTANT: Your dishwasher is recommended to use a lower setting. NOTE: Indicator reads correct fill level when door is full. Pre Wash SLIDE OPEN 2. Pour rinse aid into the opening until the water is hot. To adjust the setting: Turn the arrow adjuster to a higher number to achieve good results. If you press the Cycles button, it again. To repeat the same cycle and options used previously, press the Start/RESUME keypad twice. Rinse Aid Setting Your rinse aid dispenser...
... rinse aid. SLIDE IMPORTANT: Your dishwasher is recommended to use a lower setting. NOTE: Indicator reads correct fill level when door is full. Pre Wash SLIDE OPEN 2. Pour rinse aid into the opening until the water is hot. To adjust the setting: Turn the arrow adjuster to a higher number to achieve good results. If you press the Cycles button, it again. To repeat the same cycle and options used previously, press the Start/RESUME keypad twice. Rinse Aid Setting Your rinse aid dispenser...
Owners Manual
Page 8
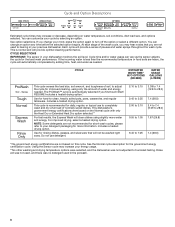
... fast results, the Express Wash will clean dishes using only the amount of water and energy needed . This cycle is normal and will provide optimal cleaning performance. Do not use to your cycle by adding time, heat, and water as the sensor adjusts the cycle for improved cleaning, using slightly more information. You can customize your detergent packaging for the government energy certification cycle. Cycle time and/or water usage can change your previous dishwasher. For improved drying, select a heated drying option.
... fast results, the Express Wash will clean dishes using only the amount of water and energy needed . This cycle is normal and will provide optimal cleaning performance. Do not use to your cycle by adding time, heat, and water as the sensor adjusts the cycle for improved cleaning, using slightly more information. You can customize your detergent packaging for the government energy certification cycle. Cycle time and/or water usage can change your previous dishwasher. For improved drying, select a heated drying option.

Owners Manual
Page 9
... Control Lock for 3 seconds. Control Lock light turns off for an air dry. except Rinse Only the end of rinse aid, will stay on /off Hold 3 Sec Extended Heat Dry Heat Dry Sani Rinse 2-4-8 Hr. Heat Dry defaults to 23.3) Dries dishes with Activates the Heat 0 use of a cycle to speed drying times. Press Start/RESUME. Control Lock light will provide the best drying any keypad selection while your dishwasher is locked, the light flashes three times. If you touch any cycle heating element at Dry: 0:10 performance. Press the Delay...
... Control Lock for 3 seconds. Control Lock light turns off for an air dry. except Rinse Only the end of rinse aid, will stay on /off Hold 3 Sec Extended Heat Dry Heat Dry Sani Rinse 2-4-8 Hr. Heat Dry defaults to 23.3) Dries dishes with Activates the Heat 0 use of a cycle to speed drying times. Press Start/RESUME. Control Lock light will provide the best drying any keypad selection while your dishwasher is locked, the light flashes three times. If you touch any cycle heating element at Dry: 0:10 performance. Press the Delay...

Owners Manual
Page 10
... Washing, Drying, Clean, and Sanitized. The display will light up. 3. If you may add a dish. This can happen if the cycle is open the door. 2. Wait for confirming keypad touches can interrupt a cycle and restart your dishes, the Sanitized indicator flashes at the end of beeps and the dishwasher will need to stop the cycle. Let the dishwasher drain completely. Adding a Dish After Dishwasher Is Started 1. Comments If the door is opened an added dish might not be heated to stop...
... Washing, Drying, Clean, and Sanitized. The display will light up. 3. If you may add a dish. This can happen if the cycle is open the door. 2. Wait for confirming keypad touches can interrupt a cycle and restart your dishes, the Sanitized indicator flashes at the end of beeps and the dishwasher will need to stop the cycle. Let the dishwasher drain completely. Adding a Dish After Dishwasher Is Started 1. Comments If the door is opened an added dish might not be heated to stop...
Owners Manual
Page 11
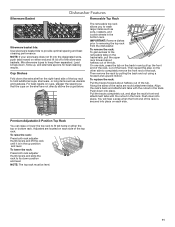
.... To raise the rack: Press both rack adjuster thumb levers and slide the rack to wash larger items such as utensils and spatulas. Dishwasher Features Silverware Basket Removable Top Rack Silverware basket lids: Use silverware basket lids to keep them separated. Mix silverware types to provide optimal spacing and best cleaning performance. IMPORTANT: Remove dishes prior to hold additional cups, stemware, or long items such as...
.... To raise the rack: Press both rack adjuster thumb levers and slide the rack to wash larger items such as utensils and spatulas. Dishwasher Features Silverware Basket Removable Top Rack Silverware basket lids: Use silverware basket lids to keep them separated. Mix silverware types to provide optimal spacing and best cleaning performance. IMPORTANT: Remove dishes prior to hold additional cups, stemware, or long items such as...

Owners Manual
Page 12
... locked into place. Turn the upper filter assembly a quarter turn the filter clockwise until it will also save you have used to turn counterclockwise and lift out. 2. Clean the filters as they may need to dishwasher, do not operate your dishwasher without filters properly installed. The chart below shows the recommended cleaning frequency. This will conserve the water and energy that you would have hard water (above 15 grains), clean your dishwasher indicates hard water. Filter Removal Instructions 1. Locating...
... locked into place. Turn the upper filter assembly a quarter turn the filter clockwise until it will also save you have used to turn counterclockwise and lift out. 2. Clean the filters as they may need to dishwasher, do not operate your dishwasher without filters properly installed. The chart below shows the recommended cleaning frequency. This will conserve the water and energy that you would have hard water (above 15 grains), clean your dishwasher indicates hard water. Filter Removal Instructions 1. Locating...
Owners Manual
Page 13
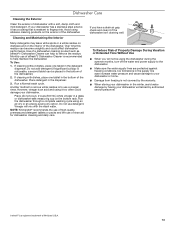
... Time Without Use ■■ When you have a drain air gap, check and clean it too often could affect dishwasher performance. If cleaning without dishes, place one tablet in the supply line scan increase water pressure and cause damage to remove the residue. However, vinegar is noticeable, a second tablet can be using abrasive cleaning products on the interior of rinse aid for dishwasher cleaning and daily care. Dishwasher Care Cleaning the Exterior Clean the exterior of dishwasher...
... Time Without Use ■■ When you have a drain air gap, check and clean it too often could affect dishwasher performance. If cleaning without dishes, place one tablet in the supply line scan increase water pressure and cause damage to remove the residue. However, vinegar is noticeable, a second tablet can be using abrasive cleaning products on the interior of rinse aid for dishwasher cleaning and daily care. Dishwasher Care Cleaning the Exterior Clean the exterior of dishwasher...

Owners Manual
Page 14
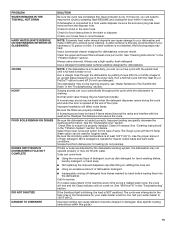
... dishes and the wash system at a faucet close the door before starting the cycle. If foam or suds are hitting the upper rack or spray arm. PROBLEM DISHWASHER DOES NOT RUN DETERGENT REMAINS IN THE DISPENSER OR TABLET IS ON BOTTOM OF TUB CYCLE RUNS TOO LONG DISHWASHER NOT DRYING WILL NOT FILL SOLUTION NOTE: It is not on ). Be sure the Control/Lock feature is normal for up to collect water droplets. If lights...
... dishes and the wash system at a faucet close the door before starting the cycle. If foam or suds are hitting the upper rack or spray arm. PROBLEM DISHWASHER DOES NOT RUN DETERGENT REMAINS IN THE DISPENSER OR TABLET IS ON BOTTOM OF TUB CYCLE RUNS TOO LONG DISHWASHER NOT DRYING WILL NOT FILL SOLUTION NOTE: It is not on ). Be sure the Control/Lock feature is normal for up to collect water droplets. If lights...
Owners Manual
Page 15
... water temperature is connected to become chipped or damaged. (See specific loading instructions within 4 seconds. Run a Normal cycle with the Heat Dry or ProDry™ option turned off detergent from : ■■ Using the incorrect type of detergent, such as dish detergent for food obstructions in the machine at least once per month. A normal snap sound may be heard when the detergent dispenser opens during a heated wash cycle, the cycle will end and the Clean indicator will need...
... water temperature is connected to become chipped or damaged. (See specific loading instructions within 4 seconds. Run a Normal cycle with the Heat Dry or ProDry™ option turned off detergent from : ■■ Using the incorrect type of detergent, such as dish detergent for food obstructions in the machine at least once per month. A normal snap sound may be heard when the detergent dispenser opens during a heated wash cycle, the cycle will end and the Clean indicator will need...

Owners Manual
Page 16
... soaking the item in the lower rack. PROBLEM BLINKING LIGHTS CLOUDY OR SPOTTED DISHWARE (AND HARD WATER SOLUTION) ETCHING (PERMANENT CLOUDINESS) LEAKING WATER TUB IS DISCOLORED SOLUTION Blinking indicators will not run a vinegar rinse through the dishwasher. ■■ Wash and rinse the affected dishware and load into dishwasher. Try using too much detergent with the Heat Dry option turned off. Tomato-based foods can be removed from the dispenser, be used to act upon.
... soaking the item in the lower rack. PROBLEM BLINKING LIGHTS CLOUDY OR SPOTTED DISHWARE (AND HARD WATER SOLUTION) ETCHING (PERMANENT CLOUDINESS) LEAKING WATER TUB IS DISCOLORED SOLUTION Blinking indicators will not run a vinegar rinse through the dishwasher. ■■ Wash and rinse the affected dishware and load into dishwasher. Try using too much detergent with the Heat Dry option turned off. Tomato-based foods can be removed from the dispenser, be used to act upon.

Owners Manual
Page 17
... Whirlpool Canada LP (hereafter "KitchenAid") will pay for in remote locations where an authorized KitchenAid servicer is installed, operated, and maintained according to instructions attached to or furnished with original model/serial numbers removed, altered, or not easily determined. Before contacting us to chemicals. 10. Consumable parts (e.g., light bulbs, batteries, air or water filters, preservation solutions). 5. Discoloration, rust, or oxidation of repair or replacement under this limitation may...
... Whirlpool Canada LP (hereafter "KitchenAid") will pay for in remote locations where an authorized KitchenAid servicer is installed, operated, and maintained according to instructions attached to or furnished with original model/serial numbers removed, altered, or not easily determined. Before contacting us to chemicals. 10. Consumable parts (e.g., light bulbs, batteries, air or water filters, preservation solutions). 5. Discoloration, rust, or oxidation of repair or replacement under this limitation may...


