
Installation Guide
Page 2
... important. This is completely enclosed at the factory and may contain some residual water in the tub as specified in Cabinet Opening 23 Complete Installation 24 Check Operation 26 If Dishwasher Does Not Operate 26 Additional Tips 26 DISHWASHER SAFETY Your safety and the safety of installation. 2 All safety messages will...
... important. This is completely enclosed at the factory and may contain some residual water in the tub as specified in Cabinet Opening 23 Complete Installation 24 Check Operation 26 If Dishwasher Does Not Operate 26 Additional Tips 26 DISHWASHER SAFETY Your safety and the safety of installation. 2 All safety messages will...

Installation Guide
Page 5
...used on the underside of opening is 34¹⁄₂" (86.3 cm). 3³⁄₄" (9.4 cm) 21" (53.3 cm) 24" (61 cm) 24" (61 cm) E Check that all surfaces have no protrusions that would prohibit dishwasher installation. D. Product and Cabinet Opening Dimensions...;" (62.6 cm) 27¹⁄₂" (68.8 cm) C B. Measured from narrowest point of the countertop. For Pro Line® handle, depth is 24" (60 cm) not including the ³⁄₄" (1.9 cm) custom door panel. Minimum, measured from the lowest point on all models). 3¹⁄₂...
...used on the underside of opening is 34¹⁄₂" (86.3 cm). 3³⁄₄" (9.4 cm) 21" (53.3 cm) 24" (61 cm) 24" (61 cm) E Check that all surfaces have no protrusions that would prohibit dishwasher installation. D. Product and Cabinet Opening Dimensions...;" (62.6 cm) 27¹⁄₂" (68.8 cm) C B. Measured from narrowest point of the countertop. For Pro Line® handle, depth is 24" (60 cm) not including the ³⁄₄" (1.9 cm) custom door panel. Minimum, measured from the lowest point on all models). 3¹⁄₂...

Installation Guide
Page 24
.... If it does, adjust leveling legs. Check that top of door do , dishwasher must be straight up and down when properly locked. 24 Place the plastic access panel against the screw heads. Using a flat-blade screwdriver, turn the fasteners ¹⁄₄ turn clockwise to lock... Option A, Install Access Panel - If needed, see website for animated representation of the access panel touches the floor. Visit www.kitchenaid.com/anchoring under FAQ tab. When dishwasher is properly centered, replace plastic buttons. Plastic Panel Check that the lower edge of this step.
.... If it does, adjust leveling legs. Check that top of door do , dishwasher must be straight up and down when properly locked. 24 Place the plastic access panel against the screw heads. Using a flat-blade screwdriver, turn the fasteners ¹⁄₄ turn clockwise to lock... Option A, Install Access Panel - If needed, see website for animated representation of the access panel touches the floor. Visit www.kitchenaid.com/anchoring under FAQ tab. When dishwasher is properly centered, replace plastic buttons. Plastic Panel Check that the lower edge of this step.

Use & Care Guide
Page 11
... is complete. They will also inform you if the dishwasher is used (detergent dispenser cover is still closed ), you to Step 2.) 2. Each bar equals approximately 24 minutes of the dishwasher cycle. After every 30 cycles, the dishwasher will light up. 3. Open the door slightly to stop the cycle. Wait for you...
... is complete. They will also inform you if the dishwasher is used (detergent dispenser cover is still closed ), you to Step 2.) 2. Each bar equals approximately 24 minutes of the dishwasher cycle. After every 30 cycles, the dishwasher will light up. 3. Open the door slightly to stop the cycle. Wait for you...
Dimension Guide
Page 1
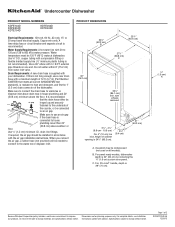
... air gap. Page 1 of cabinet opening is connected to the waste tee or disposer inlet. A time-delay fuse or circuit breaker and separate circuit is 24" (60 cm) not including the ³⁄₄" (1.9 cm) custom door panel. Use a 90° elbow with product. Make sure to use...10.6 cm) For 4" (10 cm) toe kick, height of 2 W10579129-D-KA 12/20/13 Use ¹⁄₂" (1.3 cm) minimum I.D. Copper wire only. PRODUCT DIMENSIONS 24¹⁄₂" (62.2 cm) B 23⁷⁄₈" (60.6 cm) 27¹⁄₂" (68.8 cm) C 30" (76.2 cm) 33¹⁄&#...
... air gap. Page 1 of cabinet opening is connected to the waste tee or disposer inlet. A time-delay fuse or circuit breaker and separate circuit is 24" (60 cm) not including the ³⁄₄" (1.9 cm) custom door panel. Use a 90° elbow with product. Make sure to use...10.6 cm) For 4" (10 cm) toe kick, height of 2 W10579129-D-KA 12/20/13 Use ¹⁄₂" (1.3 cm) minimum I.D. Copper wire only. PRODUCT DIMENSIONS 24¹⁄₂" (62.2 cm) B 23⁷⁄₈" (60.6 cm) 27¹⁄₂" (68.8 cm) C 30" (76.2 cm) 33¹⁄&#...
Dimension Guide
Page 2
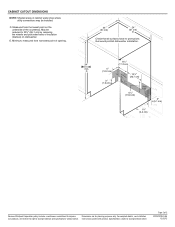
... be reduced to 33¹⁄₂" (85.1 cm) by removing the wheels and perforated area of insulation (blanket) on the underside of opening. 24" (61 cm) 24" (61 cm) E Check that all surfaces have no protrusions that would prohibit dishwasher installation. 34" (86.4 cm) min D 4" (10.2 cm) 3" (7.6 cm) 6³⁄₄...
... be reduced to 33¹⁄₂" (85.1 cm) by removing the wheels and perforated area of insulation (blanket) on the underside of opening. 24" (61 cm) 24" (61 cm) E Check that all surfaces have no protrusions that would prohibit dishwasher installation. 34" (86.4 cm) min D 4" (10.2 cm) 3" (7.6 cm) 6³⁄₄...
