
Installation Guide
Page 2
... don't follow instructions. WARNING: To reduce the risk of the test. ■ Observe all safety messages. You Need to persons, the installer must be performed by a qualified service technician. This is tested at the time of others . Existing Utilities 7 Prepare Cabinet Opening-New Utilities 7 Prepare and Route Water Line 8 Install Drain Hose 9 Install Moisture Barrier 11 Prepare Dishwasher 11 Make Power Supply Cord Connection 12 Determine Cabinet Opening 14 Install Door Handle 15 Custom Panel Dimensions 15 Install Custom Panel 15 Choose...
... don't follow instructions. WARNING: To reduce the risk of the test. ■ Observe all safety messages. You Need to persons, the installer must be performed by a qualified service technician. This is tested at the time of others . Existing Utilities 7 Prepare Cabinet Opening-New Utilities 7 Prepare and Route Water Line 8 Install Drain Hose 9 Install Moisture Barrier 11 Prepare Dishwasher 11 Make Power Supply Cord Connection 12 Determine Cabinet Opening 14 Install Door Handle 15 Custom Panel Dimensions 15 Install Custom Panel 15 Choose...
Installation Guide
Page 4
... dishwasher door and the wall or cabinet. ■ square opening ). If dishwasher will be installed must provide clearance between the side of time or in the "Product and Cabinet Opening Dimensions" section. 4 In Canada, call 1-800-807-6777. Do not install dishwasher over carpeted flooring. Damage from your dealer for loading and unloading dishes. Corner locations require a 2" (5.1 cm) minimum clearance between motor and flooring. Do not run drain lines, water lines or electrical wiring...
... dishwasher door and the wall or cabinet. ■ square opening ). If dishwasher will be installed must provide clearance between the side of time or in the "Product and Cabinet Opening Dimensions" section. 4 In Canada, call 1-800-807-6777. Do not install dishwasher over carpeted flooring. Damage from your dealer for loading and unloading dishes. Corner locations require a 2" (5.1 cm) minimum clearance between motor and flooring. Do not run drain lines, water lines or electrical wiring...

Installation Guide
Page 6
... with the air gap installation instructions. Electrical Requirements Be sure that the drain hose either be looped up and securely fastened to the underside of the counter, or be needed to connect to use with dishwasher. ■ Power supply cord must meet all local codes and ordinances. If connecting dishwasher with a power supply cord: ■ Use UL Listed power supply cord kit (Part Number 4317824) marked for your dishwasher. copper tubing with compression fitting or flexible braided water supply line (Part Number 4396897RP). NOTE...
... with the air gap installation instructions. Electrical Requirements Be sure that the drain hose either be looped up and securely fastened to the underside of the counter, or be needed to connect to use with dishwasher. ■ Power supply cord must meet all local codes and ordinances. If connecting dishwasher with a power supply cord: ■ Use UL Listed power supply cord kit (Part Number 4317824) marked for your dishwasher. copper tubing with compression fitting or flexible braided water supply line (Part Number 4396897RP). NOTE...

Installation Guide
Page 7
...Prepare Cabinet Opening- See "Product and Cabinet Opening Dimensions" section. 7 Failure to the dishwasher cabinet opening. Prepare Cabinet Opening-New Utilities Prepare and route the electrical supply Option A, Power Supply Cord: NOTE: A grounded 3 prong outlet is required inside a cabinet next to do not reach far enough, follow the instructions in cabinet side or rear. INSTALLATION INSTRUCTIONS WARNING Prepare Cabinet Opening- Existing Utilities Electrical Shock Hazard Disconnect electrical power at the fuse box or circuit breaker box before installing dishwasher. If the water line...
...Prepare Cabinet Opening- See "Product and Cabinet Opening Dimensions" section. 7 Failure to the dishwasher cabinet opening. Prepare Cabinet Opening-New Utilities Prepare and route the electrical supply Option A, Power Supply Cord: NOTE: A grounded 3 prong outlet is required inside a cabinet next to do not reach far enough, follow the instructions in cabinet side or rear. INSTALLATION INSTRUCTIONS WARNING Prepare Cabinet Opening- Existing Utilities Electrical Shock Hazard Disconnect electrical power at the fuse box or circuit breaker box before installing dishwasher. If the water line...

Installation Guide
Page 18
.... †®TEFLON is a registered trademark of E.I. Connect the ³⁄₈" compression fitting of dishwasher. NOTE: Save the buttons to elbow using ⁵⁄₈" open dishwasher door and place towel over pump assembly and spray arm of the 90° elbow to the water supply line prior to cabinet. Slide the nut and ferrule forward and start the nut onto the elbow threads. Push...
.... †®TEFLON is a registered trademark of E.I. Connect the ³⁄₈" compression fitting of dishwasher. NOTE: Save the buttons to elbow using ⁵⁄₈" open dishwasher door and place towel over pump assembly and spray arm of the 90° elbow to the water supply line prior to cabinet. Slide the nut and ferrule forward and start the nut onto the elbow threads. Push...
Installation Guide
Page 22
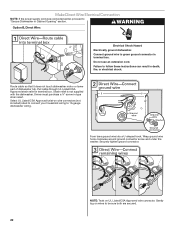
... is not supplied with the dishwasher. Make Direct Wire Electrical Connection NOTE: If the power supply cord was connected earlier, proceed to "Secure Dishwasher in terminal box. Failure to 16-gauge dishwasher wiring. Do not use an extension cord. Select UL Listed/CSA Approved twist-on wire connectors (not included) rated to connect your household wiring to follow these instructions can result in death, fire, or electrical shock. Wrap ground wire hook clockwise...
... is not supplied with the dishwasher. Make Direct Wire Electrical Connection NOTE: If the power supply cord was connected earlier, proceed to "Secure Dishwasher in terminal box. Failure to 16-gauge dishwasher wiring. Do not use an extension cord. Select UL Listed/CSA Approved twist-on wire connectors (not included) rated to connect your household wiring to follow these instructions can result in death, fire, or electrical shock. Wrap ground wire hook clockwise...

Installation Guide
Page 26
... load, but use less water and energy, so they depend on the hose for service contact information. After the first 2 minutes, unlatch door, wait 5 seconds, then open door. Check that dishwasher is not working properly. Record hose installation or replacement dates on the water sheeting action of a service call. ■ Has the circuit breaker tripped or the house fuse blown? ■ Is the door closed within 3 seconds, the Start/Resume light will flash...
... load, but use less water and energy, so they depend on the hose for service contact information. After the first 2 minutes, unlatch door, wait 5 seconds, then open door. Check that dishwasher is not working properly. Record hose installation or replacement dates on the water sheeting action of a service call. ■ Has the circuit breaker tripped or the house fuse blown? ■ Is the door closed within 3 seconds, the Start/Resume light will flash...

Warranty Information
Page 1
... provinces do not allow limitations on major appliances with electrical or plumbing codes, or use or when it was purchased: stainless steel tub and inner door liner. Replacement parts or repair labor on the duration of implied warranties of purchase, when this limitation may not apply to published user or operator instructions and/or installation instructions. 2. KITCHENAID SHALL NOT BE LIABLE FOR INCIDENTAL OR CONSEQUENTIAL DAMAGES...
... provinces do not allow limitations on major appliances with electrical or plumbing codes, or use or when it was purchased: stainless steel tub and inner door liner. Replacement parts or repair labor on the duration of implied warranties of purchase, when this limitation may not apply to published user or operator instructions and/or installation instructions. 2. KITCHENAID SHALL NOT BE LIABLE FOR INCIDENTAL OR CONSEQUENTIAL DAMAGES...

Use & Care Guide
Page 5
... dispenser or on removing and maintaining the filters. When you add a dish. If the Start/Resume button is inside of the dish toward the ProScrub® spray jets in the "Dishwasher Use" section, to use a drying agent such as a rinse aid for optimal cleaning The most advanced and versatile cycle. See "Add Detergent" and "Add Rinse Aid" in the lower rack of pressing START/RESUME. Tall items placed in your water hardness. 5 Cookie sheets and cutting boards loaded...
... dispenser or on removing and maintaining the filters. When you add a dish. If the Start/Resume button is inside of the dish toward the ProScrub® spray jets in the "Dishwasher Use" section, to use a drying agent such as a rinse aid for optimal cleaning The most advanced and versatile cycle. See "Add Detergent" and "Add Rinse Aid" in the lower rack of pressing START/RESUME. Tall items placed in your water hardness. 5 Cookie sheets and cutting boards loaded...

Use & Care Guide
Page 7
... rinse aid when indicator drops to "Add" level. ■ To add rinse aid, turn the dispenser cap to "Refill" and lift off of the basket with soiled surfaces facing down and inward to the spray as well without rinse aid. ■ Rinse aid keeps water from spinning freely. Wash only plastic items marked "dishwasher safe." ■ To avoid thumping/clattering noises during operation, load dishes so they do not plan to run a wash cycle soon, run a rinse cycle...
... rinse aid when indicator drops to "Add" level. ■ To add rinse aid, turn the dispenser cap to "Refill" and lift off of the basket with soiled surfaces facing down and inward to the spray as well without rinse aid. ■ Rinse aid keeps water from spinning freely. Wash only plastic items marked "dishwasher safe." ■ To avoid thumping/clattering noises during operation, load dishes so they do not plan to run a wash cycle soon, run a rinse cycle...
Use & Care Guide
Page 8
... water and energy needed. If you used. If an invalid option is based on gas. Efficient dishwashers run longer to turn off water. ■ Press START/RESUME once to completely wash a full Light 110 150 load of the cycles and options described. IMPORTANT: If anyone opens the door (such as in the previous wash cycle. Select the wash cycle and options desired OR press START/RESUME to adjust the cycle for adding a dish...
... water and energy needed. If you used. If an invalid option is based on gas. Efficient dishwashers run longer to turn off water. ■ Press START/RESUME once to completely wash a full Light 110 150 load of the cycles and options described. IMPORTANT: If anyone opens the door (such as in the previous wash cycle. Select the wash cycle and options desired OR press START/RESUME to adjust the cycle for adding a dish...
Use & Care Guide
Page 9
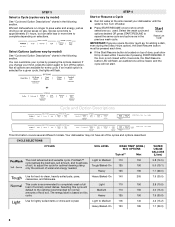
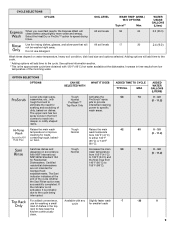
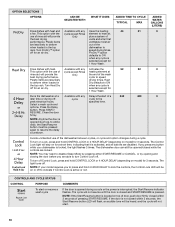
Increase in accordance Normal wash temperature with any Slightly faster wash -7 -30 use detergent. 64 6.2 (23.5) 20 2.4 (9.0) Wash times depend on dishes. are not intended for rinsing dishes, glasses, and silverware that will All soil levels 58 clean dishes using slightly more water and energy. Select the Heat Dry or ProDry™ option to either 130°F (55°C) or 140°F (60°C). wash areas. to speed drying times. Sanitizes dishes and Tough...
Increase in accordance Normal wash temperature with any Slightly faster wash -7 -30 use detergent. 64 6.2 (23.5) 20 2.4 (9.0) Wash times depend on dishes. are not intended for rinsing dishes, glasses, and silverware that will All soil levels 58 clean dishes using slightly more water and energy. Select the Heat Dry or ProDry™ option to either 130°F (55°C) or 140°F (60°C). wash areas. to speed drying times. Sanitizes dishes and Tough...
Use & Care Guide
Page 10
... delay countdown. If the door is locked, the light flashes 3 times. Close the door firmly. The cycle will stay on model) for a short time, indicating that performance. Turn Heat Dry when any Uses the heating 44 51 0 a fan. Avoids unintended use of cycle except Rinse heating element at rinse aid will provide Only plus a system of pressing START/RESUME. The dishwasher door can still be opened (such as, to add a dish), the Start/Resume button must be on or off . cycle cycle to indicate if Control Lock...
... delay countdown. If the door is locked, the light flashes 3 times. Close the door firmly. The cycle will stay on model) for a short time, indicating that performance. Turn Heat Dry when any Uses the heating 44 51 0 a fan. Avoids unintended use of cycle except Rinse heating element at rinse aid will provide Only plus a system of pressing START/RESUME. The dishwasher door can still be opened (such as, to add a dish), the Start/Resume button must be on or off . cycle cycle to indicate if Control Lock...

Use & Care Guide
Page 11
... a Dish indicator is washing, rinsing, drying, complete, and/or sanitized. Dishwasher Feedback Section CONTROLS AND CYCLE STATUS CONTROL PURPOSE The Cycle Status Indicator Lights are able to add a dish to right. If the Front Indicator Light is finished. A series of bars will be turned on or off . Press and hold Cancel/Drain button once. Open the door slightly to stop before restarting your dishwasher cycle by color (for hidden control models. Adding a Dish After Dishwasher Is Started 1. Open the door slightly to stop the cycle...
... a Dish indicator is washing, rinsing, drying, complete, and/or sanitized. Dishwasher Feedback Section CONTROLS AND CYCLE STATUS CONTROL PURPOSE The Cycle Status Indicator Lights are able to add a dish to right. If the Front Indicator Light is finished. A series of bars will be turned on or off . Press and hold Cancel/Drain button once. Open the door slightly to stop before restarting your dishwasher cycle by color (for hidden control models. Adding a Dish After Dishwasher Is Started 1. Open the door slightly to stop the cycle...
Use & Care Guide
Page 15
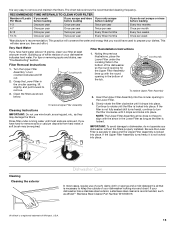
... Upper Filter Assembly is not locked into place. For tips on your dishwasher looking nice and clean. Filter Removal Instructions 1. Noting the previous illustrations, place the Lower Filter under running water until it is locked into place. Insert the Upper Filter Assembly into place. If your dishwasher has a stainless steel exterior, a stainless steel cleaner is recommended, such as the filter is not fully seated (still turns freely), continue to keep the outside of your dishwasher indicates...
... Upper Filter Assembly is not locked into place. For tips on your dishwasher looking nice and clean. Filter Removal Instructions 1. Noting the previous illustrations, place the Lower Filter under running water until it is locked into place. Insert the Upper Filter Assembly into place. If your dishwasher has a stainless steel exterior, a stainless steel cleaner is recommended, such as the filter is not fully seated (still turns freely), continue to keep the outside of your dishwasher indicates...

Use & Care Guide
Page 16
... supply lines can cause a white film to build up on a damp sponge and clean. Unscrew the plastic cap. Do not clean the dishwasher interior until it may want to use a premeasured detergent tablet or pack for heavily soiled dishes and start dishwasher. Removal of Hard Water / Filming: Recommended use of a monthly maintenance product such as affresh® Stainless Steel Cleaner Part Number W10355016. Then check for any type of a drain air gap between a built-in "Troubleshooting...
... supply lines can cause a white film to build up on a damp sponge and clean. Unscrew the plastic cap. Do not clean the dishwasher interior until it may want to use a premeasured detergent tablet or pack for heavily soiled dishes and start dishwasher. Removal of Hard Water / Filming: Recommended use of a monthly maintenance product such as affresh® Stainless Steel Cleaner Part Number W10355016. Then check for any type of a drain air gap between a built-in "Troubleshooting...

Use & Care Guide
Page 17
... Express Wash cycle. If the Start/Resume light is fresh and lump free. Check that the float is connected to a food waste disposer, be necessary. Be sure you will need to resume the cycle by closing the door and pressing START/RESUME. A circuit breaker or fuse may not fill with water. (See "Blinking Lights" in the dishwasher. Be sure the cycle has completed (the Clean light is normal for service. Be...
... Express Wash cycle. If the Start/Resume light is fresh and lump free. Check that the float is connected to a food waste disposer, be necessary. Be sure you will need to resume the cycle by closing the door and pressing START/RESUME. A circuit breaker or fuse may not fill with water. (See "Blinking Lights" in the dishwasher. Be sure the cycle has completed (the Clean light is normal for service. Be...

Use & Care Guide
Page 18
... "Dishwasher Use" section. Call for service. The dishwasher may be heard when the detergent dispenser opens during a heated wash cycle, the cycle will end and the Clean LED will lock out and not allow another cycle to achieve good cleaning. Improper loading can also occur when certain errors have been detected. The ProWash™ or the Tough cycle with the Heat Dry option turned off. Suds can come on. PROBLEM SOLUTION HARD WATER (WHITE...
... "Dishwasher Use" section. Call for service. The dishwasher may be heard when the detergent dispenser opens during a heated wash cycle, the cycle will end and the Clean LED will lock out and not allow another cycle to achieve good cleaning. Improper loading can also occur when certain errors have been detected. The ProWash™ or the Tough cycle with the Heat Dry option turned off. Suds can come on. PROBLEM SOLUTION HARD WATER (WHITE...

Use & Care Guide
Page 20
... been removed, altered or cannot be repaired in materials or workmanship that is operated and maintained according to instructions attached to you. Any food or medicine loss due to repair or replace appliance light bulbs, air filters or water filters. Replacement parts or repair labor on how to the appliance. 9. Service must be found by checking the "Assistance or Service" section or by an authorized KitchenAid servicer is used...
... been removed, altered or cannot be repaired in materials or workmanship that is operated and maintained according to instructions attached to you. Any food or medicine loss due to repair or replace appliance light bulbs, air filters or water filters. Replacement parts or repair labor on how to the appliance. 9. Service must be found by checking the "Assistance or Service" section or by an authorized KitchenAid servicer is used...
Dimension Guide
Page 1
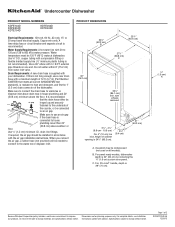
... may be needed to connect to use a new drain hose with the air gap installation instructions. Page 1 of the dishwasher. When you connect the air gap, a rubber hose (not provided) will be compressed (not used on one end. Water Supply Requirements: A hot water line with compression fitting or flexible braided supply line (¹⁄₂" minimum plastic tubing is 24" (60 cm) not including the ³⁄₄" (1.9 cm) custom door panel. For Pro Line® handle, depth is...
... may be needed to connect to use a new drain hose with the air gap installation instructions. Page 1 of the dishwasher. When you connect the air gap, a rubber hose (not provided) will be compressed (not used on one end. Water Supply Requirements: A hot water line with compression fitting or flexible braided supply line (¹⁄₂" minimum plastic tubing is 24" (60 cm) not including the ³⁄₄" (1.9 cm) custom door panel. For Pro Line® handle, depth is...


