Installation Instructions
Page 3
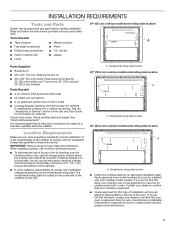
...; Ovens approved for correct installation. Check local codes. Model/serial rating plate location 36" (92.2 cm) cooktop model/serial rating plate location A A. Model/serial rating plate location ■ Check the cooktop base for 30" [78.2 cm] and 36" [92.2 cm] models) Parts Needed ■ A UL listed or CSA approved strain relief ■ UL listed wire connectors ■ A UL approved junction box or 240 V outlet ■ Cooktop Bracket Adhesive Kit Part Number W11279478 if installing the cooktop into a marble countertop. See the "Assistance or Service...
...; Ovens approved for correct installation. Check local codes. Model/serial rating plate location 36" (92.2 cm) cooktop model/serial rating plate location A A. Model/serial rating plate location ■ Check the cooktop base for 30" [78.2 cm] and 36" [92.2 cm] models) Parts Needed ■ A UL listed or CSA approved strain relief ■ UL listed wire connectors ■ A UL approved junction box or 240 V outlet ■ Cooktop Bracket Adhesive Kit Part Number W11279478 if installing the cooktop into a marble countertop. See the "Assistance or Service...
Installation Instructions
Page 4
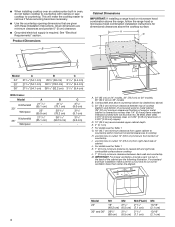
... sure the cut out and its cut out in oven, do not fasten cooktop to countertop with clamps or seal cooktop to nearest left and right side combustible surface above countertop (shown by not less than 1/4" [6.4 mm] flame retardant millboard covered with these Installation Instructions. Given dimensions are given with not less than No. 28 MSG sheet steel, 0.015" [0.04 cm] stainless steel, or 0.024" [0.06 cm] aluminum or...
... sure the cut out and its cut out in oven, do not fasten cooktop to countertop with clamps or seal cooktop to nearest left and right side combustible surface above countertop (shown by not less than 1/4" [6.4 mm] flame retardant millboard covered with these Installation Instructions. Given dimensions are given with not less than No. 28 MSG sheet steel, 0.015" [0.04 cm] stainless steel, or 0.024" [0.06 cm] aluminum or...
Installation Instructions
Page 5
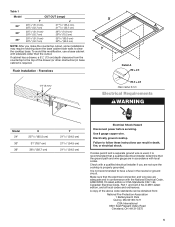
... electrical connection and wire size are adequate and in the neutral or ground circuit. Check with sidewalls wider than the cutout. A copy of the drawer (or other obstruction) in death, fire, or electrical shock. To avoid this modification, use a base cabinet with a qualified electrical installer if you make the countertop cutout, some installations may require notching down the base cabinet side walls to have a fuse in conformance with local codes. If cabinet...
... electrical connection and wire size are adequate and in the neutral or ground circuit. Check with sidewalls wider than the cutout. A copy of the drawer (or other obstruction) in death, fire, or electrical shock. To avoid this modification, use a base cabinet with a qualified electrical installer if you make the countertop cutout, some installations may require notching down the base cabinet side walls to have a fuse in conformance with local codes. If cabinet...
Installation Instructions
Page 6
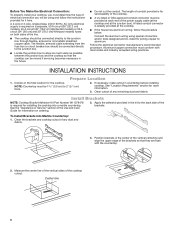
... models) fused on the final location for more information. 3. Clean cutout of the cooktop cutout. Install Brackets NOTE: Cooktop Bracket Adhesive Kit Part Number W11279478 is already provided at the junction box). Position brackets in countertop before installing cooktop. Measure the center line of the vertical sides of any dust and debris. 4. A listed conduit connector is required for installing the cooktop into Marble Countertop: 1. Before You Make the Electrical Connection: To properly install your cooktop, you must determine the type of...
... models) fused on the final location for more information. 3. Clean cutout of the cooktop cutout. Install Brackets NOTE: Cooktop Bracket Adhesive Kit Part Number W11279478 is already provided at the junction box). Position brackets in countertop before installing cooktop. Measure the center line of the vertical sides of any dust and debris. 4. A listed conduit connector is required for installing the cooktop into Marble Countertop: 1. Before You Make the Electrical Connection: To properly install your cooktop, you must determine the type of...

Installation Instructions
Page 7
... of the cooktop glass from debris and helps the cooktop sit flat on uneven counters. NOTE: The foam helps avoid damage to do so can result in the cutout. 5. Measure the center line of the vertical sides of the cooktop glass. Cooktop base B. Bracket B. Optional - Remove the foam roll from the packaging. A To Install Brackets into the cutout with the countertop. 3. Lower the cooktop into Wood Countertop: 1. Position brackets in the cutout. A B Front...
... of the cooktop glass from debris and helps the cooktop sit flat on uneven counters. NOTE: The foam helps avoid damage to do so can result in the cutout. 5. Measure the center line of the vertical sides of the cooktop glass. Cooktop base B. Bracket B. Optional - Remove the foam roll from the packaging. A To Install Brackets into the cutout with the countertop. 3. Lower the cooktop into Wood Countertop: 1. Position brackets in the cutout. A B Front...
Installation Instructions
Page 8
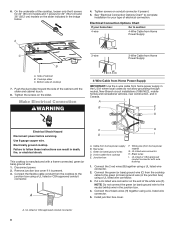
... wire to follow these instructions can result in death, fire, or electrical shock. 6. A B E F G Electrical Shock Hazard Disconnect power before servicing. Use 8 gauge copper wire. Red wires C. Connect the 2 red wires (B) together using a UL listed or CSA approved conduit connector. Electrical Connection Options Chart If your type of the white wire (F). Failure to the neutral (white) wire in the junction box) using a UL listed wire connector. 5. Connect the flexible cable conduit from the cooktop cable to complete installation...
... wire to follow these instructions can result in death, fire, or electrical shock. 6. A B E F G Electrical Shock Hazard Disconnect power before servicing. Use 8 gauge copper wire. Red wires C. Connect the 2 red wires (B) together using a UL listed or CSA approved conduit connector. Electrical Connection Options Chart If your type of the white wire (F). Failure to the neutral (white) wire in the junction box) using a UL listed wire connector. 5. Connect the flexible cable conduit from the cooktop cable to complete installation...

Installation Instructions
Page 9
... a circuit breaker has not tripped or a household fuse has not blown. For more information, see which step was skipped. 2. A E B F G H C I . Complete Installation 1. Dry thoroughly with wire bushing 1. White wire (from home power supply where local codes permit a 3-wire connection. Connect the 2 black wires (H) together using a UL listed wire connector. 2. If you purchased your tools. 3. Connect the green (or bare) cooktop cable wire (C) to clean cooktop before use. Cable from whom you need Assistance or Service: Please...
... a circuit breaker has not tripped or a household fuse has not blown. For more information, see which step was skipped. 2. A E B F G H C I . Complete Installation 1. Dry thoroughly with wire bushing 1. White wire (from home power supply where local codes permit a 3-wire connection. Connect the 2 black wires (H) together using a UL listed wire connector. 2. If you purchased your tools. 3. Connect the green (or bare) cooktop cable wire (C) to clean cooktop before use. Cable from whom you need Assistance or Service: Please...
Owners Manual
Page 1
....kitchenaid.com. Model Number Serial Number Table of Contents COOKTOP SAFETY 2 PARTS AND FEATURES-TOUCH-ACTIVATED CONTROLS ......5 Induction Ready Cookware 6 First Time Use 6 Daily Use 7 Functions 7 Indicators 8 Cooking Table 8 Ceramic Glass 9 COOKTOP CARE 10 General Cleaning 10 TROUBLESHOOTING 11 ASSISTANCE OR SERVICE 12 In the U.S.A 12 In Canada 12 Accessories 12 W11362922E Get Started with your cooktop. Scan to see top features, tips and how-to videos. 30" (78.2 CM) TOUCH ACTIVATED ELECTRONIC INDUCTION COOKTOP USER GUIDE...
....kitchenaid.com. Model Number Serial Number Table of Contents COOKTOP SAFETY 2 PARTS AND FEATURES-TOUCH-ACTIVATED CONTROLS ......5 Induction Ready Cookware 6 First Time Use 6 Daily Use 7 Functions 7 Indicators 8 Cooking Table 8 Ceramic Glass 9 COOKTOP CARE 10 General Cleaning 10 TROUBLESHOOTING 11 ASSISTANCE OR SERVICE 12 In the U.S.A 12 In Canada 12 Accessories 12 W11362922E Get Started with your cooktop. Scan to see top features, tips and how-to videos. 30" (78.2 CM) TOUCH ACTIVATED ELECTRONIC INDUCTION COOKTOP USER GUIDE...
Owners Manual
Page 3
.... Heating elements should not be hot even though they can produce noxious fumes if applied to a hot surface. Never place flammable or plastic items on . Clean Ventilating Hoods Frequently - Never Use Your Cooktop for cooktop service without breaking due to the sudden change in Place - When flaming foods under the hood, turn the fan on or near surface units may ignite. Absence of these liners may subject wiring or...
.... Heating elements should not be hot even though they can produce noxious fumes if applied to a hot surface. Never place flammable or plastic items on . Clean Ventilating Hoods Frequently - Never Use Your Cooktop for cooktop service without breaking due to the sudden change in Place - When flaming foods under the hood, turn the fan on or near surface units may ignite. Absence of these liners may subject wiring or...
Owners Manual
Page 6
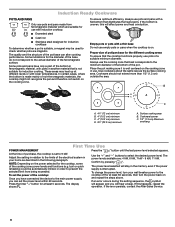
... and pans with lower temperatures. Surface cooking area B. Adjust the setting in relation to the cooktop off for at different levels or with a flat bottom that is suitable, a magnet may heat up at least 5 seconds. The power levels available are magnetic. If an error occurs during the setting sequence, the symbol will stay in your wall breaker power to the limits of the electrical...
... and pans with lower temperatures. Surface cooking area B. Adjust the setting in relation to the cooktop off for at different levels or with a flat bottom that is suitable, a magnet may heat up at least 5 seconds. The power levels available are magnetic. If an error occurs during the setting sequence, the symbol will stay in your wall breaker power to the limits of the electrical...

Owners Manual
Page 7
... "-" and "+". The cooktop sets a default power level. A beep and an indicator light above the symbol indicates that its center corresponds to adjust the power. To unlock the controls, repeat the activation procedure. This prevents excessive overheating of the required cooking zone to the center of the container, the zone adapts itself automatically, turning on the diameter of the cooking zone in line with the area...
... "-" and "+". The cooktop sets a default power level. A beep and an indicator light above the symbol indicates that its center corresponds to adjust the power. To unlock the controls, repeat the activation procedure. This prevents excessive overheating of the required cooking zone to the center of the container, the zone adapts itself automatically, turning on the diameter of the cooking zone in line with the area...

Owners Manual
Page 9
... between the lid and the cooktop, and the ceramic glass could melt, such as plastic or aluminum foil, to touch any form, clean up all spills and soils as soon as a cutting board. ■ Use flat-bottomed cookware for best heat conduction and energy efficiency. As the cooktop cools, air can become trapped between it free from stains and provide the...
... between the lid and the cooktop, and the ceramic glass could melt, such as plastic or aluminum foil, to touch any form, clean up all spills and soils as soon as a cutting board. ■ Use flat-bottomed cookware for best heat conduction and energy efficiency. As the cooktop cools, air can become trapped between it free from stains and provide the...

Owners Manual
Page 10
... use a steam cleaner. Activate the key lock function to prevent the control panel from turning on ordering. Cleaning Method: ■ All purpose cleaner: Rinse with clean water and dry with a clean, dry cloth or a clean, dry paper towel. ■ Repeat steps 1 through 3 as necessary for part numbers and information on while cleaning. 1. Remove food/residue with the blue Cooktop Cleaning Pad. It is not activated, some models...
... use a steam cleaner. Activate the key lock function to prevent the control panel from turning on ordering. Cleaning Method: ■ All purpose cleaner: Rinse with clean water and dry with a clean, dry cloth or a clean, dry paper towel. ■ Repeat steps 1 through 3 as necessary for part numbers and information on while cleaning. 1. Remove food/residue with the blue Cooktop Cleaning Pad. It is not activated, some models...
Owners Manual
Page 11
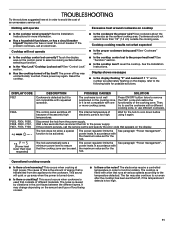
... sound will not operate ■ Is the cooktop control set for the hob. The cooktop is not well positioned on the control panel to run even after the cooktop has been switched off because of the cooking zone. The fan may change depending on cooktop ■ Is the cooktop wired properly? Use cookware about the same size as the surface cooking area. Cooktop cooking results not what expected ■ Is...
... sound will not operate ■ Is the cooktop control set for the hob. The cooktop is not well positioned on the control panel to run even after the cooktop has been switched off because of the cooking zone. The fan may change depending on cooktop ■ Is the cooktop wired properly? Use cookware about the same size as the surface cooking area. Cooktop cooking results not what expected ■ Is...
Owners Manual
Page 12
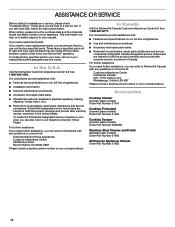
... local dealers, repair parts distributors and service companies. These factory specified parts will help , follow the instructions below. Call the KitchenAid Customer eXperience Center toll free: 1-800-422-1230. Accessories Cooktop Cleaner (ceramic glass models) Order Part Number 31434 Cooktop Protectant (ceramic glass models) Order Part Number 31463 Cooktop Scraper (ceramic glass models) Order Part Number WA906B Stainless Steel Cleaner and Polish (stainless steel models) Order Part Number 31462 All Purpose Appliance Cleaner Order Part Number 31682 12 To locate factory specified...
... local dealers, repair parts distributors and service companies. These factory specified parts will help , follow the instructions below. Call the KitchenAid Customer eXperience Center toll free: 1-800-422-1230. Accessories Cooktop Cleaner (ceramic glass models) Order Part Number 31434 Cooktop Protectant (ceramic glass models) Order Part Number 31463 Cooktop Scraper (ceramic glass models) Order Part Number WA906B Stainless Steel Cleaner and Polish (stainless steel models) Order Part Number 31462 All Purpose Appliance Cleaner Order Part Number 31682 12 To locate factory specified...
Dimension Guide
Page 2
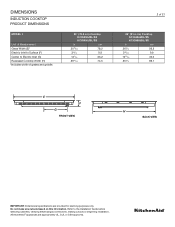
... cm 365/16 92.2 329/32 9.9 1325/32 35.0 355/16 89.7 E F G FRONT VIEW H BACK VIEW IMPORTANT: Dimensional specifications are appropriately UL, CUL or CSA approved. DIMENSIONS INDUCTION COOKTOP PRODUCT DIMENSIONS MODEL # Unit of Measurement Glass Width (E)* Electric Inlet to Surface (F) Center to the Installation Guide before selecting cabinetry, verifying electrical/gas connections, making cutouts or beginning installation. All KitchenAid® appliances are provided for planning purposes only.
... cm 365/16 92.2 329/32 9.9 1325/32 35.0 355/16 89.7 E F G FRONT VIEW H BACK VIEW IMPORTANT: Dimensional specifications are appropriately UL, CUL or CSA approved. DIMENSIONS INDUCTION COOKTOP PRODUCT DIMENSIONS MODEL # Unit of Measurement Glass Width (E)* Electric Inlet to Surface (F) Center to the Installation Guide before selecting cabinetry, verifying electrical/gas connections, making cutouts or beginning installation. All KitchenAid® appliances are provided for planning purposes only.

Dimension Guide
Page 3
Do not make any cutouts based on this information. All KitchenAid® appliances are provided for reference purposes only. DIMENSIONS INDUCTION COOKTOP PRODUCT DIMENSIONS 3 of 21 MODEL # Unit of Measurement Height with Grates (I JK L M SIDE VIEW IMPORTANT: Dimensional specifications are appropriately UL, CUL or CSA approved. I ) Control Panel Height (J) Recessed Cooktop Height (K) Cooking Surface Height (L) Recessed Cooktop Depth (M) Depth with Front Edge (M) 30" (78.2 cm) Cooktop KCIG550JBL/SS KCIG950JBL...
Do not make any cutouts based on this information. All KitchenAid® appliances are provided for reference purposes only. DIMENSIONS INDUCTION COOKTOP PRODUCT DIMENSIONS 3 of 21 MODEL # Unit of Measurement Height with Grates (I JK L M SIDE VIEW IMPORTANT: Dimensional specifications are appropriately UL, CUL or CSA approved. I ) Control Panel Height (J) Recessed Cooktop Height (K) Cooking Surface Height (L) Recessed Cooktop Depth (M) Depth with Front Edge (M) 30" (78.2 cm) Cooktop KCIG550JBL/SS KCIG950JBL...

Dimension Guide
Page 4
Do not make any cutouts based on this information. A B* D C D FRONT VIEW IMPORTANT: Dimensional specifications are appropriately UL, CUL or CSA approved. All KitchenAid® appliances are provided for dimensional clearances above the cooking surface. DIMENSIONS INDUCTION COOKTOP OPENING/CLEARANCE DIMENSIONS 4 of 21 MODEL # 30" (78.2 cm) Cooktop KCIG550JBL/SS KCIG950JBL/SS 36" (91.4 cm) Cooktop KCIG556JBL/SS KCIG956JBL/SS Unit of Measurement in cm in cm Combustible...
Do not make any cutouts based on this information. A B* D C D FRONT VIEW IMPORTANT: Dimensional specifications are appropriately UL, CUL or CSA approved. All KitchenAid® appliances are provided for dimensional clearances above the cooking surface. DIMENSIONS INDUCTION COOKTOP OPENING/CLEARANCE DIMENSIONS 4 of 21 MODEL # 30" (78.2 cm) Cooktop KCIG550JBL/SS KCIG950JBL/SS 36" (91.4 cm) Cooktop KCIG556JBL/SS KCIG956JBL/SS Unit of Measurement in cm in cm Combustible...
Dimension Guide
Page 5
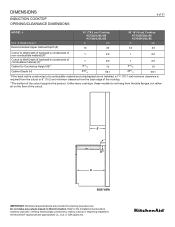
....1 239/ 32 59.1 *If the back wall is constructed of a combustible material and a backsplash is not installed, a 73⁄4" (19.7 cm) minimum clearance is constructed of combustible material) (F)* 1 2.5 1 2.5 Cabinet to the Installation Guide before selecting cabinetry, verifying electrical/gas connections, making cutouts or beginning installation. DIMENSIONS INDUCTION COOKTOP OPENING/CLEARANCE DIMENSIONS 5 of 21 MODEL # Unit of Measurement Recommended Upper Cabinet Depth (E) 30" (78.2 cm) Cooktop KCIG550JBL/SS KCIG950JBL/SS in cm...
....1 239/ 32 59.1 *If the back wall is constructed of a combustible material and a backsplash is not installed, a 73⁄4" (19.7 cm) minimum clearance is constructed of combustible material) (F)* 1 2.5 1 2.5 Cabinet to the Installation Guide before selecting cabinetry, verifying electrical/gas connections, making cutouts or beginning installation. DIMENSIONS INDUCTION COOKTOP OPENING/CLEARANCE DIMENSIONS 5 of 21 MODEL # Unit of Measurement Recommended Upper Cabinet Depth (E) 30" (78.2 cm) Cooktop KCIG550JBL/SS KCIG950JBL/SS in cm...

Dimension Guide
Page 6
.../16 75.1 2011/32 51.7 36" (91.4 cm) Cooktop KCIG556JBL/SS KCIG956JBL/SS in cm 359/16 90.3 2011/32 51.7 NOTE: Due to manufacturing factory tolerances, these are nominal dimensions. Refer to meet your clearance. DIMENSIONS INDUCTION COOKTOP OPENING/CLEARANCE DIMENSIONS 6 of 21 MODEL # Unit of Measurement Countertop and Cabinet Cutout Width (I J TOP VIEW IMPORTANT: Dimensional specifications are provided for planning purposes only.
.../16 75.1 2011/32 51.7 36" (91.4 cm) Cooktop KCIG556JBL/SS KCIG956JBL/SS in cm 359/16 90.3 2011/32 51.7 NOTE: Due to manufacturing factory tolerances, these are nominal dimensions. Refer to meet your clearance. DIMENSIONS INDUCTION COOKTOP OPENING/CLEARANCE DIMENSIONS 6 of 21 MODEL # Unit of Measurement Countertop and Cabinet Cutout Width (I J TOP VIEW IMPORTANT: Dimensional specifications are provided for planning purposes only.


