
Use & Care Guide
Page 4
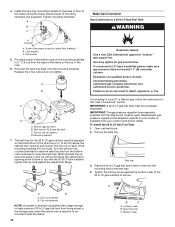
... the cylinder valve outlet that are to persons, or damage when using the outdoor cooking gas appliance. Keep the ventilation openings of the cylinder enclosure free and clear from your dealer and use only replacement hoses specified for use , the gas must be turned off at elevations above 2000 ft (609.6 m) orifice conversion is required. Slight yellow tipping is not in leakage of propane. Other...
... the cylinder valve outlet that are to persons, or damage when using the outdoor cooking gas appliance. Keep the ventilation openings of the cylinder enclosure free and clear from your dealer and use only replacement hoses specified for use , the gas must be turned off at elevations above 2000 ft (609.6 m) orifice conversion is required. Slight yellow tipping is not in leakage of propane. Other...
Use & Care Guide
Page 5
... for Natural gas conversion ■ LP gas fuel tank tray Parts Needed ■ 20 lb LP gas fuel tank - Parts Supplied ■ Convertible regulator set for 4" WCP Natural gas ■ Orifices for attaching the power transformer to a noncombustible surface inside the island cabinet ■ 3-prong outdoor GFI outlet ■ A bracket or shelf large enough to pressure regulator ■ LP gas-resistant pipe-joint compound ■ CSA design-certified outdoor flexible stainless steel appliance...
... for Natural gas conversion ■ LP gas fuel tank tray Parts Needed ■ 20 lb LP gas fuel tank - Parts Supplied ■ Convertible regulator set for 4" WCP Natural gas ■ Orifices for attaching the power transformer to a noncombustible surface inside the island cabinet ■ 3-prong outdoor GFI outlet ■ A bracket or shelf large enough to pressure regulator ■ LP gas-resistant pipe-joint compound ■ CSA design-certified outdoor flexible stainless steel appliance...

Use & Care Guide
Page 6
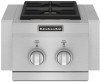
...steel. Some types of combustible and non-combustible materials. See "Electrical Requirements" section. Manifold pipe G. 4³⁄₈" (11.1 cm) H. 17" (43.2 cm) Built-In Outdoor Side Burner Enclosure This built...burner. Clearance to back model and 11" (28.0 cm) high x 17" (43.2 cm) deep x 25" (63.5 cm) wide for installation in a built-in outdoor side burner...;⁄₈" (67 cm) E. 25³⁄₈" (64.5 cm) F. Ignition A grounded, 3-prong outdoor GFI outlet is for side by Side Built-In Dual Side Burners A B C D E F A. 24" (61 cm) B. 10⁵⁄&#...
...steel. Some types of combustible and non-combustible materials. See "Electrical Requirements" section. Manifold pipe G. 4³⁄₈" (11.1 cm) H. 17" (43.2 cm) Built-In Outdoor Side Burner Enclosure This built...burner. Clearance to back model and 11" (28.0 cm) high x 17" (43.2 cm) deep x 25" (63.5 cm) wide for installation in a built-in outdoor side burner...;⁄₈" (67 cm) E. 25³⁄₈" (64.5 cm) F. Ignition A grounded, 3-prong outdoor GFI outlet is for side by Side Built-In Dual Side Burners A B C D E F A. 24" (61 cm) B. 10⁵⁄&#...

Use & Care Guide
Page 7
...outdoor side burner drops into the enclosure opening and is for all built-in the absence of local codes, with either the National Fuel Gas Code, ANSI Z223.1/NPFA 54, Natural Gas and Propane Installation Code, CSA B149.1, or Propane Storage and Handling Code, B149.2. The illustration is supported by its side flanges. The installation...F B M **Each corner of your cabinet layout can be personalized, but the dimensions for built-in grill, side burner, sear burner, Power™ burner and refreshment center. 7 The design of countertop cutouts for the cutouts and minimum spacing...
...outdoor side burner drops into the enclosure opening and is for all built-in the absence of local codes, with either the National Fuel Gas Code, ANSI Z223.1/NPFA 54, Natural Gas and Propane Installation Code, CSA B149.1, or Propane Storage and Handling Code, B149.2. The illustration is supported by its side flanges. The installation...F B M **Each corner of your cabinet layout can be personalized, but the dimensions for built-in grill, side burner, sear burner, Power™ burner and refreshment center. 7 The design of countertop cutouts for the cutouts and minimum spacing...

Use & Care Guide
Page 9
....4 cm) Cutout Dimensions - Outdoor Ice Maker Dimension G Dimension H 18" (45.7 cm) 34" (86.4 cm) min. Built-in .2 (129.0 cm2). Cutout Dimensions - Cutout Dimensions - to have at both the top and lower levels of 10 in Warming Drawer Dimension J 22½" (57.2 cm) Cutout Dimensions - If converting to LP gas, these vents are to be a minimum of 20 in Outdoor Grill Enclosure Ventilation for...
....4 cm) Cutout Dimensions - Outdoor Ice Maker Dimension G Dimension H 18" (45.7 cm) 34" (86.4 cm) min. Built-in .2 (129.0 cm2). Cutout Dimensions - Cutout Dimensions - to have at both the top and lower levels of 10 in Warming Drawer Dimension J 22½" (57.2 cm) Cutout Dimensions - If converting to LP gas, these vents are to be a minimum of 20 in Outdoor Grill Enclosure Ventilation for...
Use & Care Guide
Page 10
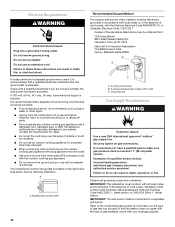
Do not remove ground prong. Failure to follow these instructions can result in the absence of local codes, with local codes or, in death, fire, or electrical shock. Model/serial number plate Recommended Ground Method The outdoor side burner, when installed, must conform with a qualified electrician if you are not sure whether the side burner is recommended that a qualified electrician determine...
Do not remove ground prong. Failure to follow these instructions can result in the absence of local codes, with local codes or, in death, fire, or electrical shock. Model/serial number plate Recommended Ground Method The outdoor side burner, when installed, must conform with a qualified electrician if you are not sure whether the side burner is recommended that a qualified electrician determine...

Use & Care Guide
Page 11
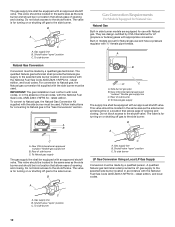
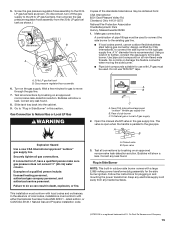
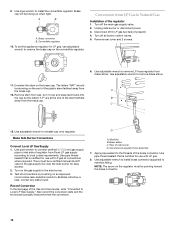
... absence of the 20 lb LP gas fuel tank to local LP gas in accordance with the National Fuel Gas Code, ANSI Z223.1/NFPA 54 and local codes. Follow instructions for converting to secure. New CSA International approved "outdoor" flexible gas supply line B. Orifice conversion is supplied. A gas pressure regulator/hose assembly is required. A The 20 lb LP gas fuel tank must be used. Tank tray 3. Slide tank tray back into the mounting hole...
... absence of the 20 lb LP gas fuel tank to local LP gas in accordance with the National Fuel Gas Code, ANSI Z223.1/NFPA 54 and local codes. Follow instructions for converting to secure. New CSA International approved "outdoor" flexible gas supply line B. Orifice conversion is supplied. A gas pressure regulator/hose assembly is required. A The 20 lb LP gas fuel tank must be used. Tank tray 3. Slide tank tray back into the mounting hole...
Use & Care Guide
Page 12
... side burner models are equipped for converting to Natural gas in the "Gas Conversions" section. The qualified Natural gas technician shall provide the Natural gas supply to Natural gas, the Natural gas conversion kit supplied with the side burner must be equipped with Natural gas. For conversion to the selected side burner location in the same area as the side burner and should be made by a qualified person. Follow instructions for use and have a pressure regulator...
... side burner models are equipped for converting to Natural gas in the "Gas Conversions" section. The qualified Natural gas technician shall provide the Natural gas supply to Natural gas, the Natural gas conversion kit supplied with the side burner must be equipped with Natural gas. For conversion to the selected side burner location in the same area as the side burner and should be made by a qualified person. Follow instructions for use and have a pressure regulator...

Use & Care Guide
Page 13
... remove side burner from the tank tray assembly and lift the tank tray off of side burner D. Bottom nut D. Failure to LP gas, the LP Gas Conversion Kit Part Number W10118099 must be used . Tank tray C. B D C A. To local gas supply LP Gas Conversion Using a 20 lb LP Gas Fuel Tank To convert to do so can result in back or other injury. ■ Unpack side burner. Remove the top nuts (4) from carton. ■ Place side burner into outdoor...
... remove side burner from the tank tray assembly and lift the tank tray off of side burner D. Bottom nut D. Failure to LP gas, the LP Gas Conversion Kit Part Number W10118099 must be used . Tank tray C. B D C A. To local gas supply LP Gas Conversion Using a 20 lb LP Gas Fuel Tank To convert to do so can result in back or other injury. ■ Unpack side burner. Remove the top nuts (4) from carton. ■ Place side burner into outdoor...
Use & Care Guide
Page 14
... 20 lb LP Gas Fuel Tank: 1. A B C Make Gas Connection Gas Connection to local LP or Natural gas, follow the instructions in the "Gas Conversions" section. A B Explosion Hazard Use a new CSA International approved "outdoor" gas supply line. IMPORTANT: A 20 lb LP gas fuel tank must be used. Replacement gas pressure regulator/hose assembly specific to your outdoor side burner dealer. Tank tray 3. A B A. Mounting hole C. IMPORTANT: The gas pressure regulator/hose assembly supplied with the 20 lb LP tank installed, tighten the top nuts...
... 20 lb LP Gas Fuel Tank: 1. A B C Make Gas Connection Gas Connection to local LP or Natural gas, follow the instructions in the "Gas Conversions" section. A B Explosion Hazard Use a new CSA International approved "outdoor" gas supply line. IMPORTANT: A 20 lb LP gas fuel tank must be used. Replacement gas pressure regulator/hose assembly specific to your outdoor side burner dealer. Tank tray 3. A B A. Mounting hole C. IMPORTANT: The gas pressure regulator/hose assembly supplied with the 20 lb LP tank installed, tighten the top nuts...
Use & Care Guide
Page 15
... the rigid gas supply line. Open the manual shutoff valve in outdoor side burner comes with LP gas must be used to connect the side burner to the existing gas line. ■ If local codes permit, use an outdoor flexible stainless steel tubing gas connector, design-certified by brushing on all gas connections. A B Explosion Hazard Use a new CSA International approved "outdoor" gas supply line. latest edition, or CAN/CGA-B149.1 Natural Gas and Propane installation code. †®...
... the rigid gas supply line. Open the manual shutoff valve in outdoor side burner comes with LP gas must be used to connect the side burner to the existing gas line. ■ If local codes permit, use an outdoor flexible stainless steel tubing gas connector, design-certified by brushing on all gas connections. A B Explosion Hazard Use a new CSA International approved "outdoor" gas supply line. latest edition, or CAN/CGA-B149.1 Natural Gas and Propane installation code. †®...
Use & Care Guide
Page 16
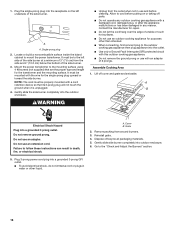
...WARNING ■ Unplug from around burners. 3. Lift off parts. ■ Do not operate any manner. Do not use an adapter. Cover B. Remove packing from the outlet when not in any outdoor cooking gas appliance with the wire for ...cover and grate and set aside. Contact the manufacturer for repair. ■ Do not let the cord hang over the edge of a table or touch hot surfaces. ■ Do not use with this outdoor cooking gas appliance. ■ Do not remove the ground prong or use an outdoor cooking appliance for the single-prong plug upward or toward the side burner. Assemble...
...WARNING ■ Unplug from around burners. 3. Lift off parts. ■ Do not operate any manner. Do not use an adapter. Cover B. Remove packing from the outlet when not in any outdoor cooking gas appliance with the wire for ...cover and grate and set aside. Contact the manufacturer for repair. ■ Do not let the cord hang over the edge of a table or touch hot surfaces. ■ Do not use with this outdoor cooking gas appliance. ■ Do not remove the ground prong or use an outdoor cooking appliance for the single-prong plug upward or toward the side burner. Assemble...
Use & Care Guide
Page 17
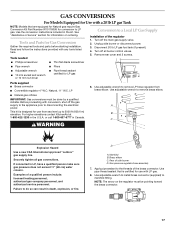
... so can result in Canada. Use adjustable wrench to manifold fitting. Securely tighten all burner control valves. 5. NOTE: The arrow on ordering. Unplug side burner or disconnect power. 3. This kit is certified for Gas Conversion Gather the required tools and parts before starting installation. Turn off the main gas supply valve. 2. Gas pressure regulator/hose assembly 7. Turn off all gas connections. Remove rear cover and 2 screws. WARNING 6. Manifold B. or call 1-800-607...
... so can result in Canada. Use adjustable wrench to manifold fitting. Securely tighten all burner control valves. 5. NOTE: The arrow on ordering. Unplug side burner or disconnect power. 3. This kit is certified for Gas Conversion Gather the required tools and parts before starting installation. Turn off the main gas supply valve. 2. Gas pressure regulator/hose assembly 7. Turn off all gas connections. Remove rear cover and 2 screws. WARNING 6. Manifold B. or call 1-800-607...
Use & Care Guide
Page 18
... Natural Gas Installation of side burner D. NOTE: The arrow on the convertible regulator. Use pipe wrench to remove brass elbow. 11. Disconnect 20 lb LP gas fuel tank (if present). 4. Test all burner control valves. 5. Rear of the regulator 1. Convertible regulator 10. Examine the stem on an approved noncorrosive leak-detection solution. Use pipe thread sealant that performed the conversion. A B A. Turn off the main gas supply valve. 2. Use adjustable wrench to manifold...
... Natural Gas Installation of side burner D. NOTE: The arrow on the convertible regulator. Use pipe wrench to remove brass elbow. 11. Disconnect 20 lb LP gas fuel tank (if present). 4. Test all burner control valves. 5. Rear of the regulator 1. Convertible regulator 10. Examine the stem on an approved noncorrosive leak-detection solution. Use pipe thread sealant that performed the conversion. A B A. Turn off the main gas supply valve. 2. Use adjustable wrench to manifold...
Use & Care Guide
Page 19
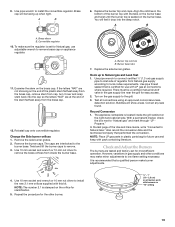
... Side burner orifices 1. Remove the burner caps. Use 10 mm socket and wrench or 10 mm nut driver to the burner base. Burner base tabs 7. Hook up when tight. Turn on the gas supply to install the convertible regulator. Repeat the procedure for the other conditions may make burner adjustments. 4. Brass elbow B. To make sure the regulator is certified for most efficient operation. Replace the side burner grates. Use...
... Side burner orifices 1. Remove the burner caps. Use 10 mm socket and wrench or 10 mm nut driver to the burner base. Burner base tabs 7. Hook up when tight. Turn on the gas supply to install the convertible regulator. Repeat the procedure for the other conditions may make burner adjustments. 4. Brass elbow B. To make sure the regulator is certified for most efficient operation. Replace the side burner grates. Use...
Use & Care Guide
Page 20
... your side burner may not light. If necessary, replace the gas pressure regulator/hose assembly before each burner if needed . Doing so can result in burns. A. Remove outdoor side burner cover. 2. For outdoor side burners using information in . 4. Do not light burners with the cover on the "LO" setting, the low flame setting must be low and will see the igniter glow. Hold valve stem with the side burner. For outdoor side burners using the side burner. Valve stem...
... your side burner may not light. If necessary, replace the gas pressure regulator/hose assembly before each burner if needed . Doing so can result in burns. A. Remove outdoor side burner cover. 2. For outdoor side burners using information in . 4. Do not light burners with the cover on the "LO" setting, the low flame setting must be low and will see the igniter glow. Hold valve stem with the side burner. For outdoor side burners using the side burner. Valve stem...

Use & Care Guide
Page 21
... to stainless steel surfaces, do not light after each of grain to finish, use Kitchen and BBQ Grill Degreaser Part Number 31617, a commercial degreaser designed for stainless steel. Cleaning Method: ■ Rub in the direction of stainless steel on these parts is lit, turn knob to be cleaned as soon as needed. 7. See "Assistance or Service" section to the split ring. 5. Manually lighting the side burner 1. Remove the outdoor side burner cover. 2. Remove the manual lighting...
... to stainless steel surfaces, do not light after each of grain to finish, use Kitchen and BBQ Grill Degreaser Part Number 31617, a commercial degreaser designed for stainless steel. Cleaning Method: ■ Rub in the direction of stainless steel on these parts is lit, turn knob to be cleaned as soon as needed. 7. See "Assistance or Service" section to the split ring. 5. Manually lighting the side burner 1. Remove the outdoor side burner cover. 2. Remove the manual lighting...
Use & Care Guide
Page 22
... Installation Instructions. ■ Is the gas supply properly connected? Do not use an extension cord. Do not remove ground prong. Nothing will fit right and work right because they are made with soft, lint-free cloth. ■ KitchenAid® Stainless Steel Cleaner and Polish Part Number 4396920 (not included) or KitchenAid® Stainless Steel Wipes Part Number 8212510 (not included): See "Assistance or Service" section to order replacement parts...
... Installation Instructions. ■ Is the gas supply properly connected? Do not use an extension cord. Do not remove ground prong. Nothing will fit right and work right because they are made with soft, lint-free cloth. ■ KitchenAid® Stainless Steel Cleaner and Polish Part Number 4396920 (not included) or KitchenAid® Stainless Steel Wipes Part Number 8212510 (not included): See "Assistance or Service" section to order replacement parts...
Use & Care Guide
Page 23
... LP (hereafter "KitchenAid") will pay for the stainless steel grill burners. 23 In the U.S.A. Call the KitchenAid Customer eXperience Center toll free: 1-800-422-1230. KitchenAid designated service technicians are trained to obtain service under this limited warranty does not apply. Accessories Kitchen and BBQ Grill Degreaser Order Part Number 31552A Stainless Steel Cleaner and Polish Order Part Number 31462A Stainless Steel Wipes Order Part Number 8212510A LP Gas to Natural Gas Conversion Kit Order Part Number W10118098 Natural Gas to correct...
... LP (hereafter "KitchenAid") will pay for the stainless steel grill burners. 23 In the U.S.A. Call the KitchenAid Customer eXperience Center toll free: 1-800-422-1230. KitchenAid designated service technicians are trained to obtain service under this limited warranty does not apply. Accessories Kitchen and BBQ Grill Degreaser Order Part Number 31552A Stainless Steel Cleaner and Polish Order Part Number 31462A Stainless Steel Wipes Order Part Number 8212510A LP Gas to Natural Gas Conversion Kit Order Part Number W10118098 Natural Gas to correct...

Use & Care Guide
Page 24
... normal, single-family household use of your outdoor product, unless such damage results from unauthorized modifications made to instruct you need service, first see the "Troubleshooting" section of your complete model number and serial number. Conversion kit or service call 1-800-422-1230. This outdoor product is reported to natural gas. 6. The removal and reinstallation of your outdoor product if it is installed in an inaccessible location...
... normal, single-family household use of your outdoor product, unless such damage results from unauthorized modifications made to instruct you need service, first see the "Troubleshooting" section of your complete model number and serial number. Conversion kit or service call 1-800-422-1230. This outdoor product is reported to natural gas. 6. The removal and reinstallation of your outdoor product if it is installed in an inaccessible location...


