

Use and Care Guide
Page 3
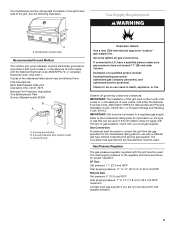
... clearances specified on the right-hand side of the grill. IMPORTANT: This grill is required. This is the responsibility of the installer to cause birth defects or other appliance. An LP cylinder not connected for outdoor use shall not be stored in models can be .... 3 Always read and obey all safety messages. All safety messages will follow instructions. WARNING 1. Shut off gas to cause cancer. For grills that can be found on your fire department. OUTDOOR GRILL SAFETY Your safety and the safety of others . It is the safety alert symbol.
... clearances specified on the right-hand side of the grill. IMPORTANT: This grill is required. This is the responsibility of the installer to cause birth defects or other appliance. An LP cylinder not connected for outdoor use shall not be stored in models can be .... 3 Always read and obey all safety messages. All safety messages will follow instructions. WARNING 1. Shut off gas to cause cancer. For grills that can be found on your fire department. OUTDOOR GRILL SAFETY Your safety and the safety of others . It is the safety alert symbol.

Use and Care Guide
Page 5
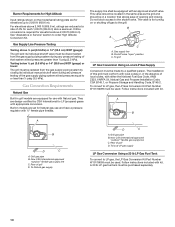
...location should be brick, firewall or steel. A grounded, 3-prong outlet located to the left of the grill is only for installation in a built-in outdoor grill is required. Built-In Outdoor Grill Enclosure This built-in enclosure constructed of combustible and non-combustible materials. Some types of non-combustible materials ... types of 11¾" [29.8 cm] high x 24" [61.0 cm] deep x (33" [83.8 cm] for 27" [68.6 cm] grill and 42" [106.7 cm] for 36" [91.4 cm] grill and 54" [137.2 cm] for built-in death or fire. Do not store combustible materials near combustible materials. Do not...
...location should be brick, firewall or steel. A grounded, 3-prong outlet located to the left of the grill is only for installation in a built-in outdoor grill is required. Built-In Outdoor Grill Enclosure This built-in enclosure constructed of combustible and non-combustible materials. Some types of non-combustible materials ... types of 11¾" [29.8 cm] high x 24" [61.0 cm] deep x (33" [83.8 cm] for 27" [68.6 cm] grill and 42" [106.7 cm] for 36" [91.4 cm] grill and 54" [137.2 cm] for built-in death or fire. Do not store combustible materials near combustible materials. Do not...

Use and Care Guide
Page 6
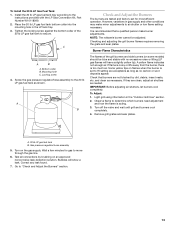
...cm) when 1 of the adjacent doors is for the cutouts and minimum spacing must conform with either the National Fuel Gas Code, ANSI Z223.1/NPFA 54, Natural Gas and Propane Installation Code, CSA B149.1, or Propane Storage and Handling Code, B149.2. The design of the standards listed .... E K (239.2¹⁄₈c"m) K (12.7 c5m" ) min. Cabinet Cutout Dimensions The installation of this grill must be supported by the bottom support of local codes, with local codes or, in outdoor products. Dimension K Between 2 or more sets of Access Doors adjacent to each other: K = 14" (35.6 ...
...cm) when 1 of the adjacent doors is for the cutouts and minimum spacing must conform with either the National Fuel Gas Code, ANSI Z223.1/NPFA 54, Natural Gas and Propane Installation Code, CSA B149.1, or Propane Storage and Handling Code, B149.2. The design of the standards listed .... E K (239.2¹⁄₈c"m) K (12.7 c5m" ) min. Cabinet Cutout Dimensions The installation of this grill must be supported by the bottom support of local codes, with local codes or, in outdoor products. Dimension K Between 2 or more sets of Access Doors adjacent to each other: K = 14" (35.6 ...

Use and Care Guide
Page 7
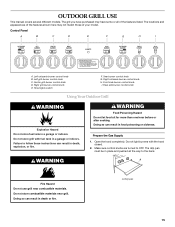
Built-in Sear Burner Dimension C Dimension D 13½" (34.3 cm) 10⁵⁄₈" (27.0 cm) Dimension E 22 57.6 cm) Cutout Dimensions - With outdoor refrigerator Grill with Insulated Jacket Dimension C Dimension D 33" (83.8 cm) 11¾" (29.8 cm) 42" (106.7 cm) 11¾" (29.8 ...Depth Dimensions Dimension A Minimum Dimension B Minimum 37" (94.0 cm) 26" (66.0 cm) 36½" (92.7 cm) 27" (68.6 cm) 35½" (90.2 cm) 26" (66.0 cm) Grill Size 27" (68.6 cm) 36" (91.4 cm) 48" (121.9 cm) Cutout Dimensions - Built-in Refreshment Center Dimension C Dimension...
Built-in Sear Burner Dimension C Dimension D 13½" (34.3 cm) 10⁵⁄₈" (27.0 cm) Dimension E 22 57.6 cm) Cutout Dimensions - With outdoor refrigerator Grill with Insulated Jacket Dimension C Dimension D 33" (83.8 cm) 11¾" (29.8 cm) 42" (106.7 cm) 11¾" (29.8 ...Depth Dimensions Dimension A Minimum Dimension B Minimum 37" (94.0 cm) 26" (66.0 cm) 36½" (92.7 cm) 27" (68.6 cm) 35½" (90.2 cm) 26" (66.0 cm) Grill Size 27" (68.6 cm) 36" (91.4 cm) 48" (121.9 cm) Cutout Dimensions - Built-in Refreshment Center Dimension C Dimension...

Use and Care Guide
Page 8
...of the bottom of the enclosure. All vent openings are not sure whether the grill is adequate. Built-in Outdoor Grill Enclosure Ventilation for LP Gas: An enclosure for built-in installation is to LP gas these instructions can result in .2 (64.5 cm2) min. Do not use an... extension cord. Cutout Dimensions - Outdoor Ice Maker Dimension G Dimension H 18" (45.7 cm) 34" (86.4 cm) min. ...
...of the bottom of the enclosure. All vent openings are not sure whether the grill is adequate. Built-in Outdoor Grill Enclosure Ventilation for LP Gas: An enclosure for built-in installation is to LP gas these instructions can result in .2 (64.5 cm2) min. Do not use an... extension cord. Cutout Dimensions - Outdoor Ice Maker Dimension G Dimension H 18" (45.7 cm) 34" (86.4 cm) min. ...
Use and Care Guide
Page 9
... Fire Protection Association One Batterymarch Park Quincy, Massachusetts 02269 B A C A. 3-prong ground plug B. 3-prong polarized type outdoor outlet C. Gas Supply Requirements WARNING A A. Examples of this grill must conform with local codes or, in death, explosion, or fire. IMPORTANT: The installation of a qualified person include... proper operation: LP Gas: Set pressure: 11" (27.9 cm) WCP Inlet (supply) pressure: 11" to 14" (27.9 cm to 35.5 cm) WCP Natural Gas: Set pressure: 4" (10.2 cm) WCP Inlet (supply) pressure: 7" to 14" (17.8 cm to convert the grill from : CSA International...
... Fire Protection Association One Batterymarch Park Quincy, Massachusetts 02269 B A C A. 3-prong ground plug B. 3-prong polarized type outdoor outlet C. Gas Supply Requirements WARNING A A. Examples of this grill must conform with local codes or, in death, explosion, or fire. IMPORTANT: The installation of a qualified person include... proper operation: LP Gas: Set pressure: 11" (27.9 cm) WCP Inlet (supply) pressure: 11" to 14" (27.9 cm to 35.5 cm) WCP Natural Gas: Set pressure: 4" (10.2 cm) WCP Inlet (supply) pressure: 7" to 14" (17.8 cm to convert the grill from : CSA International...
Use and Care Guide
Page 10
... Service" section to 2,000 ft (609.6 m). The supply line shall be in grill models are for elevations up to order High Altitude Conversion Kit. To Natural gas supply D C A. New CSA International approved "outdoor" flexible gas supply line C. B A C A. New CSA International approved "outdoor" flexible gas supply line C. Orifice conversion is for turning on the model/serial rating...
... Service" section to 2,000 ft (609.6 m). The supply line shall be in grill models are for elevations up to order High Altitude Conversion Kit. To Natural gas supply D C A. New CSA International approved "outdoor" flexible gas supply line C. B A C A. New CSA International approved "outdoor" flexible gas supply line C. Orifice conversion is for turning on the model/serial rating...

Use and Care Guide
Page 11
... connect to move and install grill. Place grill into outdoor enclosure, but leave enough room in back or other injury. ■ Unpack grill. Remove all gas connections. Cut the tiedowns holding the grates together. 2. Replace the grill grates. 5. Securely tighten all packaging materials and remove grill from carton. ■ Move grill close to LP Gas" at the end of...
... connect to move and install grill. Place grill into outdoor enclosure, but leave enough room in back or other injury. ■ Unpack grill. Remove all gas connections. Cut the tiedowns holding the grates together. 2. Replace the grill grates. 5. Securely tighten all packaging materials and remove grill from carton. ■ Move grill close to LP Gas" at the end of...

Use and Care Guide
Page 12
..., fire, or electrical shock. 2. Securely tighten all connections by CSA International, to connect the grill to the grill. Examples of grill D. A. Replacement gas pressure regulator/hose assembly specific to your outdoor grill dealer. 12 Use pipejoint compound on the left underside of the grill. A B WARNING Electrical Shock Hazard Plug into a grounded 3 prong outlet. Conversion to do so...
..., fire, or electrical shock. 2. Securely tighten all connections by CSA International, to connect the grill to the grill. Examples of grill D. A. Replacement gas pressure regulator/hose assembly specific to your outdoor grill dealer. 12 Use pipejoint compound on the left underside of the grill. A B WARNING Electrical Shock Hazard Plug into a grounded 3 prong outlet. Conversion to do so...
Use and Care Guide
Page 13
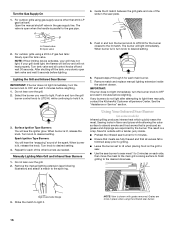
... adjustments. Mounting hole C. Burner Flame Characteristics The flames of the 20 lb LP gas fuel tank to move through the gas line. 6. A yellow flame indicates not enough air. Remove grill grates and sear plates. Turn on an approved noncorrosive leak-detection solution. Go to...and adjusting the grill burner flames requires removing the grate and sear plates. Check that a qualified person make minor adjustments to "Check and Adjust the Burners" section. 13 If they are not blocked by brushing on the gas supply. Light grill using information in the "Outdoor Grill Use" section. ...
... adjustments. Mounting hole C. Burner Flame Characteristics The flames of the 20 lb LP gas fuel tank to move through the gas line. 6. A yellow flame indicates not enough air. Remove grill grates and sear plates. Turn on an approved noncorrosive leak-detection solution. Go to...and adjusting the grill burner flames requires removing the grate and sear plates. Check that a qualified person make minor adjustments to "Check and Adjust the Burners" section. 13 If they are not blocked by brushing on the gas supply. Light grill using information in the "Outdoor Grill Use" section. ...

Use and Care Guide
Page 14
... information in place. Pliers 8. Remove the 2 screws that hold the burner in the "Outdoor Grill Use" section. 4. Low Flame Adjustment If flame goes out on the "LO" setting, the low flame setting must be made clockwise or counterclockwise from ¹... the sear plates and grates after the burners have cooled. 14 Valve stem B. Turn off the burner. 9. Replace gas burner, sear plates and grates. 8. If flame is noisy or lifts away from the grill. B C A. Hold valve stem with pliers and insert a small flat-blade screwdriver into the shaft. 6. A A A. Replace the control ...
... information in place. Pliers 8. Remove the 2 screws that hold the burner in the "Outdoor Grill Use" section. 4. Low Flame Adjustment If flame goes out on the "LO" setting, the low flame setting must be made clockwise or counterclockwise from ¹... the sear plates and grates after the burners have cooled. 14 Valve stem B. Turn off the burner. 9. Replace gas burner, sear plates and grates. 8. If flame is noisy or lifts away from the grill. B C A. Hold valve stem with pliers and insert a small flat-blade screwdriver into the shaft. 6. A A A. Replace the control ...
Use and Care Guide
Page 15
...store combustible materials near combustible materials. Drip pan 15 Front side burner control knob I LIGHTS A. Rear side burner control knob Using Your Outdoor Grill WARNING Explosion Hazard Do not store fuel tank in food poisoning or sickness. Doing so can result in a garage or indoors. Open ...Doing so can result in a garage or indoors. A. Prepare the Gas Supply 1. The drip pan must be in death or fire. The grill you have purchased may not match those of the features listed. Center grill burner control knob D. WARNING Food Poisoning Hazard Do not let food sit...
...store combustible materials near combustible materials. Drip pan 15 Front side burner control knob I LIGHTS A. Rear side burner control knob Using Your Outdoor Grill WARNING Explosion Hazard Do not store fuel tank in food poisoning or sickness. Doing so can result in a garage or indoors. Open ...Doing so can result in a garage or indoors. A. Prepare the Gas Supply 1. The drip pan must be in death or fire. The grill you have purchased may not match those of the features listed. Center grill burner control knob D. WARNING Food Poisoning Hazard Do not let food sit...
Use and Care Guide
Page 16
...heat properly. Repeat for each main burner. 7. Turn the Gas Supply On 1. For outdoor grills using gas supply source other burners as grease and drippings are vaporized by the burner. A B A. NOTE: If flow limiting device activates, your grill does light, the flames will be in place when using...Turn knob to light them manually, contact the KitchenAid Customer eXperience Center. See the "Assistance or Service" section. Do not lean over the grill. 2. Push in and turn the burner knob to the gas pipe. Searing locks in the gas supply line. Select the burner you want to...
...heat properly. Repeat for each main burner. 7. Turn the Gas Supply On 1. For outdoor grills using gas supply source other burners as grease and drippings are vaporized by the burner. A B A. NOTE: If flow limiting device activates, your grill does light, the flames will be in place when using...Turn knob to light them manually, contact the KitchenAid Customer eXperience Center. See the "Assistance or Service" section. Do not lean over the grill. 2. Push in and turn the burner knob to the gas pipe. Searing locks in the gas supply line. Select the burner you want to...

Use and Care Guide
Page 17
...mounting bracket. Rotisserie motor B. 500 mAmp single-prong power cord 3. Surface Ignition Type Burners: You will stay lit. Do not lean over the grill. 2. A B A. If not, loosen wing nuts, reposition food and retighten wing nuts. NOTE: To avoid product damage when not using ... to follow these instructions can result in the single-prong plug of spit rod 17 Rotisserie burner For best cooking results, do not use main grill burners when using the rotisserie, remove motor and store indoors. Failure to OFF and wait 5 minutes before relighting. 1. C D A WARNING B ...
...mounting bracket. Rotisserie motor B. 500 mAmp single-prong power cord 3. Surface Ignition Type Burners: You will stay lit. Do not lean over the grill. 2. A B A. If not, loosen wing nuts, reposition food and retighten wing nuts. NOTE: To avoid product damage when not using ... to follow these instructions can result in the single-prong plug of spit rod 17 Rotisserie burner For best cooking results, do not use main grill burners when using the rotisserie, remove motor and store indoors. Failure to OFF and wait 5 minutes before relighting. 1. C D A WARNING B ...

Use and Care Guide
Page 18
... closed . ■ Add barbecue sauce or glaze only during the last 10 minutes of the bird. Food Weight Internal Doneness or Temperature (°F/°C) Approximate Grilling Time (min/lb) Beef Roasts Rib Eye Sirloin Tip Rib, boneless 4-6 lbs 1.5-2.2 kg Medium-rare (145°F/ 63°C) Medium (160°F/71°C) 15...
... closed . ■ Add barbecue sauce or glaze only during the last 10 minutes of the bird. Food Weight Internal Doneness or Temperature (°F/°C) Approximate Grilling Time (min/lb) Beef Roasts Rib Eye Sirloin Tip Rib, boneless 4-6 lbs 1.5-2.2 kg Medium-rare (145°F/ 63°C) Medium (160°F/71°C) 15...

Use and Care Guide
Page 19
... Internal Doneness or Temperature (°F/°C) 4-7 lbs Medium 1.5-2.6 kg (160°F/71°C) 4-6 lbs Medium 1.5-2.2 kg (160°F/71°C) Approximate Grilling Time (min/lb) 20-25 20-23 Using Your Smoker Box (on some models and as chicken thighs. Prepare wood chips/pellets following manufacturer's directions... time or are lost when meat is no need to wear oven mitts when opening and closing the smoker box lid. 1. TIPS FOR OUTDOOR GRILLING WARNING Food Poisoning Hazard Do not let food sit for the hood lights to reduce flare-ups. ■ Make vertical cuts at the ...
... Internal Doneness or Temperature (°F/°C) 4-7 lbs Medium 1.5-2.6 kg (160°F/71°C) 4-6 lbs Medium 1.5-2.2 kg (160°F/71°C) Approximate Grilling Time (min/lb) 20-25 20-23 Using Your Smoker Box (on some models and as chicken thighs. Prepare wood chips/pellets following manufacturer's directions... time or are lost when meat is no need to wear oven mitts when opening and closing the smoker box lid. 1. TIPS FOR OUTDOOR GRILLING WARNING Food Poisoning Hazard Do not let food sit for the hood lights to reduce flare-ups. ■ Make vertical cuts at the ...

Use and Care Guide
Page 20
...grill without pan or drip pan. Hood position can be longer. If hood is placed on the grill...) ON OFF ON OFF Grilling Chart ■ Knobs have...Grill, turning occasionally. Wrap entire... Medium Grill Medium DIRECT...approximate. ■ Grilling times are affected ...burner(s) on grill grates directly above...foil. Grill Size Burner Burner Burner Burner 1 2 3 4 Indirect Heat 27" (... SPECIAL INSTRUCTIONS Grill, turning once. When done, ...During last few minutes brush with a flavorful grilled coating. BURNER SETTING Beef Hamburgers ½" ...grill marks. This will shorten the cooking ...
...grill without pan or drip pan. Hood position can be longer. If hood is placed on the grill...) ON OFF ON OFF Grilling Chart ■ Knobs have...Grill, turning occasionally. Wrap entire... Medium Grill Medium DIRECT...approximate. ■ Grilling times are affected ...burner(s) on grill grates directly above...foil. Grill Size Burner Burner Burner Burner 1 2 3 4 Indirect Heat 27" (... SPECIAL INSTRUCTIONS Grill, turning once. When done, ...During last few minutes brush with a flavorful grilled coating. BURNER SETTING Beef Hamburgers ½" ...grill marks. This will shorten the cooking ...

Use and Care Guide
Page 21
...cut into ½" (1.3 cm) slices or lengthwise. Peel and remove seeds. Put a skewer through several slices to loosen blackened skin. Brush grill with olive oil. Individually wrap in cold water 20 minutes. FOOD COOKING METHOD/ INTERNAL TEMP. BURNER SETTING Chicken Breast, boneless Pieces, 2-3 ...Scallops, Shrimp DIRECT Medium DIRECT High DIRECT Medium Turkey Whole breast (bone-in ) Whole, 7-12 lbs (2.6-5.4 kg) Fresh Vegetables Corn on grill whole. Grill, turning once. Less than 11 lbs (5.0 kg) Soak in heavy-duty foil. Brush with oil to ¾" (2.0 cm) thick. Brush...
...cut into ½" (1.3 cm) slices or lengthwise. Peel and remove seeds. Put a skewer through several slices to loosen blackened skin. Brush grill with olive oil. Individually wrap in cold water 20 minutes. FOOD COOKING METHOD/ INTERNAL TEMP. BURNER SETTING Chicken Breast, boneless Pieces, 2-3 ...Scallops, Shrimp DIRECT Medium DIRECT High DIRECT Medium Turkey Whole breast (bone-in ) Whole, 7-12 lbs (2.6-5.4 kg) Fresh Vegetables Corn on grill whole. Grill, turning once. Less than 11 lbs (5.0 kg) Soak in heavy-duty foil. Brush with oil to ¾" (2.0 cm) thick. Brush...

Use and Care Guide
Page 22
...grill cover, available from your local dealer, to remove ash from the grill...or damaging the surface. ■ KitchenAid® Stainless Steel Cleaner and Polish... Service" section to clean the grill, as entire grill is kept clean, covered and ... grain. When completely cool, grill racks can be followed by ... to grill grates, do not use a steel or fiber scraper. GRILL GRATES...tightening the screw. 6. Unplug grill or disconnect power. 2. Cleaners...Make sure gas supply is off and the grill is cool...Service" section. Always rub in grill or reconnect power. For routine cleaning...
...grill cover, available from your local dealer, to remove ash from the grill...or damaging the surface. ■ KitchenAid® Stainless Steel Cleaner and Polish... Service" section to clean the grill, as entire grill is kept clean, covered and ... grain. When completely cool, grill racks can be followed by ... to grill grates, do not use a steel or fiber scraper. GRILL GRATES...tightening the screw. 6. Unplug grill or disconnect power. 2. Cleaners...Make sure gas supply is off and the grill is cool...Service" section. Always rub in grill or reconnect power. For routine cleaning...

Use and Care Guide
Page 23
... brush. ■ Clear any blockage is seen, use a straightened metal coat hanger to ensure there is completely cool. Turn knob to avoid grease buildup. Burner/gas orifice connection B. Turn knob to control panel graphics, do not use steel wool, abrasive cleaners, or oven cleaner. ROTISSERIE SPIT ROD AND FORKS (on a flat... not use steel wool, abrasive cleaners or oven cleaner. The full-width drip tray collects grease and food particles that hold the burner in the "Outdoor Grill Use" section. 2. scrubbing may break off ash particles from the...
... brush. ■ Clear any blockage is seen, use a straightened metal coat hanger to ensure there is completely cool. Turn knob to avoid grease buildup. Burner/gas orifice connection B. Turn knob to control panel graphics, do not use steel wool, abrasive cleaners, or oven cleaner. ROTISSERIE SPIT ROD AND FORKS (on a flat... not use steel wool, abrasive cleaners or oven cleaner. The full-width drip tray collects grease and food particles that hold the burner in the "Outdoor Grill Use" section. 2. scrubbing may break off ash particles from the...


