

Use and Care Guide
Page 4
.... ■ The pressure regulator and hose assembly supplied with the Specification for use of dust cap on some models ■ 1 single-prong plug/5,000 mAmp transformer assembly 4 Parts Supplied ■ Convertible regulator set for 4" WCP Natural gas. ■ 1 single-prong plug/500 mAmp transformer assembly, on the cylinder valve outlet that is provided with the outdoor cooking gas appliance. ■ Visually check the burner flames. If the hose shows excessive abrasion...
.... ■ The pressure regulator and hose assembly supplied with the Specification for use of dust cap on some models ■ 1 single-prong plug/5,000 mAmp transformer assembly 4 Parts Supplied ■ Convertible regulator set for 4" WCP Natural gas. ■ 1 single-prong plug/500 mAmp transformer assembly, on the cylinder valve outlet that is provided with the outdoor cooking gas appliance. ■ Visually check the burner flames. If the hose shows excessive abrasion...
Use and Care Guide
Page 10
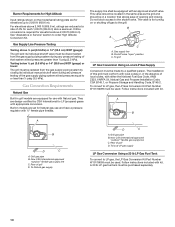
... equal to LP gas, the LP Gas Conversion Kit Part Number W10118099 must be equipped with Natural gas. See "Assistance or Service" section to the grill. This valve should be located in grill models are equipped for Natural gas use with an approved shutoff valve. Rear of grill D. Rear of grill D. A 20 lb LP gas fuel tank must conform with local codes or, in models are design-certified by a qualified person. Burner Requirements for...
... equal to LP gas, the LP Gas Conversion Kit Part Number W10118099 must be equipped with Natural gas. See "Assistance or Service" section to the grill. This valve should be located in grill models are equipped for Natural gas use with an approved shutoff valve. Rear of grill D. Rear of grill D. A 20 lb LP gas fuel tank must conform with local codes or, in models are design-certified by a qualified person. Burner Requirements for...

Use and Care Guide
Page 11
... NOTE: If grill has been converted to LP gas, follow instructions in back or other injury. ■ Unpack grill. A combination of local codes, with either the National Fuel Gas Code, ANSI Z223.1/NPFA 54, Natural Gas and Propane Installation Code, CSA B149.1, or Propane Storage and Handling Code, B149.2. 1. On some models), warming shelf and grill grates from inside the grill. Replace the grill grates. 5. B A A Fire Hazard Do not use grill near grill. Foam block...
... NOTE: If grill has been converted to LP gas, follow instructions in back or other injury. ■ Unpack grill. A combination of local codes, with either the National Fuel Gas Code, ANSI Z223.1/NPFA 54, Natural Gas and Propane Installation Code, CSA B149.1, or Propane Storage and Handling Code, B149.2. 1. On some models), warming shelf and grill grates from inside the grill. Replace the grill grates. 5. B A A Fire Hazard Do not use grill near grill. Foam block...

Use and Care Guide
Page 12
... "outdoor" gas supply line. Do not kink or damage the flexible connector when moving the grill. ■ Pipe-joint compounds suitable for the grill lights and igniter. Do not use Teflon® tape. Bubbles will show a leak. Replacement gas pressure regulator/hose assembly specific to your outdoor grill dealer. 12 Plug in the gas supply line. A. Rear of a qualified person include: licensed heating personnel, authorized gas company personnel, and authorized service...
... "outdoor" gas supply line. Do not kink or damage the flexible connector when moving the grill. ■ Pipe-joint compounds suitable for the grill lights and igniter. Do not use Teflon® tape. Bubbles will show a leak. Replacement gas pressure regulator/hose assembly specific to your outdoor grill dealer. 12 Plug in the gas supply line. A. Rear of a qualified person include: licensed heating personnel, authorized gas company personnel, and authorized service...
Use and Care Guide
Page 13
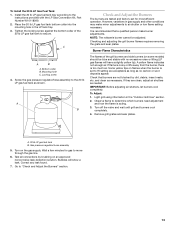
... Install the 20 lb LP Gas Fuel Tank: 1. Light grill using information in the LP tank tray. 3. Go to the instructions provided with no carbon or soot deposits appear. Tighten the locking screw against the bottom collar of the grill burners and side burners (on an approved noncorrosive leak-detection solution. NOTE: The rotisserie burner cannot be blue and stable with the LP Gas Conversion Kit, Part Number W10118099...
... Install the 20 lb LP Gas Fuel Tank: 1. Light grill using information in the LP tank tray. 3. Go to the instructions provided with no carbon or soot deposits appear. Tighten the locking screw against the bottom collar of the grill burners and side burners (on an approved noncorrosive leak-detection solution. NOTE: The rotisserie burner cannot be blue and stable with the LP Gas Conversion Kit, Part Number W10118099...
Use and Care Guide
Page 15
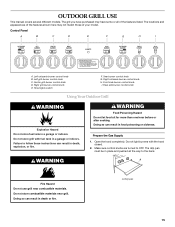
... light burners with fuel tank in food poisoning or sickness. OUTDOOR GRILL USE This manual covers several different models. Doing so can result in a garage or indoors. Failure to OFF. WARNING Food Poisoning Hazard Do not let food sit for more than one hour before or after cooking. The grill you have purchased may not match those of the features listed. Left grill burner control knob...
... light burners with fuel tank in food poisoning or sickness. OUTDOOR GRILL USE This manual covers several different models. Doing so can result in a garage or indoors. Failure to OFF. WARNING Food Poisoning Hazard Do not let food sit for more than one hour before or after cooking. The grill you have purchased may not match those of the features listed. Left grill burner control knob...

Use and Care Guide
Page 16
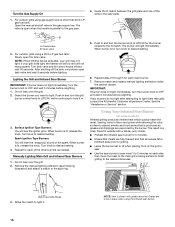
... the knob. Manually Lighting Main Grill and Infrared Sear Burners 1. Remove the manual lighting extension (see the igniter glow. Remove match and replace manual lighting extension inside . ■ Preheat the infrared sear burner for the burner closest to the lit match. See the "Assistance or Service" section. Right-hand side flange 3. Grates are fully thawed and that is produced as needed. Open valve 2. Guide the lit match between the grill grate and one of the slots in . 3. Using Your Infrared Sear Burner...
... the knob. Manually Lighting Main Grill and Infrared Sear Burners 1. Remove the manual lighting extension (see the igniter glow. Remove match and replace manual lighting extension inside . ■ Preheat the infrared sear burner for the burner closest to the lit match. See the "Assistance or Service" section. Right-hand side flange 3. Grates are fully thawed and that is produced as needed. Open valve 2. Guide the lit match between the grill grate and one of the slots in . 3. Using Your Infrared Sear Burner...

Use and Care Guide
Page 19
...using your rotisserie. 1. TIPS FOR OUTDOOR GRILLING WARNING Food Poisoning Hazard Do not let food sit for the hood lights to lower the heat setting for foods that cook a long time or are lost when meat is finished. Light the burner below the smoker box and preheat on the grill. ■ Cooking time will help reduce flare-ups. ■ Lightly oil the grill grates...Approximate Grilling Time (min/lb) 20-25 20-23 Using Your Smoker Box (on some models and as chicken thighs. A B A. Hood Lights The 5,000 mAmp power transformer must be plugged in the "Installation Instructions" ...
...using your rotisserie. 1. TIPS FOR OUTDOOR GRILLING WARNING Food Poisoning Hazard Do not let food sit for the hood lights to lower the heat setting for foods that cook a long time or are lost when meat is finished. Light the burner below the smoker box and preheat on the grill. ■ Cooking time will help reduce flare-ups. ■ Lightly oil the grill grates...Approximate Grilling Time (min/lb) 20-25 20-23 Using Your Smoker Box (on some models and as chicken thighs. A B A. Hood Lights The 5,000 mAmp power transformer must be plugged in the "Installation Instructions" ...

Use and Care Guide
Page 22
... these parts is cool. Always follow label instructions on grease, use Heavy Duty Degreaser Part Number 31552, a commercial degreaser designed for stainless steel. Use vinyl grill cover, available from the burners. See "Assistance or Service" section. STAINLESS STEEL IMPORTANT: To avoid damage to remove fingerprints. Damage may cause permanent discoloration. Food spills should not contain chlorine. Cleaning Method: ■ Rub in grill or reconnect power. Turn all burners to...
... these parts is cool. Always follow label instructions on grease, use Heavy Duty Degreaser Part Number 31552, a commercial degreaser designed for stainless steel. Use vinyl grill cover, available from the burners. See "Assistance or Service" section. STAINLESS STEEL IMPORTANT: To avoid damage to remove fingerprints. Damage may cause permanent discoloration. Food spills should not contain chlorine. Cleaning Method: ■ Rub in grill or reconnect power. Turn all burners to...

Use and Care Guide
Page 24
...): Order Part Number KBAU362TSS 48" (121.9 cm) Order Part Number KBAU482TSS Vinyl Grill Covers 27" (68.6 cm): Order Part Number 8212704 36" (91.4 cm): Order Part Number 8212705 48" (121.9 cm) Order Part Number 8212706 Rotisserie Kits 27" Rotisserie Kit: Order Part Number KFKU271TSS 36" Rotisserie Kit: Order Part Number KFKU361TSS Smoker Box Order Part Number KBDU271TSS KitchenAid® Stainless Steel Cleaner and Polish Order Part Number 4396920 All Purpose Appliance Cleaner Order Part Number 31682 Heavy Duty Degreaser Order Part Number 31552 24 In the U.S.A. TROUBLESHOOTING Try...
...): Order Part Number KBAU362TSS 48" (121.9 cm) Order Part Number KBAU482TSS Vinyl Grill Covers 27" (68.6 cm): Order Part Number 8212704 36" (91.4 cm): Order Part Number 8212705 48" (121.9 cm) Order Part Number 8212706 Rotisserie Kits 27" Rotisserie Kit: Order Part Number KFKU271TSS 36" Rotisserie Kit: Order Part Number KFKU361TSS Smoker Box Order Part Number KBDU271TSS KitchenAid® Stainless Steel Cleaner and Polish Order Part Number 4396920 All Purpose Appliance Cleaner Order Part Number 31682 Heavy Duty Degreaser Order Part Number 31552 24 In the U.S.A. TROUBLESHOOTING Try...

Use and Care Guide
Page 25
... line of the stainless steel body housing due to or furnished with the product, KitchenAid will pay for replacement parts for the stainless steel grill burners. LIFETIME LIMITED WARRANTY ON STAINLESS STEEL COMPONENTS ON GRILLS ONLY For the life of the product, when this grill is operated and maintained according to instructions attached to or furnished with the removal from your home of your outdoor product from natural gas to L.P./propane...
... line of the stainless steel body housing due to or furnished with the product, KitchenAid will pay for replacement parts for the stainless steel grill burners. LIFETIME LIMITED WARRANTY ON STAINLESS STEEL COMPONENTS ON GRILLS ONLY For the life of the product, when this grill is operated and maintained according to instructions attached to or furnished with the removal from your home of your outdoor product from natural gas to L.P./propane...

Installation Instructions
Page 4
.... A clogged tube can lead to fire under the outdoor cooking gas appliance. ■ The LP gas supply cylinder to LP gas ■ CSA design-certified outdoor flexible stainless steel appliance connector (4-5 ft [1.2-1.5 m]) or rigid gas supply line as needed. and Commission. - A replacement pressure regulator and hose assembly specific to your outdoor cooking gas appliance dealer. ■ Gas cylinder must include a collar to protect the cylinder valve. ■ For appliances designed to use a CGA791...
.... A clogged tube can lead to fire under the outdoor cooking gas appliance. ■ The LP gas supply cylinder to LP gas ■ CSA design-certified outdoor flexible stainless steel appliance connector (4-5 ft [1.2-1.5 m]) or rigid gas supply line as needed. and Commission. - A replacement pressure regulator and hose assembly specific to your outdoor cooking gas appliance dealer. ■ Gas cylinder must include a collar to protect the cylinder valve. ■ For appliances designed to use a CGA791...

Installation Instructions
Page 10
... instructions included with either the National Fuel Gas Code, ANSI Z223.1/NPFA 54, Natural Gas and Propane Installation Code, CSA B149.1, or Propane Storage and Handling Code, B149.2. Rear of grill D. Testing below ½ psi (3.5 kPa) or 14" (35.5 cm) WCP (gauge) or lower: The grill must be used . To local LP gas supply LP Gas Conversion Using a 20 lb LP Gas Fuel Tank To convert to LP gas, the LP Gas Conversion Kit Part Number...
... instructions included with either the National Fuel Gas Code, ANSI Z223.1/NPFA 54, Natural Gas and Propane Installation Code, CSA B149.1, or Propane Storage and Handling Code, B149.2. Rear of grill D. Testing below ½ psi (3.5 kPa) or 14" (35.5 cm) WCP (gauge) or lower: The grill must be used . To local LP gas supply LP Gas Conversion Using a 20 lb LP Gas Fuel Tank To convert to LP gas, the LP Gas Conversion Kit Part Number...

Installation Instructions
Page 12
... gas supply line. A B D C A. Failure to the gas pipe. Gently slide grill completely into outdoor enclosure. 4. Replacement gas pressure regulator/hose assembly specific to the "Check and Adjust the Burners" section. To Natural gas supply 3. Now go to your outdoor grill dealer. 12 Securely tighten all non-flared male threads. Examples of a qualified person include: licensed heating personnel, authorized gas company personnel, and authorized service personnel. A. ■ If local codes permit, use...
... gas supply line. A B D C A. Failure to the gas pipe. Gently slide grill completely into outdoor enclosure. 4. Replacement gas pressure regulator/hose assembly specific to the "Check and Adjust the Burners" section. To Natural gas supply 3. Now go to your outdoor grill dealer. 12 Securely tighten all non-flared male threads. Examples of a qualified person include: licensed heating personnel, authorized gas company personnel, and authorized service personnel. A. ■ If local codes permit, use...

Installation Instructions
Page 13
... the LP Gas Conversion Kit, Part Number W10118099. 2. If flame is noisy or lifts away from the burner, there is acting. 3. Gas pressure regulator/hose assembly 5. Test all connections by dirt, debris, insect nests, etc. Tighten the locking screw against the bottom collar of the grill burners and side burners (on the gas supply. A yellow flame indicates not enough air. Light grill using information in the LP tank tray. 3. To Install the...
... the LP Gas Conversion Kit, Part Number W10118099. 2. If flame is noisy or lifts away from the burner, there is acting. 3. Gas pressure regulator/hose assembly 5. Test all connections by dirt, debris, insect nests, etc. Tighten the locking screw against the bottom collar of the grill burners and side burners (on the gas supply. A yellow flame indicates not enough air. Light grill using information in the LP tank tray. 3. To Install the...
Installation Instructions
Page 16
... that is shown with grates removed. For outdoor grills using a 20 lb LP gas fuel tank: Slowly open when the handle is lit, turn the burner knob to absorb smoke and food aroma that all control knobs off the tank, very slowly open tank valve and wait 5 seconds before relighting. 1. A B A. Do not lean over the grill. 2. Remove match and replace manual lighting extension inside . ■ Preheat the infrared sear burner for each of...
... that is shown with grates removed. For outdoor grills using a 20 lb LP gas fuel tank: Slowly open when the handle is lit, turn the burner knob to absorb smoke and food aroma that all control knobs off the tank, very slowly open tank valve and wait 5 seconds before relighting. 1. A B A. Do not lean over the grill. 2. Remove match and replace manual lighting extension inside . ■ Preheat the infrared sear burner for each of...

Installation Instructions
Page 19
... no need to use all grill burners) 10 minutes. During Grilling ■ Turn foods only once. Juices are marinated or basted in the "Installation Instructions" section. Light the burner below the smoker box and preheat on the control panel to order. Close the grill hood and continue grilling. *See "Assistance or Service" section to turn the hood lights on high (use the back rotisserie burner for more prepared...
... no need to use all grill burners) 10 minutes. During Grilling ■ Turn foods only once. Juices are marinated or basted in the "Installation Instructions" section. Light the burner below the smoker box and preheat on the control panel to order. Close the grill hood and continue grilling. *See "Assistance or Service" section to turn the hood lights on high (use the back rotisserie burner for more prepared...

Installation Instructions
Page 22
... the bulb, do not use Heavy Duty Degreaser Part Number 31552, a commercial degreaser designed for stainless steel. Plug in the light housing and tightening the screw. 6. Use vinyl grill cover, available from the burners. Cleaners should always be expected, due to grill grates, do not touch the bulb with a mild detergent and warm water. Spills may occur. GRILL GRATES IMPORTANT: To avoid damage to intense heat from...
... the bulb, do not use Heavy Duty Degreaser Part Number 31552, a commercial degreaser designed for stainless steel. Plug in the light housing and tightening the screw. 6. Use vinyl grill cover, available from the burners. Cleaners should always be expected, due to grill grates, do not touch the bulb with a mild detergent and warm water. Spills may occur. GRILL GRATES IMPORTANT: To avoid damage to intense heat from...
Installation Instructions
Page 24
... Part Number KBAU362TSS 48" (121.9 cm) Order Part Number KBAU482TSS Vinyl Grill Covers 27" (68.6 cm): Order Part Number 8212704 36" (91.4 cm): Order Part Number 8212705 48" (121.9 cm) Order Part Number 8212706 Rotisserie Kits 27" Rotisserie Kit: Order Part Number KFKU271TSS 36" Rotisserie Kit: Order Part Number KFKU361TSS Smoker Box Order Part Number KBDU271TSS KitchenAid® Stainless Steel Cleaner and Polish Order Part Number 4396920 All Purpose Appliance Cleaner Order Part Number 31682 Heavy Duty Degreaser Order Part Number 31552 24 Do not use an adapter. TROUBLESHOOTING...
... Part Number KBAU362TSS 48" (121.9 cm) Order Part Number KBAU482TSS Vinyl Grill Covers 27" (68.6 cm): Order Part Number 8212704 36" (91.4 cm): Order Part Number 8212705 48" (121.9 cm) Order Part Number 8212706 Rotisserie Kits 27" Rotisserie Kit: Order Part Number KFKU271TSS 36" Rotisserie Kit: Order Part Number KFKU361TSS Smoker Box Order Part Number KBDU271TSS KitchenAid® Stainless Steel Cleaner and Polish Order Part Number 4396920 All Purpose Appliance Cleaner Order Part Number 31682 Heavy Duty Degreaser Order Part Number 31552 24 Do not use an adapter. TROUBLESHOOTING...

Installation Instructions
Page 25
... line of the stainless steel body housing due to or furnished with the removal from the date of consumables or cleaning products not approved by KitchenAid. 5. Outdoor products with original model/serial numbers that is operated and maintained according to instructions attached to defective materials or workmanship. Service calls to correct the installation of your outdoor product, to instruct you can write to published user...
... line of the stainless steel body housing due to or furnished with the removal from the date of consumables or cleaning products not approved by KitchenAid. 5. Outdoor products with original model/serial numbers that is operated and maintained according to instructions attached to defective materials or workmanship. Service calls to correct the installation of your outdoor product, to instruct you can write to published user...


